Advertisement
Quick Links
Download this manual
See also:
Instruction Book
Advertisement

Related Manuals for XIEGU X108


Summary of Contents for XIEGU X108
- Page 1 HF TRANSCEIVER X108 USER’S MANUAL XIEGU TECH V1.1 Copyright © 2014, XIEGU, Inc. All Rights Reserved 1 / 12...
-
Page 2: Security Considerations
Security considerations: Important reminder: Before operating the equipment, please read our operating manual carefully and keep the manual, so as not to lose. Do not use equipment during a lightning Features: storm. Low noise, single conversion HF transceiver . Double balanced diode mixer for extended dynamic range. - Page 3 一、Machine parameters Basic parameters 0.5~30MHz ( ) Frequency range: Receive: Continuous Transmitting: All HF Amateur bands including WARC bands Operating mode: SSB(J3E) CW (A1A) AM (A3E) minimum frequency stepping: 1Hz Antenna impedance: 50Ω Operating temperature range: -10℃ ~ +60℃ Frequency stability: ±1.5ppm @ Open the power about 1 minute,-10℃~+60℃(Standard Edition) ±...
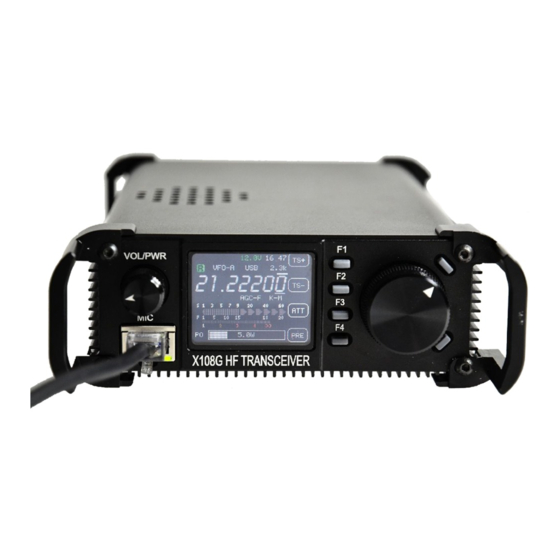
- Page 4 二、 Description of equipment 2.1 Front panel Description Power switch/ Volume knob 2. Hand microphone socket 3. Display screen 4. Multifunction key 5. Frequency knob 6. UP key 7. DOWN key 2.2 Rear panel Description SO-239 Antenna Jack. 2. Audio input / PTT input. 3.
- Page 5 2.3 Microphone 1. Lock button/ Press it unlock again 2. PTT button 3. Up / Down frequency/channel 4. Receiving indicator 5. Multifunction 6. Filter selection buttons 7. Mode selection button 8. No indication 9. No function 10. Memory write button 11.
-
Page 6: Menu Functions
Menu Functions: 【PRE】Switch receive preamp on or off. 【ATT】Switch receive signal attenuator on or off. 【MODE】Select desired operating mode – CW/AM/LSB/USB. 【AGC】 Select AGC level – FAST/SLOW/OFF. 【NB】 Select NB level between 1 and 4. ------------------------------------------------------------------------------------------------------------------------------------------------ 【A/B】 Switch between VFO A & VFO B. 【A=B】... - Page 7 3.3 Functions Operating Instructions Functions Operating Instructions 3.3.1: Set the current operating frequency Set the current operating frequency Method 1: Press the front panel UP / DN button, move to the desired frequency step : Press the front panel UP / DN button, move to the desired frequency step : Press the front panel UP / DN button, move to the desired frequency step-bit bit, then rotate the frequency knob to change the current frequency value.
- Page 8 ATT will appear dark. The attenuator provides 10 dB attenuation. 3.3.6: Automatic Gain Control on/off Press the frequency knob to switch the current menu page, then press [AGC]. AGC options are Fast or Slow with the screen showing the current status. Press [AGC] again to exit.
- Page 9 desired power setting and press [POW] to exit. 3.3.13: Switching between Frequency Mode / Channel Mode Press the frequency knob to switch the current menu page, then press [V/M]. Press this function key to move between frequency mode and channel mode. 3.3.14: Move current channel to VFO Press the frequency knob to switch the current menu page, then press [M>V].
-
Page 10: Extended Interface
Then press the corresponding number keys on the microphone to set the local time. 3.3.20: Setting squelch level Press the frequency knob to switch the current menu page, then press [SQL]. Turn the frequency knob to set the squelch depth. Press [SQL] again to save the squelch setting and exit. -
Page 11: Advanced Menu Settings
Telegraph Key 【KEYER】 The telegraph key is automatic and manual integration. You can switch in the menu. PC control or firmware update 【USB】 11-14.5 v DC input 【DC IN】 【Ground hole】 【Ground screw】 3.5.Advanced Menu Settings CAUTION: THESE SETTINGS ARE DIRECTLY RELATED TO THE CORRECT OPERATION OF THIS RADIO. PLEASE EXERCISE CAUTION. - Page 12 Item 6, for CW Receiving side tone pitch adjustment. Users can according to their preferences and habits, adjusting CW side tone. Item 7, for CW transceiver delay. Users can operate according to their own habits, appropriate changes this parameter to match the transmitters speed. XIEGU TECH 无线生活,无限创造 12 / 12...
Need help?
Do you have a question about the X108 and is the answer not in the manual?
Questions and answers