XIEGU X5105 Quick Start Manual
Hf+50mhz portable hf transceiver
Hide thumbs
Also See for X5105:
- Operation manual (62 pages) ,
- Instruction manual (31 pages) ,
- Manual (21 pages)
Table of Contents
Advertisement
Quick Links
Advertisement
Table of Contents

Related Manuals for XIEGU X5105


Summary of Contents for XIEGU X5105
- Page 1 X5105 HF+50MHz Portable HF Transceiver Quick-Start Manual...
-
Page 2: Packing List
Avoid skin contact with antenna surfaces! Ultra-Compact, Self-Contained Portable Packing list: ① ① X5105.......... 1 ② Power supply cable......1 ③ Hand microphone......1 ④ USB Cable..........1 ⑤ Service card........1 ②... - Page 3 (the X5105 also operates from any regulated 9-15 Volt 3-Amp dc supply). Even though it’s loaded with features, the X5105 is still extremely compact and light, measuring 6-5/8” wide x 3-5/8” high x 1-7/8” deep, and weighing just 2.1 pounds.
-
Page 4: Specifications
SPECIFICATIONS Receive Range: 500kHz to 30MHz, 50MHz to 54MHz Transmit Range: 160-M through 6-M (Amateur bands only) Operating Mode: A1A(CW),A3E(AM),J3E(USB/LSB),F3E(FM) Temperature Range: -10℃ ~ +60℃ Stability: First Hour, + 4ppm @25℃. After First Hour, 1ppm Voltage: 13.8VDC ± 15%, (9–15 Vdc) Current: Rx, 500 mA Peak, Tx, 2.5 A Peak Battery: 3800 mAh @ 12Vdc Dimensions: 6-5/8”... -
Page 5: External Connections
EXTERNAL CONNECTIONS... -
Page 6: Internal Battery
INTERNAL BATTERY The X5105 comes with a built-in 3800-mAh battery pack. When no external power source is connected to the radio, the battery supplies power by default. When an external source is connected, power-management circuitry switches to it automatically. Charging Procedure: 1. -
Page 7: Power Button
⑩ Multifunction-Menu Buttons: Press to access desired function (displayed above each button on the menu screen). 1 1 Main Tuning Knob: ○ Tunes the X5105 VFO, or adjusts menu parameters menu parameters menu parameters menu parameters. 1 2 ATU Button: ○... - Page 8 1 3 Po Button: ○ Press and rotate the VFO knob to set power output level (0.5W-5W). 1 4 A/B Button: ○ Toggles between VFO-A and VFO-B. 1 5 < Button: ○ Press to shift VFO frequency step one decimal point to the left. >...
- Page 9 Set AGC Time Select IF-Filter Scan SWR Scan Constant Passband Receive Mode Menu-3 M > V Move memory entry Store current Clear Current Use to “tag” current to VFO channel to memory Channel channel with custom ID. Press and hold to activate edit feature.
-
Page 10: Screen Display
Accepts 50 Ω BNC-Male connector from antenna system ③ IF-Signal Output: Connects the 1st-IF output signal to Xiegu XDT1 data terminal or spectrum display. ④ External Speaker or Headphones: Accepts 3.5mm stereo plug (3 wire) for external speaker or phones (4-16 Ω). - Page 11 Important Warning: Always reduce volume setting before plugging in headphones or ear buds. High volume setting could damage your headphones or impair your hearing! ⑤ DC Power Connector: Accepts a standard 2.1 mm x 5.5 mm coaxial power plug, (+) center. Supply must deliver 13.8-V @ 3-A to operate radio and fully charge battery.
-
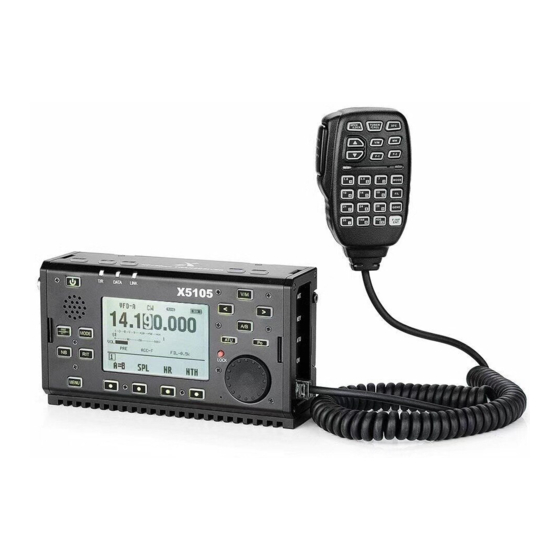
Page 12: Handheld Microphone
HANDHELD MICROPHONE: 1. Lock Button: Toggle to lock or unlock radio’s controls 2. PTT Button: Push to Transmit 3. Up/Down: Tune VFO frequency higher or lower. 4. Rx/Tx LED: Displays Receive/Transmit status. 5. Digital keypad: 1-10 Tone Encoder. 6. FIL Button: Toggle to change filter passband. 7.
Need help?
Do you have a question about the X5105 and is the answer not in the manual?
Questions and answers