XIEGU X108G Operating Manual
Hide thumbs
Also See for X108G:
- Service manual (37 pages) ,
- Operating manual (17 pages) ,
- Operating instructions manual (15 pages)
Table of Contents
Advertisement
Quick Links
Advertisement
Table of Contents

Related Manuals for XIEGU X108G


Summary of Contents for XIEGU X108G
- Page 1 XIEGU HF TRANSCEIVER X108G Outdoor version Operating Manual Chongqing XieGu Technology Co.,Ltd 403,4th buildings,Youth DreamWorks, No.87, Langkou industrial park, Langkou community, Dalang Avenue,new district of Longhua, Shenzhen,China. Zip Code: 518131...
-
Page 2: Security Considerations
TCXO clock source. 500 MHz narrow band CW filter configuration. Note RF high-voltage of antenna connector! ① Packing list: ① ....1 X108G ② Power supply cable...1 ③ Hand microphone....1 ④ USB Cable...1 ⑤ Service card....1 ②... - Page 3 I . Specification: Basic Specifications: Frequency range: Receive:0.5~30MHz ( Continuous ) Transmitting: All HF Amateur bands including WARC bands Operating mode: SSB(J3E) CW (A1A) AM (A3E) minimum frequency stepping: 10Hz Antenna impedance: 50Ω Operating temperature range: Maximum temperature is 55℃ Frequency stability: ±0.5ppm @ Open the power about 5 minute Operating voltage: 12~14.5V DC...
-
Page 4: Description Of Equipment
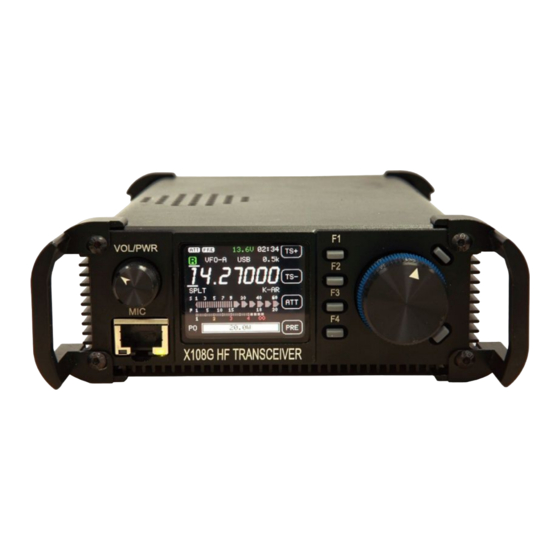
Dynamic range:Better than 90db RIT Frequency controlrange: ±1kHz audio output: 0.5W@8Ω II. Description of equipment 2.1 Front panel Description 1. Metal handle 2. Power switch/Volume knob 3. Color OLED display screen 4. Microphone port 5. UP Key 6. Multi-function Key 7. - Page 5 2.3 Microphone 1. Lock button/Press it again unlock 2. PTT button: Launch control button 3. Up / Down: In the system settings menu, upper and lower entry selection 4. Receiving indicator 5. Multifunction 6. Filter selection buttons:Selection of built-in filter 7.
- Page 6 1. Pre-attenuator/Preamplifier/Voice compression 2. Receiving / transmitting status 3. Current operating frequency value 4. Current functional status: SPLIT, NB Suppressor, AGC, Key mode 5. Received signal strength indicator 6. Real time power/SWR indicators 7. The current input voltage display 8. Time display 9.
- Page 7 【A=B】 Set VFO A the same as VFO B. 【SPLT】 Select SPLIT operating mode on or off. 【RIT】 Select RIT mode-adjust via selector Main function knob, setting shown on RIT display in screen 【POW】 Set RF output power-adjust via selector Main function knob, level displayed via red in screen 【V/M】...
- Page 8 Select to adjust Squelch level via selector Main function knob, level shown on line display in screen 【CMP】voice compression settings. 3.2 Start using your X108G 3.2.1 Set the current operating frequency Method 1: Press the function button(TS+/TS-), move the frequency step to the required numerical...
- Page 9 3.2.5: Attenuator on/off Press the frequency knob to switch the current menu page, then press [ATT]. When the attenuator is on, ATT will be highlighted. Press this button again to close the attenuator. When the attenuator is off, ATT will appear dark. The attenuator provides 10 dB attenuation. 3.2.6: Automatic Gain Control on/off Press the frequency knob to switch the current menu page, then press [AGC].
- Page 10 3.2.15: Save current settings to Memory Press the frequency knob to switch the current menu page, then press [V/M] to choose channel mode. Turn the frequency knob until “BLANK” is highlighted. Press [MW] to return to frequency mode. In the lower left corner of the screen will be the symbol "CH***", flashing..Adjust frequency, operating mode and other parameters desired, then press [MW] to write this information to memory.
-
Page 11: Extended Interface
3.3 Extended Interface 【AUX】No function 【SPK】External speaker output Speaker or Headphone(3.5 stereo Socket); Otherwise it will damage the rig. Before using the headphone, please decrease the volume. 【KEYER】Telegraph Key The telegraph key is automatic and manual integration. You can switch in the corresponding menu. -
Page 12: Ground Screw
4: ALC voltage output 5: External Audio input 6: Ground Bandvoltage parameter 【USB】USB port PC control or firmware update 【DC IN】 Power port Power socket polarity, as shown: Note :Power input range: 12~14.5V DC 12~14.5V DC Do not exceed the input voltage range and Reverse Do not exceed the input voltage range and Reverse polarity. - Page 13 1. IF SSB: SSB IF 2. IF CW: CW IF 3. BFO LSB: BFO value LSB mode 4. BFO USB: BFO value USB mode 5. BFO CW: BFO value of the CW mode 6. CW Tone: CW side tone pitch frequency adjustment 7.
- Page 14 In shutdown state, hold down the F2 key, turn on your X108G, you can see setting interface for ADC check value of the system. The data in this interface is related to the accuracy of the S table. It is strictly prohibited to modify or delete the data!! Otherwise it will cause the S table display is not accurate or S table does not show.
-
Page 15: General Troubleshooting
No connection power cord Connecting power cable Power is not turned on Turn on the power Unable to turn on your X108G Power cable connection is bad Replace or repair power cord Power supply reverse connection Properly connected power supply... -
Page 16: Warranty Clause
After sales service policy 1. Warranty clause: When buyer from the point of sale who has obtained the authorization of XIEGU to buy our products, within two weeks after purchase, if host, multifunctional microphone, shell structure of the host, the USB data lines, power lines appear the performance fault of non-human damage, the buyer can be in the original place of purchase to enjoy a free replacement service. - Page 17 XIEGU www.cqxiegu.com...
Need help?
Do you have a question about the X108G and is the answer not in the manual?
Questions and answers