Table of Contents
Advertisement
X6100, an ultra-portable short-wave transceiver that adopts high-performing SDR software radio platform
architecture, powerful baseband and RF units, transmitting and receiving separated dual-channel structure
and 24bit sampling and large dynamic RF front-end unit, can obtain extremely high radio transmitting and
receiving indicators.
The whole device integrates rich and varied operation functions and desktop-like functions, such as
recording call, variable bandwidth digital filter, digital noise reduction and so on,
cognition and experience on amateur radio. With its compact structure and appearance, you can immediately
set forth on a journey with it, get close to nature, and enjoy the fun of outdoor communication.
●
HF/50MHZ full mode (supporting data communication)
●
Transmitting power: external power supply: 10W, battery: 5W
●
4-cun high-resolution color screen (800*480)
●
Built-in large capacity lithium battery pack (3000mAh, 12V)
●
Built-in efficient automatic antenna tuner
●
Integrated standing wave scanner and voice pager
●
Integrated modem, preset message, CW automatic call
●
Built-in Bluetooth/WLAN function, which can realize wireless audio, keyboard and mouse operation
●
Integrated USB line control/transmission, supporting USBHOST.
●
Standard high-stability TCX0 internal clock source
We strongly recommend you to read through this Manual to rapidly keep abreast of the operation & control
method of the X6100 before using it.
1
which brings you a new
Advertisement
Table of Contents

Related Manuals for XIEGU X6100


Summary of Contents for XIEGU X6100
- Page 1 X6100, an ultra-portable short-wave transceiver that adopts high-performing SDR software radio platform architecture, powerful baseband and RF units, transmitting and receiving separated dual-channel structure and 24bit sampling and large dynamic RF front-end unit, can obtain extremely high radio transmitting and receiving indicators.
-
Page 2: Safety Precautions
Safety Precautions Do not use this device in lightning weather. Disconnect the power supply and antenna in advance. Do not touch the antenna during the transmission of the device. Do not apply AC power to the DC interface on the side panel of transceiver. Otherwise it may cause fire or damages to the device. -
Page 3: Battery Precautions
Battery Precautions This device contains lithium-ion battery components, so improper use may result in dangers such as smoke, fire or battery rupture. ■ The battery pack is installed inside the backplane of the equipment. Do not hit the backplane of the device. -
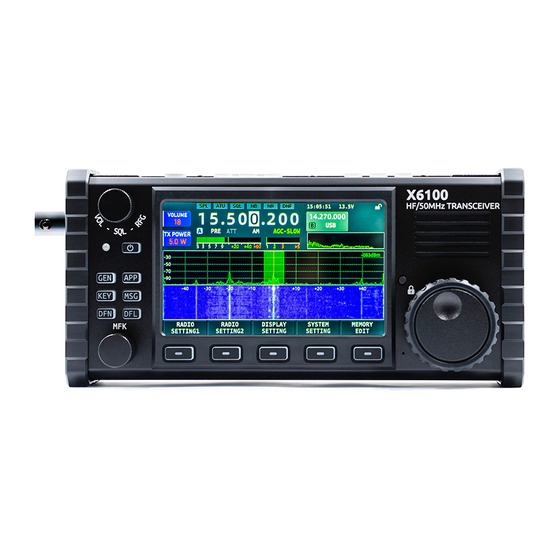
Page 4: Panel Instructions
I. Panel Instructions Front panel GEN button DFL button Press it to bring up the general settings menu. Press it to bring up digital filter settings interface KEY button 10~14 Multi-function button Press it to bring up tapper settings menu. Press it to execute functions displayed on screen. - Page 5 Left plate BNC interface, 50Ω, for antenna connection. I/Q OUT IQ signal output port 3.5mm stereo socket. DC IN External power input port, 5525 type. Note: input voltage shall not be higher than 15V DC. Right plate CARD microSD memory card slot USB port.
-
Page 6: Top Button
Top button PTT button on device body. Fast step selection button AM|FM AM/FM mode switch button. Built-in antenna tuner access/tuning button CW mode switch button Pre-amplifier/pre-attenuator switch SSB mode switch button VF0A-VF0B switch button 38~39 Left and right switch VF0/MEM0 status switch Frequency band/channel increase and decrease switch AGC switch/speed selection button... - Page 7 Hand microphone button 1. LOCK button Lock button 2. PTT button Transmitting control button 3. Up/down Frequency increase/decrease button (user-defined, detailed in system menu 1) 4. Transceiver indicator light Hand microphone operation indicator light 5. Figure button area Figure keyboard area 6.
-
Page 8: Interface Definition
● Using plugs of other specifications may damage the socket. ● X6100 may switch to transmitting mode if plugging in or unplugging the tapper plug when it is working. ● Please cut off the power supply of X6100 before connecting or disconnecting the tapper. -
Page 9: Power Source Wiring
Caution! 1. The charging adapter can only charge the X6100 and cannot be used for transmitting as there is a risk of damaging the device. 2. Under no circumstances shall the DC port on the left of the X6100 be connected to a voltage higher than... - Page 10 II. Screen Display Interface ① Status display area 1 ⑧ Status display area 2 This area displays SPL, ATU, SQL, NB, NR and This area displays the status including lock/USB ANF switch status. port/Bluetooth/WLAN/battery/volume. ② Volume tag ⑨ VFOB display area ⑩...
-
Page 11: Adjust Audio Volume
Basic Operation Turn on/off radio Press the on-off button for 1s to turn on the radio. Press the on-off button for 1s again to turn off the radio. Adjust audio volume Turn the volume knob to the left or right to adjust the output volume. - Page 12 Set frequency by multi-function hand microphone ● Press [F-INP ENT] key on hand microphone, and the X6100 will be in frequency setting state, and cursor will be flickering at the first place on the left of frequency display bit; ●...
-
Page 13: Automatic Gain Control (Agc)
Pre-amplifier/pre-attenuator The pre-amplifier can improve the receiving effect of some weak signals of high frequency range and the sensitivity of the receiver. Pre-attenuator can improve barrage jamming caused by strong signals and the performance of receiver. 1. Short press the [PRE] button at the top of the radio, and the character PRE appears at the top of the screen, indicating that the pre-amplifier has been turned on. -
Page 14: Automatic Antenna Tuner
Press the PTT button on the microphone to start transmitting. Please speak to the microphone in a normal voice. During the transmitting, the TX indicator light on X6100 will turn red, as will the indicator light on hand microphone. Release the PTT button to return to the receiving state. - Page 15 Use the build-in PTT of radio for transmitting The X6100 radio integrates PTT button and build-in microphone, which make it convenient when using the radio outdoors. Press the PTT button on the top of the device and speak to the built-in microphone hole at the left of large knob to transmit voice.
-
Page 16: Multifunctional Operation
Multifunctional operation Operation methods: 1. Function buttons in the left area of the panel can directly access the common function Directly access operation menu. functional button area Multifunctional 2. After selecting direct button, button area corresponding menu will appear at the bottom of the screen. - Page 17 DFN function setting and operation Short press [DFN] to enter the menu of DFN items. The KEY menu will appear at the bottom of the screen: Page1: NR DEPTH NB WIDTH NB LEVEL Page2: DNF CENTER DNF WIDTH NR: digital noise reduction function switch NRDEPTH: digital noise reduction depth settings NB: pulse interference blanking function switch NBWIDTH: pulse interference blanking width settings...
-
Page 18: System Settings
System settings System menu area The system menu area is located at the bottom of the screen and is used to set or adjust some general parameters. RADIO SETHNG1 radio settings 1 menu Shortcut tag Restore default Adjustment Set as shortcut Exit AGC KNEE: AGC control level AGC SLOPE: AGC control slope... - Page 19 MONI LEVEL: monitoring level settings DISPLAY SETTINGS: display settings menu RF FFT AVE: settings of displayed average of radio frequency spectrum RF FFT REF: settings of displayed reference level of radio frequency spectrum WF REF: waterfall plot reference offset level AF FFT AVE: settings of displayed average of audio spectrum AF FFT REF: settings of displayed reference level of audio spectrum BL LEVEL: backlight brightness settings...
- Page 20 After connection, the X6100 can automatically control the wave band switching of XPA125B. Moreover, the ALC control will be built between two machines. When the X6100 output power exceeds the power limit of the XPA125B, the AACL control will automatically decrease the output power of the radio so that the output power of the XPA125B will be kept to be about 100W.
-
Page 21: Transmitter Parameters
Frequency range: receiving: 0.5MHz~30MHz 50.00~53.99MHz Transmitting: 1.8~2.0MHz 3.5~4.0MHz 7.0~7.3MHz 10.1~10.15MHz 14.0~14.35MHz 18.068~18.168MHz 21.0~21.45MHz 24.89~24.99MHz 28.0~29.7MHz 50.00~54.00MHz Working mode: CW, AM, SSB, FM Minimum stepping: 10Hz Antenna impedance: 50D Working temperature range: 0°C~+55°C Frequency stability: ±1.5ppm within 0~30min after startup @25°C: 1ppm/hour Supply voltage: 9.0~15.0VDC, negative electrode grounding Current consumption: receiving: 330mA@Max Transmitting: 3A@Max... -
Page 22: Antenna Tuner
〇 Working frequency range of transceiver varies from version of the equipment. Ask local dealer for details. Packing List X6100 host: 1 pc. Type-C cable: 1 pc. Multifunction hand microphone: 1 pc. Charger adapter: 1 pc. Power cable: 1 pc.
Need help?
Do you have a question about the X6100 and is the answer not in the manual?
Questions and answers