enphase M215 Installation And Operation Manual
Enphase microinverter
Hide thumbs
Also See for M215:
- Installation and operation manual (32 pages) ,
- Instructions manual (8 pages) ,
- Manual (52 pages)
Table of Contents
Advertisement
Quick Links
Download this manual
See also:
Troubleshooting Manual
Advertisement
Table of Contents

Related Manuals for enphase M215


Summary of Contents for enphase M215
- Page 1 I NS TA L L A TI O N A N D O P E R A TI O N MA NU A L Enphase Microinverter Model M215 141-00012, Rev 05...
-
Page 2: Contact Information
Other Information Product information is subject to change without notice. All trademarks are recognized as the property of their respective owners. User documentation is updated frequently; Check the Enphase website (http://www.enphase.com/support) for the latest information. For warranty text refer to http://www.enphase.com/warranty. -
Page 3: Table Of Contents
Step 1: Measure AC Voltage at the Electrical Utility Connection ..............10 Step 2: Install the AC Branch Circuit Junction Box ..................11 Step 3: Position the Enphase Engage Cable ....................12 Step 4: Attach the Microinverters to the PV Racking ..................13 Step 5: Ground the System .......................... -
Page 4: Important Safety Information
This manual contains important instructions for use during installation and maintenance of the Enphase M215 Microinverter™. To reduce the risk of electrical shock, and to ensure the safe installation and operation of the Enphase® Microinverter, the following safety symbols appear throughout this document to indicate dangerous conditions and important safety instructions. -
Page 5: The Enphase Microinverter System
M215 Installation and Operation The Enphase Microinverter System The Enphase Microinverter® System™ is the world’s most technologically advanced inverter system for use in utility-interactive applications. This manual details the safe installation and operation of the Enphase Microinverter. The three key elements of an Enphase Microinverter System include the: ... -
Page 6: How The Microinverter Works
Microinverter systems are inherently more reliable than traditional inverters. The distributed nature of a microinverter system ensures that there is no single point of system failure in the PV system. Enphase Microinverters are designed to operate at full power at ambient temperatures as high as 65 C (150 F). -
Page 7: Planning For Microinverter Installation
M215 Installation and Operation Planning for Microinverter Installation The M215 is compatible with most 60-cell PV modules (to 270W or higher) and installs quickly and easily. It works with either three-phase 208 VAC or single-phase 240 VAC services. The M215 ships with integrated DC and AC cables and connectors. -
Page 8: Parts And Tools Required
For this reason, Enphase recommends that you protect your system with lightning and/or surge suppression devices. In addition to having some level of surge suppression, it is important to have insurance that protects against lightning and electrical surges. -
Page 9: Enphase Microinverter Installation
Installing the Enphase Microinverter System involves several key steps. Each step listed here is detailed in the following pages. Follow the instructions in this section to install Enphase M215 Microinverters. Step 1: Measure AC Voltage at the Electrical Utility Connection... -
Page 10: Step 1: Measure Ac Voltage At The Electrical Utility Connection
M215 Installation and Operation Step 1: Measure AC Voltage at the Electrical Utility Connection Measure AC line voltage at the electrical utility connection to confirm that it is within range. Acceptable ranges are shown in the following table. Single-phase 240 Volt AC... -
Page 11: Step 2: Install The Ac Branch Circuit Junction Box
M215 Installation and Operation Step 2: Install the AC Branch Circuit Junction Box DANGER: Risk of Electrical Shock. Be aware that installation of this equipment includes risk of electric shock. Do not install the AC junction box without first removing AC power from the Enphase System. -
Page 12: Step 3: Position The Enphase Engage Cable
PV module widths vary by manufacturer. On the Engage Cable, connectors are spaced at intervals to allow for the widest PV modules compatible with Enphase Microinverters. If narrower PV modules are used, it may be necessary to account for excess cable by looping the cable at suitable intervals. -
Page 13: Step 4: Attach The Microinverters To The Pv Racking
Also allow 1.3 cm (0.50 inches) between the back of the PV module and the top of the microinverter. WARNING: You must install the M215 under the module, out of rain and sun. Do not mount the microinverter in a position that allows long-term exposure to direct sunlight or in a vertical orientation that allows water to collect in the DC connector recess. -
Page 14: Step 5: Ground The System
M215 Installation and Operation Step 5: Ground the System Each M215 Microinverter comes with a grounding clip that can accommodate a 6-8 AWG conductor. Check local requirements for allowable grounding conductor sizes. Ground the microinverter chassis as follows: NOTE: Ground the system in accordance with all applicable local electrical codes and the National Electrical Code (NEC), ANSI/NFPA 70. -
Page 15: Step 6: Dress The Engage Cable
M215 Installation and Operation Step 6: Dress the Engage Cable NOTE: Adhere to the following requirements: Do not expose the connection to directed, pressurized liquid (water jets, etc.). Do not expose the connection to continuous immersion. Do not expose the AC connector to continuous tension (e.g., tension due to pulling or bending the cable near the connection) ... -
Page 16: Step 7: Connect The Microinverters
Unused AC connectors are live when the system is energized by the utility system. Sealing caps may not be reused. NOTE: If you need to remove a sealing cap, you must use the Enphase disconnect tool or a #3 Phillips screwdriver. See “Disconnect a Microinverter from the PV Module” on page 24. -
Page 17: Step 8: Terminate The Unused End Of The Engage Cable
Screw the hex nut onto the cap. Never unscrew the hex nut as this can twist and damage the cable. g. Hold the cap with an Enphase disconnect tool, or insert a #2 Phillips screwdriver. h. Use a 22 mm (7/8 inch) wrench to tighten the hex nut until the latching mechanism is screwed all the way to the base. -
Page 18: Step 9: Connect The Engage Cable To Ac Junction Box(Es)
M215 Installation and Operation Step 9: Connect the Engage Cable to AC Junction Box(es) a. Connect Engage Cable into the AC branch circuit junction box using an appropriate gland or strain relief fitting. The Engage Cable requires a strain relief connector with an opening of 1.3 cm (0.5 inches) in... -
Page 19: Step 10: Complete The Installation Map
You can build the system map manually, by peeling the serial number labels from the microinverters and placing the labels on the installation map, or you can use the ArrayGun feature from the Enphase Installer Toolkit to easily build and configure a system. Refer to http://enphase.com/products/arraygun/... -
Page 20: Commissioning And Operation
Enphase Enlighten web-based monitoring and analysis. M215 Operation The Enphase Microinverter is powered on when sufficient DC voltage from the PV module is applied. The Status LED of each microinverter will blink green six times to indicate normal start-up operation approximately one minute after DC power is applied. -
Page 21: Troubleshooting
Adhere to all the safety measures described throughout this manual. Qualified personnel can use the following troubleshooting steps if the PV system does not operate correctly. WARNING: Do not attempt to repair the Enphase Microinverter; it contains no user- serviceable parts. If the microinverter fails, contact Enphase customer service to obtain an RMA (return merchandise authorization) number and start the replacement process. -
Page 22: Troubleshoot An Inoperable Microinverter
L1, L2, L3 to neutral 106 to 132 VAC 5. Using an Enphase disconnect tool, disconnect the AC cable for the microinverter in question from the Engage Cable. 6. Verify that utility power is present at the microinverter by measuring line to line and line to neutral at the Engage Cable connector. - Page 23 PV module isn’t functioning correctly. If it stays in place, the problem is with the microinverter. Call Enphase Customer Support for help in reading the microinverter data and for help in obtaining a replacement microinverter, if needed.
-
Page 24: Disconnect A Microinverter From The Pv Module
2. Disconnect the microinverter from the Engage Cable as follows: Enphase AC connectors are tool-removable only. To disconnect an M215 from the Engage Cable, insert the two large prongs of the disconnect tool (see illustration) into the two holes in the drop connector. -
Page 25: Install A Replacement Microinverter
Install a Replacement Microinverter If Enphase authorizes a replacement (RMA), replace the microinverter as follows: 1. When the replacement M215 is available, verify that the AC branch circuit breaker is de- energized. 2. Attach the replacement microinverter to the PV racking using hardware recommended by your PV racking vendor. -
Page 26: Technical Data
Technical Data Technical Considerations The Enphase M215 Microinverters are electrically compatible with most 60-cell PV modules. Be sure to verify the voltage and current specifications of your PV module match those of the microinverter. For more information, refer to our list of compatible PV modules at http://www.enphase.com/support. - Page 27 M215 Installation and Operation Enphase M215 Microinverter Parameters Topic Unit Typical AC Parameters Rated (continuous) AC output Power (-40 to +65C) Output power factor 0.95 0.99 Nominal AC output voltage range 240 VAC (split phase) Vrms 208 VAC (three phase)
-
Page 28: Engage Cable Specifications
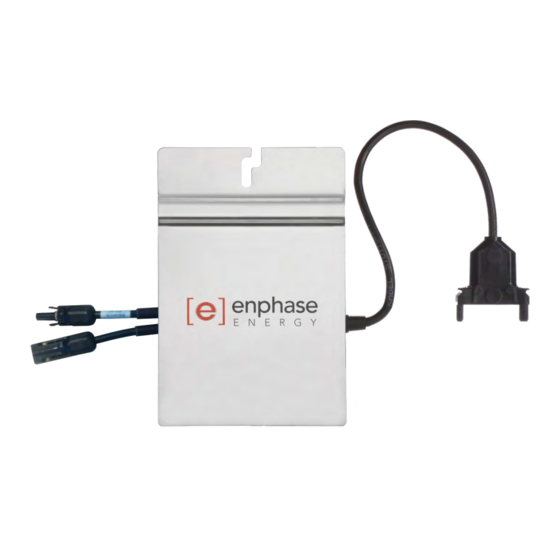
M215 Installation and Operation Enphase M215 Microinverter Parameters Topic Unit Typical Features and Specifications Compatibility Pairs with most 60-cell PV modules 17.3 cm x 16.4 cm x 2.5 cm (6.8” x 6.45” x 1.0”) Dimensions not including mounting bracket (approximate) Weight 3.5 Lbs (1.6 Kg) -
Page 29: Engage Cable Planning And Ordering Information
PV Racking Compatibility document on the Enphase website (http://www.enphase.com/support). Selecting Cable Type Enphase Engage Cable is available in two different voltage types and two connector spacing options. Depending upon installer needs, the cable is also available in different lengths. Connector Spacing Options The gap between connectors on the cable can be either 1.025 meters (40”) or 1.7 meters (67”). -
Page 30: Voltage Types And Conductor Count
The number of Enphase Microinverters to be installed on the AC branch circuit. Be certain to allocate the correct number of connectors, including extra connectors for gaps and turns. - Page 31 PV modules in portrait orientation be coiled and dressed so that the cable does not contact the roof. Again, unused connectors must be covered with Enphase watertight sealing caps.
-
Page 32: Enphase Installation Map
M215 Installation and Operation Enphase Installation Map 2013 Enphase Energy Inc. 141-00012 Rev 05... -
Page 33: M215 Dimensions
M215 Installation and Operation M215 Dimensions 2013 Enphase Energy Inc. 141-00012 Rev 05... -
Page 34: Sample Wiring Diagram: M215, 240 Vac
M215 Installation and Operation Sample Wiring Diagram: M215, 240 VAC 2013 Enphase Energy Inc. 141-00012 Rev 05... -
Page 35: Sample Wiring Diagram: M215, 208 Vac
M215 Installation and Operation Sample Wiring Diagram: M215, 208 VAC 2013 Enphase Energy Inc. 141-00012 Rev 05... -
Page 36: Enphase Energy Inc
Enphase Energy Inc. 1420 N. McDowell Boulevard Petaluma, CA 94954 www.enphase.com info@enphaseenergy.com support@enphaseenergy.com...
Need help?
Do you have a question about the M215 and is the answer not in the manual?
Questions and answers