enphase M215-60-2LL-S22-IG Quick Install Manual
Microinverters m250 series; m215 series;
Hide thumbs
Also See for M215-60-2LL-S22-IG:
- Installation and operation manual (42 pages) ,
- Manual (52 pages) ,
- Instructions manual (8 pages)
Advertisement
Q U I C K I N S T A L L G U I D E
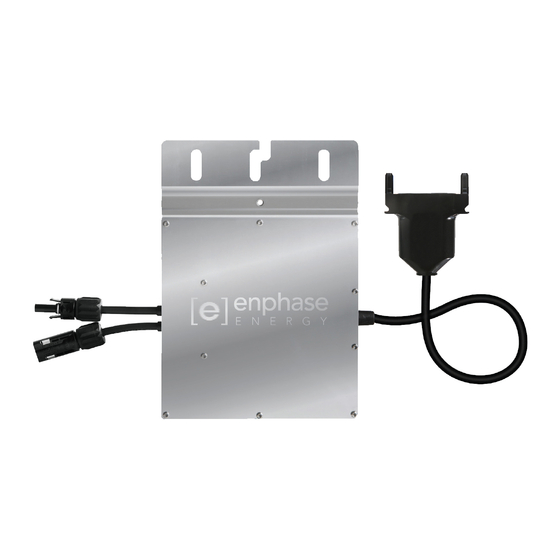
Installing Enphase M250 and M215 Microinverters
To install the Enphase M250 and M215 Microinverters™ read and follow all warnings and instructions in this guide and in the Enphase M250 and M215
Microinverter Installation and Operation Manual at: enphase.com/support. Safety warnings are listed on the back of this guide.
Because ground fault protection (GFP) is integrated into the M250 and M215 microinverters, the models listed in this guide do not require a grounding elec-
trode conductor (GEC) between microinverters. To support GFP, use only PV modules equipped with DC cables labeled PV Wire or PV Cable.
PREPARATION
A ) Download the Enphase Installer Toolkit™ mobile app and
open it to log in to your Enlighten account. With this app,
you can scan microinverter serial numbers and connect
to the Envoy-S to track system installation progress. To
download, go to
enphase.com/toolkit
B ) Refer to the following table and check PV module electrical compatibility
at:
enphase.com/en-us/support/module-compatibility.
Microinverter model
M215-60-2LL-S22-IG
M250-60-2LL-S22
M250-60-2LL-S25
M250-72-2LL-S22
M250-72-2LL-S25
M250-72-2LL-S22-US
To ensure mechanical compatibility, order the correct connector type
(MC-4 locking or Amphenol H4) for both microinverter and PV module
from your distributor.
C ) In addition to the Enphase Microinverters, PV modules and racking, you
will need these Enphase items:
Enphase Envoy or Envoy-S™ communications gateway (required to
•
monitor solar production)
Enphase Engage Cable™, single-phase 240 VAC or three-phase 208
•
VAC, as needed
Tie wraps or cable clips
•
Enphase Sealing Caps (for any unused drops on the Engage Cable)
•
Enphase Terminators (one needed at the end of each AC branch
•
circuit)
Enphase Disconnect Tool (number 2 and 3 Phillips screwdrivers can
•
be substituted)
How It Fits Together
AC
junction box
or scan the QR code at right.
PV module cell count
Pair only with 60-cell modules.
Pair with 60- or 72-cell modules.
DC
connectors
D ) Check that you have these other items:
Outdoor-rated, weather-proof AC junction box(es)
•
Gland or strain relief fitting (one per AC junction box)
•
Number 2 and 3 Phillips screwdrivers
•
Torque wrench, sockets, wrenches for mounting hardware
•
Adjustable wrench or open-ended wrench (for terminators)
•
Hand-held mirror (to view LEDs on the undersides of the
•
microinverters)
E ) Protect your system with lightning and/or surge suppression devices. It
is also important to have insurance that protects against lightning and
electrical surges.
F ) Plan your AC branch circuits to meet the following limits for maximum
number of microinverters per branch when protected with a 20-amp
maximum over-current protection device (OCPD).
Service type
Max. M250s per
branch circuit
Single-phase 240 VAC 16
Three-phase 208 VAC 24
G ) Size the AC wire gauge to account for voltage rise. Select the correct
wire size based on the distance from the beginning of the microinverter
AC branch circuit to the breaker in the load center. Design for a voltage
rise total of less than 2% for the sections from the microinverter AC
branch circuit to the breaker in the load center. Refer to the Voltage Rise
Technical Brief at
enphase.com/support
Best practice: Center-feed the branch circuit to minimize voltage rise in
a fully-populated branch.
Tie wraps or
cable clips
AC connector
Enphase
Microinverter
Max. M215s per
branch circuit
17
25
for more information.
terminator
Engage
Cable
AC drop on
Engage Cable
© Enphase Energy, Inc. All rights reserved.
Advertisement
Table of Contents

Related Manuals for enphase M215-60-2LL-S22-IG


Summary of Contents for enphase M215-60-2LL-S22-IG
- Page 1 Installing Enphase M250 and M215 Microinverters To install the Enphase M250 and M215 Microinverters™ read and follow all warnings and instructions in this guide and in the Enphase M250 and M215 Microinverter Installation and Operation Manual at: enphase.com/support. Safety warnings are listed on the back of this guide.
-
Page 2: Installation
B ) Cover any unused connectors with Enphase Sealing Caps. Listen for two • Do not expose the AC or DC connectors (on the Engage clicks as the connectors engage. -
Page 3: Activate Monitoring
Solid red There is an active “DC Resistance Low, Power Off” or rotate the hex nut with “GFDI” fault. To reset, refer to the Enphase M250 and your hand or a wrench M215 Microinverter Installation and Operation Manual until the latching at: http://www.enphase.com/support. -
Page 4: Pv Rapid Shutdown Equipment (Pvrse)
This guide contains important instruc- normal operating conditions, the temperature WARNING: When installing the Engage Cable, tions to follow during installation of the Enphase M215 and is 20°C above ambient, but under extreme secure any loose cable to minimize tripping M250 Microinverter.
Need help?
Do you have a question about the M215-60-2LL-S22-IG and is the answer not in the manual?
Questions and answers