
Subscribe to Our Youtube Channel
Related Manuals for meitav-tec FMH-220-FAN-COIL-SUPER 3


Summary of Contents for meitav-tec FMH-220-FAN-COIL-SUPER 3
- Page 1 FMH-220 Fan-Coil Super 3 Owner's Manual - Installation and Operating Instructions Meitav-tec Ltd (Contel group) Tel: +972-3-9626462 Fax: +972-3-9626620 Cat. P048052 Rev. 3 – 10.06 www.meitavtec.com - support@meitavtec.com...
- Page 2 Please read this manual carefully before installation and use. Index Introduction Options and accessories Installation instructions Wiring Connections DIP switch explanation - different configurations Operating manual RT03 - Hand Held Remote Control - option Technician settings Temperature limits Security settings Offset for calibration of ambient temperature Bimetal sensor / Contact input Economy mode settings...
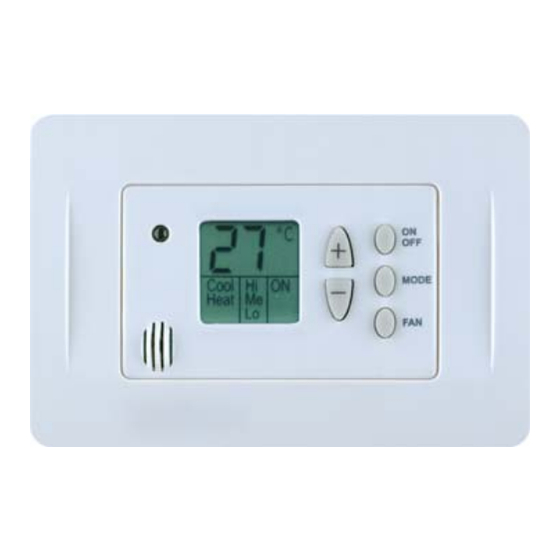
- Page 3 1. Introduction The FMH-220-FAN-COIL-SUPER 3 is an attractive and fully functional thermostat that will provide years of dependable and comfortable control of your home’s heating and air conditioning system. It is the best Flush mount, Fan-Coil thermostat solution, All In One™ that fits all fan coil...
- Page 4 Set point limits with password • Option NO VALVES - thermostat work ONLY on the fan. For details on where to purchase accessories, please contact Meitav-tec for you’re nearest location or visit our web site at www.meitavtec.com 3. Installation Instructions It is very important to find the right place to install the Flush Mount unit.
- Page 5 Installation procedure: Connect the wires (see wiring connections #4) Put the thermostat in the electrical box. Tighten up the 2 screws. Adapt the front frame-panel into its place, by pushing it towards the wall.
-
Page 6: Wiring Connections
4. Wiring Connections 4-pipe system – 2 valves Switch Function Switch Function 230 VAC Cool Valve 230 VAC HE (H1) Heat Valve Fan High Bimetal Sensor Fan Medium External Sensor Fan Low Common for External Sensor and/or Auto-Change Over Sensor / Contact input 2-pipe system –... - Page 7 5. DIP Switch Explanations IMPORTANT! Before making any changes in the DIP switch disconnect electricity in the main board. The red DIP switch with 6 switches is situated as shown in the drawing below: 1 2 3 4 5 6 1 2 3 4 5 6 Default switch from factory DIP switch...
- Page 8 5.3 DIP switch selection Switch Function Default Auto-Change Over Sensor Contact Input Internal Sensor Control External sensor control Internal Sensor Control External sensor control With auto change over mode Without auto change over mode Display - user can switch between Tamb and Tset using the mode button Display - Tset only Auto fan or selectable fan...
- Page 9 5.5 External sensor connection - option Important - the external sensor must be Meitav-tec type N.TC. Sensor; Temperature ~ Resistance Characteristics Temp °C 10.0 12.8 15.6 18.3 21.1 23.9 26.7 29.4 32.2 Temp °F Res. k 115.8 100.9 88.1 77.1 67.7...
-
Page 10: Operating Manual
6. Operating Manual 6.1 Switching the thermostat On/OFF 1. Press the ON/OFF button to activate or deactivate the thermostat. 2. ON or OFF will appear on display. MODE 6.2 Setting the temperature Press the (+) or (-) – the temperature will flash. Change the set temperature using the (+) or (-) buttons. - Page 11 6.3 Selecting modes Press the MODE button to switch between: Cool Heat Cool/Heat (auto change) Fan only MODE Cool Heat 6.4 Selecting Fan Speeds Changing Fan Speeds can be done only in Fan Mode (see #6.3) Press the FAN button to switch between: High Speed Medium Speed Low Speed...
- Page 12 6.5 FAN/AUTO FAN function (not for NO VALVES applications) Press and hold the FAN button, Fan will appear (FAN ON). Press and hold the FAN button, Fan will disappear (AUTO FAN). In AUTO FAN the fan will only run when calling for heat or cool. When FAN ONLY mode is selected this function is not in use.
- Page 13 7. RT03 - Hand Held Remote Control - Non-Program - Option 7.1 General This is an Infrared Remote Control Unit, which means it must be pointed at the thermostat (or extra receiver) to operate. Every time you change a parameter in the Remote Control, you must send it to the thermostat by pressing the "ON/SEND"...
- Page 14 Temperature Set Point: • Select the desired temperature using the (+) or (-) buttons. • Press the ON/SEND button to send information to thermostat. Real Time Clock and Day: • Press the SELECT button - CLOCK SET will flash. • Press the (+) or (-) buttons - the hours will flash.
- Page 15 • Press the SELECT button - the minutes will flash. • Adjust the minutes using the (+) or (-) buttons. Stop Time: • Press the SELECT button. • PROGRAM & STOP (flashing) will appear on display. • Press the SELECT button - the hours will flash. •...
-
Page 16: Technician Settings
8. Technician Settings Technician can have access to the following features: - High temperature limit (8.2) - Low temperature limit (8.3) - Lock buttons (8.4) - Offset for calibration of ambient temperature (8.5) - Auto change over sensor or contact input selection (8.6) - Economy mode set-points (8.7) 8.1 Set temperature to 10°C. - Page 17 8.5 Press the MODE button again – a digit between –6 and +6 will appear on display Using the (+) or (-) buttons adjust the OFFSET for temperature reading. 8.6 Press the MODE button again and choose between activating the Input (T2-0)- (option for Auto- Change Over Sensor or Contact Input), or not.
- Page 18 EF = Mode selection (via the remote switch) Change the system mode through one remote switch, attached to one or more thermostats. It is suitable for hotel rooms and offices, when the system mode cannot be defined differently for each thermostat. •...
-
Page 19: Troubleshooting For Technician
9. Connection of Remote Switch Installation of remote switch: Connect the T2 and the “0” terminals of the thermostats as shown in the illustration below. Connect the T2 and “0” terminals of the last thermostat to the remote switch. Open Close Remote contact... - Page 20 Meitav-tec Ltd offers a WIDE range of products for the HVAC industry These include: - Flush Mount Thermostats - Programmable and Non-Programmable. - HVAC Analyzer that can measure BTU’s, for technicians. - Tamper proof thermostats that can be operated ONLY with the remote control, for public places.
Need help?
Do you have a question about the FMH-220-FAN-COIL-SUPER 3 and is the answer not in the manual?
Questions and answers