meitav-tec FMH220 Installation Manual
Hide thumbs
Also See for FMH220:
- Owner's manual (20 pages) ,
- Owner's manual & technician settings (9 pages)
Advertisement
Quick Links
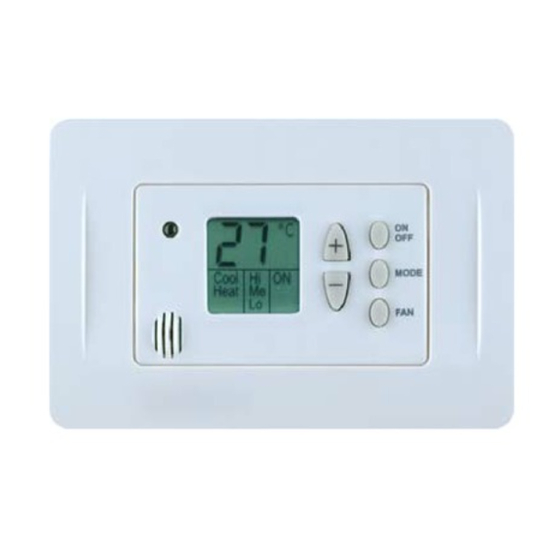
Installation
The FMH220 is designed for flush mounting in the room to be
controlled. It should be located where the occupant can easily read
the LCD display and use the controls. If the built in temperature
sensor is being used to measure room temperature, the module
should be placed where the temperature is representative of the
general room conditions. Cold or warm air draughts; radiant heat
and direct sunlight should be avoided.
General points to follow:
- Disconnect power to the main board before installing the unit.
- The unit MUST be fitted into a standard electrical box (Gewiss Box - GW 24 203)
- The unit should not be installed on an outside wall or where there is an air draft.
- The unit must not be exposed to a direct sunlight.
- The standard height to install this unit is 1.5 meter (5 feet) from the floor.
Installation procedure:
A. Connect the wires as shown in the enclosed wiring diagram. All terminals on accept 1x0.5 mm2 /24 AWG.
B. Place the thermostat in the electrical box and tighten up the 2 screws (Gewiss Box - GW 24 203).
C. Adapt the front frame-panel into its place, by pushing it towards the wall.
FMHC220-FC-MDB03
Owner's manual & Technnician Settings
File: FMHC220-FC-MDB03_reLo(8 pages).vsd
Tel: +972-3-9626462
Fax: +972-3-9626620
www.meitavtec.com | support@meitavtec.com
ON
o
C
OFF
Set
MODE
Cool
Lo
On
Heat
Me
Off
FAN
Fan
Hi
Aux
Advertisement

Subscribe to Our Youtube Channel
Related Manuals for meitav-tec FMH220


Summary of Contents for meitav-tec FMH220
- Page 1 Installation The FMH220 is designed for flush mounting in the room to be controlled. It should be located where the occupant can easily read the LCD display and use the controls. If the built in temperature MODE Cool sensor is being used to measure room temperature, the module...
- Page 2 Wiring Before connecting or disconnecting any wires, ensure that all power supplies have been switched off and all wires are potentialee to prevent equipment damage and avoid electrical shock. Do not run wiring close to transformers or high frequency generating equipment. Complete and verify all wiring connections before applying power to the controller to which the module is connected.
-
Page 3: Dip Switch Configuration
DIP Switch Configuration The DIP Switches are located on the top of the back side of the thermostat. “ON” Position “OFF” Position 4 5 6 1 2 3 4 5 6 IMPORTANT: Disconnect power to the unit before changing the configuration of the DIP switches. Switch “ON”... - Page 4 Technician Settings (Temp. limits, Lock, Offset, “0”,”T2" output, Beeper, MAC Address) Adjust the set point temperature to 10°C. Wait until display stops flashing. Default Press and hold the [MODE] button (10 sec.) to enter technician settings. Use the [MODE] button to switch between different configurable parameters. Use the [+] and [-] buttons to make adjustments or switch between options.
- Page 5 Technician Settings (MAC Address) Adjust the set point temperature to 11°C. Wait until display stops flashing. Default Press and hold the [MODE] button (10 sec.) to enter MAC Address settings. Use the [+] and [-] buttons to change the MAC Address. MODE (Press and hold) MAC Address Indication: The MAC Address, “SET and “Aux”...
-
Page 6: Operating Instructions
Operating instructions MODE Cool Heat On/Off Press the [ON-OFF] button to turn the thermostat ON or OFF. “ON” or “OFF” will appear on display. Set point Press the [+] or [-] button – “Set” and the set point temperature will appear on display. Adjust using the [+] and [-] buttons. - Page 7 RT03 – Infra-Red Remote Control Unit (option) General Clock Temperature scale Set-point display Fan speeds display Modes display Medium Fan only High Heat Auto Cool Auto Turn system OFF Fan speed selection Clock adjustment Mode selection Set-point adjustment Turn system ON / Send changes Batteries Replacement Real Time Clock and Day...
- Page 8 Tel: +972-3-9626462 Fax: +972-3-9626620 www.meitavtec.com support@meitavtec.com...
Need help?
Do you have a question about the FMH220 and is the answer not in the manual?
Questions and answers