
Related Manuals for Petsafe LITTLE DOG Remote Trainer


Summary of Contents for Petsafe LITTLE DOG Remote Trainer
- Page 1 LITTLE DOG Remote Trainer Operating and Training Guide Please read this entire guide before beginning...
-
Page 2: Table Of Contents
We want to ensure your pet’s safety by providing you with the tools and techniques to successfully train your pet. If you have any questions, please contact the Customer Care Center at 1-800-732-2677 or visit our website at www.petsafe.net. ________________________________________________________________________________________ Table of Contents Components ......................4... - Page 3 General Tips ......................23 Teaching Basic Obedience ..................27 Eliminating Unwanted Behavior ................32 Frequently Asked Questions ..................41 Troubleshooting ......................45 To Pair the Remote Transmitter and Receiver Collar ..........47 Test Light Instructions ....................48 Terms of Use and Limitation of Liability ..............49 FCC ........................51 www.petsafe.net...
-
Page 4: Components
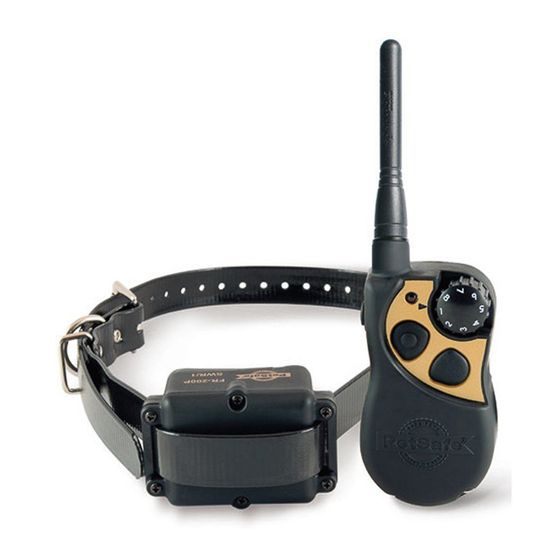
Components Lanyard Test Light Tool PetSafe Charging Adapter Little Dog Remote Receiver Collar Transmitter Warranty Operating and Battery ® Card Training Guide (PetSafe RFA-188) 1-800-732-2677... -
Page 5: Other Items You May Need
• Non-metallic collar and 10-foot leash for training How the System Works The PetSafe Remote Trainer has been proven safe, comfortable, and effective for all pets up to 55 pounds. This system assists you in controlling your pet without a leash in a range up to 100 yards. -
Page 6: Key Definitions
Key Defi nitions Remote Transmitter: Transmits the radio signal to the Receiver Remote Transmitter Collar. It is waterproof. Transmitter Indicator Light: Indicates that a button is pressed Transmitter Antenna and also serves as a low-battery indicator. Transmitter Intensity Dial: Provides multiple levels of Stimulation so you can Indicator match the correction to your pet’s temperament. - Page 7 Once your dog associates the Negative Tone with the Stimulation, you will only need to use the Negative Tone. Positive Tone: Use the Positive Tone (Side Button) as a marker to reinforce positive behavior. Again, timing is critical. Praise or treat the dog immediately following the Positive Tone. www.petsafe.net...
-
Page 8: Receiver Collar
Receiver Collar: Receives the radio signal from Receiver Collar the Remote Transmitter. It is waterproof. Two Color LED Contact Points: The contacts through which the Receiver Collar delivers Stimulation. Two Color LED: Indicates when the Receiver Collar has been turned on or off. This light also On / Off serves as a low battery indicator. -
Page 9: Operating Guide Prepare The Remote Transmitter
Recharges take only 12 hours. Note: The Transmitter Indicator Light will flash after 12 Charger connector placed hours of charging. For the first charge, continue to charge in the Remote Transmitter the Remote Transmitter for an additional 12 hours. Charging Jack www.petsafe.net... - Page 10 5. When charging is completed, replace the rubber cover. Note: Approximate battery life between charges is 40 to 60 hours, depending on frequency of use. Transmitter Indicator Light - Function and Response Remote Transmitter Function Indicator Light Response Transmitter being charged for up to 12 hours Solid in color Transmitter being charged for more than 12 hours Flashes once per second...
- Page 11 12 hours. • If your equipment has not been charged for an extended period, you may experience a decrease in battery life the first few uses. Afterwards, the battery life will return to previous capacity levels. www.petsafe.net...
- Page 12 The battery should last for a period of 3-5 years. When a battery needs replacement, you can order a new pack by contacting our Customer Care Center or visit our website at www.petsafe.net. Please do not open the Remote Transmitter until you have received the replacement.
-
Page 13: Prepare The Receiver Collar
Note: To extend the life of the batteries, turn the Receiver Collar off when it is not in use. Important: If the Receiver Collar is left on continuously, the maximum battery life (before replacing batteries) will be two weeks. www.petsafe.net... - Page 14 To Insert and Remove the Battery Note: Do not install the battery while the Receiver Collar is on your pet. ® This Receiver Collar utilizes a replaceable PetSafe battery (RFA-188). This unique battery is designed to make battery replacement easier and increase water protection.
- Page 15 DO NOT attempt to cut into or pry open the battery. Be sure to discard the used battery properly. A replacement PetSafe ® battery (RFA-188) can be found at many retailers. Contact the Customer Care Center at 1-800-732-2677 or visit our web site at www.petsafe.net for a list of common retailers. www.petsafe.net...
- Page 16 Two Color LED – Function and Response Receiver Function LED Response Receiver Beeper Response When the Battery is installed and Green Light fl ashes fi ve times Beeps fi ve times turned to the “ON” position Unit is on Green Light fl ashes once every fi ve seconds None Continuous stimulation delivered Red light fl...
-
Page 17: Fit The Receiver Collar
3. Place the Receiver Collar high on your dog’s neck close to the ears. Center the Contact Points underneath your dog’s neck, touching the skin (F). Note: It is sometimes necessary to trim the hair around the Contact Points to make sure that contact is consistent. www.petsafe.net... - Page 18 4. The PetSafe QuickFit™ Collar is designed so you can quickly attach and remove the Receiver Collar from your dog while maintaining the desired fi t. a. With the Snap Buckle fastened (G), thread the collar through the Metal Buckle (H).
- Page 19 Important: Do not attach a leash to the collar. This can result in pulling the Contact Points too tightly against your pet’s neck. Attach a leash to a separate, non-metallic collar or harness, making sure the extra collar does not put pressure on the Contact Points. www.petsafe.net...
-
Page 20: Care And Cleaning
Care and Cleaning For comfort, safety, and effectiveness of this product, please ensure that you check the fit of your pet’s collar frequently. This Guide describes proper collar fitting. If any skin irritation is observed, discontinue the use of the collar for a few days. If the condition persists beyond 48 hours, see your veterinarian. -
Page 21: Find The Best Intensity Level For Your Pet
1. Press the Side Button (Positive Tone) for 2 to 3 seconds. If your pet reacts to this, you may use this button for training, simply substitute the Side Button (Positive Tone) whenever Lower Button (Stimulation) is used in the Training Guide section. If your pet shows no reaction, go to the next step. www.petsafe.net... - Page 22 2. Starting at Level 1, press the Lower Button (Stimulation) continuously for 2 to 3 seconds. 3. If your pet shows no reaction, go to the next Intensity Level and repeat the process. 4. Repeat each Intensity Level several times before moving to the next level. 5.
-
Page 23: Training Guide
“Sit” command. • Never use the Remote Trainer to correct or eliminate any form of aggressive behavior. If you are unsure if your dog is aggressive, please consult your veterinarian or a certifi ed trainer. www.petsafe.net... -
Page 24: Teaching Your Pet The Positive Tone
Teaching Your Pet the Positive Tone (Using the Side Button) Before using the Trainer to correct your pet, spend 10 to 15 minutes per day for 2 or 3 days helping him create the association of the positive tone with reward and praise. - Page 25 4. Once the misbehavior has stopped, count out two seconds and then push the Side Button (Positive Tone) for two consecutive seconds. 5. Reward your pet after pushing the Side Button (Positive Tone) approximately once every 3 to 5 times, to help your pet maintain the association of the positive tone with reward. www.petsafe.net...
- Page 26 To train using Stimulation (Lower Button): You control the timing of the Lower Button (Stimulation) being applied to your pet. The stimulation stays on as long as the Lower Button (Stimulation) is pressed. If this button is pressed longer than 8 seconds, the Remote Transmitter will “time- out,”...
-
Page 27: Teaching Basic Obedience
2. Hold the leash and the Remote Transmitter in one hand. Keep your other hand free to guide your pet into a “Sit” position. 3. Press and hold the Lower Button (Stimulation). 4. Immediately give the “Sit” command while continuing to hold the Lower Button (Stimulation). www.petsafe.net... - Page 28 5. Release the Lower Button (Stimulation) as soon as your pet is in position, and praise him. 6. Release your pet from the “Sit” command and play. 7. Repeat Steps 2 through 6. Note: If your pet breaks the “Sit” command, repeat steps 3 through 6.
- Page 29 Lower Button (Stimulation). 5. Using the leash, gently guide your pet toward you until he begins to come in your direction. 6. Immediately release the Lower Button (Stimulation) as soon as your pet steps towards you, and praise him enthusiastically. www.petsafe.net...
- Page 30 7. Quickly move backwards as your pet begins to come back to you, praising him the entire time. 8. Praise your pet when he returns to you. 9. Repeat Steps 3 through 8. 10. Once your pet responds readily to the “Come” command several times, back away from him without giving a command.
- Page 31 4. If your pet tries to leave the bed, press and hold the Lower Button (Stimulation) and give the “Stay” command. Continue to hold the button until your pet is back on his bed. If necessary, use the leash to guide your pet onto his place. www.petsafe.net...
-
Page 32: Eliminating Unwanted Behavior
5. Praise your pet when he is back on his bed. 6. Once your pet has settled for a few seconds, release him and play calmly. 7. Repeat steps 1 through 5. ____________________________________________________ Eliminating Unwanted Behavior Jumping Up Pets typically jump up to get attention. If you do not want your pet to jump on you, then friends or members of the family should not encourage this behavior. - Page 33 3. Release the Lower Button (Stimulation) immediately once your pet is sitting, and verbally praise him. 4. If your pet ignores the stimulation, increase the Intensity Level by 1. 5. Practice this exercise in several different areas and use different people for distractions. www.petsafe.net...
- Page 34 Digging It is important to first understand why your pet is digging. Many dogs, such as terriers, were bred to flush out prey, and digging is very innate to them. Other dogs may be digging to find a cool spot to lie down, or simply out of boredom. Your pet may no longer have the desire to dig if he is provided with the following: •...
- Page 35 5. If your pet ignores the stimulation, increase the Intensity Level by 1. 6. Continue to watch your pet, as he may choose another area to dig. 7. Do not allow your pet in the yard unsupervised until he has completely stopped digging. www.petsafe.net...
- Page 36 Chasing Chasing is an instinctive behavior stimulated by moving objects. Some dogs have a particularly strong desire to chase that can put them in harm’s way and leave you helpless. Never allow your dog off the leash or out of a contained area until he has learned the “Come”...
- Page 37 5. When your dog stops chasing the object, immediately release the button, walk backwards and give the command “Come.” Praise your dog as he comes to you. 6. Repeat the process until your dog stops chasing the object. www.petsafe.net...
-
Page 38: Trash Raiding
Trash Raiding The easiest way to prevent trash raiding is to remove garbage and tempting food from your pet’s environment. You can use the Remote Trainer to teach your pet to stay away from these items; however, you must be prepared to correct your pet every time he approaches them. - Page 39 4. Do not say anything, as you want your pet to associate the stimulation with his behavior, not you. 5. If your pet does not respond to the stimulation, increase the Intensity Level by 1 and repeat the process. 6. Repeat this process in several different locations with different temptations. www.petsafe.net...
- Page 40 Excessive Barking Barking is an instinctive behavior for dogs. It is impossible to keep your dog from barking entirely, but you can teach him be quiet when you give him a command. Note: This will only be effective when you are at home with your dog. 1.
-
Page 41: Frequently Asked Questions
How old does my pet have to Your pet should be able to recognize basic obedience commands such as “Sit” or “Stay”. be before using the PetSafe Remote Trainer? Once my pet is trained and has Probably not. You may need to reinforce training been obeying my commands, with the Receiver Collar from time to time. - Page 42 Is the Receiver Collar Yes. When changing the battery, be sure to keep the area free of dirt and debris. waterproof? Can I use the Remote Trainer We do not recommend any of our products to be used on aggressive dogs. If you are unsure if your on aggressive dogs or stop my dog is aggressive, please consult your veterinarian or dog from being aggressive?
- Page 43 If the Receiver Collar is left on continuously, the battery will last about 2 weeks. We recommend you the battery? turn the Receiver Collar off when it is not in use. The battery in the Remote Transmitter will last for a period of 3-5 years. www.petsafe.net...
- Page 44 How long can I leave the The Receiver Collar is not designed to be worn constantly. We recommend the Receiver Collar Receiver Collar on my pet? not be worn for more than 8 hours out of every 24-hour period. 1-800-732-2677...
-
Page 45: Troubleshooting
• Make sure the Contact Points are placed snugly against your pet’s skin. • Trim your pet’s fur where the Contact Points touch his neck. • Increase the Intensity Level by 1. See “Find the Best Intensity Level for Your Pet.” www.petsafe.net... - Page 46 The Receiver Collar will • Check that the battery has been installed properly. See not turn on. “To Insert and Remove the Battery.” The Receiver Collar is • Verify the Receiver Collar is on. not responding to the • See “To Pair the Remote Transmitter and the Receiver Remote Transmitter.
-
Page 47: To Pair The Remote Transmitter And Receiver Collar
4. Press both the upper and lower buttons on the Remote Transmitter at the same time and hold for ten seconds. 5. The Receiver Collar should emit two beeps. 6. If the Receiver Collar does not beep twice, please contact the Customer Care Center at 1-800-732-2677. www.petsafe.net... -
Page 48: Test Light Instructions
Test Light Instructions 1. Hold the Test Light Contacts to the Contact Points. Test Light Contacts 2. Press the Lower Button (Stimulation) on the Remote Transmitter. 3. The Test Light will flash. Note: At higher Intensity Levels, the Test Light will flash brighter. -
Page 49: Terms Of Use And Limitation Of Liability
If you are unsure whether this is appropriate for your pet, please consult your veterinarian, certified trainer or contact our Customer Care Center at 1-800-732-2677. Proper use includes reviewing the entire Operating and Training Guide provided with your product and any specific Caution statements. www.petsafe.net... - Page 50 3. No Unlawful or Prohibited Use This Product is designed for use with pets only. This pet training device is not intended to harm, injure, or provoke. Using this product in a way that is not intended could result in violation of Federal, State or local laws. 4.
-
Page 51: Fcc
• Relocate the interfered receiving antenna. • Increase the separation between the equipment and receiver. • Connect the equipment into an outlet on a circuit different to that to which the receiver is connected. • Contact the Customer Care Center at 1-800-732-2677. www.petsafe.net... - Page 52 Unauthorized changes or modifi cations to the equipment, not approved by Radio Systems Corporation, could result in not meeting compliance with FCC regulations and could void the user’s authority to operate the equipment. 1-800-732-2677...
-
Page 53: Product Warranty
Misuse, loss, damage by pet or improper use or handling is not covered. PetSafe will not pay for loss of time, incon- venience, loss of use of your product or any incidental or consequential damage. Warranty void if product resold. - Page 54 1-800-732-2677...
- Page 55 www.petsafe.net...
- Page 56 Radio Systems Corporation 10427 Electric Avenue Knoxville, TN 37932 1-800-732-2677 www.petsafe.net 400-829 ©Copyright 2006, Radio Systems Corporation...
Need help?
Do you have a question about the LITTLE DOG Remote Trainer and is the answer not in the manual?
Questions and answers