
Related Manuals for Petsafe Yard & Park Remote Trainer


Summary of Contents for Petsafe Yard & Park Remote Trainer
-
Page 1: Operating And Training Guide
® PetSafe Yard & Park Remote Trainer Operating and Training Guide Please read this entire guide before beginning... -
Page 2: Table Of Contents
Our mission is to ensure your pet’s safety by providing you the tools and techniques to successfully train your pet. If you have any questions, please contact the Customer Care Center or visit our website at www.petsafe.net. ____________________________________________________________________ Table of Contents Components ....................3... -
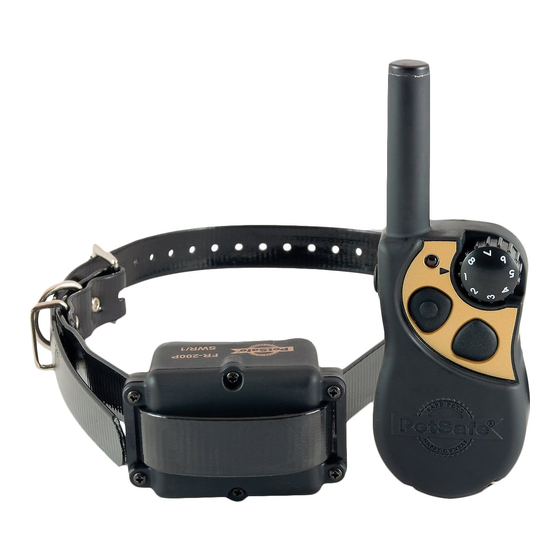
Page 3: Components
How the System Works ® The PetSafe Yard & Park Trainer has been proven safe, comfortable, and effective for all pets greater than 8 lb and at least 6 months old. This system assists you in controlling your pet without a leash in a range up to 400 yards. -
Page 4: Key Defi Nitions
Key Defi nitions Handheld Transmitter: Transmits the radio signal to the Receiver Collar. It is waterproof. Transmitter Indicator Light: Indicates that a button is pressed and also serves as a low-battery indicator. Intensity Dial: Provides multiple levels of Stimulation so you can match the correction to your pet’s temperament. -
Page 5: Operating Guide Prepare The Handheld Transmitter
Note: Approximate battery life between charges is 40 to 60 hours, depending on frequency of use. Transmitter Indicator Light - Function and Response Handheld Transmitter Function Indicator Light Response Continuous Stimulation or Positive / Negative Solid in color Tone Only button pressed Low battery – Any button pressed Flashes continuously www.petsafe.net... -
Page 6: Prepare Product
Step Prepare the Receiver Collar Charge the Receiver Collar 1. Lift the rubber cover protecting the Receiver Collar Charger connector Charging Jack. placed in Receiver 2. Connect one of the charger connectors to the Collar Charging Jack Receiver Collar Charging Jack. 3. - Page 7 • The batteries should last for a period of 3-5 years. When a battery needs replacement, you can order a new pack by contacting our Customer Care Center or visit our website at www.petsafe.net. Please do not open the Receiver Collar or Handheld Transmitter until you have received the replacement.
-
Page 8: Fit The Receiver Collar
Step Fit the Receiver Collar Important: The proper fi t and placement of your Receiver Collar is important for effective operation. The Contact Points must have direct contact with your dog’s skin on the underside of his neck. To assure a proper fi t, please follow these steps: 1. -
Page 9: Program The Handheld Transmitter
Intensity Dial set by Intensity Dial set by Intensity Dial DOG #1 DOG #2 DOG #3 Positive Tone only Positive Tone only Positive Tone only DOG #1 DOG #2 DOG 3# Negative Tone only Negative Tone only Negative Tone only www.petsafe.net... -
Page 10: Reset The Receiver Collar
Program the Receiver Collar for Two or Step Three-Dog Operation ® With the Transmitter set to Mode 6, 7 or 8, PetSafe Receiver Collars can be set to ™ respond to the upper, lower, or side Handheld Transmitter buttons. Add-A-Dog receiver(s) must be purchased to train additional dogs. -
Page 11: Training Guide
4. Once the misbehavior has stopped, count out two seconds and then push the Positive Tone button for two consecutive seconds. 5. Reward your pet following pushing the Positive Tone button approximately once every 3 to 5 times, to help your pet maintain the association of the positive tone with reward. www.petsafe.net... -
Page 12: Find The Best Stimulation Level For Your Pet
If all of these steps have been done and your pet continues to show no reaction to the Stimulation, see the “Test Light Instructions” section. If after completing all of these steps your dog still does not indicate he is feeling the Stimulation, please contact Customer Care Center or visit our website at www.petsafe.net. 1-800-732-2677... -
Page 13: Teaching Basic Obedience The "Sit" Command
5. If your pet now sits reliably with the spoken “Sit” command, he may now be ready to respond without Stimulation. Take a play break and then go back and repeat from Step 2 with Negative Tone only. Note: Keep your pet close to you while teaching the “Sit” command. www.petsafe.net... -
Page 14: The "Come" Command
The “Come” Command 1. Put a separate, non-metallic collar on your pet’s neck ABOVE the Receiver Collar, and attach a long leash. Note: Be sure the extra collar does not put pressure on the Contact Points. 2. Hold your leash in one hand and the Handheld Transmitter in the other. -
Page 15: The "Stay" Command
14. Repeat steps 10 to 13 several times. 15. If your pet stays reliably on receiving the spoken “Stay” command, he may now be ready to respond without Stimulation. Take a play break and then go back and repeat from Step 3 with Negative Tone only. www.petsafe.net... -
Page 16: Eliminating Unwanted Behavior Jumping Up
Eliminating Unwanted Behavior Jumping Up Pets typically jump up to get attention. If you do not want your pet to jump on you, then friends or members of the family should not encourage this behavior. That means every time your pet jumps on someone, he should be reprimanded or redirected to an alternate and acceptable behavior, for which he can receive praise. -
Page 17: Chasing
“Come.” Praise your dog as he comes to you. 6. If your dog ignores the Stimulation, repeat using a higher level of Stimulation. 7. Repeat the process until your dog responds consistently to the “Come” command. www.petsafe.net... -
Page 18: Excessive Barking
Excessive Barking Barking is an instinctive behavior for dogs. It is impossible to keep your dog from barking entirely, but you can teach him be quiet when you give him a command. Note: This will only be effective when you are at home with your dog. 1. -
Page 19: Frequently Asked Questions
Discontinue use of the Receiver Collar for a few days. If the condition persists beyond 48 hours, see your veterinarian. Once the skin returns to normal, replace Receiver Collar, and monitor the skin condition closely. www.petsafe.net... -
Page 20: Troubleshooting
Troubleshooting The answers to these questions should help you solve any problem you have with this system. If they do not, please contact the Customer Care Center or visit our website at www.petsafe.net. My pet is not responding when • Check to see if the Receiver Collar has been turned on. -
Page 21: Test Light Instructions
Note: If the Test Light does not fl ash, recharge the battery and re-test. If Test Light still does not fl ash, contact the Customer Care Center or visit our website at www.petsafe.net. Important: The Test Light Tool can be used to tighten the Contact Points. This Receiver Collar has special waterproof Contact Points that will crack if they are over-tightened. -
Page 22: Fcc Compliance
Radio Systems Corporation are in violation of FCC regulations and could void the user’s authority to operate the equipment and void the warranty. _____________________________________________________________________________________ ™ PetSafe Add-A-Dog Receiver Description Part Number 400 m Advanced Trainer Add-A-Dog... - Page 23 www.petsafe.net...
- Page 24 Radio Systems Corporation 10427 Electric Ave. Knoxville, TN 37932 1-800-732-2677 www.petsafe.net 400-707/1 ©Copyright 2006, Radio Systems Corporation...
Need help?
Do you have a question about the Yard & Park Remote Trainer and is the answer not in the manual?
Questions and answers
How can I purchase a manual and a test light?
You can purchase a manual and a test light for the PetSafe Yard & Park Remote Trainer by contacting the Customer Care Center at 1-800-732-2677 or visiting the website www.petsafe.net.
This answer is automatically generated
should the handheld transmitter light up when I first plug it in or not until after hours of charging
The Petsafe Yard & Park Remote Trainer handheld transmitter lights up as soon as it is first plugged in. The red light appears when it is connected to a standard wall outlet.
This answer is automatically generated
should the handheld transmitter light up when I plug it in or not until hours of charging
The Petsafe Yard & Park Remote Trainer handheld transmitter lights up when plugged in. The red light appears when it is connected to a standard wall outlet for charging.
This answer is automatically generated