
Related Manuals for ESP GuardCam WF-SAR


Summary of Contents for ESP GuardCam WF-SAR
- Page 1 Wire free external area protection system Installation and operation manual GuardCam WF-SAR • GuardCam WF-T • GuardCam WF-MR...
-
Page 3: Table Of Contents
GuardCam WF-SAR ........ -
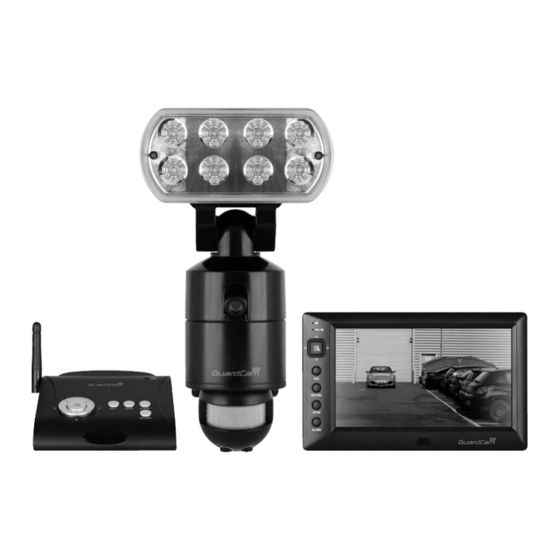
Page 4: System Components
System components GuardCam WF-T Combined PIR Floodlight camera and transmitter GuardCam WF-MR GuardCam WF-SAR Combined Monitor receiver Stand alone receiver module... -
Page 5: Introduction
Up to four transmitters (GuardCam WF-T) can be paired with a single receiver (either GuardCam WF- MR or GuardCam WF-SAR). Note. A transmitter can only be paired with one receiver at a time. It is not possible to pair a... -
Page 6: Guardcam Wf-T
GuardCam WF-T LED light Pairing button Camera Termination box and mounting plate PIR detector Time adjustment / Lux adjustment GuardCam WF-SAR 5vDC power input Reset Micro SD slot AV out Jack Power Button DISPLAY MENU PLAYBACK REC MODE OTHER Link indicator... -
Page 7: Guardcam Wf-Mr
GuardCam WF-MR Power Button Antenna Micro SD slot Reset AV out Jack Speaker Speaker Adaptor Plug Flip-out Stand DISPLAY MENU PLAYBACK REC MODE OTHER Link indicator Power indicator Channel up Cursor UP Fast Forward menu Left Switch Display CH Menu OK / ENTER PLAY / PAUSE menu Right... -
Page 8: Guardcam Wf-T Installation
GuardCam WF-T Installation Screw E Screw E Screw A 1. Place plastic masonry plugs into desired surface aligning holes as shown above. Using an electric screwdriver, fasten mounting plate directly to surface using screws E. 2. Feed the cable through the back mounting box and bush the cable entry to avoid abrasion to the cable. -
Page 9: Pir Set Up
PIR Set Up For optimum performance it is recommended to mount the GuardCam WF-T 1.8 to 2.5 m above the ground. The PIR has a range of 12m over a 140 degree angle. 140º 2.5m PIR technology provides much better target capture if movement is across the face of the PIR. Aim the PIR to achieve the highest chance of this happening. -
Page 10: System Set Up
Pairing GuardCam WF-T to a Receiver Pairing allows the GuardCam WF-T to communicate with a chosen receiver (GuardCam WF-MR or GuardCam WF-SAR). Up to four GuardCam WF-T transmitters can be paired with each receiver. A GuardCam WF-T can only be paired to a single receiver at any one time. -
Page 11: Record Setup
Image brightness adjustment Press ▼▲ to select a camera for adjustment. Press ▼▲ to select brightness level. Press ESC to return to MAIN MENU or press ▼▲ to select another camera. Camera Activation It is possible to turn cameras on or off. Please turn cameras to off position if channel has no camera ... -
Page 12: Motion Detection Sensitivity
Motion Detection Sensitivity Motion detection sensitivity can be selected on each camera from highest sensitivity to off. This can be useful when motion detection recording mode is selected for the whole system but only certain cameras are required to make a motion record trigger. - Page 13 Press Use NOTE: Each RECORDED FILE to select Hour to highlight (each block represents desired HOUR for playback. folder indicated with file start / end time and type of one hour time). Press Press MENU to confirm file recorded. MENU to enter.
-
Page 14: System Setup
System Setup Select to set up the general configuration of the system. Select SYSTEM SETUP, press the MENU button Use ▼ to select the sub menu to enter sub-menu. Date and Time Use ▲▼ to highlight DATE AND TIME, press MENU to enter. -
Page 15: Multi Channels Idle Display
Multi Channels Idle Display Selects style of display after no inputs received or selections made for 3 minutes . Use to select: DISPLAY QUAD(all images) after idle period Display each channel at 5 SEC intervals Display each channel at 10 SEC intervals Display each channel at 15 SEC intervals Press MENU to confirm selection Press ESC to save and exit... -
Page 16: Alarm Buzzer
Alarm Buzzer Select on/off for alarm sound on activation of motion detection on any camera . Select ALARM BUZZER, press the MENU button to turn buzzer ON or OFF. Note: The SD card must be inserted and have sufficient space for the alarm to operate. -
Page 17: Captured Image Playback Software
Captured Image Playback Software Images captured by GuardCam-WF can be transferred to PC for storage and transfer. To increase the security of these images they are encoded in .snx format. Playback and control of .snx files is possible via the Sec24 Media Player included on the CD provided with your GuardCam-WF. Files are physically transferred from GuardCam-WFs micro SD card using the included MicroSD –... -
Page 18: Software Installation
Software Installation Insert the CD into the CD-ROM of the PC. Click on MY COMPUTER, double click on the drive where the CD-ROM is assigned by the PC (for example: E;\) and you will find the Sec24 Media Player icon. Please read the following steps to complete installation. - Page 19 Double click the icon to start the installation process. Click “Next” to continue the installation. When the installation is completed, click “Finish” to exit the install wizard.
-
Page 20: Playback Recorded File(S)
Playback Recorded File(s) Double click the Sec24 Media Player icon on the desktop to start the software.  Sec24 Media Player icon Click on “Load” to import and playback previous recorded files (SNX files) already stored on your PC. Note: You will first need to save the files from the Micro SD card to the PC first. -
Page 21: Connecting To A Television
Connecting to a Television Both GuardCam WF receivers can be directly connected to a television with AV inputs to display live images or menu controls. An AV lead is supplied for this purpose. GUARDCAM WF-MR GUARDCAM WF-SAR... -
Page 22: Trouble Shooting Guide
Trouble Shooting Guide Problem Solution No image appears • Make sure the power adaptor is not damaged or defective and is plugged into an electrical outlet with power. • Make sure the receiver has enough charge • Make sure the GuardCam-WF-T is powered. •... -
Page 23: Best Practice
Best Practice Please consider the following points to achieve best performance from your GuardCam WF system. Before inserting an SD card for the first time and each time it is re-inserted it’s a good idea to format the card using a PC or Laptop. To format the SD card Ensure to save any required images to an alternative folder prior to formatting. -
Page 24: Technical Specifications
225±20mA IP rating IP55 Operating Temperature -10°C ~ 40°C Dimensions 160 x 176 x 260MM Weight 1400g GuardCam WF-SAR Channels Reception Range 150 meters in open field Receiver Resolution 800 X 480 Maximum SD card size 32Gb Receiver technology 2.4GHz FHSS Technology Video Output 1.2±0.2Vp-p/75ohm...
Need help?
Do you have a question about the GuardCam WF-SAR and is the answer not in the manual?
Questions and answers