
Subscribe to Our Youtube Channel
Related Manuals for ESP HDV4R


Summary of Contents for ESP HDV4R
- Page 1 HDV 4 channel and 8 channel.qxp_Layout 2 17/03/2015 15:01 Page 1 4 / 8 C H A N N E L T R U E H D C C T V S Y S T E M H D V 4 R • H D V 8 R H D V 4 K B •...
-
Page 2: Table Of Contents
HDV 4 channel and 8 channel.qxp_Layout 2 17/03/2015 15:01 Page 2 Contents DVR Description ............3 System Connection Diagram . -
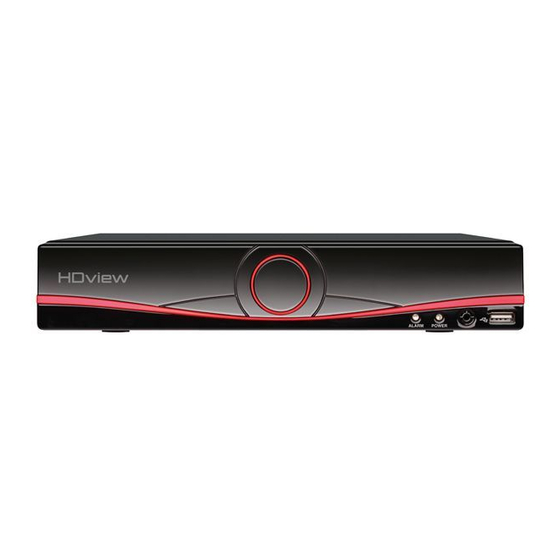
Page 3: Dvr Description
HDV 4 channel and 8 channel.qxp_Layout 2 17/03/2015 15:01 Page 3 Front Panel 1. System indicator lights 2. Remote control receiver 3. USB for mouse or USB stick Rear Panel 1. VIDEO IN 1-4/8 for video input from camera 2. AUDIO OUT Audio output 3. -
Page 4: System Connection Diagram
HDV 4 channel and 8 channel.qxp_Layout 2 17/03/2015 15:01 Page 4 DVR Connection Diagram Monitor Mouse controller VGA / HDMI Connection Local area network DVR rear panel Camera Video Input (BNC female) Power supply / Splitter lead BNC Video (female) Video / Power cable Power Jack (female) Notes on Camera Connection:... -
Page 5: Basic Operations
HDV 4 channel and 8 channel.qxp_Layout 2 17/03/2015 15:01 Page 5 Basic operations CONNECTION TO A MONITOR The DVR has a HDMI and VGA output to connect to a monitor. Please select the appropriate connection and select the correct input channel on the monitor. POWER ON Plug one lead from the 5-way power supply into the 12VDC power supply input marked on the DVR. -
Page 6: Record Setup
HDV 4 channel and 8 channel.qxp_Layout 2 17/03/2015 15:01 Page 6 Once logged in you may now right click again to access your menu selections. An opportunity to change the password is provided within the settings menu. Please note if an incorrect password is entered three times the DVR alarm will activate. - Page 7 HDV 4 channel and 8 channel.qxp_Layout 2 17/03/2015 15:01 Page 7 QUICK GUIDE OPTION 2- Motion Detection Record (Activated by Motion) From the live camera view: Right-click on the screen to bring-up the Shortcut Menu and log-in to the Main Menu. •...
- Page 8 HDV 4 channel and 8 channel.qxp_Layout 2 17/03/2015 15:01 Page 8 DIGITAL ZOOM During playback it is possible to carry out a digital zoom. Left click and hold anywhere in the picture then move the mouse in any direction to create a selection window. Once you are happy with the selection window release the left click and then left click again within the created window to zoom in.
-
Page 9: Main Menu Layout
HDV 4 channel and 8 channel.qxp_Layout 2 17/03/2015 15:01 Page 9 ADDITIONAL BACKUP NOTES Once the selections have been entered as listed above; click Add. Data applicable to the selections will now appear in the main screen. Clicking start will commence the backup operation and replace the capacity requirement with information on the estimated time to complete the process. -
Page 10: Remote Viewing
How to Remote Access your DVR guide. NB: ESP are unable to guarantee that your PC / mobile device will be compatible with the DVR and software supplied. Your specific model of phone, tablet or other device, the hardware it contains, your service provider, the types of data services they offer and your specific phone / device plan will all affect the performance of your PC / mobile device for remote access to the DVR. - Page 11 HDV 4 channel and 8 channel.qxp_Layout 2 17/03/2015 15:01 Page 11 There are no cameras displayed on the monitor • The camera power supply is not correctly connected or damaged • The camera signal cable is not correctly connected or damaged •...
- Page 12 HDV 4 channel and 8 channel.qxp_Layout 2 17/03/2015 15:01 Page 12 Elite Security Products Telephone: 01527 51 51 50 Unit 7, Target Park, Shawbank Rd Fax: 01527 51 51 43 Lakeside, Redditch B98 8YN email: info@espuk.com w w w. es p u k. co m...
Need help?
Do you have a question about the HDV4R and is the answer not in the manual?
Questions and answers
DVR WILL NOT TURN ON. JUST HAS RED FLASHING LIGHT