
Related Manuals for Speck pumps Badu EcoM3V


Summary of Contents for Speck pumps Badu EcoM3V
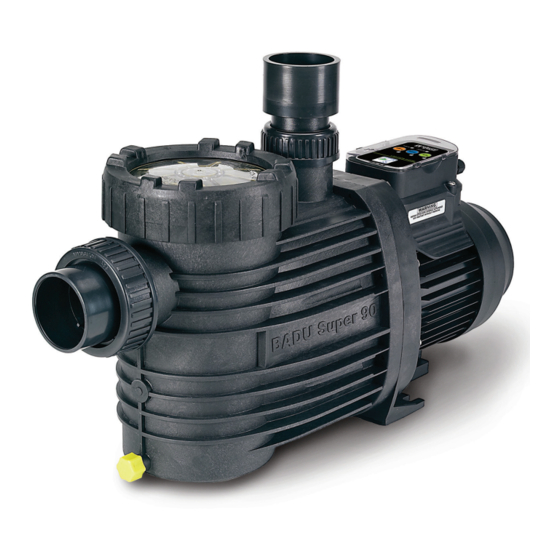
- Page 1 Installation, Operating, and Service Manual Badu EcoM3V ® Variable Speed Pool Pump...
-
Page 2: Save These Instructions
800-223-8538 Phone: 904-739-2626 Fax: 904-737-5261 Website: www.usa.speck-pumps.com Manufactured by Speck Pumps, Jacksonville Florida USA, © 2012 All Rights Reserved. This document is subject to change without notice. Date of Installation: Installed By: Serial Number: For Service Call: SAVE THESE INSTRUCTIONS! -
Page 3: Table Of Contents
Table of Contents Important Safety Instructions General Description Installation Information Preparation Guide ....7 Pump Location ....8 Pipe Sizing . -
Page 4: Important Safety Instructions
Important Safety Instructions READ THIS MANUAL CAREFULLY BEFORE USING THE SPECK PUMP READ AND FOLLOW ALL INSTRUCTIONS! Important Notice: This manual contains important information about the installation, operation and safe use of this product. This information should be given to the owner and/or operator of this equipment. WARNING: Before Installing this product, read and follow all warning notices and instructions which are included. - Page 5 The system must be built to include at least two (2) suction outlets (drains) connected to the pump whenever the pump is running. However, if two (2) main drains run into a single suction line, the single suction line may be equipped with a valve that will shut off both main drains from the pump. The system shall be constructed such that it shall not allow for separate or independent shutoff or isolation of each drain.
-
Page 6: General Description
The robust pump is based on Speck Pumps energy efficient design platform. The Badu EcoM3 - Variable Speed high performance, medium head pump uses a state of the art axial flux permanent magnet brushless-DC motor controlled by advance logic electronics. -
Page 7: Installation Information
General Description - continued The affinity laws of hydraulics states that if you half the speed, the power reduces by 8 times. The multiple speeds offered by the Badu EcoM3 - Variable Speed enables it to run slower and consume less energy but still have the ability to run at full speed if required. -
Page 8: Pump Location
NOTE: In Canada, the pump must be located a minimum of three (3) meters (approximately ten (10) feet) from the water (CSA C22.1). 1. Speck Pumps recommends in order to achieve better self-priming, to install the pump as close to the pool as practical. Consult local codes for minimum distance between pool and pump. -
Page 9: Bonding And Grounding
Plumbing Installation - continued If the pump is located below water level, isolation valves must be installed on both sides of the pump to prevent the back flow of pool water during any routine or required servicing. The Badu EcoM3 - Variable Speed comes equipped with unions on both the suction and discharge ports. -
Page 10: Electrical Installation
Electrical Installation 1. The pump motor must be securely grounded inside the motor control box. (See Figure 2.0) NOTE: Do not connect to electric power supply until unit is permanently grounded. 2. Wire size must be adequate to minimize voltage drop during the start-up and operation of the pump. See Table 1.0 for recommended wiring sizes. -
Page 11: Voltage Checks
Electrical Installation - continued Green\Yellow White Orange Connection Control Box Lower Half Green/ Ground Yellow White Yellow White Connection Yellow Control Box Figure 2 Top Half Voltage Checks The correct voltage, as specified on the pump data plate, is necessary for proper performance and long motor life. -
Page 12: Operation
Pressure Test - continued WARNING: When pressure testing the system with water, it is very important to make sure that the pump basket and lid is completely secure. STEPS: 1. Fill the system with water, using care to eliminate trapped air. 2. -
Page 13: Changing The Default Speed
10. If the pump does not prime and all the instructions to this point have been followed, check for a suction leak. If there is a leak repeat Steps 2 through 6. 11. For technical assistance, call Speck Pumps Technical Support at 800-223-8538. Changing the Default Speed The pump is factory set with a default speed of LOW. -
Page 14: Adjusting The Speed
Changing the Default Speed - continued 5. The low speed LED will continue to blink for three seconds to indicate a modification to the automatic default speed is being requested. After a brief pause, a second series of LED blinks will indicate the new default setting has been set to either medium speed (medium speed LED blinks) or low speed (low speed LED blinks). -
Page 15: Service And Maintenance
Adjusting the Speeds - continued To Adjust the HIGH Speed • Verify that the pump is powered ON and the green power LED light is on. • Press the HIGH button for 5 to 10 seconds, this will switch the control from Normal Operation Mode to the Speed Adjust Mode. -
Page 16: Winterizing
Routine Maintenance - continued 8. Verify that all valves have been returned to the proper position for normal operation. Turn on the power to the pump. Winterizing CAUTION: The pump must be protected when freezing temperatures are expected. Allowing the pump to freeze will cause severe damage and void the warranty. -
Page 17: General Troubleshooting Problems
Controller Malfunction Warnings - continued Table 2.0 The Badu EcoM3 - Variable Speed Error Light Sequence Flash Rate LED “Error” Light Error Description Cause 1 Flash Microprocessor fault Microprocessor Start-Up 2 Flashes Low voltage Voltage must exceed < 208V AC control activates itself independently when voltage exceeds 208V for more than six (6) seconds (Motor Activates) -
Page 18: Blocked Impeller
Blocked Impeller WARNING: Before servicing the pump, switch off the circuit breakers at the power source. Severe personal injury or death may occur if the pump starts while your hand is inside the pump. 1. Turn off the pump. Switch off the circuit breaker to the pump motor. 2. -
Page 19: Motor Replacement
Removal and Replacement of the Impeller and/or Mechanical Seal - continued 9. Using water with a small amount of dish soap, brush the impeller shaft for ease of assembly. 10. With the carbon side up, push the mechanical onto the impeller shaft and wipe carbon surface with a clean cloth. -
Page 20: Product Specifications
Motor Replacement - continued 7. After removal of the impeller, the seal housing will slide easily off the motor shaft. 8. Using a M8 Allen wrench, remove the four bolts and washers securing the flange to the motor. 9. Remove the slinger from the old motor and install on to the new motor. Removal and Replacement of the Impeller and/or 10. -
Page 21: Performance Curves
A, B, C, and D represent average system curves for pools with below pipe diameter. 3” Limited Warranty The manufacturer supplies a limited warranty to the original consumer The manufacturer shall not bear any costs or risks incurred in shipping purchaser of the pump and motor on the following terms and a defective pump or motor to the manufacturer or in shipping a repaired conditions:... - Page 22 2999999995 - Rev 05/2012...
Need help?
Do you have a question about the Badu EcoM3V and is the answer not in the manual?
Questions and answers