Table of Contents
Advertisement
INSTALLATION & OPERATING INSTRUCTIONS
WARNING
If you do not follow these instructions exactly, a fire or
explosion may result causing property damage, personal
injury or loss of life.
CAUTION: Keep gasoline and other liquids having flam-
mable vapors away.
WHAT TO DO IF YOU SMELL GAS
•
Do not try to light any appliance.
•
Do not touch any electrical switch; do not use any
phone in your building.
•
Immediately call your gas supplier from a neighbor's
phone. Follow the gas supplier's instructions.
•
If you cannot reach your gas supplier, call the fire
department.
WARNING
Do NOT use this appliance if any part has been under water.
Immediately call a qualified service technician to inspect the
appliance and to replace any part of the control system and
any gas control, which has been under water.
WARNING:
Improper installation, adjustment, alteration,
service or maintenance can cause injury or property damage.
Refer to this manual. For assistance or additional information
consult a qualified installer, service agency or the gas suppli-
er.
GAS DIRECT VENT FIREPLACE
with Premium Fiber Log Set Combustion System
Model DXV-45 DT3 - LX
NO. DXV45-DT3-LX- 0812
AVERTISSEMENT. Quiconque ne respecte pas à la lettre
les instructions dans la présente notice risque de dé-
clencher un incendie ou une explosion entraînant des
dommages, des blessures ou la mort.
ATTENTION. Garder l'essence ou autres liquides produi-
sant des vapeurs inflammables loin del'appareil.
QUE FAIRE SI VOUS SENTEZ UNE ODEUR DE GAZ :
•
Ne pas tenter d'allumer d'appareil.
•
Ne touchez à aucun interrupteur; ne pas vous servir
des téléphones se trouvant dans le bâtiment.
•
Appelez immédiatement votre fournisseur de gaz
depuis un voisin. Suivez les instructions du
fournisseur.
•
Si vous ne pouvez rejoindre le fournisseur, appelez
le service des incendies.
N'utilisez pas cet appareil s'il a été plongé dans l'eau,
même partiellement. Faites inspecter l'appareil par un
technicien qualifiéet remplacez toute partie du système
de contrôle et toute commande qui ont été plongés dans
l'eau.
AVERTISSEMENT : Une installation, un réglage, une modifi-
cation, une réparation ou un entretien mal effectué peut cau-
ser des dommages matériels ou des blessures. Voir la notice
de l'utilisateur quiaccompgne l'appareil. Pour de l'aide oueds
renseignements supplémentaires, consultez un installateur,
un technicien agréé ou le fournisseur de gaz.
Advertisement
Table of Contents

Related Manuals for Mendota DXV-45 DT3-LX


Summary of Contents for Mendota DXV-45 DT3-LX
- Page 1 GAS DIRECT VENT FIREPLACE with Premium Fiber Log Set Combustion System Model DXV-45 DT3 - LX INSTALLATION & OPERATING INSTRUCTIONS NO. DXV45-DT3-LX- 0812 WARNING AVERTISSEMENT. Quiconque ne respecte pas à la lettre If you do not follow these instructions exactly, a fire or les instructions dans la présente notice risque de dé- explosion may result causing property damage, personal clencher un incendie ou une explosion entraînant des...
-
Page 2: For Your Safety Read Before Lighting
FOR YOUR SAFETY READ BEFORE LIGHTING WARNING Attention. Ne pas utiliser l’appareil si le panneau Do not operate this appliance with the glass re- frontal en verre n’est pas enplace, est craqué ou moved, cracked or broken. A licensed or quali- brisé. -
Page 3: Dxv45 Dt3 Features - Quick Reference Information
DXV45 DT3 FEATURES - QUICK REFERENCE INFORMATION EXTERNAL DIMENSIONS: 40-3/8” Wide X 39” High X 19-1/8” Deep MINIMUM FRAMING DIMENSIONS: 41” WIDE x 38-1/8” HIGH X 20” DEEP GLASS SIZE: NeoCeram Glass with non-reflective coating. Visible Glass measures 707.5 in . -
Page 4: Table Of Contents
TROUBLESHOOTING MENDOTA GAS DXV FIREPLACE CUSTOMER INFORMATION AND TROUBLE-SHOOTING MAINTENANCE WIRING SCHEMATICS NATURAL TO LP GAS CONVERSION INSTRUCTIONS INSTALLING THE LP PRESSURE REGULATOR LP GAS PRESSURE REQUIREMENTS REPLACEMENT PARTS LISTING LABEL, RATING PLATE REPSENTATION MENDOTA WARRANTY QUALIFICATION & SERVICE REFERENCE FORM... -
Page 5: Specifications
“Gas-fired appliances for use at high altitudes.” HIGH ALTITUDE INSTALLATION INFORMATION: Prior to installing at altitudes higher than 7500, please con- tact the Mendota technical service department for specific venting requirements and venting restrictions. Building Permit and Installation Inspection Approval Requirements... - Page 6 Fireplace and replace any part of the control system and any gas control, which has been under water. DO NOT use this fireplace if the burner does not light immediately. Turn unit off and call Mendota ap- proved service person if there is any delay in burner light off.
-
Page 7: Locating The Fireplace And General Information
The DXV Fireplace must be installed and serviced by a Mendota approved service person. Any adjustments to burner, pilot, logs or coal bed must be made by a Mendota approved service person. Pilot flame must be checked with voltmeter. Pilot flame must register a minimum of 250 on mill volt meter. If pilot goes out always wait five (5) minutes before relight- ing pilot. -
Page 8: Heating Performance
HEARTH PROTECTION REQUIREMENTS: A non-combustible hearth protector is required and must extend a minimum of 14" in front of the fireplace (see Figure 1 on pg. 4 for raised hearths). We suggest installing the Mendota Fireplace 6 to 12 inches above the floor by utilizing an elevated hearth. -
Page 9: Dxv-45 Gas Direct Vent Fireplace
DIRECT VENT COAXIAL PIPE SIZE: 5" I.D. X 8" O.D. 51 7/16 51 7/16 FIGURE 1: Specifications & Clearances HIGH ALTITUDE INSTALLATION INFORMATION: Prior to installing at altitudes higher than 7500, please con- tact the Mendota technical service department for specific venting requirements and venting restrictions. -
Page 10: Installation Instructions
The Mendota DXV Fireplace is approved for mobile home and bedroom installations. CAUTION: The Mendota DXV Fireplace may be installed in a manufactured (mobile) homes after the first sale of the home. Manufactured home (mobile home) installation must conform with the Manufactured Home Construction and Safe- ty Standard, Title 24 CFR, Part 3280, or, when such a standard is not applicable, the Standard for Manufactured Home Installations, ANSI A225.1/NFPA 501A, or CSA Z240.4-Gas Equipped Mobile Housing. -
Page 11: Gas Supply Requirements
GAS SUPPLY REQUIREMENTS Correct gas pressure and proper gas supply line sizing is imperative to the successful performance of your Mendota gas fireplace. Be sure the gas supplier or plumber carefully checks for correct gas pressure and gas line sizing when in- stalling the fireplace. -
Page 12: Gas Pressure Requirements
GAS PRESSURE REQUIREMENTS A MAJOR CAUSE OF OPERATING PROBLEMS WITH GAS APPLIANCES CAN BE IMPROPER GAS PRESSURE! Problems such as changes in flame color or flame height, pilot or burner outages, intermittent operation, changes in heat output, excessive burner noise, etc. are nearly always the result of changes in gas pressure or improper gas pressure at the time of the installation. -
Page 13: Exterior Vent Locations And Restrictions
EXTERIOR VENT LOCATIONS AND RESTRICTIONS Figure 3: Exterior Vent Locations NOTE: ALL MEASUREMENTS TO BE TAKEN FROM CENTER LINE OF VENT CAP ∨ - ∧ - ≡ - Vent Terminal Air Supply Inlet Area where terminal is not permitted Clearance above grade, veranda, porch, *Not to be installed above a meter/regulator as- deck, or balcony (*12 inches (30 cm) mini- sembly within 3 feet (90 cm) horizontally from... -
Page 14: Flue Venting Instructions
FLUE VENTING INSTRUCTIONS The Mendota Fireplace must be vented using DuraVent or Amerivent or Security venting system. All warranties will be voided and serious fire, health or other safety hazards may result from any of the following actions: Installation by unau- thorized personnel;... -
Page 15: Flue Venting Requirements For Ng And Lpg
USED, after the first 90 elbow, reduces the maximum horizontal distance by 1-1/2’. HIGH ALTITUDE INSTALLATION INFORMATION: Prior to installing at altitudes higher than 7500, please con- tact the Mendota technical service department for specific venting requirements and venting restrictions. - Page 16 5"/ 8"FLUE VENTING COMPONENTS FOR NG AND LPG ITEM PART # DESCRIPTION 45-01-00222 12" VENT STACK 5" / 8" 45-01-00223 24" VENT STACK 5" / 8" 45-01-00224 36" VENT STACK 5" / 8" 45-01-00225 48" VENT STACK 5" / 8" 45-01-00228 GALVANIZED ELBOW 5"...
- Page 17 Adjustable– telescoping – pipe sections must be sealed using 1000° MILLPAK SILICATE STOVE MASONRY SEALANT (part #65-06-00909). HIGH ALTITUDE INSTALLATION INFORMATION: Prior to installing at altitudes higher than 7500, please con- tact the Mendota technical service department for specific venting requirements and venting restrictions.
- Page 18 MINIMUM RISE THROUGH-THE-WALL VENTING FOR NG AND LPG HEAT SHIELD #AA-11-00458 HEAT SHIELD AA-11-00458 WARNING: ALWAYS USE HEAT SHIELD (#AA-11-00458) WHEN EXTERIOR WALL COVERING IS MADE OF VINYL, WOOD OR OTHER COMBUSTIBLE MATERIALS. HEAT SHIELD (#AA-11-00458) IS INCLUDED WITH THE DXV45 FIREPLACE.
- Page 19 ELEVATED RISE THROUGH-THE-WALL VENTING FOR NG AND LPG The minimum vertical rise from top of fireplace is 48 in. when used with the maximum horizontal run of 16 ft. For other venting configurations within these maximum limits see pg. 14. NOTE: All horizontal runs of vent pipes must have a ¼"...
- Page 20 B - 1 VERTICAL THROUGH-THE-ROOF VENTING FOR NG AND LPG The maximum vertical run of vent pipe is 36 ft. from the top of the fireplace. The fireplace will support a run of a maximum of 36 ft. Maintain 1" air space clearances on all sides of vents (2" above horizontal vents). IMPORTANT: REFER TO DRAWING ON PAGE 10 &...
- Page 21 13/12 to 16/12 17/12 to 21/12 Complete installation with storm collar and vent cap. HIGH ALTITUDE INSTALLATION INFORMATION: Prior to installing at altitudes higher than 7500, please con- tact the Mendota technical service department for specific venting requirements and venting restrictions. 1"...
-
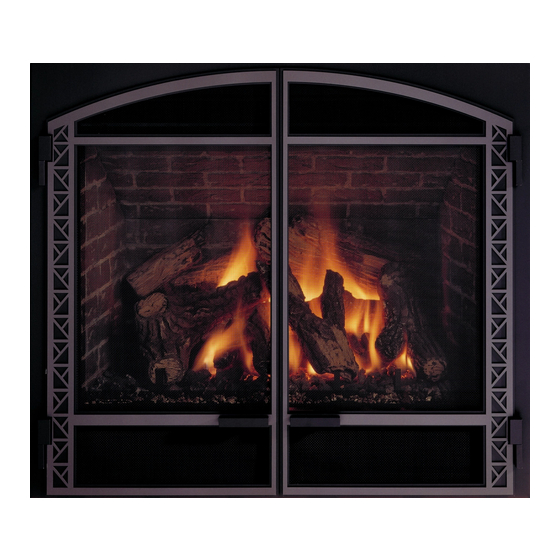
Page 22: Mendota Designer Fronts Installation Information
MENDOTA DESIGNER FRONTS INSTALLATION INFORMATION The following Designer Fronts are available for the DXV-45 Fireplace: 1. Andover Arched Door Kit with Firescreen with optional Overlays as listed below: 2. Black Andover Overlay 3. Pewter Andover Overlay 4. Antique Copper Andover Overlay 5. -
Page 23: Faceplate. Door Removal And Replacement
Faceplate with non-combustible materials such as Tile, Mar- ble, Slate, Stone and Brick; as long as enough room is al- lowed for the removal of these Mendota Designer Fronts and the glass door for servicing, WARNING: COMBUSTIBLE MATERIALS MUST NOT COVER THE FRONT SURFACE OF THE FIREPLACE’S FACEPLATE. -
Page 24: Door Removal And Replacement
DOOR REMOVAL AND REPLACEMENT CAUTION: Do not operate the appliance with glass removed, cracked or broken. Replacement of the glass should be done by a licensed or qualified service person. Glass latch tool #HA-57-00743 is supplied with the unit.: To Unlatch Glass Frame Latches: 1. -
Page 25: Glass Frame Assembly Repair And Replacement
GLASS FRAME ASSEMBLY REPAIR AND REPLACEMENT DO NOT substitute other manufac- WARNING WARNING turer's materials or components. Use only authorized parts and Do not operate this appliance materials obtained from Johnson DO NOT operate unit with cracked, with the glass removed, broken or missing glass. -
Page 26: Dxv45 Coal Bed And Logs Installation
DXV45 COAL BED AND LOGS INSTALLATION Carefully unpack the shipping boxes containing the coal bed sections and logs and remove them gently from the foam packing. 10 Log pieces, one 24 oz bag of small coals and one bag of inswool/Rockwool are included. Lay out the log pieces on a soft flat surface and arrange them according to the diagram, below, to aid you in through the installation process. - Page 27 DXV45-DT3 LOG SET INSTALLATION INSTRUCTIONS Locate Fiber Coal Bed “A”. This Fiber Coal Bed installs between the front burner and the front of the rear burner tube as shown below. The Fiber Coal Bed “A” is placed directly behind the front burner. The Coal Bed ‘s front edge must touch back edge of front burner tube.
- Page 28 LOG “C” Holes in bottom of Log “C”. Identify Log “C”. Back left log. Locate holes on bottom of log. Place log “C” onto the 2 pins on left-side behind the rear burner as shown. Identify Log “D”. This log will be installed between the front and back of the rear burner tube as shown below.
- Page 29 Identify Log “E” and Log “F”. Log “E” rests on left side of the T-propagation tube . Log “E”’s left edge rests against the front burner inlet tube, at floor level. Log “F” sits on the firebox floor and against the left side of the inlet tube on the front burner.
- Page 30 Identify Log “I”. Log “I” will be installed in the middle of the fireplace, with the hole on the bottom of the log setting on the middle pin in log “D”. 2” gap Once Log “I” is pinned to the middle pin in Log “D”, rotate FRONT –MOST TIP of Log “I”...
- Page 31 Place small coals between Firebox Front and front Burner. Pile the coals higher near the Front burner to build height. Any excess coals should be spread on the far left and far right sides of firebox to extend the coal bed effect. A couple of coals may be place behind front burner tube on Ember Bed “A”...
-
Page 32: Completed Logs And Coal Bed Assembly Evaluation
Have the Installer/Dealer adjust the log positions of the logs and coals and also conduct a thorough evaluation of the venting configuration to make certain that the venting configuration conforms to Mendota’s venting requirements, which are listed in this Installation and Operations Manual. -
Page 33: Installation Check Off List
Keep a record of these Check OFF guidelines for fu- ture reference. Mendota may request a certified copy of these Check OFF lists to verify compliance to these printed guidelines. -
Page 34: Before You Begin
: If the “Standing Pilot Switch” is toggled to ON, the pilot light will ignite and remain ON as long as the “Standing Pilot Light Switch” is in the ON position. NOTE: Mendota Fireplaces recommends that the Standing Pilot Mode be used during the winter months when external temperatures fall below 50 F. -
Page 35: Remote Control Transmitter Functions
Remote Control Transmitter Functions NOTE: The Wall Receiver will “beep” once every time a Remote Transmitter Key is pressed, signaling that the command has been received. Identify the four function buttons on the Remote Transmitter: 1. ON/OFF KEY: This button turns the system ON or OFF. -
Page 36: To Turn On The Appliance
ON, OFF or adjust the fan speed. A single “beep” will confirm reception of the command. Aux (Accent-Light): This function controls the Mendota Accent Light func- tion. Pressing the UP key in this mode will TURN ON the Ac- cent Light and Pressing the DOWN key will TURN OFF the Accent Light. - Page 37 MANUAL BYPASS OF THE REMOTE SYSTEM If the remote transmitter is misplaced or lost, the appliance can be turned on manually by sliding the three position slider switch on the wall receiver to the ON position. This will bypass the remote con- trol feature of the system and the appliance’s main burner will turn on.
-
Page 38: First Time" Pilot Lighting Instructions
“FIRST TIME” PILOT LIGHTING INSTRUCTIONS IMPORTANT: Be sure all items on "INSTALLATION CHECK OFF LIST" in the Installation Manual have been completed! CAUTION: If the pilot goes out, be sure to wait a minimum of five minutes before attempting to relight the pilot. 1. -
Page 39: Backup Batteries
Backup Batteries The life span of the backup batteries depends on the quality of the batteries used and how long the batteries have been installed in the wall receiver. These batteries are only utilized during power outages. Replace these batteries every heat- ing season even if you have not experienced any power outages. -
Page 40: Blower Operation And Wiring
BLOWER OPERATION AND WIRING WARNING: The Electrical Junction box within this appliance must be connected to a grounded LIVE power circuit. No switches, Light Dimmers or Fan Speed Control Devices are allowed within the same electric circuit as this appliance. Connect only to a LIVE electrical power supply that is not controlled by any other switching device. -
Page 41: Troubleshooting Mendota Gas Dxv Fireplace
1/16" increments until sooting stops. IF SOOTING DOES NOT STOP, TURN OFF UNIT AND CALL YOUR MENDOTA SERVICE PERSON. The front coal bed burner is pre-set at 1/8" open. Normally, no adjustment is required. For LPG applications, a slightly larger (greater than 1/8”... -
Page 42: Customer Information And Trouble-Shooting
Fireplace viewing glass or on the outside of the home around the vent cap), open both burner air shutters fully. If sooting continues, the unit must be immediately turned off and the local Mendota dealer promptly informed. Mendota dealers will correct "sooting"... -
Page 43: Maintenance
ANNUAL MAINTENANCE OF THIS MENDOTA FIREPLACE IS REQUIRED. The following procedures must be performed each year by a Mendota approved service person. NOTE: Any adjust- ments to burner, pilot or logs must be done by a qualified Mendota service person. -
Page 44: Wiring Schematics
WIRING SCHEMATICS Note: The DXV45 DT3 ignition system utilizes Transformed DC power for normal ignition functions. In the event of a pow- er outage, the Battery Pack power is utilized. IGNITION SYSTEM WIRING SCHEMATIC... -
Page 45: Natural To Lp Gas Conversion Instructions
NATURAL TO LP GAS CONVERSION INSTRUCTIONS Kit # HA-42-00302 Mendota Model DXV45-DT3-LX This conversion kit shall be installed by a qualified service agency in Motorized accordance with the manufacturer’s instructions and all applicable LP Pressure Regulator codes and requirements of the authority having jurisdiction. If the in- [10.0-5.5"WC]... - Page 46 5. Using a ½” deep well socket wrench, remove Front and Rear Orifices. HINT: PACK SOME SOFT PAPER OR INSWOOL INSIDE DEEP WELL SOCKET TO STOP CAP ORIFICE FROM SLIDING TOO FAR INTO THE SOCKET. 6. Thread a new 3/64” drilled orifice to the Front Orifice mounting brass fitting and new #53 drilled orifice to the Rear Ori- fice mounting brass fitting.
- Page 47 10. Before reinstalling burners, loosen the screw that secures the rotary air shutter on the Front Burner. Rotate the air shutter open to ¼” minimum. 11. Install both rear and front burners in their original locations and positions and secure down using screws you removed earlier.
-
Page 48: Installing The Lp Pressure Regulator
INSTALLING THE LP PRESSURE REGULATOR WARNING: READ AND UNDERSTAND ALL INSTRUCTIONS PACKAGED WITH LP PRESSURE REGULATOR BODY BEFORE YOU ATTEMPT THE CONVERSION. FAILURE TO FOLLOW ALL INSTRUCTIONS WILL RESULT IN A LEAK OR OVERFIRING OF THE APPLIANCE AND CAN LEAD TO AN EXPLOSION OR A FIRE HAZARD. 1. -
Page 49: Lp Gas Pressure Requirements
Failure to perform this leak test may lead to a house fire and/or an explosion. Mendota is not responsible for any damages due to an Installer’s failure to conduct a leak test and verify that all connections and supply lines are leak proof. -
Page 50: Replacement Parts
REPLACEMENT PARTS MENDOTA DXV-45 DT3 FIREPLACE PART NO DESCRIPTION PART NO DESCRIPTION 65-02-00103 GLASS GASKET 05-04-00050 PILOT ASS'Y. NAT. 05-04-00052 LP PILOT ORIFICE 65-06-00658 GLASS - FLAT HA-42-00210 DOOR FRAME ASS'Y. – FLAT HA-42-00302 LP KIT 65-14-00038 REAR ORIFICE (Nat. Gas) # 38... -
Page 51: Listing Label, Rating Plate Repsentation
LISTING LABEL, RATING PLATE REPSENTATION LISTED DIRECT VENT GAS FIREPLACE HEATER POÊLE AU GAZ HOMOLOGUE’, A AÉRATION DIRECTE NOT FOR USE WITH SOLID FUEL (NE DOIT PASÉ UTILISÉ AVEC UN COMBUSIBLE SOLIDE) Manufactured by (Fabriqué par): JOHNSON GAS APPLIANCE CO. CEDAR RAPIDS, IOWA CERTIFIED FOR CANADA HOMOLOGUÉ... - Page 52 THIS PAGE LEFT BLANK INTENTIONALLY...
-
Page 53: Mendota Warranty Qualification & Service Reference Form
As a part of Mendota's on-going program of customer satisfaction, this Form verifies proper installation and operation. It is important as a reference for future service. It insures long life and trouble-free operation of Mendota fireplaces & stoves and qualifies the owner for Mendota's lifetime limited warranty. Owner should sign Form when completed and mail a copy along with Warranty Registration to Mendota. - Page 54 TAPE SHUT -------------------------------------------------------------------------------------------------------------------------------------------------------- POSTAGE NEEDED JOHNSON GAS APPLIANCE COMPANY 520 E AVENUE N.W. CEDAR RAPIDS, IA 52405...
-
Page 55: Mendota Extended Protection And Limited Warranty
Fireplace. All adjustments to logs, coals or burner must be made by an authorized Mendota person. Any alteration, willful abuse, accident or misuse of the product shall nullify this warranty. - Page 56 Johnson Gas Appliance Company 520 E Avenue N.W. - Cedar Rapids, IA 52405 Mendota Hearth Division www.johnsongas.com www.mendotahearth.com...
Need help?
Do you have a question about the DXV-45 DT3-LX and is the answer not in the manual?
Questions and answers