Table of Contents
Advertisement
Quick Links
Download this manual
See also:
Installation Manual
Installation Manual
EF5000 – AUS
Important:
The appliance shall be installed in accordance with;
Local gas fitting regulations
Municipal building codes
AS 5601 / AG 601—2000, Gas installations
Any other relevant statutory regulations.
TO BE INSTALLED ONLY BY AN AUTHORIZED PERSON
THIS APPLIANCE MUST NOT BE INSTALLED OR USED INDOORS
INSTRUCTIONS MUST BE LEFT WITH THE CONSUMER AND THE CONSUMER
TO RETEAIN THEM FOR FUTURE REFERENCE.
Manufactured by: Escea Ltd, PO Box 5277 Dunedin NZ, Ph: +64 3 4788220, email: info@escea.net
For contact details of your local Escea distributor or dealer please visit www.escea.net
630051_6 Installation Manual EF5000 AUS
Advertisement
Table of Contents

Subscribe to Our Youtube Channel
Related Manuals for Escea EF5000 – AUS


Summary of Contents for Escea EF5000 – AUS
- Page 1 INSTRUCTIONS MUST BE LEFT WITH THE CONSUMER AND THE CONSUMER TO RETEAIN THEM FOR FUTURE REFERENCE. Manufactured by: Escea Ltd, PO Box 5277 Dunedin NZ, Ph: +64 3 4788220, email: info@escea.net For contact details of your local Escea distributor or dealer please visit www.escea.net...
- Page 2 Warning: Children and adults should be alerted to the hazards of high surface temperatures, burns and clothing ignition. Young Children should be carefully supervised when they are in the area of the ap- pliance. Clothing or other flammable materials should not be hung from the appliance, or placed on or near the appliance.
-
Page 3: Table Of Contents
Contents: Page: Product description Power supply Creating the cavity Wall cladding around the fire Minimum install height off the ground Types of installation Corner Installations Laying gas pipe Fixing the fire into the cavity Connecting gas pipe 10.0 Connecting the power supply and touch panel 11.0 Testing of touch panel and spark ignition 12.0... -
Page 4: Product Description
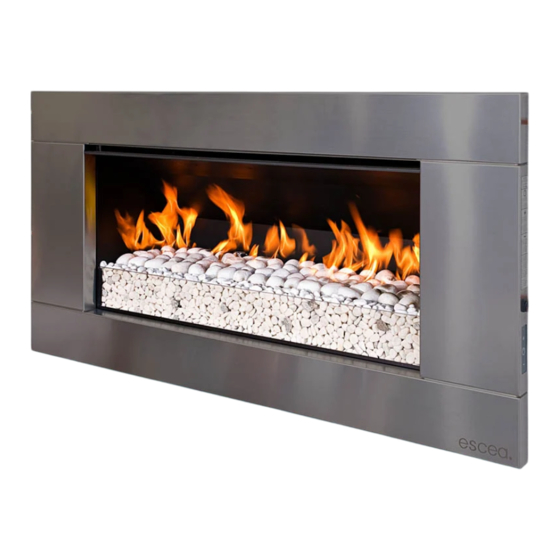
Product Description: The escea EF5000 flame effect gas fire is designed for outdoor use only. This appliance re- quires no flue and must be permanently installed into a cavity. It may be installed into a tim- ber cavity. The fire is controlled by the user from a switch that is situated on the lower right hand side of the stainless steel fascia. -
Page 5: Power Supply
2000mm. Warning: Under no circumstances should any object such as people, pets, furniture, etc. be closer than 1 metre in front of the escea EF5000. 630051_6 Installation Manual EF5000 AUS... -
Page 6: Wall Cladding Around The Fire
Certain materials or items, when placed under or near the appliance, will be subjected to ra- diant heat and could become damaged. The following installation diagrams are escea recommendations only and may or may not comply with your local council standards. Please check with your local council for actual building standards. - Page 7 Within a partial enclosure that includes an overhead cover and no more than two walls. Within a partial enclosure that includes an overhead cover and more than two walls, the following should apply: At least 25% of the total wall area is completely open, and ...
-
Page 8: Corner Installations
Corner Installations: If a cavity is to be created in a corner, the following drawings give the minimum sized interi- or wall dimensions possible. 1010 1830 Note: Allowances need to be made for cladding the internal of the cavity. Dimensions of the cavity in this diagram represent the internal size only. 1000 Minimum Minimum... -
Page 9: Laying Gas Pipe
Laying Gas Pipe: Gas pipe should be sized as per the requirements of AS5601/AG601-2000. The pipe sizing must be sufficient to deliver the following volume of gas to the heater with all other gas ap- pliances in the home running at the same time; EF5000 Natural Gas = 52 Mj/hr EF5000 Propane = 40 Mj/hr It is highly recommended to install an easily accessible isolating shut off valve (ball valve) -
Page 10: Fixing The Fire Into The Cavity
MUST NOT BE REMOVED. Removal of the regulator, or replacing it with one not intended for use with an Escea EF5000, will void the limited appliance warranty. 10.2 The EF5000 must be disconnected from the gas supply piping system during any pressure testing of that system at test pressures in excess of ½... - Page 11 11.0 Connecting the power supply and power switch: 11.1 The Power Supply socket is located in the centerline of the fire, below the firebox, facing the right hand side behind the ignition tray. Push the 2 pin plug together until they ‘click’. 11.2 The ON/OFF Power Switch socket plugs into the 3 pin plug lead situated at the front RH side of the fire.
-
Page 12: Checking Operating Pressure
13.0 Checking Operating Pressure: This is done at the regulator located at the lower front of the appliance. 13.1 This must be done before fascia has been fitted. 13.2 Pressure test point available for operating pressure (as shown below). 13.3 The operating pressure has been factory set. Please check that the operating pressure is exactly as listed below and if not, adjust screw in centre of regulator until pressure is correct. -
Page 13: Assembly Of Stone Cartridge
14.0 Assembly of stone cartridge: The glass which fits inside in the stone Cartridge has been packaged to protect it during transit, and can be found inside the firebox. Insert the glass strip into the stone cartridge as shown to the right, between the two metal flanges and push it all the way to the bottom. A bag of pebbles (River Stones) are also supplied, use these to fill the stone cartridge. -
Page 14: Fitting The Fascia
15.0 Fitting the Fascia: Before fitting the fascia, the hooks must be attached using the screws supplied. Ensure the wires connecting the fascia to the fire are securely connected, as per section 11.0. The EF5000 fascia is attached to the combustion box by four ‘hooks’ on the corners of the fascia. - Page 15 16.0 Placement of ceramic stones: EF5000 fuel beds should be evenly spread out with a maximum one layer of media. Do not heap or mound the fuel bed media and attempt to get an even spread across the top of the burners.
-
Page 16: Operating Instructions
17.0 Operating Instructions: The EF5000 is operated by the switch located on the right hand side outer edge of the fas- cia. The basic operations possible are ON/OFF. Before operating the fire, ensure the power transformer is plugged into the mains wall socket &... -
Page 17: Maintenance And Cleaning
17.3 Pilot Flame and Burner Positioning 18.0 Maintenance and Cleaning The unit must be cold before starting any form of maintenance or cleaning. To remove the glass and stones in the front stone tray simply reverse the steps in section 15.0. The glass can be cleaned using standard window cleaner and the quartz stones can be washed using soapy water 18.1 If the stainless steel fascia or weather cover requires cleaning the following products are... -
Page 18: Electrical Schematic
19.0 Electrical Schematic 630051_6 Installation Manual EF5000 AUS... - Page 19 630051_6 Installation Manual EF5000 AUS...
-
Page 20: Natural Gas
5mm x 1 off per burner Rear Burner Aeration Hole 11mm x 2 off per burner 5mm x 1 off per burner Mj/hour For any inquires, please contact your local Escea distributor or dealer www.escea.net 630051_6 Installation Manual EF5000 AUS... -
Page 21: Warranty
Escea product will be free from defects of materials or workmanship for the periods specified below (with each of the below periods commencing on the date the Escea product was purchased by you as a brand new product from a retailer located in the regions outlined in section 1):... - Page 22 Escea product; the breakdown occurs after the expiry of the express warranty period set out in section 2; the Escea product was not purchased in any of the regions outlined in section 1 as a brand new product.
- Page 23 Where you make a claim under this warranty, an authorised repairer may need to attend your premises to inspect the Escea product. We may charge you a service call fee if a repairer will be required to trav- el more than 30 kilometers from the nearest Glen Dimplex service centre to your location. You may ob- tain details on the location of our service centres and our service call fees by visiting our website (www.glendimplex.com.au) or calling our customer care line (1300 556 816).
Need help?
Do you have a question about the EF5000 – AUS and is the answer not in the manual?
Questions and answers