Table of Contents
Advertisement
Quick Links
Advertisement
Table of Contents

Related Manuals for DAPAudio LIVE 16


Summary of Contents for DAPAudio LIVE 16
- Page 1 LIVE 16 ORDERCODE D2211...
- Page 2 Congratulations! You have bought a great, innovative product from DAP Audio. DAP Audio LIVE 16 brings excitement to any venue. Whether you want simple plug-&-play action or a sophisticated show, this product provides the effect you need. You can rely on DAP Audio, for more excellent audio products.
-
Page 3: Table Of Contents
DAP Audio DAP Audio LIVE 16 Product Guide ™ Warning..…...................………………………………………….. Safety-instructions………………………………………………………………………………………….…. Operating Determinations……………………………………………………………………………………. Description..…................……….………………………………… Features………………………………………………………………………………….………………….…. Overview ..…………………………………………………………………………………….………..……. Installation................…...……………………………………..…. Installation............………………………………………..………..... Set Up and Operation..............……..…………………………….….. Input Channel Section....................…...……..Stereo Channel Section…......................……..Master Section.….........................………..Mixer output section..........…………………………………....……..Connection Cables......…........………..………….…….………….…. Maintenance………......…........………..………….…….………….…. Troubleshooting………......…........………..………….…….………….….. Block Diagram………......…........………..………….…….………….…….. -
Page 4: Warning
WARNING CAUTION! Keep this system away from rain and moisture! FOR YOUR OWN SAFETY, PLEASE READ THIS USER MANUAL CAREFULLY BEFORE YOUR INITIAL START-UP! SAFETY INSTRUCTIONS Every person involved with the installation, operation and maintenance of this system has to: be qualified follow the instructions of this manual CAUTION! Be careful with your operations. -
Page 5: Operating Determinations
• Make sure that the available voltage is not higher than stated on the rear panel. • Make sure that the power-cord is never crimped or damaged. Check the system and the power-cord from time to time. • In system setup, the amplifier's output power must be 50%-100% more than the loaded loudspeakers rated power. -
Page 6: Description
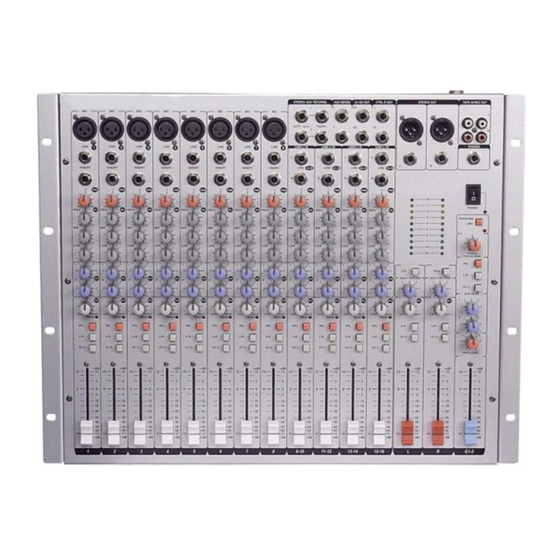
Description of the device Features The LIVE 16 is a mixer from Dap Audio. • 8 Mono Input Channels with goldplated XLR connectors and balanced Line Inputs • Ultra-low noise Mic pre-amps with +48 V Phantom Power • 4 Stereo Input channels with balanced TRS jacks •... -
Page 7: Installation
Installation Remove all packing materials from the LIVE 16. Check that all foam and plastic padding is removed. Connect all cables. Always disconnect from electric mains power supply before cleaning or servicing. Damages caused by non-observance are not subject to warranty. -
Page 8: Input Channel Section
Input-Channel-Section 1) MIC Electronically balanced XLR-connector input socket. For connecting low signal sources such as microphones or other low impedance devices. +48V Phantom Power on each input MIC socket. 2) LINE Balanced or unbalanced 1/4 (Ø 6.35mm) Stereo jack input socket. For connection with high level sound sources, such as keyboards, electric guitars, electronic musical instruments or audio playback units. - Page 9 8) AUX1 This is normally placed after the EQ section and before the channel fader (PRE- FADE, POST-EQ), and is therefore unaffected by the fader position and routing status. This makes it particularly suitable for foldback or monitor feeds, which need to be controlled separately from the main PA Mix.
-
Page 10: Stereo Channel Section
Stereo-Channel Section 16) LINE L / R 1/4 jack line input for L/R balanced stereo line level signals.status. When using mono line signal, use the L side. When using stereo line signal, use the L and R side. 17) TRIM) With this function you can adjust the input sensitivity (-∞... - Page 11 21) AUX1 This is normally placed after the EQ section and before the channel fader (PRE- FADE, POST-EQ), and is therefore unaffected by the fader position and routing status. This makes it particularly suitable for foldback or monitor feeds, which need to be controlled separately from the main PA Mix.
-
Page 12: Master Section
MASTER-Section 29) Output Level Indicator This is a level indicator, which shows the output level of the Left & Right channel and G1 & G2. 30) Output Level Indicator Switch L/G1 and R/G2 With this switch you can select L/R and G1/G2. 31) AUX 1 RETURN / AUX 2 RETURN Return level of AUX 1/2 into the mixer. - Page 13 36) POWER Switch The Power LED will illuminate when you push this switch. 37) PHANTOM POWER Switch The Power LED will illuminate when you push this switch. Pressing this switch applies 48V DC to all microphone input channel connectors, for remote powering of condenser microphones.
-
Page 14: Mixer Output Section
MIXER Output-Section 43) STEREO AUX RETURNS & AUX SENDS These can be used to connect all kinds of effects. 44) G1-G2 OUT On these outputs is connected, the signal which is set with the G1-2 faders. These can be used to connect all kinds of effects. -
Page 15: Connection Cables
Connection Cables Take care of the connector cables, always holding them by the connectors and avoiding knots and twists when coiling them: This gives the advantage of increasing their life and reliability, which is always to your advantage. Periodically check that your cables are in good condition, that they are correctly wired and that all their contacts are perfectly efficient: a great number of problems (faulty contacts, ground hum, discharges, etc.) are caused entirely by using unsuitable or faulty cables. -
Page 16: Maintenance
Make sure connections are thoroughly dry before linking equipment or supplying electric power. Troubleshooting DAP Audio Mixer LIVE 16 This troubleshooting guide is meant to help solve simple problems. If a problem occurs, carry out the steps below in sequence until a solution is found. Once the unit operates properly, do not carry out following steps. -
Page 17: Block Diagram
Block Diagram... -
Page 18: Product Specifications
Product Specification Model: DAP Audio LIVE 16 Inputs Mic Input electronically balanced Bandwidth 10 Hz to 60 KHz ±3 dB Distortion (THD & N) 0.01% at +4dBu, 1Khz, Bandwidth 80 KHz Mic E.I.N. (22 Hz – 22Khz) -129.5 dBu, 150 Ohm source -117.3 dBqp, 150 Ohm source... - Page 19 2004 Dap Audio.
Need help?
Do you have a question about the LIVE 16 and is the answer not in the manual?
Questions and answers