
Related Manuals for DAPAudio GIG-12


Summary of Contents for DAPAudio GIG-12
- Page 1 GIG-12 ORDERCODE D2262 Highlite International B.V. Vestastraat 2 6468 EX Kerkrade The Netherlands...
- Page 2 Congratulations! You have bought a great, innovative product from DAP Audio. DAP Audio GIG-12 brings excitement to any venue. Whether you want simple plug-&-play action or a sophisticated show, this product provides the effect you need. You can rely on DAP Audio, for more excellent audio products.
-
Page 3: Table Of Contents
Features ..................................6 Overview ..................................6 Front panel ..................................7 Back panel ..................................9 Installation ..................................9 Functions ..................................10 Connection Cables ..............................18 Maintenance ................................19 Troubleshooting ................................19 Product Specifications ..............................20 Appendix 1: GIG-12 block diagram ........................21... -
Page 4: Dap Audio Gig-12
Save the carton and all packing materials. In the event that a device must be returned to the factory, it is important that the device is returned in the original factory box and packing. Your shipment includes: • DAP GIG-12 • 1X 1,80 m, 3-pin IEC powercable • User manual... -
Page 5: Operating Determinations
Do not connect this system to a dimmerpack. Do not switch the system on and off in short intervals, as this would reduce the system’s life. Do not open the device and do not modify the device. ... -
Page 6: Return Procedure
Connection with the mains Connect the device to the mains with the power-plug. Always pay attention, that the right color cable is connected to the right place. International EU (including UK) North America From April 2004 Brown Black Phase Blue White Neutral Green/Yellow... -
Page 7: Description Of The Device
Features The DAP GIG-12 is a 12 channel mixer with 16 controllable DSP effects. It is a very complete 2 bus mixer with all functionality you need to make a perfect audio mix. The USB port gives you the possibility to connect a PC or MAC and record your mix or use it as an external input source. -
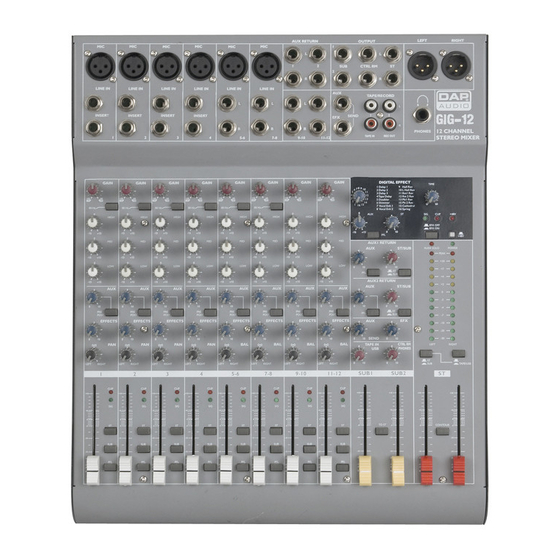
Page 8: Front Panel
Front panel 1. Balanced mic input (mono channel 1-4) 2. Balanced line input mono (mono channel 1-4) 3. Left line input (stereo channel 5-12) 4. Insert TRS jack 5. Right line input (stereo channel 5-12) 6. Gain control (range: mic 0/+40dB, line -25/+15dB) 7. - Page 9 21. Effect selector 22. ST return level control 23. EFX to aux level control 24. EFX to PFL button 25. EFX on/off button 26. Phantom power button 27. Signal LED 28. Clip LED 29. Phantom power LED 30. Phantom power on/off button 31.
-
Page 10: Back Panel
67. USB port Installation Remove all packing materials from the GIG-12. Check that all foam and plastic padding is removed. Connect all cables. Always disconnect from electric mains power supply before cleaning or servicing. Damages caused by non-observance are not subject to warranty. -
Page 11: Functions
Functions 1. Mic Electronically balanced XLR-type inputs for connecting low- impedance microphones. The input provides extremely low noise and low hum signal processing. When connecting a microphone make sure that the pin assignment is correct. Always make sure to read the manual of the microphone you want to connect. The XLR- inputs are not suitable for connecting line level signals like an additional mixing console, FX-unit, etc. - Page 12 7. Low cut If you push the “low cut” button, a filter will be inserted into the audio chain of the GIG-12 that has a characteristic 80Hz, 18dB/oct high pass characteristic to cut any undesired low frequencies. This function can be used to cut the humming sound or to prevent resonances of low frequencies, when the speakers are placed in close distance.
- Page 13 17. Channel ST This button allows you to route the channel to the main bus. 18. Channel sub This button allows you to route the channel to the sub bus. 19. Channel PFL The Solo button (pre fade listening) is designed to select a channel and listen to that channel on your control room or phones output independent of the position of the channel fader (20).
- Page 14 21. Effect selector Use this dial for selecting an effect preset. 22. ST return This control allows you to adjust the level of the digital effect unit to the main (ST) bus. 23. Aux The (stereo) output of the digital effect section is summed and routed to the aux bus. This control allows you to adjust the channel’s level to the aux bus.
- Page 15 32. PFL switch Allows you to route the Aux 1 return (54) input to the PFL bus. 33. Aux 2 return The signal of the (stereo) Aux 2 return (55) inputs is summed together for a mono signal and is routed to the (internal) aux bus.
- Page 16 Indicates one or more PFL buttons are pushed in. 47. Power LED The green power LED lights when the GIG-12 is turned on. If, after switching the device on, the LED does not light, make sure that the mains plug is plugged in correctly. If the LED still doesn’t light up, please contact your DAP Audio dealer.
- Page 17 54. Aux 1 return input Use this input as an additional stereo input or as an effect return. Warning: If you use the aux 1 return (54) input in combination with the aux send (60) output as an effect send return, make sure this control is set to its minimum position (fully counterclockwise) otherwise you will create a feedback loop.
- Page 18 (65) switch to operate the unit. 67. USB port This USB port can be used to connect the GIG-12 to your PC/ laptop. You can use this connector For playback or record with your favorite media player.
-
Page 19: Connection Cables
Connection Cables Take care of your cables, always holding them by the connectors and avoiding knots and twists when coiling them: This gives the advantage of increasing their life and reliability. Periodically check your cables. A great number of problems (faulty contacts, ground hum, discharges, etc.) are caused entirely by using unsuitable or faulty cables. -
Page 20: Maintenance
Compensation of interference with balanced connections Maintenance DAP Audio GIG-12 requires almost no maintenance. However, you should keep the unit clean. Disconnect the mains power supply, and then wipe the cover with a damp cloth. Do not immerse in liquid. Do not use alcohol or solvents. -
Page 21: Product Specifications
Product Specifications Input channels: 6 x Mic balanced 6 x Line mono 2 x Line stereo 2 x Aux stereo return 1 x CD/Tape stereo input Output channels: 1 x Main Stereo out by 2x 1/4" Jack 1 x Sub Stereo out by 2x 1/4" Jack 1 x Ctrl room stereo out by 2 x 1/4"... -
Page 22: Appendix 1: Gig-12 Block Diagram
Appendix 1: GIG-12 Block Diagram...
Need help?
Do you have a question about the GIG-12 and is the answer not in the manual?
Questions and answers