Table of Contents
Advertisement
Quick Links
Advertisement
Table of Contents

Related Manuals for Coemar Panorama Power MK2


Summary of Contents for Coemar Panorama Power MK2
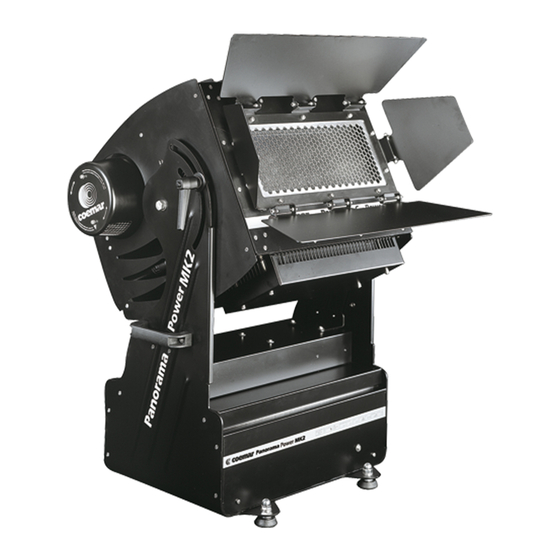
- Page 1 manuale di istruzioni instructions manual Version 1.0...
- Page 2 Please note in the space provided above the relative service information of the model and the retailer from whom you purchased your Panorama Power MK2 : this information will assist us in answering any technical enquiries with the utmost speed and accuracy.
-
Page 3: Table Of Contents
English Index 1. Packaging and transportation Pag. 4 1.1. Packaging “ 1.2. Transportation “ 2. General information Pag. 4 2.1. Important safety information “ 2.2. Warranty conditions “ 2.3. CE norms “ 3. Product specifications Pag. 5 3.1. Technical characteristics “... -
Page 4: Packaging
2.1. Important safety information Fire prevention: 1. Panorama Power MK2 utilises two Philips MSR 575/2 or 575 MSD lamps; the use of any alternative lamp is not recommended and will null and void the fixture’ s warranty. 2. Never locate the fixture on any flammable surface. -
Page 5: Warranty Conditions
3. The warranty is immediately void if the projector has been operated or dismantled by unauthorised personnel 4. The warranty does not extend to fixture replacement 5. The serial number of the projector is required for any advice or service fro your authorised coemar service centre. 2.3. CE norms The projector meets or exceeds all applicable CE requirements. -
Page 6: Mechanical Installation
Permanent and temporary installation So that it may be utilised in a variety of positions, the Panorama Power MK2 is fitted with four rubber feet on its base. For more permanent and robust installations, you may remove the four feet and, utilise the four holes corresponding to those marked “A”... -
Page 7: Beam Adjustment
4.2. Safety chain If the Panorama Power MK2 is affixed to a mobile structure the use of a safety chain designed to meet relevant safety standards is recom- mended. You may attach the safety chain “C” to the appropriate holes in the base of the Panorama Power MK2 and to the suspen- ding structure. -
Page 8: Adjusting Fan Shrouds
4.5. Adjusting beam angles The Panorama Power MK2 has 4 different diffusion filters available which can be used to alter the dimensions and shape of the beam output, thus making it suitable for a variety of situations. -
Page 9: Adjusting Barndoors
Additional adjustment of the projected beam angle may be achieved using the 4 barndoors. 4.6. Adjusting barndoors The 4 leaf barndoors can be used to adjust and shape the projected beam angle of the Panorama Power MK2 to further suit your needs. The following pictures indicate the procedure needed to adjust the barndoors. -
Page 10: Operating Voltage And Frequency
5.1. Operating voltage and frequency The projector may operate at either 208, 230 or 240VAC at a frequncy of either 50 or 60Hz. Coemar presets (barring specific requests) a voltage of 230v at a frequency of 50Hz.. The preset voltage is indicated on the base of the projector. - Page 11 English 3. Locate the ballast inside the base. 3. Cables 32 and 34 determine the operating voltage. Move them to the required voltage, 208, 230 or 240V on the ballast. 4. Cables 43 and 49 determine the operating frequency. Move them to the required frequency, 50 or 60Hz on the ballast. Refer to the stickers on the ballast to ensure correct selection is made.
-
Page 12: Mains Connection
• Prior to powering up the projector, ensure that the model in your possession correctly mathces the mains supply avai- lable to you. • A good earth connection is essential for the correct operation of the Panorama Power MK2. Never connect the pro- jector to main power if the green/yellow earth cable is not correctly connected... -
Page 13: Connecting Dmx Signal
Control signal is digital and is transmitted via two pair screened ø0.5mm cable as per international standards for the transmission of DMX512 data. Connection is serial, utilising XLR 3 male and female sockets located on the base of the Panorama Power MK2. Coemar supplies XLR3 connectors with a IP67 protection rating. -
Page 14: Powering Up
English 6.2. Powering up Panorama Power MK2 is supplied with a 4 leaf barndoor which is generally in the closed position when shipping. ATTENTION!! The barndoors should always be in an open position prior to turning on the lamp. This will avoid the possiblity of the lamp and projector being damaged through overheating. -
Page 15: Dmx Functions
English 6.4. DMX functions channel function type of control effect decimal percentage step closed 0% - 3% dimmer proportional from close to open - 255 3% - 100% cyan proportional - 255 0% - 100% proportional cyan control from white to cyan proportional magenta control from white to magenta proportional... -
Page 16: Quick Guide To Menu Navigation
Changing the preset settings made by coemar can vary the functions of the device so that it may not respond to a DMX 512 controller being used to control it. Carefully follow the instructions before applying any variations or selections. -
Page 17: Operating Mode (Mode)
English 7.2. Operating mode (MODE) By using the Panorama Power MK2 display panel it is possible to alter the operating mode of the projector. The following diagram shows the menu navigation layout in MODE. A OO 1 menu M OD E... -
Page 18: Measure And Test (Meas)
The internal microprocessor of the Panorama Power MK2 allows for several diagnostic and output parameters to be displayed. You may record, in this menu, determine the position in which the projector will come to rest when turned on with no dmx signal attached. -
Page 19: Function Settings (Func)
English 7.4. Function settings (FUNC) The projector allows the altering of several functions and for selecting personalised settings. AOO1 menu FUNC ST RD LAMP enter enter enter enter switching on control all the lamps switching on throught DMX512 To disable on/off control of the lamps by DMX signal +o-- enter... -
Page 20: Rapid Scrolling
English 7.5. Rapid scrolling Via the Panorama Power MK2 display it is possible to rapidly scroll through the various numbers displayed in the menu in the follo- wing manner: 1. Pressing the + or - buttons will cause the number to scroll more quickly. -
Page 21: Signal Connection For Master/Slave Mode
Connect the projectors via the XLR3 sockets beginning with output of the MASTER unit to the input of the first SLAVE, the output of the first SLAVE to the input of the second and so on to a maximum of 10 projectors. Coemar supplies on the units XLR3 connectors with an IP67 protection rating;... -
Page 22: Master/Slave Mode
English 8.2. MASTER/SLAVE mode After having connected the projectors, as described in section 8.1 MASTER/SLAVE signal connection, turn on power to the projec- tors. Settings are made via the 4 button display panel. Setting up a “MASTER” Only one projector may be set up as MASTER, the initial projector in the dmx daisy chain. Via the display panel, it is also possible various parameters such as program execution speed between steps (WAIT) and the speed of colour changes (SPEED). -
Page 23: Lamp Installation
English 9. Lamp installation and alignment Panorama Power MK2 utilises two Philips 575/2 MSR or MSD 575 lamps of 575W with a GX 9,5 base . All lamps are available from your Coemar service centre. Lamp Philips 575 MSR/2 Philips 575 MSD... - Page 24 English 3. Locate the two lamp assemblies, right and left. Remove the two screws “C” which hold the assemblies in place. 5. Locate the lampholder “E” 6. Insert the lamps. The lamp used is manufactured from quartz glass and should be handled with care; always adhere to the instructions supplied in the lamp’...
-
Page 25: Aligning The Lamp In The Optical Path
11. Maintenance Whilst every possible precaution has been taken to ensure the trouble-free operation of your Panorama Power MK2, the following periodic maintenance is highly recommended. -
Page 26: Fuse Replacement
Periodically check the lubrication of all components, particularly the parts subject to high temperatures. If neces- sary, lubricate with suitable lubricant, available from your coemar distributor. Check that the bolts which affix the barndoors are firmly fastened. -
Page 27: Electronic Motor Alignment
This procedure should only be undertaken by qualified and experienced technical personnel. The display panel of the Panorama Power MK2 allows for the electronic alignment of the projector’ s motors in the optical system. This procedure is performed by coemar at the factory. It may be useful to perform this procedure in the case of internal components being replaced. -
Page 28: Spare Parts
- Check the input voltage. - Check and replace the fuse if necessary. Panorama Power MK2 does not respond to DMX signal. DMX may not be being recieved by the Panorama Power MK2: - Check controller output and all DMX cables. - Page 29 Coemar s.p.a. via Inghilterra 2/A - 46042 Castel Goffredo (Mantova) Italy ph. +39 0376/77521 - fax +39 0376/780657 info@coemar.com Coemar si riserva il diritto di apportare modifiche senza preavviso. Coemar reserves the right to effect modifications without notification...
Need help?
Do you have a question about the Panorama Power MK2 and is the answer not in the manual?
Questions and answers