Table of Contents
Advertisement
Quick Links
Advertisement
Table of Contents

Related Manuals for Coemar Mini ReLite Led


Summary of Contents for Coemar Mini ReLite Led
- Page 1 Mini ReLite Led...
- Page 2 Please note in the space provided above the relative service information of the model and the retailer from whom you purchased your Mini ReLite Led: this information will assist us in providing spare parts, repairs or in answering any technical enquiries with the utmost speed and accuracy.
-
Page 3: Table Of Contents
4.1 Mechanical installation .............................Pag. 8 5. Powering up ................................Pag. 9 5.1 Operating voltage and frequency ........................Pag. 9 6. Turning the Mini ReLite Led on ..........................Pag. 9 7. Spare parts ................................Pag. 9 8. Maintenance ................................. Pag. 10 8.1 Periodic cleaning .............................Pag. 10 8.2 Periodic control ..............................Pag. -
Page 4: Packaging And Transportation
Congratulations on having purchased a Coemar product. You have assured yourself of a fixture of the highest quality, both in componentry and in the technology used. We renew our invitation to you to complete the service information on the previous page, to expedite any request for service information or spares (in case of problems encountered either during, or subsequent to, installation). -
Page 5: Warranty Conditions
3. The level of technology of Mini ReLite Led requires the use of specialized personnel for all service applications; refer all work to your authorised Coemar service centre. 4. A good earth connection is essential for the proper functioning of the projector. Never connect the fixture if there is no earth connection. -
Page 6: Product Specifications
. Product specifications Technical characteristics Power supply 90-240 V, auto-sensing, 50/60Hz Maximum current 0.31 A at 230 V, 0.65 at 110 V Power factor Cosφ = 0.98 Max power consumption 70 W Color temperature Tungsten: 3200 K - Daylight: 5600 K Color Rendering Index (CRI) 90 or 97 Weight... -
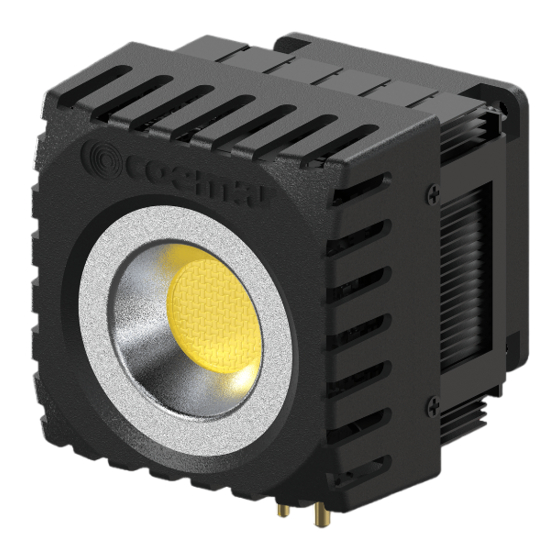
Page 7: Unit's Main Components
Unit’s main components Components description Heatsink Pin Base... -
Page 8: Installation
Installation Mechanical installation With Mini ReLite Led will be possible to give new life to your projector, simply replacing the old lamp with the Mini ReLite Led. Note: the fixture’s reflector needs to be removed before the installation. -
Page 9: Powering Up
All connections should be carried out by a suitably qualified personnel. . Turning the Mini ReLite Led on After having followed the previous steps, turn on the projector, in which the Mini ReLite Led is installed, connect- ing it to the mains power. -
Page 10: Maintenance
Mini ReLite Led does not emit • Make sure the power cord is plugged in or test the input voltage in the light projector in which is installed Mini ReLite Led; • Make sure the Mini ReLite Led is well inserted into the socket. -
Page 11: Usage Warnings
4. If only some Mini ReLite Led are connected to a power unit of a certain size (2000 W), an additional com- ponent called dump load resistor is required, which will charge other watts to activate the triacks. This device will be inserted into the power cord, thus dissipating the watt needed to ensure it will turn on. - Page 12 User notes ..........................................................................................................................................................................................................................................
- Page 13 Information on disposal of the equipment The equipment at the end of its useful life must be disposed of at an appropriate recycling center for waste electrical and electronic equipment. The treatment and disposal of environmentally friendly, helps prevent potential negative environmental and health and promote the reuse and / or recycling of materials making up the equipment.
- Page 14 Coemar Lighting s.r.l. Via Carpenedolo 90 46043 Castiglione delle Stiviere, Mantova, Italia tel. +39 0376/1514412 - fax +39 0376/1514380 info@coemar.com Coemar reserves the right to change specifications without prior notice...
Need help?
Do you have a question about the Mini ReLite Led and is the answer not in the manual?
Questions and answers