Menvier Security TS2500 Operator's Manual
Intruder alarm control panel
Hide thumbs
Also See for TS2500:
- Installation & programming manual (100 pages) ,
- Operator's manual (48 pages) ,
- Quick manual (8 pages)
Table of Contents
Advertisement
Quick Links
Advertisement
Table of Contents

Related Manuals for Menvier Security TS2500


Summary of Contents for Menvier Security TS2500
- Page 1 TS2500 Intruder Alarm Control Panel Operators Manual...
-
Page 2: Table Of Contents
CONTENTS Overview .................... 1 Glossary of Terms....................1 Introduction ....................3 Circuits & Wards....................4 Communication Devices ................5 Remote Keypads....................6 Operation ................... 8 Introduction ....................8 Using the Set/Unset Menu ................9 Setting Your Ward(s) ..................10 Setting with Circuits in Fault ................12 Unsetting Your Ward(s)...................13 Part Setting the System .................15 Part Unsetting the System................16 Setting with Circuits Omitted ................17... -
Page 3: Overview
Glossary of Terms Overview A permanently manned monitoring station used Alarm Receiving Centre to receive alarm signals from an alarm system. A facility which allows selected detection circuits Chime to generate a two tone sound when triggered. All detection devices, (e.g. magnetic contacts, Detection Circuit movement sensors) are connected to detection circuits. - Page 4 Glossary of Terms Overview The user(s) who has the authority for assigning Master User new users to the alarm system. A device for transmitting and receiving data to Modem and from a computer via the telephone line. To intentionally exclude the monitoring of one or Omit more detection circuits when setting the alarm system.
-
Page 5: Introduction
Introduction Overview The TS2500 is an advanced security alarm control system using state of the art electronics to provide comprehensive but flexible protection for both large domestic and commercial premises. The system comprises of a number of components linked to a central control unit which is concealed from view but accessible for maintenance. -
Page 6: Circuits & Wards
If a user does not have access to a particular ward they cannot set or unset that ward. The TS2500 can be broken down into 16 wards, each ward is identified using the letters A - P. When the system is part set the display will show which wards are currently set. -
Page 7: Communication Devices
Communication Devices Overview Remote Signalling Your alarm system may be fitted with a digital communicator or RedCARE unit. The device is connected to your telephone line and in the event of an alarm activation, the device will signal the alarm condition to the alarm receiving centre. -
Page 8: Remote Keypads
Remote Keypads Overview Your alarm system can be operated from one or more remote keypads, which will have been strategically located within the protected premises. Arming station The remote arming station can only be used to set and unset the alarm system. -
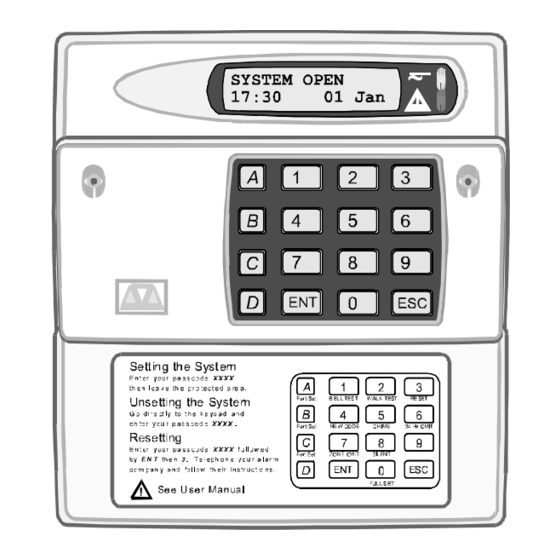
Page 9: Lcd Keypad
Remote Keypads Overview The LCD remote keypad is the only keypad that will display full information. Any kind of programming or testing of the system, must be done using this type of keypad. LCD Keypad The LCD remote keypad is a full function keypad and can be used to program, test, set and unset the alarm system. -
Page 10: Operation
4 or 6 digit passcode. Every time you wish to use the system your passcode must be entered correctly. User Types The TS2500 can have up to 199 separate users each user is assigned a passcode, an access level and wards. User Menus The system has 4 users menus, with each menu having between 9 and 12 options. -
Page 11: Using The Set/Unset Menu
Using the Set/Unset Menu Operation The set/unset menu is displayed whenever you enter your passcode. Pressing ] whilst the menu is displayed will return the system to its original state. The set/unset menu has several options, however, only options that are relevant will be displayed, e.g. -
Page 12: Setting Your Ward(S)
Setting Your Ward(s) Operation Setting of wards can only be performed at a valid remote keypad. If you attempt to set a ward from an invalid remote keypad the display will show: Cannot 'SET' from this keypad. Before attempting to set your ward, ensure all doors and windows are securely closed and the wards to be protected are vacated. - Page 13 Setting Your Ward(s) Operation If your user code is assigned to more than one ward, you may be able to select the wards that you want to set after selecting the SET WARDS option. 1. At the remote keypad enter your passcode.
-
Page 14: Setting With Circuits In Fault
Setting with Circuits in Fault Operation When starting the exit procedure, any active circuits, will cause the panel to enter into a fault mode. Whilst in this mode, the exit procedure is temporarily suspended. 1. At the remote keypad enter your passcode. -
Page 15: Unsetting Your Ward(S)
Unsetting Your Ward(s) Operation Unsetting of wards can only be performed at a valid remote keypad. If you attempt to unset a ward from an invalid remote keypad the display will show: Cannot 'UNSET' from this keypad. Enter the protected area via the designated entry point, the internal sounder will sound. - Page 16 Unsetting Your Ward(s) Operation If your user code is assigned to more than one ward you may be able to select the wards that you want to unset. 1. Enter the protected area via the designated entry point, the internal sounder will sound.
-
Page 17: Part Setting The System
Part Setting the System Operation The TS2500 can store up to 10 pre- defined part set groups, each group is allocated a combination of wards, e.g. "PART SET GROUP 1" could be allocated wards A and C, whereas "PART SET GROUP 2"... -
Page 18: Part Unsetting The System
Part Unsetting the System Operation The TS2500 can store up to 10 pre- defined part set groups, each group is allocated a combination of wards, e.g. "PART SET GROUP 1" could be allocated wards A and C, whereas "PART SET GROUP 2"... -
Page 19: Setting With Circuits Omitted
Setting with Circuits Omitted Operation If you have configured the alarm system to omit one or more circuits, you may set your wards with those circuits omitted. For details on selecting the circuits to be omitted, see "Omitting Circuit" on page 29. -
Page 20: Viewing Error Circuits
Viewing Error Circuits Operation If during the setting procedure one or more circuits remain active, the alarm system will fail to set. The internal sounder will sound and the external strobe will flash. Before the alarm system can be successfully set you must ensure that the circuits that caused the "SET FAIL"... -
Page 21: Unsetting After An Alarm
Unsetting after an Alarm Operation If an alarm has occurred whilst the system was set, the display will indicate the cause of the alarm when you unset the system. Once the cause of the alarm has been established the system must be reset, see "Resetting after an Alarm"... -
Page 22: Resetting After An Alarm
Resetting after an Alarm Operation Each ward can be configured to be reset by one of the following methods: Full alarms generated in a ward that is User Reset configured as user reset can be reset by any user that has access for that ward. From step 5 of "Unsetting after an Alarm": 1. - Page 23 Resetting after an Alarm Operation Full alarms generated in a ward that is Remote Reset configured as remote reset can be reset by the engineer or the user via the exchange of unique passcodes. From step 5 of "Unsetting after an Alarm". 1.
-
Page 24: User Menu 1
Introduction User Menu 1 User menu 1 is accessed by entering your passcode followed by [ There are 9 menu options and access to these options will depend on your access level. Each option has a "hotkey" and can be selected by pressing the relevant number, e.g. -
Page 25: Testing Bells & Sounders
Testing Bells & Sounders User Menu 1 This option allows you to periodically test the external sounders (bell and strobe) and internal sounders. 1. At the remote keypad enter your passcode followed by [. 2. Press 1 followed by [ to select the bell test option. -
Page 26: Walk Testing Circuits
Walk Testing Circuits User Menu 1 This option allows you to periodically test the operation of detection circuits. You can only select or deselect the wards that you have access to. 1. At the remote keypad enter your passcode followed by [. 2. -
Page 27: Use Remote Reset
Use Remote Reset User Menu 1 The remote reset option allows you to reset your alarm via the exchange of unique passcodes. The remote reset procedure is fully covered on page 17. If you select this option when the system does not require resetting the display will show "Remote reset is not required". -
Page 28: Changing Your Passcode
Changing Your Passcode User Menu 1 This option allows you to change your own passcode. 1. At the remote keypad enter your passcode followed by [. 2. Press 4 followed by [ to select the change passcode option. 3. Enter your new passcode followed by 4. -
Page 29: Selecting Chime
Selecting Chime User Menu 1 This option allows you to enable or disable the chime feature for your wards. If a ward has the chime feature enabled, detection circuits that have been programmed as "Chime" will generate a chime tone when activated. 1. -
Page 30: Omitting A 24Hr Group
Omitting a 24hr Group User Menu 1 This option allows you to omit a group of 24hr detection circuits. The group is pre- defined by the master user or alarm company. 1. At the remote keypad enter your passcode followed by [. 2. -
Page 31: Omitting Circuits
Omitting Circuits User Menu 1 Occasionally it may be necessary to omit detection circuits when setting your ward, e.g. to leave door open that would normally be protected. This option allows you to select which circuits are to be omitted. Once selected you can then choose to set your ward(s) with or without the selected circuits omitted, see "Setting... -
Page 32: Silent Set Wards
Silent Set Wards User Menu 1 This option allows you to configure which wards will set silently, i.e. no exit tone when setting the selected ward. The wards that you select will remain configured as "silent set" until you deselect them using this menu option. 1. -
Page 33: Set/Unset Menu
Set/Unset Menu User Menu 1 Normally the set/unset menu is displayed whenever you enter your passcode. This option allows you to access the menu whilst user menu 1 is selected. The set/unset menu has several options, however, only options that are relevant will be displayed, e.g. -
Page 34: Selecting User Menu 2
Selecting User Menu 2 User Menu 1 User menu 2 is accessed by pressing [ whilst "User menu 1 Select option :-" is displayed. To leave user menu 2 and return to user menu 1 simply press the ] key. This manual does not cover the procedures available in user menu 2. -
Page 35: Fault Finding
Display Messages Fault Finding These messages can occur when your ward is Unset alarms & Faults unset, if accompanied with an internal alarm they can be silenced by entering your passcode. Your alarm system is fitted with a remote signalling device which is reporting a telephone line fault. -
Page 36: Display Messages
One or more wards have been isolated so that 24hr protection with those wards can be accessed. Press [ to display which wards are currently isolated. The TS2500 has an auto-set feature which will automatically set and unset specified wards at pre-programmed times,... - Page 37 Another user is accessing the alarm system. You cannot use your keypad until this message has cleared. The TS2500 has an high security feature which can be applied to any ward. When the ward is unset the remote keypads display "HI SECURE UNSET"...
- Page 38 Cannot set due to the expiry of the payment timer. Contact your alarm company for further advice. The TS2500 has a code lock feature which can be applied to selected users. When the code lock is in operation the selected users cannot use their passcode to set or unset their wards.
-
Page 39: Records
System Details Records Wards Setting Entry Time Exit Time Setting Mode Bell Delay Bell Time User Reset Eng. Reset Rem. Reset Wards Setting Entry Time Exit Time Setting Mode Bell Delay Bell Time User Reset Eng. Reset Rem. Reset Set with Line Fault Set with Mains Off 4 or 6 digit passcode Automatic Omitting... -
Page 40: User Details
User Details Records No. Name Type Wards Auto-set Auto-Unset Engineer A - P Master... - Page 41 User Details Records No. Name Type Wards Auto-set Auto-Unset...
-
Page 42: Circuit Details
Circuit Details Records Location Omit Chime Wards... - Page 43 Circuit Details Records Location Omit Chime Wards...
- Page 44 Circuit Details Records Location Omit Chime Wards...
- Page 45 Circuit Details Records Location Omit Chime Wards...
-
Page 46: Service Record
Service Record Records Date Engineer Action... -
Page 47: Installer Information
Installer Information Records Installation Engineer: Installation Company: Address: Telephone No: Reset Message: Alarm Receiving Centre: Telephone No: Rem. Reset Message:... - Page 48 Part No. 496496 Issue 2...
Need help?
Do you have a question about the TS2500 and is the answer not in the manual?
Questions and answers