Table of Contents
Advertisement
PREFACE
Thank you for your purchase of the HYT TC-780 professional portable radio. This
easy-to-use radio will deliver you secure, instant and reliable communications at peak
efficiency. Please read this manual carefully before use. The information presented herein
will help you to derive maximum performance from your radio.
MODELS COVERED IN THIS MANUAL
TC-780 VHF Two-way Radio
TC-780 UHF Two-way Radio
Advertisement
Table of Contents

Related Manuals for HYT TC-780


Summary of Contents for HYT TC-780
- Page 1 PREFACE Thank you for your purchase of the HYT TC-780 professional portable radio. This easy-to-use radio will deliver you secure, instant and reliable communications at peak efficiency. Please read this manual carefully before use. The information presented herein will help you to derive maximum performance from your radio.
-
Page 2: Table Of Contents
Contents Safety and General Information ................... 3 Product Inspection ....................... 4 Radio Overview ........................6 Battery Information ....................... 8 Antenna Information ......................11 Assembly and Disassembly ....................12 Attaching the Battery ....................12 Removing the Battery ....................12 Attaching the Antenna ....................13 Removing the Antenna .................... - Page 3 Voice Encryption ......................24 GPS Report......................... 25 Home Channel ......................25 Keypad Lock ....................... 25 Lone Worker ....................... 25 Man Down ........................25 Short Message ......................25 Monitor ........................25 Monitor Momentary ..................... 25 Nuisance Channel Temporary Delete ................. 26 Radio Call ........................
-
Page 4: Safety And General Information
◇ This equipment should be serviced by qualified technicians only. ◇ Do not modify the radio for any reason. ◇ Use only HYT original batteries and chargers. ◇ Do not use any portable radio that has a damaged antenna. If a damaged antenna comes into contact with your skin, a minor burn can result. -
Page 5: Product Inspection
Product Inspection Please unpack the package box carefully and check that all items shipped were received; report any missing or damaged items to your dealer. Accessories Item Qty. (PCS) Antenna Belt Clip Leather Strap Li-Ion Battery MCU Rapid-rate Charger Switching Power Owner’s Manual Antenna Li-Ion... - Page 6 Note: Frequency band is marked on the label of antenna, if not, identify the frequency band according to the color circle. Please refer to the label on the radio unit for detailed frequency band information.
-
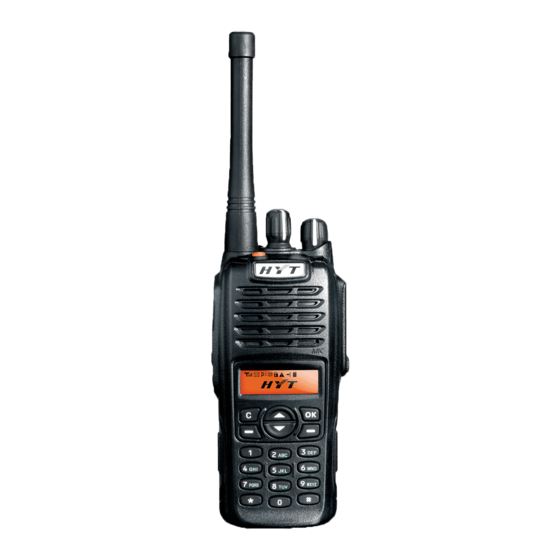
Page 7: Radio Overview
Radio Overview ○ ○ ○ ○ 1 PTT (Push-to-Talk) Key 2 SK1 (Side Key 1) 3 SK2 (Side Key 2) 4 Antenna ○ ○ ○ ○ 5 Microphone 6 Speaker 7 LCD Display 8 Function Keypad ○ ○ ○ ○ 9 Numeric Keypad 10 TK (Top Key) 11 Channel Selector... - Page 8 Programmable function key. ﹡ ﹡ ﹡ ﹡ SK2 (Side Key 2) Programmable function key. ﹡ ﹡ ﹡ ﹡ LCD Display Used to display radio status information. ﹡ ﹡ ﹡ ﹡ Function Keypad Exit key Use the Exit key to return to the previous menu. Up key Down key Menu/Select key...
-
Page 9: Battery Information
﹡ ﹡ ﹡ ﹡ TK (Top Key) Programmable function key. ﹡ ﹡ ﹡ ﹡ Channel Selector Knob Rotate the knob to select a desired channel. ﹡ ﹡ ﹡ ﹡ Radio On-Off/Volume Control Knob Rotate the knob clockwise to turn the radio on, and rotate the knob fully counter-clockwise until a click is heard to turn the radio off. - Page 10 battery. Applicable Battery Packs To reduce the risk of injury, charge only the battery specified by the manufacturer. Other batteries may burst, causing bodily injury and damage. Caution: To avoid risk of personal injury, do not dispose of batteries in a fire! Dispose of batteries according to local regulations (e.g.
- Page 11 over-discharge. When storing your battery, keep it in a cool, dry place under room temperature. Charging the Battery Use only the charger specified by the manufacturer. The charger’s LED indicates the charging progress. Status Charger LED Standby (no-load) Red LED flashes slowly (0.2s on/3s off ) Battery is charging Red LED solidly glows...
-
Page 12: Antenna Information
Red LED flashes rapidly (0.2s on/0.2s off)? Remove the battery from the charger, and: Make sure that it is a HYT authorized battery. Other batteries may not charge. Remove power from the battery charger, and clean the gold metal, charging contacts of the battery and charger, using a clean dry cloth. -
Page 13: Assembly And Disassembly
preparation in advance to avoid potential inconvenience. Assembly and Disassembly Attaching the Battery 1. When attaching the battery, make sure the battery is in parallel and good contact with the aluminum chassis. The battery bottom is about 1 to 2 centimeters below the bottom of the radio’s body. -
Page 14: Attaching The Antenna
Figure 2 Attaching the Antenna 1. Align the threaded end of the antenna with the radio’s antenna connector. 2. Turn the antenna clockwise to fasten it. See figure 3 Removing the Antenna Turn the antenna counter-clockwise until you can remove it. See figure 3 Figure 3 Attaching the Belt Clip 1. -
Page 15: Removing The Belt Clip
Figure 4 Removing the Belt Clip 1. Remove the screws (belt clip). 2. Remove the belt clip. See figure 5. Figure 5 Removing the Accessory Cover Unscrew the screw on the accessory cover counter-clockwise with a flat head screwdriver. Remove the accessory cover. See figure 6. Figure 6... -
Page 16: Attaching The Earpiece/Microphone
Attaching the Earpiece/Microphone 1. Insert the tab at the bottom of the earphone/microphone into the slot on the radio. 2. Align the screw at the top of the earphone/microphone with the threaded hole on the radio. 3. Rotate the screw clockwise to fasten. See Figure 7. Figure 7 Note: The figures above are only for references. -
Page 17: Lcd Icons
LCD Icons The LCD displays 17 status icons in all and 8 characters at most simultaneously, each with fixed display position. The display priority is from high to low, as from the top row to the bottom row in the table. When a high priority status appears, the icon for the low priority status will not be displayed until the high priority status disappears. -
Page 18: Menu
Home Channel Indicator Transmit Inhibit Indicator Battery Strength Indicator Menu Menu Navigation Chart: Function Select Exit Used to switch among function options. - Page 19 Keypad Keys Function Menu/Select key. Press the Menu/Select key to go to the next menu, or make selections. Exit key. Use the Exit key to cancel or return to the previous menu. Left key. Press the Left key under an input interface to delete an entry. This key can also be programmed as a programmable function key.
- Page 20 System Scan System Scan Enable Select whether to enable the Scan feature. Button Beep (On/Off) On/Off Voice Compandor (On/Off) On/Off Audio/Tone Alert (On/Off) On/Off Enable the Talk Around feature. Talk Around Disable the Talk Around feature. Squelch Level Available options are: Off/Loose/Tight Radio Lock Enable/disable password protection.
-
Page 21: General Radio Operations
General Radio Operations Selecting a Channel Your radio offers up to 256 channels. Turn the Channel Selector knob clockwise or counterclockwise to select a desired channel. Transmitting a Call To transmit, press and hold down the PTT key, and speak into the microphone at your normal voice level. -
Page 22: Backlight
Backlight Call 1 Call 2 Call 3 Call 4 Call 5 Channel Menu Shortcut Voice Compandor Scan Add/Delete Channel Down Channel Up Display Channel Alias Display Channel Frequency Switch Display DTMF Keypad Exit Emergency Enable Emergency Disable Emergency Alarm Enable Emergency Alarm Voice Encryption GPS Report Home Channel... -
Page 23: Scan
Scan Scrambler Squelch Off Squelch Off Momentary Carrier Squelch Level Status List Talk Around Vibrate Volume Down Volume Up Whisper Zone Down Zone Up Inverted Display Advanced Operations The following functions are programmable by your dealer. Power Adjust A press of the programmed Power Adjust key switches the transmit power level among high, medium and low. - Page 24 Call 1- Call 5 Press the programmed Call 1-Call 5 key to transmit the assigned call. Channel Menu Shortcut Press the Channel Menu Shortcut key to go to the Channel menu. Input a channel number under the Channel menu, and then a press of shall cause the radio to go to the channel.
- Page 25 Display Channel Frequency Press the Display Channel Frequency key to display the transmit or receive frequency of the current channel. Switch Display Press the Switch Display key to switch the display among Channel Number, Channel Alias, Zone Number, Zone Alias, and Channel Frequency. DTMF Keypad Press the DTMF Keypad key to switch the keypad to DTMF keypad.
- Page 26 GPS Report Press the GPS Report key to send GPS data, which is displayed on the LCD while transmitting. Note: Only for radios with GPS remote speaker microphone. Home Channel Press the Home Channel key to switch between the currently selected channel and the defined Home Channel.
- Page 27 Hold down the Monitor Momentary key while in non-auto reset mode to enter Monitor Mode, and release it to exit Monitor Mode. Press the Monitor Momentary key while in auto reset mode to cancel a call. Nuisance Channel Temporary Delete While the radio waits on a scanned channel, press the Nuisance Channel Temporary Delete key to temporarily delete the channel from the Scan List.
- Page 28 Squelch Off Press the Squelch Off key to toggle the Squelch on or off. Press this key while in auto reset mode to cancel a call. Squelch Off Momentary Hold down the Squelch Off Momentary key to turn the Squelch off, and release it to exit Squelch Off status.
-
Page 29: Volume Up
Volume Up Press the Volume Up key to increase the volume. VOX (Voice-Operated Transmit) Press the VOX key to toggle the VOX feature on or off. Whisper Press the Whisper key to toggle the Whisper feature on or off. Zone Down Press the Zone Down key to select a lower numbered zone. -
Page 30: Sending A Voice Call
Sending a Voice Call Select a channel used for transmitting a call. Press and hold down the PTT, and then speak into the microphone. LED glows red when transmitting. Release the PTT to receive. If auto reset mode is enabled for the current channel, the auto reset timer shall be activated. - Page 31 Key press When radio standby, press the Scan key on a channel assigned with a Scan List, to start scan. Auto If Auto Scan is enabled for a channel assigned with a Scan List, the radio shall automatically initiate scanning when it switches to the channel. Menu selection Scan Exit The radio emits a programmable alert when it exits scanning, with the...
-
Page 32: Emergency
Note: To assure scan speed, adjacent channel frequency should not be above 30MHz. Emergency Activate Emergency The Emergency key can be programmed by your dealer. You may activate Emergency by the following methods: Press the Emergency key (long or short) to activate the Emergency Mode. Activate Emergency while in Lone worker mode. -
Page 33: Time-Out Timer (Tot)
mode. Time-out Timer (TOT) Limits the amount of time the radio user can continuously transmit on a channel. If the user holds down the PTT longer than the preprogrammed limit, the radio automatically stops transmitting. The TOT feature is null while in Emergency Mode. Time-out Timer If the user holds down the PTT longer than the preprogrammed limit, the radio automatically stops transmitting, and generates a warning tone until the PTT is released. -
Page 34: Troubleshooting
Troubleshooting Symptom Solution The battery runs out. Please recharge the battery or replace it with a new one. Cannot power on the radio. The battery is not properly installed. Please remove the battery and attach it again. The operating time is noticeably The battery has worn out. -
Page 35: Optional Accessories
Optional Accessories Belt clip Antenna Ni-MH Battery (1800mAh) Li-Ion Battery (2100mAh) BC09 BH1801 BL2102 MCU Multi-unit Charger (for Switching Power PS7501 Vehicle Adapter CHV09 Earbud with in-Line Li-Ion/Ni-MH batteries) MCA03 (for use with different power ESN05 cords for different countries and areas) Earbud with... - Page 36 LCBY22 microphone) ESS08 HYT endeavors to achieve the accuracy and completeness of this manual, but no warranty of accuracy or reliability is given. All the above specifications and design are subject to change without notice due to continuous development.
- Page 37 No part of this manual may be copied, reproduced, translated, stored in a retrieval system, distributed, or transmitted in any form or by any means, electronic or mechanical, for any purpose without the express written permission of HYT.
Need help?
Do you have a question about the TC-780 and is the answer not in the manual?
Questions and answers