Table of Contents
Advertisement
Advertisement
Table of Contents

Related Manuals for HYT TC-518 OBR


Summary of Contents for HYT TC-518 OBR
- Page 1 TC-518 OBR www.hytera.us...
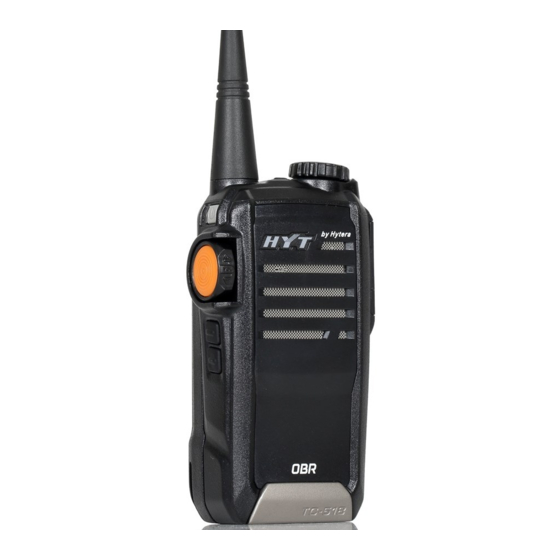
- Page 2 Thank you for purchasing Hytera’s HYT TC-518 On-Site Business Radio. With its stable output power, clear audio quality and its unique form, the TC-518 OBR was designed with reliability and productivity in mind. Hytera’s engineers have cleverly combined the PTT button and volume knob, allowing retail employees,...
-
Page 3: Copyright Information
Note: indicates important information which helps you make better use of your radio. Copyright Information HYT is registered trademarks of Hytera Communications Corporation Limited (the Company) in P.R.C and other countries and/or areas. Hytera retains the ownership of its trademarks and product names. All other company and/ or product names used in this manual are trademarks and/or registered trademarks of their respective owners. - Page 4 FCC License Information This device complies with Part 15 of the FCC Rules. Operation is subject to the condition that this device does not cause harmful interference. On-Site business two-way radios operate on radio frequencies that are regulated by the FCC. To transmit on these frequencies, you are required to have a license issued by the FCC.
-
Page 5: Table Of Contents
Contents Safety Information --------------------------------------------------------------------------------- 2 Product Inspection -------------------------------------------------------------------------------- 3 Radio Overview ------------------------------------------------------------------------------------- 4 Battery Information -------------------------------------------------------------------------------- 6 Antenna Information ------------------------------------------------------------------------------ 9 Assembly and Disassembly ------------------------------------------------------------------- 10 Attaching/Removing the Battery ---------------------------------------------------------- 10 Attaching/Removing the Antenna --------------------------------------------------------- 11 Attaching/Removing the Belt Clip --------------------------------------------------------- 11 Attaching/Removing the Earpiece or Microphone ------------------------------------ 11 Basic Operations ----------------------------------------------------------------------------------- 12 Turning the Radio On/Off ------------------------------------------------------------------- 12... -
Page 6: Safety Information
Safety Information The following safety precautions shall always be observed during operation, service and repair of this equipment. ● This equipment shall be serviced by qualified technicians only. ● Do not modify the radio for any reason. ● Use only Hytera supplied or approved batteries and chargers. ●... -
Page 7: Product Inspection
Product Inspection Please unpack the package box carefully and check that all shipped items are received; report any missing or damaged items to your reseller. Accessories Supplied with the Radio Item Qty. (PCS) Antenna Belt Clip Strap Battery Rapid-Rate Charger Switching Power Owner’s Manual Li-Ion Battery... -
Page 8: Radio Overview
Radio Overview (1) Power On/Off Key (10) Microphone (2) PTT (Push-to-Talk) Key (11) Speaker (3) SK1 (Side Key 1) (12) Battery Latch (4) SK2 (Side Key 2) (13) Accessory Jack (5) Antenna (14) Accessory Jack Cover (6) LED Indicator (15) Belt Clip (7) Channel Selector Knob (16) Battery (8) Channel Indicator... -
Page 9: Led Indicator
Radio Overview Note: Short Press Key press no longer than 1 second. Long Press Key press longer than 1 second. ﹡LED Indicator LED indications and alert tones are shown in the table below (see Advanced Operations for details): Status LED Indication and Alert Tone 1. -
Page 10: Battery Information
Radio Overview VOX/Compandor/ Enable functions: one beep is heard. Scrambler/Channel Disable functions: two continuous beeps are heard. Lock ﹡Channel Indicator Used to indicate the currently selected channel. ﹡Battery Latch Used to secure or remove the battery. ﹡Earpiece Jack & Programming Port Used to connect accessories such as speaker/microphone, earpiece, programming cable and cloning cable. -
Page 11: Charging The Battery
Battery Information 4. The battery will eventually wear out. When the operating time of a fully charged battery is noticeably shorter than its normal performance, you need to buy a new one. Please replace it ASAP. 5. If the product shuts off automatically due to low battery, please charge the battery soon, or the battery could suffer damage. - Page 12 Battery Information Status Charge Indicator of the Radio Charging Solidly glows red Fully charged Or Ready to charge Solidly glows green Charging Method 1 Please follow the steps below: 1. Plug the AC connector of the adapter into the AC outlet socket. 2.
-
Page 13: Antenna Information
Figure 1 Assembly Diagram of Multi-unit Charger The assembled multi-unit charger can work with HYT Six-Unit Switching Power, to charge up to six batteries simultaneously, as shown in figure 2. Please refer to Owner’s Manual for Six-Unit Switching Power for detailed operation procedures. -
Page 14: Assembly And Disassembly
Assembly and Disassembly Attaching/Removing the Battery Attaching the Battery 1. Slightly press the belt clip, and insert the tab at the top of the battery into the slots at the top of the radio’s body, as shown in figure 1. Note: Make sure the battery tab is fully inserted into the radio's slot. -
Page 15: Attaching/Removing The Antenna
Assembly and Disassembly Attaching/Removing the Antenna Attaching the Antenna 1. Align the threaded end of the antenna with the radio’s antenna connector. 2. Turn the antenna clockwise until it is screwed down, shown as figure 5. Removing the Antenna Turn the antenna counter-clockwise until it is loosened and screwed out. Figure 5 Figure 6 Attaching/Removing the Belt Clip... -
Page 16: Basic Operations
Assembly and Disassembly Figure 7 Removing the External Earpiece Loosen the screw and then remove the audio accessories. N o te : U s e of a u d i o a c c e s s o r y m a y a f f e c t t h e w a te r p ro of performance of the radio. -
Page 17: Selecting A Channel
To transmit, press and hold down the PTT, speak into the microphone. Ensure the radio is 2.5 to 5 centimeters away from your lips. Receiving To receive signal, release the PTT. Typical Coverage Area TC-518 OBR 2W Low Power UHF Office Space Multi-Level Inside steel/concrete office space buildings Inside multi-level buildings... -
Page 18: Programmable Auxiliary Functions
Programmable Auxiliary Functions Auxiliary functions to the programmable key (with long/short press) can be programmed via programming cable and CPS software. ● None ● Compandor ● Monitor ● Monitor Momentary ● Scan ● Scrambler ● Squelch Off ● Squelch Off Momentary ●... -
Page 19: Time-Out Timer (Tot)
Advanced Operations Pressing any key or receiving a signal will cause the radio to exit from Battery Save and restore it to normal operation. Time-out Timer (TOT) Limits the amount of time the radio user can continuously transmit on a channel. -
Page 20: Scan
Advanced Operations Press the function key to enter the Squelch Off mode, and press it again to exit. ● Squelch Off Momentary Causes the radio to forcibly unmute speaker to hear activities on the current channel, whatever the receive condition is. The radio speaker outputs audio when audio signal is present, or background noise will be heard if no audio signal is detected. - Page 21 Advanced Operations Priority Channel Scan If you prioritize Channel 2 as Priority 1, the scan operation would proceed in the following sequence, as shown in figure 2. Figure 1 Figure 2 ● Scan On/Off You can enter scan mode through the following two methods: a.
-
Page 22: Busy Channel Lockout (Bcl)
Advanced Operations When unchecked, the radio shall always use the predefined channel to transmit. ● Priority Channel Scan Enable you to constantly monitor & keep an update on the activities on the most commonly used channel so that messages will not be missed. Check with your retailer for details. - Page 23 Advanced Operations 1. Select the PTT/VOX switch on the earpiece to VOX. 2. Plug the earpiece into the accessory jack on your radio. 3. Press the programmed VOX key to activate the VOX feature. 4. Speaker into the earpiece microphone and your voice will be transmitted. Function Description: 1.
-
Page 24: Compandor
Advanced Operations Note: To order accessories, please contact your reseller. Compandor This feature secures high quality communication even in high noise environment. It can be enabled/disabled through the programmed key, or set on a definite channel via programming cable and CPS software The radio sounds one beep when the feature is enabled, and two continuous beeps when the feature is disabled. -
Page 25: Troubleshooting
Troubleshooting Symptom Solution ● The battery has run out. Please recharge the battery or replace it with a new one. Cannot power on the radio. ● The battery is not properly installed. Please remove the battery and attach it again. ●... -
Page 26: Care And Cleaning
Care and Cleaning ● Do not hold the radio by its antenna or external earpiece directly. ● Do not place the radio in a dusty or dirty environment. ● Clean the radio with a lint-free cloth to remove dirt or grease, to avoid poor contact due to excessive dust. - Page 27 Optional Accessories Nylon Carrying Case Multi-unit Rapid-rate Li-ion Battery Leather Carrying Case Charger (for Li-ion Adapter POA51 (non-swivel) NCN001 (Non-Swivel) Belt Clip Battery) MCL15 Black HY1015-30C KIT Programming Cable Nylon Hand Strap Six-unit Switching Universal Nylon Chest PL2303 USB PC26 RO03 Power PS7002 Pack for Portable-...
-
Page 28: Default Frequency List
Default Frequency List TC-518V OBR Frequency Frequency (MHz) Code (Hz) Radio Channel Number 154.4900 67.0 154.5150 67.0 151.6250 67.0 151.9550 67.0 151.5125 67.0 151.6850 67.0 151.7750 67.0 158.4000 67.0 151.6250 77.0 151.6250 88.5 151.6250 179.9 151.9550 82.5 151.9550 94.8 151.9550 179.9 151.7000 67.0... -
Page 29: Frequency And Codes Chart
Frequency and Codes Chart If the default frequencies are not adequate for communication needs, you can re-program your device using the following optional business frequencies via a Customer Programming Cable and Software. Contact your point of purchase for additional re-programming information. VHF Frequency Chart Frequency # Frequency (MHz) -
Page 30: Ctcss And Cdcss Codes
Frequency and Codes Chart Table No. Frequency (MHz) Table No. Frequency (MHz) 461.1375 462.4625 461.1625 462.4875 461.1875 462.5125 461.2125 467.1875 461.2375 467.4625 461.2625 467.4875 461.2875 467.5125 461.3125 451.1875 461.3375 451.2375 461.3625 451.2875 462.7625 451.3375 462.7875 451.4375 462.8125 451.5375 462.8375 451.6375 462.8625 452.3125 462.8875... - Page 31 CTCSS and CDCSS Codes CTCSS CTCSS 85.4 167.9 88.5 173.8 91.5 179.9 94.8 186.2 97.4 192.8 100.0 203.5 103.5 210.7 107.2 218.1 110.9 225.7 114.8 233.6 118.8 241.8 123.0 250.3 127.3 CDCSS Codes CDCSS CDCSS...
-
Page 32: Default Factory Feature List
CTCSS and CDCSS Codes CDCSS CDCSS Hytera offers free download CPS software to modify/configure OBR radios per user specific requirements. The software is available on www.hytera.us. Default Factory Feature List Default Feature Note Please refer to Monitor Momentary SK1 (Long Press) Monitor Momentary for detailed feature description. -
Page 33: Hytera's Limited Warranty For The United States And Canada
HYTERA AMERICA, INC. warrants its manufactured Communication Products against defects in material and workman-ship under normal use and service for a period of time from the date of purchase by end-user as scheduled below: HYT Brand: TC-518 - OBR One (1) year Warranty Exclusions: Defects or damage resulting from use of the Product other than its normal and customary manner. - Page 34 Hytera Communications Corporation Limited. 2015 Hytera Communications Corporation Limited. C10524 L06774 8110051801100...
Need help?
Do you have a question about the TC-518 OBR and is the answer not in the manual?
Questions and answers