Table of Contents
Advertisement
Quick Links
THANK YOU!
We are grateful for your purchase of HYT product. We believe this easy–to-use
radio will provide you with dependable and reliable communications. This HYT
portable two-way radio is a precision device. Treat it with care, and you will enjoy
years of reliable operation.
MODELS COVERED IN THIS MANUAL
TC-1600 UHF Two-way Radio
Advertisement
Table of Contents

Related Manuals for HYT TC-1600


Summary of Contents for HYT TC-1600
- Page 1 THANK YOU! We are grateful for your purchase of HYT product. We believe this easy–to-use radio will provide you with dependable and reliable communications. This HYT portable two-way radio is a precision device. Treat it with care, and you will enjoy years of reliable operation.
-
Page 2: Table Of Contents
TC-1600 Owner’s Manual CONTENTS User Safety, Training, and General Information Compliance with RF Energy Exposure Standards FCC Compliance Precautions Product Inspection Battery Information Accessory Installation Getting Started LCD Display Features and Operations Basic Operation Turning On/Off the Radio Operations under Radio Modes Conventional Mode Clock and Alarm Clock Setting Mode Channel Setting Mode... -
Page 3: User Safety, Training, And General Information
BEFORE USING YOUR HYT PORTABLE TWO-WAY RADIO. Compliance with RF Energy Exposure Standards Your HYT two-way radio is designed and tested to comply with a number of national and international standards and guidelines (listed below) regarding human exposure to radio frequency electromagnetic energy. - Page 4 Use of non- HYT -approved batteries may exceed FCC RF exposure guidelines. Approved Accessories For a list of HYT approved accessories, see the accessories page of this user manual or visit the following website which lists approved accessories: http://www.HYT.com.cn FCC Information...
- Page 5 User Safety Information READ THIS IMPORTANT INFORMATION ON SAFE AND EFFICIENT OPERATION BEFORE USING YOUR HYT PORTABLE TWO-WAY RADIO. ◇ Only qualified technicians are allowed to maintain this product. ◇ To avoid electromagnetic interference and/or compatibility conflicts, turn off your radio in any place where posted notices instruct you to do so.
-
Page 6: Product Inspection
TC-1600 Owner’s Manual Product Inspection Thank you for your use of HYT portable two-way radio TC-1600. Before use, you are recommended to inspect the product as follows. First check the shipping carton for any signs of damage. If any damage has occurred, please contact your dealer immediately. -
Page 7: Battery Information
When the battery power is low, it needs to be charged. Applicable Battery Packs Charge only the HYT approved battery packs. Other batteries may burst and cause personal injury. Safety attention 1. - Page 8 3. Notice the ambient humidity and temperature for the battery storage. Please store it in cool dry area with room temperature, to decrease self-discharge. Battery charging You are recommended to use HYT-approved, supplied charger; Charger LED will indicate the charging status. Indication...
-
Page 9: Accessory Installation
TC-1600 Owner’s Manual Accessory Installation Battery Attaching the battery: Insert the two tabs on bottom of the battery into the slots at the bottom of the radio. Push the top of the battery towards the radio until a click is heard. (See figure 1) 卡... - Page 10 TC-1600 Owner’s Manual (Fig 3) Press the tab between the battery cover and the belt clip along the indicated direction. Slide the belt clip upwards along the radio chassis to detach the clip from the radio. (See fig.4) Metal holder of belt clip (Fig4)...
-
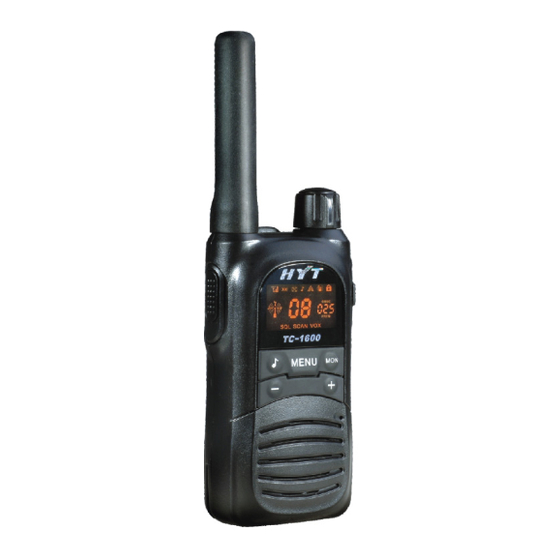
Page 11: Getting Started
TC-1600 Owner’s Manual Getting Started Antenna PTT key In normal work mode, press the key to transmit (no button beep) either in standby or menu mode. When the key is pressed in menu mode, the channel information will be displayed on the screen at the same time. And the display returns to its original display when the PTT key is released. - Page 12 TC-1600 Owner’s Manual code (CTCSS or CDCSS) selector. Press the key in menu mode to go to your required setting item. When channel information is displayed on the screen in standby mode, press the key to go to next channel. Press and hold the key to scroll the channels at the speed of 250ms per channel.
-
Page 13: Lcd Display
TC-1600 Owner’s Manual LCD Display Battery Meter, used to indicate the battery power. Appears when keypad is lock. Appears when setting the call tone. Communication Range Alarm, flashes when your companion is out of range; appears when setting communication range alarm or communication range alarm is enable. Interference Delete Code Icon: CTCSS and CDCSS are called interference delete code. -
Page 14: Features And Operation
TC-1600 Owner’s Manual Features and Operation Basic Operation Turn On/Off the radio 1. Turn on the radio, the radio emits a power-on tone and LCD fully displays simultaneously. The radio is on about 2 seconds. Due to different key pressing, the radio enters different modes: A No key pressing and the radio enters conventional mode. - Page 15 TC-1600 Owner’s Manual Insert plug of earphone (with external PTT) into the accessory jack of the radio. Put on the earphone and press PTT. Speak into the microphone to talk. Fig 2 (a) Tx Interface Fig 2 (b) Rx Interface Call Tone The call tone feature is valid only when you have set a call tone in the menu mode.
- Page 16 TC-1600 Owner’s Manual is on, “ ” icon appears on the display and “+” / “-” and MON key are invalid. Holding down MENU key and briefly pressing “ ” key are both invalid. The user can transmit/receive through PTT key, briefly press MENU key to display channel information, or hold down “...
- Page 17 TC-1600 Owner’s Manual (Channel Number display) (Channel Number and non-stand Frequency Number display) (Channel Number and Interference Eliminator Code display) Fig 4 Channel Information Display Channel Scan Briefly press MON key in conventional mode to begin channel scanning. (See figure 5) LCD displays “SCAN”...
-
Page 18: Channel Setting Mode
TC-1600 Owner’s Manual Low Battery Detect and Battery Power Indication The radio detects battery voltage periodically and indicates the battery power. The battery power indicator “ ”on the top left corner of LCD will flash when the battery power is low. You should recharge the battery or replace it with a fresh one. - Page 19 TC-1600 Owner’s Manual frequency number flashes (See figure7). Press “+” / “-” key to select frequency number from 1 to 56. Press MENU key to confirm the setting and switch to the next setting. Press “ ” key to save the setting and return to the first setting or to exit channel setting mode. This feature can be enabled/disabled by the dealer.
-
Page 20: Menu Mode
TC-1600 Owner’s Manual In factory default setting, the number of available channels is 8 Blink Fig 9 Set the Number of Available Channels Set Channel Scan Add/Delete When setting channel scan add/delete, “SCAN” icon appears on the bottom of LCD and the character “y”... - Page 21 TC-1600 Owner’s Manual a. Select VOX Sensitivity Level b. Disable VOX Feature Fig 11 Set VOX Feature Select Power Level When setting high-low level, character “P” appears on the left of LCD and Character “L” or “H" blinks at the same time. “L” indicates low power while “H” indicates high power. Press “+”...
- Page 22 TC-1600 Owner’s Manual Set Button Beep When setting button beep, “bP” icon appears on LCD and the character “y” or “n” flashes (See figure20-1). “y” indicates enabling button beep and “n” indicates disabling. Press “+” / “-” key to select between “y” and “n”. Press MENU key to confirm the setting and switch to the next setting.
-
Page 23: Pc Programming Mode
TC-1600 Owner’s Manual In factory default setting, the communication range alarm is disabled. Blink Blink a. Enable Communication Range Alarm b. Disable Communication Range Alarm Figure16: Set Communication Range Alarm PC Programming Mode In standby mode, connect the radio and a PC with programming cable and then programme the radio through programming software, the radio enters PC programming mode. -
Page 24: Default Setting Mode
TC-1600 Owner’s Manual Flash Scroll a. Wired Clone Ready b. Cloning c. Clone Failure d. Clone Successfully Fig18 Wired Clone Default Setting Mode This feature is used to enter conventional mode and restore all the radio settings to factory default setting. This feature can be enabled/disabled by the dealer. - Page 25 TC-1600 Owner’s Manual Annex 1. Frequency Chart (460MHz—470MHz) Frequency No. Frequency (MHz) Frequency No. Frequency (MHz) 464.5000 462.9125 464.5500 464.4875 467.7625 464.5125 467.8125 464.5375 467.8500 464.5625 467.8750 466.0375 467.9000 466.0625 467.9250 466.0875 461.0375 466.1125 461.0625 466.1375 466.1625 461.0875 461.1125 466.1875 461.1375 466.2125 461.1625...
- Page 26 TC-1600 Owner’s Manual Annex 2 CTCSS Table (38) Frequency (Hz) Frequency (Hz) 67.0 131.8 71.9 136.5 74.4 141.3 77.0 146.2 79.7 151.4 82.5 156.7 85.4 162.2 88.5 167.9 91.5 173.8 94.8 179.9 97.4 186.2 100.0 192.8 103.5 203.5 107.2 210.7 110.9 218.1 114.8...
- Page 27 TC-1600 Owner’s Manual Annex 3 CDCSS Table (83) CDCSS CDCSS...
- Page 28 TC-1600 Owner’s Manual...
-
Page 29: Troubleshooting Guide
TC-1600 Owner’s Manual Troubleshooting Guide Trouble Solution Battery may be used up. Please replace or recharge the battery. No power Battery may not be attached properly. Remove the battery and attach again. Power doesn’t last long even if fully Battery life cycle is over. Please replace it with a charged. -
Page 30: Optional Accessories
TC-1600 Owner’s Manual Optional Accessories ESM05 Two-wire Earbud ECM02 Light Headset ESM02 Series earbud EHM03 Series earset with boom microphone EHM04 Series earset without boom microphone SM08M2 Speaker Microphone MCL09 TC1600 series rapid MUC (for Li-ion Battery) LCBN25 TC1600 Leather Carry Case (black) LCBN26 TC1600 Nylon Carry Case (black) -
Page 31: Frequency Chart
HYT endeavors to achieve the accuracy and completeness of this manual, but cannot guarantee its accuracy at all times. All the above specifications and design are subject to change by HYT without notice. All the reproduction and translation of this manual without authorization of HYT is not allowed. - Page 32 TC-1600 Owner’s Manual Revision History: 第一次: (蓝色) FCC 认证内容修改。修改前版本为 AWC 的 FCC 认证说明,改为 HYT。 电池充电步骤更改,且增加 NOTE 信道信息显示、时钟显示、VOX 设置三处,共四张图修改。 按键说明补充。 频率表删除 9-16,TC-1600 仅含 8 个信道。 第二次: (紫色)07.27 LCD 显示图改变,删除图中 5、6、7 三个图标,相应文字说明删除。 文中所有图替换。 增加 TOT 功能说明。 第三次: (紫红色, P6-7)08.01 充电操作更改 Precaution 中关于天线部分删除...
Need help?
Do you have a question about the TC-1600 and is the answer not in the manual?
Questions and answers