
Subscribe to Our Youtube Channel
Related Manuals for REMKO RKL 480 S-Line


Summary of Contents for REMKO RKL 480 S-Line
-
Page 1: Spare Parts
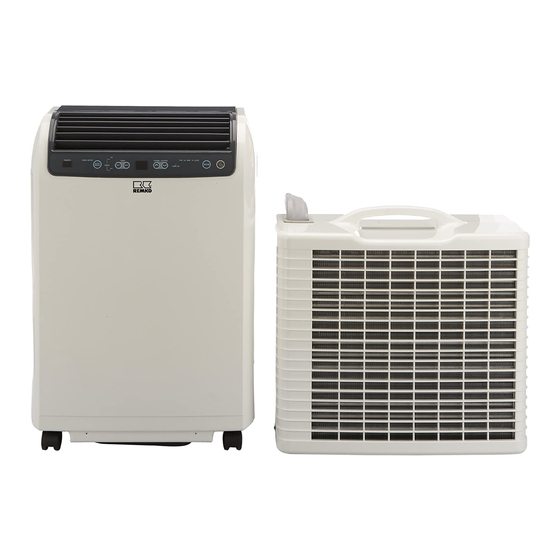
S-Line REMKO RKL 460/RKL 480/RKL 480 Portable Air Conditioner Operation Technology Spare Parts Edition GB – T01 REMKO - powerful like a bear. -
Page 3: Table Of Contents
Our guarantee will become void when the unit supplied by us is used and installed for inadequate purposes, or maintained incorrectly, etc., or if it is changed without our prior consent. Subject to alterations! Portable Air Conditioner REMKO RKL 460 S-Line) REMKO RKL 480 ( Contents Contents... -
Page 4: Safety Instructions
◊ Do not set up or operate the unit in rooms containing Extensive tests have been conducted on the material, functionality and quality of the REMKO portable air con- explosion hazards. ditioner to ensure that it is a high-performance unit with ◊... -
Page 5: Unit Description
Unit Description The portable air conditioners RKL 460 and RKL 480 consist of a portable indoor unit and a weather-resistant outdoor unit (Fig. 1). Suspension (outdoor unit) The indoor and outdoor unit are connected to one an- Connecting line Dust filter Handle other via a flexible connecting line. -
Page 6: Control Panel
AUTO remote control via the "REMOTE SENSOR". TIMING SWING RESET Special accessory for RKL 460. 9 "TIMING ON" display Fig. If this display is lit up, the unit will automatically be switched on after a preset amount of time. 5 " TIMER " button (timer clock) 9 "TIMING OFF"... -
Page 7: Infrared-Remote Control
10 Operating mode and fan setting display This display provides information about the operat- A description of the button functions (see picture below) ing mode and the fan setting which have been se- can be found in the “Control panel” section. The remote lected. -
Page 8: Installation Instructions
Installation Instructions The standard unit is equipped with a connecting line be- tween the indoor unit and the outdoor unit which makes it ready for operation. It comes with various accessories for assembling the out- 20 cm door unit. There are different ways to set up the indoor unit and outdoor unit which are described in the following sec- tion. -
Page 9: Unit Shut Down
Safety screw M4 20 cm Fig. 9 Mounting on an outside wall with straps Another way to attach the outdoor unit to a wall or to a Fig. 11 parapet in the outer area is to use straps. 1. Hook the wall holders onto the outdoor unit and se- cure them with the M4 safety screws. -
Page 10: Detaching The Connecting Line
8. Clean the dust filter and the plastic surfaces. Connecting line 9. Hang the outdoor unit onto the indoor unit. 10. Protect the unit from dust with a plastic tarp. Fastening clamp 11. Store the unit in a cool, dry place that is protected from sunlight. -
Page 11: Maintenance And Service
13. Screw the supplied protective caps onto the 4 cou- ◊ The unit may only be cleaned with a clean, soft and pling halves (Fig. 16). slightly damp cloth which is used to carefully wipe the dirt from the surface. ◊... -
Page 12: Troubleshooting
The unit is not standing upright. out of the unit. place. Sealing cap is not in place. Reseal the water drainage tube tightly. Technical Data Model RKL 460 RKL 480 RKL 480 S-Line 4,18 4,84 Nominal Cooling capacity Energy efficiency class... -
Page 13: Wiring Diagram
Wiring Diagram = yellow PCB1 = Control panel = white PCB2 = Control board = red = Swing motor = Fan motor (indoor unit) BU = blue = Fan motor (outdoor unit) BR = brown = Water pump BK = black = Compressor motor GR = grey OR = orange... -
Page 14: Exploded View
Exploded View Indoor unit Outdoor unit We reserve the right to make modifications in dimensions and construction in the interests of technical progress. -
Page 15: Spare Part List
“guarantee certificate” leased will not cause injury to the respiratory sys- enclosed with all units and send it back to REMKO tems of people and animals. Do not touch the liquid GmbH & Co. KG. - Page 16 REMKO GmbH & Co. KG Air-Conditioning and Heating Technology D-32791 Lage Im Seelenkamp 12 • D-32777 Lage P.O. Box 1827 • Phone: +49 52 32 606 - 0 Fax: +49 52 32 606- 260 E-mail: export@remko.de Internet: www.remko.de...
Need help?
Do you have a question about the RKL 480 S-Line and is the answer not in the manual?
Questions and answers