
Related Manuals for REMKO RKL DC Series


Summary of Contents for REMKO RKL DC Series
-
Page 1: Installation Instructions
Operating and installation instructions REMKO RKL DC series Local room air conditioner in split design RKL 495 DC 0240-2019-12 Edition 1, en_GB Read the instructions prior to performing any task! - Page 2 Read these operating instructions carefully before commis- sioning / using this device! These instructions are an integral part of the system and must always be kept near or on the device. Subject to modifications; No liability accepted for errors or mis- Refrigerant prints! Translation of the original...
-
Page 3: Table Of Contents
Table of contents Safety and usage instructions......................4 1.1 General safety notes........................4 1.2 Identification of notes........................4 1.3 Personnel qualifications........................4 1.4 Dangers of failure to observe the safety notes................5 1.5 Safety-conscious working....................... 5 1.6 Safety instructions for the operator....................5 1.7 Safety notes for installation, maintenance and inspection.............. -
Page 4: Safety And Usage Instructions
REMKO RKL DC series Safety and usage instructions DANGER! This combination of symbol and signal word 1.1 General safety notes warns of a situation in which there is immediate danger, which if not avoided may be fatal or Carefully read the operating manual before com- cause serious injury. -
Page 5: Dangers Of Failure To Observe The Safety Notes
1.4 Dangers of failure to observe The units must be inspected by a service tech- nician to ensure that they are safe to use and the safety notes fully functional at least once yearly. Visual Failure to observe the safety notes may pose a risk inspections and cleaning may be performed by to people, the environment and the units. -
Page 6: Unauthorised Modification And Changes
For warranty claims to be considered, it is essential that the ordering party or its representative com- plete and return the "certificate of warranty" to REMKO GmbH & Co. KG at the time when the units are purchased and commissioned. The warranty conditions are detailed in the "Gen- eral business and delivery conditions". -
Page 7: Technical Data
Technical data 2.1 Unit data Series RKL 495 DC RKL 495 DC Operating mode Local inverter room air conditioner in split design 4.30 Nominal cooling output Energy efficiency ratio 4.74 Energy efficiency ratio SEER Power consumption, annual, Q Application area (room volume), approx. Adjustment range indoor unit °C/%r.H. -
Page 8: Design And Function
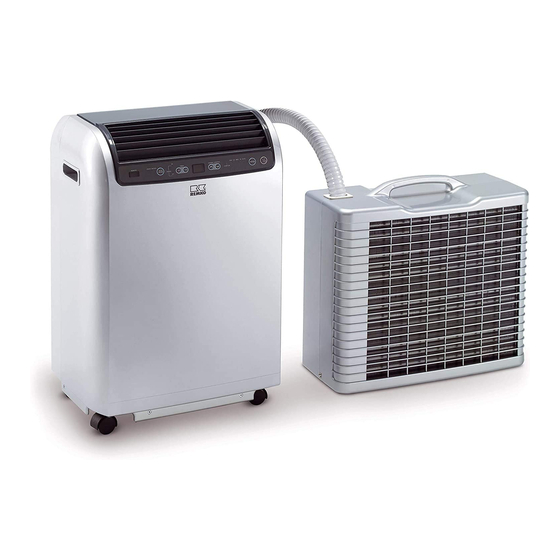
REMKO RKL DC series Design and function Unit description The unit is particularly suited for flexible operation, but can also be mounted in a stationary installa- tion. The local room air conditioner is equipped with an indoor unit for floor installation in an indoor area, and an outdoor unit for wall or ground instal- lation outdoors. -
Page 9: Operation
Operation The system can be operated by means of the control panel on the device or via the standard infrared remote control unit. The functional operation of the buttons among themselves is identical, however, the designation can vary. The batteries must be correctly inserted before the infrared remote control is used. REMOTE DRAIN WATER TIMER... - Page 10 REMKO RKL DC series Dehumidifying mode DE-HUM. ( ) Position the indoor unit and the outdoor unit in the room that is to be dehumidified. Ensure that the indoor unit cannot extract warm air from the outdoor unit. Do not hang the outdoor unit onto the indoor unit.
-
Page 11: Installation
Installation Installation on the ground Installation instructions The device is supplied in a fully operational condi- tion and is equipped as standard with a 3.0 m long connection pipe linking the indoor and outdoor devices, meaning that it is ready for use. The 20 cm scope of delivery includes various accessories for mounting the outdoor unit. - Page 12 REMKO RKL DC series Fig. 8: Required air circulation Fig. 7: Example assembly outdoor unit Mounting on an external wall with wall bracket Fasten to the wall using the supplied wall bracket. Hook the outdoor unit into the wall bracket and secure it with the supplied M4 bolts (Fig.
- Page 13 20 cm Fig. 10: Max. assembly height Fig. 11: Assembly with fastening straps Spring catch Fastening eyelet Safety bolt M4 External wall mounting with fastening straps Eyebolt Fastening straps are an additional option for mounting the outdoor unit to an external wall or parapet wall.
-
Page 14: Connecting Line
REMKO RKL DC series Connecting line In doing so, the following procedure must be adhered to: The connecting line is connected to the outdoor Switch the unit off. unit in the factory with quick-release couplings. This facilitates disconnection of the connecting line Pull the power plug out of the socket. - Page 15 Screw continuously until the connection is disconnected. NOTICE! Do not stop screwing in the event that refrigerant escapes and a slight hissing sound is heard. Screw the protective caps provided onto the 4 coupling halves (Fig. 16). Ensure that there is a wall opening available of Ø...
- Page 16 REMKO RKL DC series Fig. 15: Unscrew the right-hand union nut A: Hold to prevent turning B: Tighten C: Loosen Fig. 16: Screw on protective caps 1: Protective caps...
-
Page 17: Electrical Wiring
Electrical wiring Electrical wiring diagram Fig. 17: Electrical wiring diagram PCB1: Keypad board THCT: Compressor temperature probe PCB2: Control board THEP: Probe, evaporator PCB3: Motherboard THOP: Compressor end temperature probe PCB4: IPM protection board THRA: Room temperature probe PCB5: Capacitor board Condensate pump Compressor Colour coding:... -
Page 18: Troubleshooting
REMKO RKL DC series Troubleshooting The unit has been manufactured using state-of-the-art production methods and has been tested several times to ensure that it works properly. If malfunctions should occur, please check the unit as detailed in the list below. Please inform your dealer if the unit is still not working correctly after all the function checks have been performed. - Page 19 Error code Error description Possible cause/remedy Liquid line probe defective - If the error appears <1 minute after turning on the unit, the THOP probe (PCB 3) is Liquid line excessive temperature defective. Replace it. - If the error only appears after operating for some time, a lack of refrigerant can be the cause or the fan motor of the outdoor unit is not working properly.
-
Page 20: Care And Maintenance
REMKO RKL DC series Care and maintenance Clean the air filter on the indoor unit at regular intervals, and more frequently if necessary. Regular care and observation of some basic points It is recommended that you take out a mainte-... -
Page 21: Shutdown
The entire system should only be dismantled by a specialist firm familiar with all environmental NOTICE! aspects involved. REMKO GmbH & Co. KG or your contractual partner will be pleased to provide a list Never switch off the equipment by pulling out of refrigerant specialists in your area. -
Page 22: Exploded View And Spare Parts Lists
REMKO RKL DC series Exploded view and spare parts lists 11.1 Exploded view indoor unit Fig. 19: Exploded view indoor unit We reserve the right to modify the dimensions and design as part of the ongoing technical development process. -
Page 23: Spare Parts List - Indoor Unit
11.2 Spare parts list - Indoor unit Please contact REMKO GmbH & Co. KG directly to order spare parts. IMPORTANT! To ensure the correct delivery of spare parts, please always the device type with the corresponding serial number (see type plate) No. - Page 24 REMKO RKL DC series No. Designation RKL 495 DC RKL 495 DC IPM protection board Capacitor board Evaporator fan, complete Evaporator Fan motor, evaporator Overheating protection for compressor Compressor, cpl. Base plate, cpl. Capillary tube Seal fastening clip On request by providing the serial number...
-
Page 25: Exploded View - Outdoor Unit
11.3 Exploded view - Outdoor unit Fig. 20: Exploded view outdoor unit We reserve the right to modify the dimensions and design as part of the ongoing technical development process. -
Page 26: Spare Parts List - Outdoor Unit
REMKO RKL DC series 11.4 Spare parts list - Outdoor unit No. Designation RKL 495 DC RKL 495 DC Back wall Threaded fittings for cover Connecting line opening Unit base Fan motor, condenser Fan motor fastening Fan covering On request by providing the serial number... -
Page 27: Index
Index Outdoor unit ......11 Assembly Connecting line ..... . 14 Maintenance . - Page 28 REMKO QUALITY WITH SYSTEMS Air-Conditioning | Heating | New Energies Telephone +49 (0) 5232 606-0 REMKO GmbH & Co. KG Hotline within Germany +49 (0) 5232 606-0 Klima- und Wärmetechnik Telefax +49 (0) 5232 606-260 Im Seelenkamp 12 E-mail info@remko.de...
Need help?
Do you have a question about the RKL DC Series and is the answer not in the manual?
Questions and answers