PRESONUS StudioLive 16.4.2 Owner's Manual
Hide thumbs
Also See for StudioLive 16.4.2:
- User manual (125 pages) ,
- Owner's manual (74 pages) ,
- Brochure (5 pages)
Table of Contents
Advertisement
Quick Links
Advertisement
Table of Contents

Related Manuals for PRESONUS StudioLive 16.4.2


Summary of Contents for PRESONUS StudioLive 16.4.2
- Page 1 StudioLive 16.4.2 ™ Owner’s Manual ™ www.presonus.com...
- Page 2 All PreSonus products in REMOVE THE COVER. NO USER-SERVICEABLE PARTS INSIDE. REFER the USA should be serviced at the PreSonus factory in Baton Rouge, SERVICING TO QUALIFIED PERSONNEL. Louisiana. If your StudioLive requires a repair, contact techsupport@ CAUTION: To reduce the risk of electric shock, do not expose this presonus.com to arrange for a return-authorization number.
-
Page 3: Table Of Contents
Controls — 33 Introduction — 4 Input Channel Strip — 34 4.3.1 Input Channel Controls — 34 Summary of StudioLive 16.4.2 Hardware Features — 5 Aux and FX Buses — 36 Summary of Capture™ Software 4.4.1 Analog Aux Send Controls — 36 Features —... - Page 4 PreSonus StudioLive 16.4.2 ™ 6.0 Connecting to 7.3.1 Networking your iPad a Computer — 59 and Computer — 86 7.3.2 Connecting to Virtual StudioLive System Requirements — 59 and the StudioLive Mixer — 89 Installation for Windows — 60 7.3.2 SL Remote: Overview Page —...
- Page 5 Warranty — 182 Aux Bus Mixing — 160 8.5.1 Monitor Mixing — 160 10.1 Troubleshooting — 182 8.5.2 Using an External Effects 10.2 PreSonus StudioLive 16.4.2 Limited Processor — 161 Warranty — 184 Digital Effects — 163 Index — 185 8.6.1 Reverb —...
- Page 6 PreSonus StudioLive 16.4.2 ™ vi vi...
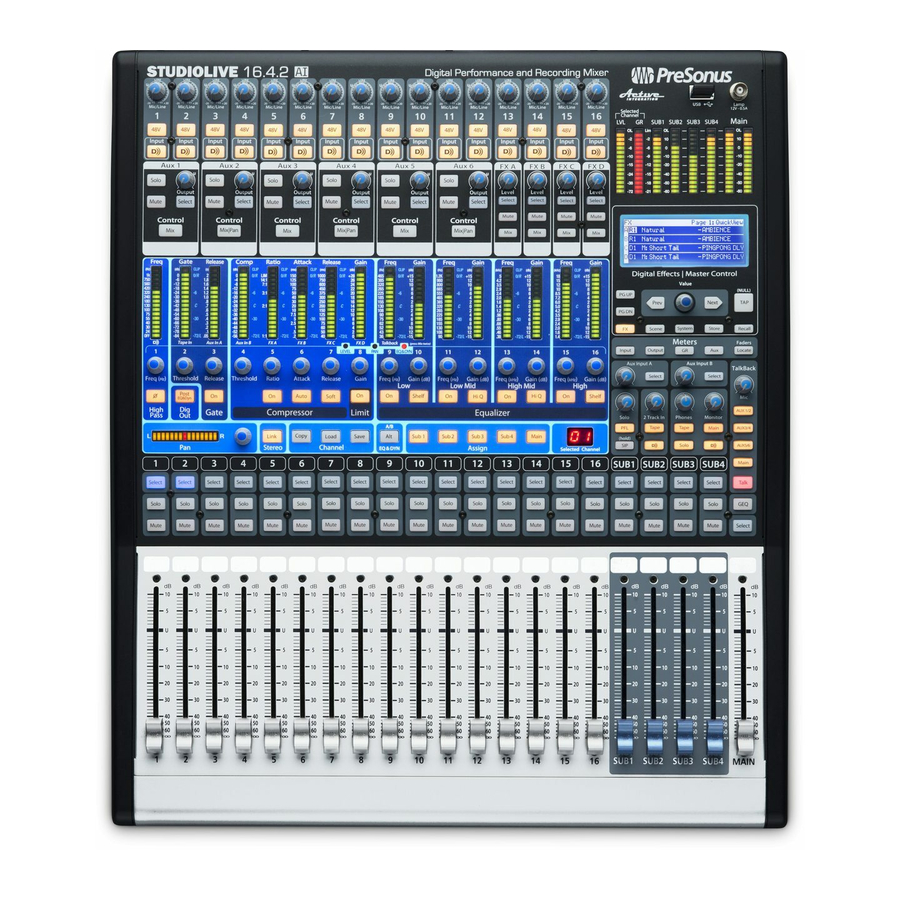
- Page 7 Level Setting Quick Start This is a map of the StudioLive 16.4.2. You’ll notice that each major section is marked with a manual section number where you can find more information: Trims and Phantom Power: For Level Setting see Sections 1.1 and 8.7 FireWire Returns: *Section 4.3.1 and 6.4.2...
- Page 8 • Your P.A. and studio equipment should be powered on in the following order: A. Sound sources (keyboards, direct boxes, microphones, etc.) connected to the StudioLive inputs B. StudioLive 16.4.2 C. Computer (if applicable) D. Power amplifiers or powered monitors When it’s time to power down, your system should be turned off in the reverse order.
-
Page 9: Quick Start
Owner’s Manual Quick Start Level Setting Channel. Adjust the Channel 1 trim knob until a little more than half of the green LEDs are lighting up. The red LED at the top of the meter should never light up! 10. Press the Select button on Channel 1 and move the Channel 1 fader up until it reaches “U”... -
Page 10: Overview
Introduction Overview Introduction Thank you for purchasing the PreSonus StudioLive™ 16.4.2. PreSonus Audio Electronics has designed the StudioLive utilizing high-grade components to ensure optimum performance that will last a lifetime. Loaded with 16 high- headroom, XMAX™ microphone preamplifiers; a built-in 32x18 FireWire recording and playback engine;... -
Page 11: Summary Of Studiolive
EQ, reverb and delay—are available on every input channel, subgroup, aux, and main mix, delivering total control in a compact, rugged steel chassis. The StudioLive 16.4.2 includes PreSonus Capture™, a fully integrated live-recording software that allows you to record every performance and rehearsal with a few clicks of your mouse. -
Page 12: Summary Of Studio One™ Artist Software Features
Capture software was designed to integrate perfectly with StudioLive 16.4.2, allowing instant setup and recording of performances. In addition to recording the 16 channels of the StudioLive 16.4.2, Capture also allows you to record a single stereo track from the StudioLive’s main output, one pair of subgroup outputs, or a pair of aux sends, giving you the option to record your main mix or create a separate recording mix. - Page 13 • Load effects quickly by simply dragging presets into the GUI • Makes StudioLive as easy to use as Studio One • Remote controllable with an Apple iPad® running PreSonus SL Remote™ • Use the mouse to quickly assign channels to multiple buses, mute, solo, etc.
-
Page 14: Summary Of Studiolive Remote™ For Apple Ipad Features
Summary of StudioLive Remote™ for Apple iPad Features StudioLive Remote for iPad, available free from the Apple App Store, provides direct wireless control over PreSonus Virtual StudioLive software for Mac and Windows, which in turn controls any FireWire-connected StudioLive-series digital mixer. As long as you have a wireless connection between your iPad and computer, you are in control of the console. -
Page 15: What Is In The Box
• 6’ (1.8 m) 6-pin-to-9-pin FireWire 400-to-800 cable • IEC power cord • StudioLive Software Library containing • PreSonus StudioLive Artist program DVD plus gigabytes of third-party content PreSonus Capture CD with demo Sessions • PreSonus Virtual StudioLive and Universal Control CD... -
Page 16: Hookup
Rear-Panel Connections Hookup Rear-Panel Connections Microphone Inputs. Your StudioLive is equipped with 16 PreSonus XMAX microphone preamplifiers for use with all types of microphones. (A 17th XMAX preamp serves the talkback section.) The XMAX preamplifier has a Class A input buffer, followed by a dual-servo gain stage. - Page 17 Owner’s Manual Hookup Rear-Panel Connections Insert. Each channel of the StudioLive has a direct-insert point. These unbalanced, ¼-inch connectors can be used to connect external processors (such as compressors, EQs, de-essers, and filters) to your StudioLive’s preamps and line inputs. The insert’s send is after the channel’s gain control but before the digital bus.
- Page 18 PreSonus StudioLive 16.4.2 ™ Hookup Rear-Panel Connections Talkback Mic Level. This is the trim control for your talkback microphone. It adjusts the gain of the talkback input. Mono Output. This balanced output carries a mono, summed version of the stereo signal from the main bus.
- Page 19 FireWire devices (such as external hard drives) to your computer or to daisy-chain an additional StudioLive mixer. You can connect two StudioLive 16.4.2 mixers to create a standalone, large-format mixing console with recording capability. 13 13...
- Page 20 PreSonus StudioLive 16.4.2 ™ Hookup Rear-Panel Connections S/PDIF Output. By default, the S/PDIF output receives the same signal as the main outputs, so no activation is necessary. However, any buses that can be routed to the auxiliary FireWire returns can be routed to the S/PDIF output, either through the System menu in the Digital Effects | Master Control section, or in the StudioLive Control Panel.
-
Page 21: Basic Hookup Diagram
Owner’s Manual Hookup Basic Hookup Diagram Basic Hookup Diagram Drum kit Bass D.I. Vocal Mic Drum Monitor Vocal Monitor Bass Bass Monitor 16.4.2 Keyboard Keyboard Monitor Guitar Amp Guitar Monitor Main P.A. 15 15... -
Page 22: Typical Band Hookup
PreSonus StudioLive 16.4.2 ™ Hookup Typical Band Hookup Typical Band Hookup Bass D.I. Guitar Monitor Bass Monitor Bass Guitar Amp Keyboard Keyboard Monitor Guitar Guitar Monitor Vocal Monitor Vocal Mic 16 16... - Page 23 Owner’s Manual Hookup Typical Band Hookup Drum kit Drum Monitor 16.4.2 Main P.A. Mac or PC running Universal Control 17 17 with VSL, Capture or Studio One Artist...
-
Page 24: Typical Church Hookup
PreSonus StudioLive 16.4.2 ™ Hookup Typical Church Hookup Typical Church Hookup Guitar Guitar Guitar Monitor Monitor Guitar Amp Vocal Mic 16.4.2 Slave Keyboard Vocal Monitor Monitor Vocal Mic Vocal Mic Vocal Mic Horn 18 18... - Page 25 Owner’s Manual Hookup Typical Church Hookup Drum kit Vocal Mic Bass D.I. Drum Monitor Bass Monitor Bass 16.4.2 Master Crying Room Foyer or Overflow Room Main P.A. Mac or PC running Universal Control 19 19 with VSL, Capture or Studio One Artist...
-
Page 26: Typical Recording Hookup
PreSonus StudioLive 16.4.2 ™ Hookup Typical Recording Hookup Typical Recording Hookup Drum Headphones Drum kit 16.4.2 Reference Monitors Mac or PC running Universal Control with VSL, Capture or Studio One Artist 20 20... -
Page 27: Typical Recording Hookup
Owner’s Manual Hookup Typical Recording Hookup Guitar Guitar Headphones Headphones Guitar Amp Guitar Amp Condensor Mic Vocal Headphones Bass D.I. Bass Headphones Bass PreSonus HP60 Headphone Distribution PreSonus HP60 Headphone Distribution 21 21... -
Page 28: Controls
PreSonus StudioLive 16.4.2 ™ Controls The Fat Channel Controls The Fat Channel The heart of the StudioLive is the revolutionary Fat Channel. The Fat Channel makes dynamics, routing, and panning for every input and output on the StudioLive available at the touch of a Select button. The 16 multipurpose knobs and meters located in the Fat Channel control nearly every adjustment you will need to make on your StudioLive. -
Page 29: Select Buttons, Meters And The Fat Channel
Owner’s Manual Controls The Fat Channel Select Buttons, Meters and the Fat Channel 4.1.1 Select Buttons. All around the StudioLive, you will see Select buttons. There is a Select button on each of the 16 inputs, each of the 6 analog aux sends, both of the internal effects buses, each of the 4 subgroups, the 2 auxiliary inputs, and the Main output bus. -
Page 30: Fat Channel: Dynamics Processing And Eq
PreSonus StudioLive 16.4.2 ™ Controls The Fat Channel Fat Channel: Dynamics Processing and EQ 4.1.3 The main function of the Fat Channel is to provide dynamics processing and filtering for every input and output on the StudioLive. The rotary encoders work in conjunction with the meters directly above them to adjust the dynamics processing and EQ. - Page 31 By default, the gates on the Power User Tip: Gate-release times should StudioLive 16.4.2 are set to typically be set so that the natural decay the Downward Expander of the instrument or vocal being gated is setting in the System Menu.
- Page 32 PreSonus StudioLive 16.4.2 ™ Controls The Fat Channel Fat Channel Compressor / Limiter Section Compressor Compressor Sets and Displays the Threshold of the Turns the Compressor On and Off for the Threshold On/Off Compressor for the Selected Channel or Selected Channel or Output Bus.
- Page 33 Owner’s Manual Controls Controls The Fat Channel Compressor Compressor Sets and Displays the Compressor Attack Sets and Displays the Amount of Makeup Attack Makeup Gain Setting for the Selected Input Channel or Gain for the Compressor on the Selected Output Bus. Input Channel or Output Bus.
- Page 34 PreSonus StudioLive 16.4.2 ™ Controls The Fat Channel Fat Channel Equalization Section Low EQ On/Off Low Shelf EQ Activates Control for the Low Band EQ for Turns on the Low Shelving EQ for the Button Button the Selected Input or Output Bus.
- Page 35 Owner’s Manual Controls The Fat Channel Low-Mid EQ Hi High-Mid EQ Enables a Narrow Bandwidth for the Sets and Displays the Center Frequency of Q Button Frequency Low-Mid Band EQ on the Selected Input or the High-Mid EQ. Control Output Bus.. This encoder sets, and the meter Q is the ratio of the EQ band’s displays, the center frequency of...
- Page 36 PreSonus StudioLive 16.4.2 ™ Controls The Fat Channel High EQ On/ High Shelving Activates Control for the High EQ for the Turns on the High Shelving EQ for the Off Button EQ Button Selected Input or Output. Selected Input or Output Bus.
-
Page 37: Fat Channel Panning And Stereo Link
Owner’s Manual Controls The Fat Channel Fat Channel Panning and Stereo Link 4.1.4 The Pan Control for each Input or Output bus is set on the Fat Channel. The LED display shows the Pan setting, and the encoder to the right of the display controls panning for the selected input or output bus. -
Page 38: Copying, Loading, And Storing Fat Channel Settings
PreSonus StudioLive 16.4.2 ™ Controls The Fat Channel Copying, Loading, and Storing Fat Channel Settings 4.1.6 Every setting in the Fat Channel can be copied from one channel to another and can be saved and stored as a user preset to be recalled later. -
Page 39: Studiolive Metering Controls
Owner’s Manual Controls Metering StudioLive Metering Controls 4.2.1 The Meters section of the StudioLive is located below the System section. Each of these buttons are toggle switches; you turn them on and off by pressing them. The meter state can also be changed by pressing another button in the Meter section, or any Select button on the StudioLive, or a Mix or Mix/Pan button in the Aux section. -
Page 40: Input Channel Strip
PreSonus StudioLive 16.4.2 ™ Controls Input Channel Strip Input Channel Strip The StudioLive is equipped with all of the standard input controls of an analog mixer. In addition, the StudioLive provides the added flexibility of routing a playback stream from your audio-recording software to the mixer via the FireWire bus, just as if it were an analog input. - Page 41 Owner’s Manual Controls Input Channel Strip Solo Button Turns Soloing On and Off. This button will solo its channel to the main outputs or to the monitor outputs, depending on whether PFL or SIP is selected in the Solo bus section. Please review Section 8.8 for details.
-
Page 42: Aux And Fx Buses
PreSonus StudioLive 16.4.2 ™ Controls Aux and FX Buses Aux and FX Buses The StudioLive has six analog aux buses and two internal effects buses. The aux buses are mono; however, two aux buses can be linked to create a stereo bus. -
Page 43: Internal Fx Send Controls
Owner’s Manual Controls Aux and FX Buses Internal FX Send Controls 4.4.2 Mute Button Mutes and Unmutes the Internal Effects Bus. This button will mute or unmute its internal effects (EFX) bus. It will illuminate red when the bus is muted. Post-Fader Send Button Enables and Disables Post-Fader Send. -
Page 44: Creating Analog Aux And Fx Mixes
PreSonus StudioLive 16.4.2 ™ Controls Aux and FX Buses Creating Analog Aux and FX Mixes 4.4.3 In addition to setting the dynamics for each channel and bus and metering each channel and output, the Fat Channel also allows you to create Aux mixes and quickly view the send level for each channel. -
Page 45: Subgroups
Owner’s Manual Controls Subgroups Subgroups As explained in Section 8.4, subgroup mixing is very useful for grouping channels for master level control of a submix (e.g., drums) and for providing a fader level for effects. 4.5.1 Subgroup Controls Subgroup Channel Enables Fat Channel Adjustments of Subgroup. -
Page 46: Main Output Bus
PreSonus StudioLive 16.4.2 ™ Controls Main Output Bus Subgroup Meters Displays the Level of the Subgroups. In the upper-right corner of the StudioLive are the Subgroup meters, which display the levels of the subgroup outputs. Main Output Bus Main Select Button Enables Fat Channel Viewing. -
Page 47: Master Section
Power User Tip: Aux Ins A and B can also be used as stereo line input channels for devices like keyboards, synths, amp modelers, and other line-level devices. In effect, this makes your StudioLive 16.4.2 an 18 channel mixer! Aux Input Select Button Enables Fat Channel Viewing. -
Page 48: Talkback System
PreSonus StudioLive 16.4.2 ™ Controls Master Section Talkback System 4.7.2 The StudioLive features a Talkback microphone input on the back panel. This can be routed to the aux outputs and to the mains. It is important to note that the aux outputs are grouped in this section. For example, if you are using Aux 3 as mono monitor send to the bass player’s floor wedge and Aux 4 the send... -
Page 49: Track In
Owner’s Manual Controls Master Section 2 Track In 4.7.3 The 2 Track input allows you to patch in an analog input or a playback stream from your audio application. This enables you to compare audio sources during mixdown or patch in intermission music between bands without using any of your 16 input channels. -
Page 50: Solo Bus
PreSonus StudioLive 16.4.2 ™ Controls Master Section Solo Bus 4.7.4 The StudioLive features a Solo bus for flexible monitoring. With this feature, you can fine-tune a vocal compressor in your control-room monitors or headphones while the rest of the band is warming up, or you can audition an aux mix for more accurate adjustments. -
Page 51: Monitor Bus
Owner’s Manual Controls Master Section Monitor Bus 4.7.5 The StudioLive features a headphone output and control-room outputs, giving you the ability to monitor multiple sources on the StudioLive. The Monitor bus on the StudioLive allows you to monitor the main outputs, Solo bus, main FireWire return from your computer, and the stereo analog tape input. -
Page 52: Digital Effects | Master Control
PreSonus StudioLive 16.4.2 ™ Controls Digital Effects | Master Control Digital Effects | Master Control From the Digital Effects | Master Control section, you can select and change the parameters of the two internal effects processors, and you can store and recall every setting on your StudioLive. - Page 53 Owner’s Manual Controls Digital Effects | Master Control Press the Page Down button to move to the next page of the FX menu. Pages 2 and 3 of the FX menu display the rest of the parameters for FX A and FX B, respectively.
-
Page 54: Digital Effects Library
4.8.2 Your StudioLive contains a library of 50 custom reverb and delay presets designed by PreSonus. In addition to these presets, there are 49 free locations for you to build your own custom effects library. The Factory Presets can be altered, renamed, and overwritten. -
Page 55: Scenes, Presets, And The System Menu
Owner’s Manual Scenes, Presets, and System Menu Creating and Recalling a Scene Scenes, Presets, and the System Menu Creating and Recalling a Scene The StudioLive allows you to create and store a library of Scenes. A Scene is like a snapshot of your mix. It stores each Fat Channel parameter for every input and bus, as well as each fader’s position, the aux and effects mixes, channel mutes and solos, and the input... - Page 56 PreSonus StudioLive 16.4.2 ™ Scenes, Presets, and System Menu Scenes, Presets, and System Menu Creating and Recalling a Scene Your StudioLive will be zeroed out as follows: SETTINGS INPUTS AND BUSES ASSIGN SOLO MUTE SELECT LINK SENDS MODE INPUT CHANNELS...
-
Page 57: Creating And Recalling A Scene
Owner’s Manual Scenes, Presets, and System Menu Creating and Recalling a Scene The StudioLive’s recallable parameters are grouped as follows: • Mute: All channel and bus mutes (Channels 1-16, Subgroups 1-4, FXA, FXB) • FX: All parameters for the internal effects assigned to FXA and FXB •... -
Page 58: Saving And Loading Channel Presets
Saving and Loading Channel Presets The StudioLive comes with a suite of channel-strip presets created by professional users of PreSonus products. These presets provide a great jumping-off point to create a mix quickly and easily. The StudioLive also allows you to create your own library of presets. -
Page 59: Channel Presets Library
5.2.1 Your StudioLive comes with 50 Fat Channel presets that were custom- designed by professional PreSonus users. These presets can be altered, renamed and overwritten; however, there are 49 additional empty storage locations for you to build your own custom library of channel-strip settings. -
Page 60: Graphic Equalizers
Graphic Equalizers Graphic Equalizers The StudioLive 16.4.2 features 4 dual-mono (8 channels), 31-band, 1/3 octave graphic EQs that can be inserted on the Main output bus or any of the Auxes. When the GEQ Menu is active, the meters and encoders of the Fat Channel become the controls for the Graphic EQ. - Page 61 Graphic EQ, try creating a smoother curve. To open the GEQ menu, press the System button and navigate to Page 7: GEQ. The StudioLive 16.4.2 features 4 dual-mono (8 channels) Graphic EQs. Each GEQ is assigned to a specific bus: Main Left, Main Right, and Aux 1-6.
-
Page 62: System Menu
PreSonus StudioLive 16.4.2 ™ Scenes, Presets, and System Menu System Menu System Menu In most digital-console manuals, the phrase “System menu” inspires a sense of dread. However, with the StudioLive, you have nothing to fear. The System menu on the StudioLive serves just a few simple functions, most of which have very little to do with mixing a show. - Page 63 Owner’s Manual Scenes, Presets, and System Menu System Menu parameter can be adjusted from the StudioLive while it is synced to a computer, in which case you need to use the Universal Control Device Window to make your S/PDIF assignments and change your sample rate. (See Section 7.1.1 for more details.) When two StudioLives are cascaded together, the Status will read “Linked, ”...
- Page 64 PreSonus StudioLive 16.4.2 ™ Scenes, Presets, and System Menu System Menu Because of this, the global default setting for the StudioLive is the Expander. Any changes made to this page are stored with custom scenes. When you recall as scene, the gate type that you have chosen for each stereo pair of channels will also be recalled.
-
Page 65: Connecting To A Computer
Apple iPad™. Power User Tip: As part of our commitment to the quality of our products, PreSonus continually updates our product drivers and software. Because of this, it is always a good idea to visit www.PreSonus.com and check for the latest driver version before installing your product. - Page 66 PreSonus StudioLive 16.4.2 ™ Connecting to a Computer Installation for Windows After you insert the Installation CD into your CD-ROM drive, the StudioLive installer will take you through each step of the installation process. Please read each message carefully—ensuring especially that you do not connect your StudioLive too soon.
-
Page 67: Installation For Mac Os X
Owner’s Manual Connecting to a Computer Installation for Mac OS X Installation for Mac OS X After inserting the Installation CD into your disc drive, browse the disc and run the StudioLive installer, which will take you through each step of the installation process. -
Page 68: Using The Studiolive As An Audio Interface
StudioLive driver as the audio device driver for your software. Note that your StudioLive uses the same driver as the PreSonus FireStudio family of interfaces, so its driver will be displayed as “PreSonus FireStudio” in all driver-selection menus. -
Page 69: Firewire Sends And Returns
7. Highlight all input and output drivers beginning with “PreSonus FireStudio. ” 8. Go to Options | Audio... and click on the General tab. 9. Set the Playback Timing Master to “PreSonus FireStudio ... DAW Out 1. ” 10. Set the Recording Timing Master to “PreSonus FireStudio ... Mic/Inst 1. ”... - Page 70 PreSonus StudioLive 16.4.2 ™ Connecting to a Computer Using the StudioLive as an Audio Interface Aux Return A (Aux Input A) • Aux Return B (Aux Input B) • FX Return A (EFXA Return) • • FX Return B (EFXB Return) •...
-
Page 71: Using Plug-In Effects As Inserts
StudioLive channels, you can quickly insert a plug-in from your recording application into any channel strip and monitor it in real time. In this example, we will insert the Beat Delay plug-in from PreSonus Studio One onto Channel 16 of the StudioLive. -
Page 72: Advanced Wdm Features (Pc Only)
PreSonus StudioLive 16.4.2 ™ Connecting to a Computer Using the StudioLive as an Audio Interface Note: The Dig Out button does not function when you have a FireWire return selected as an input source. If Dig Out is enabled, any aux, subgroup, and the main bus to which the return is routed will not receive the post-Fat Channel signal. -
Page 73: Configuring The Studiolive For Core Audio (Mac Only)
Owner’s Manual Connecting to a Computer Using the StudioLive as an Audio Interface 2. The WDM Channel Mapper window will open. By default, WDM Outputs 1 and 2 are routed to StudioLive Channels 1 and 2. As previously mentioned, we recommend that they be set, instead, to Channels 17 and 18, so as not to use input channels on your StudioLive for WDM playback. - Page 74 PreSonus StudioLive 16.4.2 ™ Connecting to a Computer Using the StudioLive as an Audio Interface 2. Deselect Stream 1 and select Stream 2 instead. 3. Choose Channel 17 for the left speaker and Channel 18 for the right speaker. 4. When you are finished, click Apply and then Done.
-
Page 75: Software: Universal Control With Vsl, Capture, And Studio One Artist
Scenes and Presets on your mixer. Universal Control The StudioLive 16.4.2 is compatible with the Universal Control application. As with all FireStudio- and StudioLive-family interfaces, Universal Control includes two windows: the Launcher window and the Device window. -
Page 76: Universal Control: Launch Window
PreSonus StudioLive 16.4.2 ™ Software: Universal Control, SL Remote, Capture, Studio One Artist Universal Control Since the control is bidirectional, fader moves and parameter changes made on the StudioLive are reflected in VSL, as well. So, for example, you can set up the StudioLive the way you want it and then save your Scene or other presets in VSL. - Page 77 Owner’s Manual Software: Universal Control, SL Remote, Capture, Studio One Artist Universal Control Operation Mode Changes How the StudioLive Driver’s Buffer Size is Set. Normal Mode. Input and Output buffers are both identical to the Buffer Size setting. Safe Mode 1-3. Increases the output buffer size for added stability. Buffer Size Selector (PC only) Changes the StudioLive Buffer Size.
- Page 78 Settings: Factory Reset Resets Your StudioLive to its Factory Default Settings. The Factory Reset option will reset your StudioLive 16.4.2 to factory default. All user presets and scenes will be deleted. All FX and Channel Strip scenes will be reset to their factory settings.
- Page 79 Owner’s Manual Software: Universal Control, SL Remote, Capture, Studio One Artist Universal Control Settings: Always on Top Allows the Launch Window to Stay in View When Other Applications Are in Use. When this is enabled, the Launch window will remain in the foreground when other applications are active, rather than being in the background behind the current application’s window.
-
Page 80: Vsl: Virtual Studiolive
StudioLive and VSL, whatever you do on the StudioLive‘s mixing surface will be reflected in VSL and vice versa. VSL for StudioLive 16.4.2 requires a minimum screen resolution of 1024x768. For vertical resolutions set below 914, VSL will dynamically change the channel faders to knobs. - Page 81 Owner’s Manual Software: Universal Control, SL Remote, Capture, Studio One Artist Virtual StudioLive Add to Disk Button Transfers all Scenes, Fat Channel, FX, and Graphic EQ Presets from Temporary Memory to the Permanent Cache. VSL allows you to back up your Scenes, Fat Channel, FX, and graphic EQ presets and permanently store them on your computer.
- Page 82 PreSonus StudioLive 16.4.2 ™ Software: Universal Control, SL Remote, Capture, Studio One Artist Virtual StudioLive Add New Button Creates a New Scene or Preset. In the On the Disk and Device Memory sections of the Browser, you will see the Add New button. Clicking this button will immediately create a new Scene or preset.
-
Page 83: Vsl: Overview Tab
Owner’s Manual Software: Universal Control, SL Remote, Capture, Studio One Artist Virtual StudioLive VSL: Overview Tab 7.2.2 Display Browser Enable GEQ Phantom Power FireWire Return Phase Reverse Digital Out High Pass Filter Focus GEQ Subgroup Assign Main Bus Assign Gate Microview Compressor Microview EQ Microview Aux Send Levels... - Page 84 PreSonus StudioLive 16.4.2 ™ Software: Universal Control, SL Remote, Capture, Studio One Artist Virtual StudioLive Aux Send View VSL provides two views for your StudioLive Aux Outputs and FX Buses. The Aux Send View gives you an overview of the send levels of every channel on your StudioLive to every Aux Output and FX Bus.
-
Page 85: Vsl: Channel Tab
Owner’s Manual Software: Universal Control, SL Remote, Capture, Studio One Artist Virtual StudioLive VSL: Channel Tab 7.2.3 The Channel Tab provides a detailed overview of the Fat Channel parameters for the selected channel. The selected channel will always be shown above the Gate section. It is important to remember that you have continuous bidirectional control. - Page 86 PreSonus StudioLive 16.4.2 ™ Software: Universal Control, SL Remote, Capture, Studio One Artist Virtual StudioLive Loading an Entire Fat Channel Preset To load every component in a Fat Channel preset (Gate, Compressor, EQ), select the preset from the Browser window and drag it over any part of the desired channel.
-
Page 87: Vsl: Geq Tab
VSL: GEQ Tab 7.2.5 The StudioLive 16.4.2 features a 31-band graphic EQ on each of the 6 Aux Buses as well as the Main Bus. You can control each graphic EQ individually, and if you link any of these buses, VSL automatically links each dual-mono graphic EQ to create a true stereo graphic EQ. -
Page 88: Vsl: Setup Tab
PreSonus StudioLive 16.4.2 ™ Software: Universal Control, SL Remote, Capture, Studio One Artist Virtual StudioLive VSL: Setup Tab 7.2.6 As discussed in Section 6.4.2, the StudioLive allows you to route any 16 of 23 buses and inputs, in addition to its 16 input channels. This is done via the Auxiliary Inputs Router on the Setup tab. - Page 89 Owner’s Manual Software: Universal Control, SL Remote, Capture, Studio One Artist Virtual StudioLive The Auxiliary Inputs Router also allows you to assign a specific bus to the S/PDIF output and to select which stereo pair will be recorded on the Auxiliary Stereo Track in Capture. When the StudioLive is not connected to a computer, the S/PDIF output is routable through the System Menu (see Section 5.4).
-
Page 90: Enabling Lockout Mode
PreSonus StudioLive 16.4.2 ™ Software: Universal Control, SL Remote, Capture, Studio One Artist Virtual StudioLive Enabling Lockout Mode 7.2.7 Your StudioLive features a Lockout mode that allows you to temporarily disable nearly every feature on the StudioLive, although analog features such as input-trim knobs, faders, and cue, tape-input, and monitor levels can still be adjusted. -
Page 91: Remotely Controlling Studiolive With Vsl
Owner’s Manual Software: Universal Control, SL Remote, Capture, Studio One Artist Virtual StudioLive Remotely Controlling StudioLive with VSL 7.2.8 VSL allows you to control almost every parameter in your StudioLive remotely from your desktop or laptop computer. Your StudioLive will reflect every change made in VSL, including fader movements. This means that if you move Channel 12’s fader in VSL, you will hear the level set in VSL, rather than the level represented by the current physical position of the Channel 12 fader on your StudioLive. -
Page 92: Using Studiolive Remote For Ipad
PreSonus StudioLive 16.4.2 ™ Software: Universal Control, SL Remote, Capture, Studio One Artist Using StudioLive Remote for iPad Using StudioLive Remote for iPad ® StudioLive Remote for iPad provides an unprecedented level of remote control over your StudioLive. With SL Remote, you can adjust level, pan, dynamics, bus routing, effects mixes, aux mixes, and GEQ setting from an Apple iPad via a wireless network. - Page 93 Owner’s Manual Software: Universal Control, SL Remote, Capture, Studio One Artist Using StudioLive Remote for iPad 4. Under “Change your networking settings, ” click “Set up a new connection or network. ” 5. Select “Set up a wireless ad hoc (computer-to-computer) network. ” 6.
- Page 94 PreSonus StudioLive 16.4.2 ™ Software: Universal Control, SL Remote, Capture, Studio One Artist Using StudioLive Remote for iPad Troubleshooting your Ad Hoc Network Every once in a while, your iPad will accept an ad hoc network even though that network is not usable. When this...
-
Page 95: Connecting To Virtual Studiolive And The Studiolive Mixer
Owner’s Manual Software: Universal Control, SL Remote, Capture, Studio One Artist Using StudioLive Remote for iPad Connecting to Virtual StudioLive and the StudioLive Mixer 7.3.2 Once you have created your ad hoc network and joined it from your iPad, you are ready to launch StudioLive Remote. Important: You must connect to your computer’s ad hoc network each time you plan on remote-controlling your StudioLive with StudioLive Remote. -
Page 96: Sl Remote: Overview Page
PreSonus StudioLive 16.4.2 ™ Software: Universal Control, SL Remote, Capture, Studio One Artist Using StudioLive Remote for iPad SL Remote: Overview Page 7.3.2 The Overview page in StudioLive Remote corresponds directly with most of the controls on the Overview page in VSL. The following parameters can be controlled and/or viewed from this page: •... - Page 97 Owner’s Manual Software: Universal Control, SL Remote, Capture, Studio One Artist Using StudioLive Remote for iPad Bus Assignments Query Displays the Bus Assignments for a Channel or Bus. Tap to open Bus Assignments Query page and make changes. Above each channel, you will find the Bus Assignments view. This displays the current bus and FireWire return assignments for each channel.
- Page 98 PreSonus StudioLive 16.4.2 ™ Software: Universal Control, SL Remote, Capture, Studio One Artist Using StudioLive Remote for iPad Channel Controls: Select Selects Channel for Fat Channel Zoom and Portrait View. When no Microview has been selected for Fat Channel Zoom, the channel Select buttons merely display the channel number or name, if a name has been entered into the Scribble Strip in VSL.
- Page 99 Owner’s Manual Software: Universal Control, SL Remote, Capture, Studio One Artist Using StudioLive Remote for iPad Masters Overview Displays the metering for the Main bus, Auxes (16.0.2) and Subgroups (16.4.2 and Masters Section Page 24.4.2). Tap to open the Masters Section page. In the upper right-hand corner of every page in StudioLive Remote (Overview, Aux Mixer, and Graphic EQ), you will find the Masters Overview.
-
Page 100: Aux Mix Page
PreSonus StudioLive 16.4.2 ™ Software: Universal Control, SL Remote, Capture, Studio One Artist Using StudioLive Remote for iPad Aux Mix Page 7.3.3 The Aux Mix page shows the send level for each channel on each Aux and FX bus. It corresponds directly to the Aux Mix tab in VSL but has been streamlined to show only the parameters you need to control when away from the StudioLive. - Page 101 Owner’s Manual Software: Universal Control, SL Remote, Capture, Studio One Artist Using StudioLive Remote for iPad Aux Mix Select and Aux Mixing Displays Channel Send Levels to an Aux Bus. To create an aux mix using StudioLive Remote, tap anywhere in the Aux Mix Select tab for the desired aux bus.
- Page 102 PreSonus StudioLive 16.4.2 ™ Software: Universal Control, SL Remote, Capture, Studio One Artist Using StudioLive Remote for iPad POWER USER TIP: The FX sends support off-axis movement. Once you have touched a send-level control to select it, you can slide your finger anywhere in the screen and make an up/down movement to control the send-level.
-
Page 103: The Geq Page
• Draw the EQ curve you want, rather than adjust each slider manually GEQ Select Tab Brings a Pair of Graphic EQs into View (StudioLive 16.4.2 and 24.4.2 Only). To begin making changes to a particular GEQ, you must first select it. To do this, simply tap on the GEQ pair you’d like to edit. - Page 104 PreSonus StudioLive 16.4.2 ™ Software: Universal Control, SL Remote, Capture, Studio One Artist Using StudioLive Remote for iPad GEQ Flatten Button Sets All Graphic EQ Band Levels to 0 dB. To reset a GEQ to 0 dB, simply tap its Flatten button. This will return each slider to 0 dB so that no frequency band is boosted or attenuated.
-
Page 105: Channel Zoom Page
Software: Universal Control, SL Remote, Capture, Studio One Artist Using StudioLive Remote for iPad StudioLive 16.4.2 users: Each of your graphic EQs is already assigned to either your Main output or one of your Auxes. These assignments cannot be changed. -
Page 106: Capture
What is Capture? Capture is an audio-recording application created exclusively for use with PreSonus StudioLive-series mixers. To record from the StudioLive mixer into Capture, you will need to install the StudioLive driver and connect the mixer to a FireWire port on your computer. Once the StudioLive mixer has been connected to your computer, and Capture has been installed, simply launch Capture, and you are ready to record. -
Page 107: Start Page
Owner’s Manual Software: Universal Control, SL Remote, Capture, Studio One Artist Capture Key Commands Many operations in Capture have associated key commands (keyboard shortcuts) that can be used instead of navigating menus with the mouse. Several of these key commands use modifier keys, some of which differ depending on the operating system (Windows or Mac OS X). -
Page 108: The Session Page
Software: Universal Control, SL Remote, Capture, Studio One Artist Capture Audio Device and Sample Rate Capture was specifically created for use with the PreSonus StudioLive-series mixer and will only work with that device. It is not possible to configure any other audio device for use with Capture. - Page 109 Owner’s Manual Software: Universal Control, SL Remote, Capture, Studio One Artist Capture The following are diagrams and descriptions of the Session interface. Transport The Transport is at the top of the Session page and contains: • Meter Bridge: Peak LED-style meters with clip indicators for each input into Capture from your StudioLive mixer and an additional pair of meters for the routable Master track.
-
Page 110: The Edit Window
PreSonus StudioLive 16.4.2 ™ Software: Universal Control, SL Remote, Capture, Studio One Artist Capture • Play: Start playback at the current playback-cursor position. • Record: Start recording at the current playback-cursor position. • Loop: Engage/Disengage Loop Mode. • Time Display: Displays the time at the current playback-cursor position. -
Page 111: Getting Started In Capture
Owner’s Manual Software: Universal Control, SL Remote, Capture, Studio One Artist Capture Getting Started in Capture 7.4.5 Tracking is the first stage of audio production. The following chapter discusses aspects of recording tracks in Capture, including Session creation and setup, Audio Tracks and Events, and more. Audio Device Before recording anything in Capture, please take a moment to be sure your StudioLive mixer is properly... - Page 112 PreSonus StudioLive 16.4.2 ™ Software: Universal Control, SL Remote, Capture, Studio One Artist Capture Capture Audio I/O Setup There is no need for audio inputs and outputs to be set up in Capture; the software automatically detects which StudioLive mixer model is connected (16.0.2, 16.4.2, two 16.4.2s, or 24.4.2), and it self-configures.
- Page 113 Owner’s Manual Software: Universal Control, SL Remote, Capture, Studio One Artist Capture It is possible to process each StudioLive mixer input channel with the Fat Channel before the input signal is routed to Capture. To do this, you will need to engage the Post button in the Dig Out section of the Fat Channel for each channel in your StudioLive mixer.
-
Page 114: Recording In Capture
PreSonus StudioLive 16.4.2 ™ Software: Universal Control, SL Remote, Capture, Studio One Artist Capture Capture Main Source Selection The Auxiliary Stereo Track in Capture is a stereo channel intended to be used to record a stereo mix from your StudioLive. This mix can be... -
Page 115: Editing In Capture
Owner’s Manual Software: Universal Control, SL Remote, Capture, Studio One Artist Capture Activating Recording in Capture Once you have the desired tracks record-enabled, the next step is to record. To activate recording, click on the Record button in the Transport. The Record button will turn red, and the Play button will turn green in the Transport;... - Page 116 PreSonus StudioLive 16.4.2 ™ Software: Universal Control, SL Remote, Capture, Studio One Artist Capture Size an Audio Event Events can be thought of as windows into audio files, where what you see is what you will hear. Sizing is a fundamental technique wherein Audio Events are made shorter or longer, so that only a portion of the audio they contain is seen, and therefore heard.
- Page 117 Owner’s Manual Software: Universal Control, SL Remote, Capture, Studio One Artist Capture This makes quickly selecting and editing any range of an event very simple. • The Range Tool can be temporarily toggled when the Arrow Tool is selected by pressing and holding [Ctrl]\[Cmd] on the keyboard. Splice Tool Using the Splice Tool, single Audio Events can be split into multiple Audio Events.
-
Page 118: Capture Session Navigation
PreSonus StudioLive 16.4.2 ™ Software: Universal Control, SL Remote, Capture, Studio One Artist Capture Capture Session Navigation 7.4.8 The ability to quickly navigate to certain areas of your Session is highly useful when mixing. The following describes the ways in which you can quickly navigate throughout your Session. -
Page 119: Mixing In Capture
Owner’s Manual Software: Universal Control, SL Remote, Capture, Studio One Artist Capture Looping To loop the playback of any range of your Capture session, do one of the following: • Select an Event with the Arrow Tool, or select a Range with the Range Tool, that you wish to loop. - Page 120 PreSonus StudioLive 16.4.2 ™ Software: Universal Control, SL Remote, Capture, Studio One Artist Capture 3. In Capture, select the Auxiliary Stereo Track (17 and 18) and enable Record Arm. 4. Bring the playback cursor position to the beginning of the Session by clicking the Back to Beginning button in the Transport.
- Page 121 Owner’s Manual Software: Universal Control, SL Remote, Capture, Studio One Artist Capture Export Audio Files To export audio from your Session in Capture, navigate to Session/Export to Audio File, or press [Ctrl]/[Cmd]+E on the keyboard to open the Export to Audio File menu.
- Page 122 Mixing a Capture Session in Studio One Many users will want to use Capture strictly as a track-recording tool and mix the recorded tracks later in a DAW application. PreSonus has included a copy of Studio One Artist with your StudioLive for just this purpose.
- Page 123 Owner’s Manual Software: Universal Control, SL Remote, Capture, Studio One Artist Capture You will want to be sure to have the Session option selected in the Export Audio File menu, as shown, so that the result of the process will be a single, continuous audio file for each track in the session.
-
Page 124: Capture Key Commands
PreSonus StudioLive 16.4.2 ™ Software: Universal Control, SL Remote, Capture, Studio One Artist Capture 7.4.10 Capture Key Commands Key Commands Action Key Command File New Session Cntrl/Cntrl/Cmd+N Open Session Cntrl/Cntrl/Cmd+O Close Session Cntrl/Cmd+W Save Session Cntrl/Cmd+S Save Session As... - Page 125 Owner’s Manual Software: Universal Control, SL Remote, Capture, Studio One Artist Capture Key Commands ...continued Action Key Command Navigation Focus Next Focus Previous Shift+Tab Left Left Arrow Extend Selection Left Shift+Left Arrow Extend Selection Left Add Cntrl/Cmd+Shift+Left Arrow Skip Left Cntrl/Cmd+Left Arrow Right...
-
Page 126: 7.4.11 Capture Applications And Scenarios
PreSonus StudioLive 16.4.2 ™ Software: Universal Control, SL Remote, Capture, Studio One Artist Capture 7.4.11 Capture Applications and Scenarios When recording live, most people usually make a single, continuous multitrack recording. This involves record-enabling Audio Tracks in Capture, triggering recording, and continuing to record until the performance is done. - Page 127 Owner’s Manual Software: Universal Control, SL Remote, Capture, Studio One Artist Capture all other channels in the StudioLive mixer. Even if the computer blows up during the live show, your live mix will be completely unaffected. You can mix and record a live performance using the StudioLive mixer and Capture with complete confidence.
- Page 128 PreSonus StudioLive 16.4.2 ™ Software: Universal Control, SL Remote, Capture, Studio One Artist Capture To do this, first open the original Session. If you have not already done so, rename each marker to the desired name for each song. Then, select Export to Audio File from the Session menu.
- Page 129 Owner’s Manual Software: Universal Control, SL Remote, Capture, Studio One Artist Capture Now you can plug the guitar or guitar-amp mic into an input channel on the StudioLive mixer and set the input level as you normally would. Then add the guitar-input channel to the Aux 1/2 mix that the guitarist will listen to so he can hear himself.
-
Page 130: Studio One Artist Quick Start
Studio One Artist Quick Start Studio One Artist Quick Start Your StudioLive 16.4.2 comes with Studio One Artist recording and production software. Whether you are about to record your first album or your fiftieth, Studio One Artist provides you with all of the tools necessary to capture and mix a great performance. -
Page 131: Installation And Authorization
7.5.1 Once you have installed the StudioLive drivers and connected your StudioLive to your computer, you can use the PreSonus Studio One Artist music-production software included with your StudioLive to begin recording, mixing, and producing your music. To install Studio One Artist, insert your installation disc into your computer’s DVD drive. - Page 132 PreSonus StudioLive 16.4.2 ™ Software: Universal Control, SL Remote, Capture, Studio One Artist Studio One Artist Quick Start Activating Studio One Artist Offline • Once you have created a user account, launch Studio One Artist. From the Activate Studio One Menu, click on the Activate Offline link.
-
Page 133: Enabling The Audio Driver
Start page. On this page, you will find document- management and device-configuration controls, as well as a customizable artist profile, a news feed, and links to demos and tutorials from PreSonus. If you have an Internet connection on your computer, these links will be updated as new tutorials become available on the PreSonus Web site. - Page 134 PreSonus StudioLive 16.4.2 ™ Software: Universal Control, SL Remote, Capture, Studio One Artist Studio One Artist Quick Start Setting Up an External MIDI Keyboard Controller from the Start Page A MIDI keyboard controller is a hardware device that is generally used for playing and controlling other MIDI devices, virtual instruments, and software parameters.
- Page 135 Owner’s Manual Software: Universal Control, SL Remote, Capture, Studio One Artist Studio One Artist Quick Start In the Send To drop-down menu, select the MIDI interface output from which Studio One Artist will send MIDI data to your keyboard. If your keyboard controller does not need to receive MIDI data from Studio One (say, for moving motorized faders and the like), you can leave this unselected.
-
Page 136: Creating A New Song
You’ll notice a list of templates on the left. The StudioLive 16.4.2 template will create a Song with a track for each of the 16 inputs. Every track is armed for recording, and no further setup is required. - Page 137 Owner’s Manual Software: Universal Control, SL Remote, Capture, Studio One Artist Studio One Artist Quick Start 3. To begin a new Song, select Empty Song from the Templates list. At this point, you should give your Song a name and select your preferred sample rate and bit depth.
-
Page 138: Creating Audio Tracks
PreSonus StudioLive 16.4.2 ™ Software: Universal Control, SL Remote, Capture, Studio One Artist Studio One Artist Quick Start 7. Click on the Outputs tab, and you will see all of the available outputs on your StudioLive. At this time, you can add the number of output buses to which you would like to have access and can give them names. -
Page 139: Creating Midi Tracks
Owner’s Manual Software: Universal Control, SL Remote, Capture, Studio One Artist Studio One Artist Quick Start 3. Once you have added your tracks, you can assign the input by simply clicking on the input to which a track is currently assigned. This will bring up the inputs list. -
Page 140: Adding Virtual Instruments And Plug-In Effects To Your Song
PreSonus StudioLive 16.4.2 ™ Software: Universal Control, SL Remote, Capture, Studio One Artist Studio One Artist Quick Start 3. To the left of the Add Track button, you will find the Inspector button. Click it to display more parameters for the selected track. - Page 141 Owner’s Manual Software: Universal Control, SL Remote, Capture, Studio One Artist Studio One Artist Quick Start Drag-and-Drop Virtual Instruments To add a virtual instrument to your session, click the Browse and Instrument buttons to open the instrument browser. Select the instrument or one of its patches from the instrument browser and drag it into the Arrange view.
- Page 142 PreSonus StudioLive 16.4.2 ™ Software: Universal Control, SL Remote, Capture, Studio One Artist Studio One Artist Quick Start Drag-and-Drop Audio and MIDI Files Audio and MIDI files can also be quickly located, auditioned, and imported into your Song by dragging them from the file browser into the Arrange view.
-
Page 143: Tutorials
Owner’s Manual Tutorials Microphone Types and Placement Tutorials Microphone Types and Placement The StudioLive works with most types of microphones, including dynamic, ribbon, and condenser microphones. Condenser 8.1.1 Condenser microphones generally capture sound with excellent fidelity and are one of the most popular microphone choices for studio recording and, increasingly, for live performance as well. -
Page 144: Microphone Placement
PreSonus StudioLive 16.4.2 ™ Tutorials Microphone Types and Placement Regardless of the microphone type you are using, we recommend reading your microphone’s user’s manual thoroughly before engaging phantom power and if other usage questions arise. 8.1.4 Microphone Placement The following are a few recording applications to help you get started with your StudioLive. - Page 145 Owner’s Manual Tutorials Microphone Types and Placement Acoustic Guitar Point a small-diaphragm condenser microphone at the 12th fret, approximately 8 inches away. Point a large-diaphragm condenser microphone at the bridge of the guitar, approximately 12 inches from the guitar. Experiment with distances and microphone placement.
- Page 146 PreSonus StudioLive 16.4.2 ™ Tutorials Microphone Types and Placement Drum Overheads (XY example) Place two small-diaphragm condenser microphones on an XY stereo-microphone holder (bar). Position the microphones so that each one is at a 45-degree angle, pointed down at the drum kit, approximately 7 or 8 feet above the floor or drum riser.
-
Page 147: A Brief Tutorial On Dynamics Processing
The heart of the StudioLive is the Fat Channel dynamics section. What follows is an excerpt from brief tutorial on dynamics processing written by PreSonus president and founder Jim Odom. It is included to help you get the most out of your StudioLive. -
Page 148: Types Of Dynamic Processing
PreSonus StudioLive 16.4.2 ™ Tutorials A Brief Tutorial on Dynamics Processing Why do the best consoles in the world put compressors on every channel? The answer is simply that most instruments need some form of compression, often very subtle, to be properly heard in a mix. - Page 149 Owner’s Manual Tutorials A Brief Tutorial on Dynamics Processing How severely the compressor reduces the signal is determined by the compression ratio and compression threshold. A ratio of 2:1 or less is considered mild compression, reducing the output by a factor of two for signals that exceed the compression threshold.
- Page 150 PreSonus StudioLive 16.4.2 ™ Tutorials A Brief Tutorial on Dynamics Processing Attack. Attack sets the speed at which the compressor acts on the input signal. A slow attack time allows the beginning envelope of a signal (commonly referred to as the initial transient) to pass through the compressor unprocessed, whereas a fast attack time immediately subjects the signal to the ratio and threshold settings of the compressor.
- Page 151 Owner’s Manual Tutorials A Brief Tutorial on Dynamics Processing Commonly used for noise reduction, expansion is very effective as a simple noise gate. The major difference between expansion and noise gating is that expansion is dependent on the signal level after the level crosses the threshold, whereas a noise gate works independent of a signal’s level beyond the threshold.
-
Page 152: Compression Settings: Some Starting Points
Compression Settings: Some Starting Points 8.2.3 The following are the compression presets that were used in the PreSonus BlueMax. We have included them as a jumping- off point for setting up compression on your StudioLive. Vocals Soft. This is an easy compression with a low ratio setting for ballads, allowing a wider dynamic range. - Page 153 Owner’s Manual Tutorials A Brief Tutorial on Dynamics Processing Left/Right (Stereo) Overheads. The low ratio and threshold in this setting gives a “fat” contour to even out the sound from overhead drum mics. Low end is increased, and the overall sound is more present and less ambient.
-
Page 154: Equalizers
PreSonus StudioLive 16.4.2 ™ Tutorials A Brief Tutorial on Dynamics Processing Stereo Mix Stereo Limiter. Just as the name implies, this is a hard limiter, or “brickwall, ” setting— ideal for controlling the level to a two-track mixdown deck or stereo output. -
Page 155: What Is An Eq
Tutorials Equalizers The StudioLive 16.4.2 is equipped with a 4-band quasi-parametric equalizer on every input and output bus. Here’s a brief explanation of how an EQ functions, as well as some charts to help you navigate the frequency ranges of various instruments so you can quickly choose the best EQ settings for your recordings and live mixes. - Page 156 Graphic EQ The StudioLive 16.4.2 features 8 graphic EQs, one for each Aux bus and a pair for the Main stereo bus. (See Section 5.3 for details.) A graphic EQ is a multiband equalizer that uses sliders to adjust the amplitude for each frequency band.
-
Page 157: Equalization Settings: How To Find The Best And Leave The Rest
Owner’s Manual Tutorials Equalizers High Mids (2 kHz to 4 kHz). The attack portion of percussive and rhythm instruments occurs in this range. High mids are also responsible for the projection of midrange instruments. Presence (4 kHz to 6 kHz). This frequency range is partly responsible for the clarity of a mix and provides a measure of control over the perception of distance. - Page 158 PreSonus StudioLive 16.4.2 ™ Tutorials Equalizers Instrument What to Cut Why to Cut What to Boost Why to Boost Human Voice 7 kHz Sibilance 8 kHz Big sound 2 kHz Shrill 3 kHz and above Clarity 1 kHz Nasal 200-400 Hz...
-
Page 159: General Eq Suggestions
Owner’s Manual Tutorials Equalizers General EQ Suggestions 8.3.3... - Page 160 PreSonus StudioLive 16.4.2 ™ Tutorials Equalizers Included with your StudioLive is a library of Channel Strip presets. Section 4.1.6 discusses how to load these presets onto a channel or bus and how to create your own presets. For an idea of where to start, check out the following generic EQ settings for several different instruments.
- Page 161 Owner’s Manual Tutorials Equalizers Snare LOW MID LOW MID LOW MID LOW MID ON/OFF PEAK/SHELF FREQ (Hz) GAIN ON/OFF HI/LOW Q FREQ (Hz) GAIN PEAK HI MID HI MID HI MID HI MID ON/OFF HI/LOW Q FREQ (kHz) GAIN ON/OFF PEAK/SHELF FREQ (kHz) GAIN...
-
Page 162: Subgroup Mixing
PreSonus StudioLive 16.4.2 ™ Tutorials Equalizers LOW MID LOW MID LOW MID LOW MID ON/OFF PEAK/SHELF FREQ (Hz) GAIN ON/OFF HI/LOW Q FREQ (Hz) GAIN PEAK HI MID HI MID HI MID HI MID ON/OFF LO/HI FREQ (kHz) GAIN ON/OFF... -
Page 163: Instrument Groups
Owner’s Manual Tutorials Subgroup Mixing A subgroup allows you to combine multiple channels in a single bus so that the overall level for the entire group is controlled by a single fader. In addition to level control, the StudioLive allows you to apply the Fat Channel’s noise gate, limiter, compression, and EQ to the group as a whole, in addition to the processing available for each channel. -
Page 164: Effects Group
PreSonus StudioLive 16.4.2 ™ Tutorials Subgroup Mixing hard left and right. Now Subgroups 1 and 2 are linked, with Sub 1 panned hard left and Sub 2 panned hard right. The channel panning is preserved. 8. Now assign Subgroup 1 to the Main outputs; since Subgroup 2 is linked to Sub 1, it is automatically assigned to the Main outs as well. -
Page 165: Aux Bus Mixing
Owner’s Manual Tutorials Subgroup Mixing • You can quickly add or subtract the effect by grabbing a fader. • The effect can be muted or soloed. • The performers on stage can have a different amount of the effect in their monitor mix than the audience hears in the main mix, enabling you to reduce the possibility of feedback while providing the performers with the tools they need for their best performance. -
Page 166: Monitor Mixing
Tutorials Aux Bus Mixing from the main and subgroup mixes. The StudioLive 16.4.2 is equipped with 8 aux buses: Aux 1 through 6, which have physical output jacks, and EFX A and B, which are the internal effects buses. Aux buses can be used for many applications, the two most common of which are creating monitor mixes and inserting external effects processors into the mix. - Page 167 Owner’s Manual Tutorials Aux Bus Mixing processor rather than using a channel insert: several channels can be sent to a single processor, and you can vary the level sent from each channel to the processor, allowing you to create an effects mix. The StudioLive features two internal effects buses.
-
Page 168: Digital Effects
PreSonus StudioLive 16.4.2 ™ Tutorials Aux Bus Mixing 3. Press the Mix button for Aux 3. The meter section of the StudioLive will now show the output levels of each of the 16 channels. The encoders below each meter control the output level of each channel into Aux 3. You will use these encoders... -
Page 169: Reverb
Owner’s Manual Tutorials Digital Effects most common type of effects is use for live sound: reverb and delay. Reverb 8.6.1 Reverberation—or reverb, as it is more commonly known—is perhaps the most widely used effect. Natural reverb is created by sound waves reflecting off of a surface or many surfaces. -
Page 170: Level Setting Procedure In Detail
PreSonus StudioLive 16.4.2 ™ Tutorials Digital Effects delays to create more complex time-based effects. The source signal is delayed so that it is heard later than it actually occurred. Delay Time. Delay time is the time between the source signal and its echo. -
Page 171: The Solo Bus
Owner’s Manual Tutorials Level Setting Procedure in Detail 1. Turn each of the 16 trims to 0/-20. 2. Press the Input button in the Meter section. 3. In the Solo bus section, select PFL and turn the Cue level to 12 o’clock. 4. -
Page 172: Using The Solo Bus For Monitoring
PreSonus StudioLive 16.4.2 ™ Tutorials The Solo Bus The Solo bus has three different modes: AFL (default), PFL, and SIP. AFL (After-Fade Listen). AFL sends the channel or subgroup signal to the Solo bus post-fader so that you can control the level of the soloed signal with the fader. -
Page 173: Using Solo In Place (Sip) To Set Up A Mix
Cascading Two or More StudioLive 16.4.2s Your StudioLive 16.4.2 can be combined with one or more StudioLive 16.4.2s, using a FireWire cable, to create a larger console. Two units can be cascaded... -
Page 174: Configuring Multiple Units
Any value larger than that of the Master can be used for the Slave unit. If you will be recording with two StudioLive 16.4.2 mixers, take a moment to look at the serial numbers on the bottom of each mixer. The mixer with the lowest serial number will be designated as Inputs and Outputs 1-16 in your recording application. -
Page 175: Internal Effects Buses
Owner’s Manual Tutorials Cascading Two or More StudioLive 16.4.2s the Mix button for the corresponding aux will illuminate on every mixer in the chain. For example, if you press the Mix button on Aux 1 on the Master unit, the Mix button on Aux 1 on each of the Slave units will also illuminate. -
Page 176: Scene Store And Recall
PreSonus StudioLive 16.4.2 ™ Tutorials Cascading Two or More StudioLive 16.4.2s the mixers in the chain can either be merged together or local only. This is determined on each mixer for the unit with the next ID number in the chain and therefore the previous bank of channels. - Page 177 Owner’s Manual Tutorials Cascading Two or More StudioLive 16.4.2s accept signals from the channels on their respective mixers. The following inputs and bus are local only: • Talkback Microphone: The Talkback Microphone input on the Master unit‘s Master Section is the only talkback mic input that can be routed to the Aux Mixes on the Master Unit and to its Main outputs.
-
Page 178: Technical Information
PreSonus StudioLive 16.4.2 ™ Technical Information Specifications Technical Information Specifications Microphone Preamp Type XLR Female, balanced Frequency Response to Direct Output (at unity gain) 20 Hz-40 kHz, 0 / -0.5 dBu Frequency Response to Main Output (at unity gain) 20 Hz-20 kHz, ± 0.5 dBu Input Impedance 1 kΩ... -
Page 179: Auxiliary Inputs
Owner’s Manual Technical Information Specifications Auxiliary Inputs Type 1/4” TRS Female, balanced (2 stereo pairs) Maximum Input Level +22 dBu Main Outputs Type XLR Male, balanced (stereo pair); 1/4” TRS Female, balanced (stereo pair); XLR Male, balanced (mono) Rated Output Level +24 dBu Output Impedance 10 kΩ... -
Page 180: Digital Audio
PreSonus StudioLive 16.4.2 ™ Technical Information Specifications Noise Gate / Expander Threshold Range -84 dB to 0 dB Attack Time 0.5 ms Release Time 0.05s to 2s Expander Attenuation Range Noise Gate Attenuation Range ∞ Compressor Threshold Range -56 dB to 0 dB... - Page 181 Owner’s Manual Technical Information Specifications Clock Jitter <20 ps RMS (20 Hz - 20 kHz) Jitter Attenuation >60 dB (1 ns in ≈ 1 ps out) Power Connector Input-Voltage Range 90 to 240 VAC (factory-configured for country of destination) Power Requirements (continuous) 100W Physical Length...
-
Page 182: Channel Presets
Channel Presets Your StudioLive comes with 50 Fat Channel presets that were custom- designed by professional PreSonus users. These presets can be altered, renamed and overwritten, and there are 50 additional empty storage locations where you can build your own custom library of channel-strip settings. -
Page 183: Digital Effects Types
Owner’s Manual Technical Information Digital Effects Library Digital Effects Types Your StudioLive contains 13 different effect types from which to create your own custom presets or to redesign the included library of presets. NAME TYPE PARAM 1 PARAM 2 PARAM 3 PARAM 4 PARAM 5 PARAM 6... -
Page 184: Block Diagram
PreSonus StudioLive 16.4.2 ™ Technical Information Block Diagram Block Diagram Firewire Send 1-16 Input Input Channels 1-16 Channel Meter Gain Output Mic -6 + 65 dB Line -20 +20 dB Phase Channel Insert Gate Compressor Equalizer Mic Input Main Mix L... - Page 185 Owner’s Manual Technical Information Block Diagram Master Bus Dig Out FireWire Send Master Meter TalkBack Mic to Main Gate Compressor Equalizer BALANCE LINE DRIVERS Left Main Output 36 - 465Hz 90 - 1.2kHz 380 - 5kHz 1.4k - 18kHz Limit Right Output Level Attenution 0 to -40 dB...
- Page 186 PreSonus StudioLive 16.4.2 ™ Technical Information Old-Fashioned Analog Session Data StudioLive 16.4.2 Track Trim Production Notes Track Trim Production Notes Instrument ______________________________ Instrument ______________________________ Mic used ______________________________ Mic used ______________________________ Notes ______________________________ Notes ______________________________ ________________________ ________________________ Instrument ______________________________ Instrument ______________________________...
- Page 187 Owner’s Manual Technical Information Recall Sheet (print out on US tabloid or Euro A3 paper or 2-page letter size or A4) Artist ____________________________Scene ________________________Date __________________ A U X I N P U T S AUX In A SOURCE AUX In B SOURCE Level Level Notes ________________________________...
-
Page 188: 10.0 Troubleshooting And Warranty
You can get individual technical assistance by calling PreSonus at 225-216-7887, Monday through Friday, between the hours of 9 a.m. and 5 p.m. Central Time. PreSonus technical support is available via email during the same hours at techsupport@presonus.com. - Page 189 This video chipset is only found in PC laptops and is entirely integrated as the computer’s only video controller. PreSonus strongly recommends that users do not purchase a system with this chipset, as there is currently no workaround for this incompatibility.
-
Page 190: Presonus Studiolive 16.4.2 Limited Warranty
PreSonus reserves the right to update any unit returned for repair. PreSonus reserves the right to change or improve the design of the product at any time without prior notice. This warranty does not cover claims for damage due... - Page 191 Owner’s Manual Index Index Ableton Live 63 Equalizer AFL 166 Definition 149 Arrow Tool 109 Graphic 150 Assigning FX Parametric 149 To Main Bus & Subgroups 37 Shelving 150 Audio Device Eraser Tool 111 Capture 105 Expansion Studio One Artist 127 Definition 144 Audio I/O Set-up Terminology Associated With 145...
- Page 192 PreSonus StudioLive 16.4.2 ™ Index LCD Contrast 56 Safe Modes 71 Limiter 27 Sample Rate 56, 70 Loading Presets Scenes Fat Channel 52 Creating in VSL 76 FX 46 Recalling 50 Graphic EQ 55 Recalling Groups 51 in VSL 80...
- Page 193 Owner’s Manual Troubleshooting and Warranty Current Sub Section...
- Page 194 Note: No product support is available when you call the number above. Refer to your Certificate of Warranty in your Owner’s Manual for PreSonus’ Product Support telephone number. Baton Rouge • USA • www.presonus.com...
- Page 195 © 2011 PreSonus Audio Electronics, Inc. All Rights Reserved. The following are trademarks or registered trademarks of PreSonus Audio Electronics, Inc., all rights reserved: AudioBox, Capture, FireStudio, PreSonus, StudioLive, Studio One, and XMAX. Mac, Mac OS, and Macintosh are registered trademarks of Apple, Inc., in the U.S. and other countries. Windows is a registered trademark of Microsoft, Inc., in the U.S.
- Page 196 • Consult the dealer or an experienced radio/TV technician for help. CAUTION: Changes or modifications to this device not expressly approved by PreSonus Audio Electronics could void the user’s authority to operate the equipment under FCC rules. This apparatus does not exceed the Class A/Class B (whichever is applicable) limits for radio noise emissions from digital apparatus as set out in the radio interference regulations of the Canadian Department of Communications.
Need help?
Do you have a question about the StudioLive 16.4.2 and is the answer not in the manual?
Questions and answers