PRESONUS StudioLive 16.0.2 Owner's Manual
Performance and recording digital mixer
Hide thumbs
Also See for StudioLive 16.0.2:
- Owner's manual (176 pages) ,
- Quick start manual (23 pages) ,
- Owner's manual (80 pages)

Related Manuals for PRESONUS StudioLive 16.0.2


Summary of Contents for PRESONUS StudioLive 16.0.2
- Page 1 StudioLive 16.0.2 ™ Performance and Recording Digital Mixer Owner’s Manual ® English www.presonus.com...
- Page 2 Important Safety Instructions 14. Servicing is required when the apparatus has been damaged in any way, such as The exclamation point within an equilateral triangle is intended to alert the user if a power-supply cord or plug is damaged; or liquid has been spilled, or objects to the presence of important operating and maintenance (servicing) instructions have fallen, into the apparatus;...
-
Page 3: Table Of Contents
Aux and FX Buses — 26 About This Manual — 1 4.4.1 Analog Aux Bus Controls — 26 4.4.2 Internal FX Bus Controls — 27 Summary of StudioLive 16.0.2 Hardware Features — 2 4.4.3 Aux and FX Bus Channel Sends — 27 What is in the Box —... - Page 4 Roland FC-300 — 57 Resources — 60 Stereo Microphone Placement — 60 EQ Frequency Guides — 63 Technical Specifications — 65 StudioLive 16.0.2 Block Diagram — 68 StudioLive 16.0.2 Recall Sheet — 70 Troubleshooting and Warranty — 71 Trouble Shooting — 71...
-
Page 5: Overview
StudioLive before trying to connect it to your computer. This will help you avoid problems during installation and setup. This manual covers hardware functions for the StudioLive 16.0.2. A separate manual, also included with your StudioLive mixer, covers the StudioLive Software Library and connecting and using your StudioLive with a computer. -
Page 6: Summary Of Studiolive 16.0.2 Hardware Features
Summary of StudioLive 16.0.2 Hardware Features Summary of StudioLive 16.0.2 Hardware Features • 24-bit/48 kHz sampling rate • 12 Class A XMAX microphone preamplifiers • 16 line-level inputs • 4 auxiliary buses • High-definition analog-to-digital converters (118 dB dynamic range) •... -
Page 7: What Is In The Box
StudioLive™ 16.0.2 Owner’s Manual What is in the Box Your StudioLive package contains the following: • PreSonus StudioLive 16.0.2 digital recording and performance mixer • 6’ (1.8 m) 6-pin-to-6-pin FireWire 400 cable • 6’ (1.8 m) 6-pin-to-9-pin FireWire 400-to-800 cable •... -
Page 8: Getting Started
Level Setting Procedure Getting Started Before you begin, here are a few general rules of thumb: • Always turn the Main fader and both the Monitor and Phones knobs in the Monitor section down before making connections. • Before plugging or unplugging a microphone while other channels are active, mute the channel to which you are connecting. - Page 9 StudioLive™ 16.0.2 Owner’s Manual Connect the Main outs (TRS or XLR) of your StudioLive to your power amplifier or powered monitors. If you’re using passive speakers, connect them to your power amplifier using speaker cable. Bring down all the faders on your StudioLive to the ∞ setting. Make sure that the Mic/Line knob on Channel 1 is all the way counter-clockwise.
-
Page 10: Level Setting Procedure
Level Setting Procedure Plug your StudioLive into a power outlet and turn it on. If your microphone requires phantom power, engage the 48V button on Channel 1 of your StudioLive. Turn on your amplifier or powered monitors. - Page 11 StudioLive™ 16.0.2 Owner’s Manual Press the Input button in the Meter section. 10. Speak or sing into your microphone at approximately the same volume you expect during the performance. 11. Turn the trim knob on Channel 1 clockwise while watching the first meter in the Fat Channel.
- Page 12 Level Setting Procedure 13. Press the Select button on Channel 1 and raise the Channel 1 fader until it reaches “U” (unity gain). 14. Bring up the Main fader until you can comfortably listen to your microphone through your speakers. 15.
-
Page 13: Hookup
StudioLive™ 16.0.2 Owner’s Manual Hookup Rear-Panel Connections Microphone Inputs. Your StudioLive is equipped with 12 PreSonus XMAX microphone preamplifiers for use with all types of microphones. The XMAX preamplifier has a Class A input buffer, followed by a dual-servo gain stage. This arrangement results in ultra-low noise and wide gain control, allowing you to boost signals without increasing unwanted background noise. - Page 14 Rear-Panel Connections Channels 13/14 and 15/16 have unbalanced RCA connections, in addition to the balanced TRS connections. Like the TRS connections, the right RCA input will not be accessible on the mixer if the channels are not linked. Aux Outputs. The StudioLive is equipped with four auxiliary outputs.
- Page 15 StudioLive™ 16.0.2 Owner’s Manual MIDI I/O. MIDI stands for “Musical Instrument Digital Interface. ” However, MIDI has uses well beyond instruments and sequencing. The MIDI inputs and outputs allow connection to, and communication with, external MIDI equipment. One function of these ports is to serve as a standard MIDI interface, useful for sequencing and myriad other applications.
-
Page 16: Typical Live Band Hookup Diagram
Typical Live Band Hookup Diagram Typical Live Band Hookup Diagram Lead Vocal Mic Bass Guitar Keyboard Rhythm Guitar and Amp Drum Set 100 - 240 VAC 50-60Hz Monitors Laptop Front-of-House Speakers MIDI Pedal... -
Page 17: Typical Recording Hookup Diagram
StudioLive™ 16.0.2 Owner’s Manual Typical Recording Hookup Diagram Lead Vocal Mic Rhythm Guitar and Amp Bass Guitar Drum Set 100 - 240 VAC 50-60Hz PreSonus HP60 Headphone Distribution Laptop Reference Monitors MIDI Controller... -
Page 18: Controls
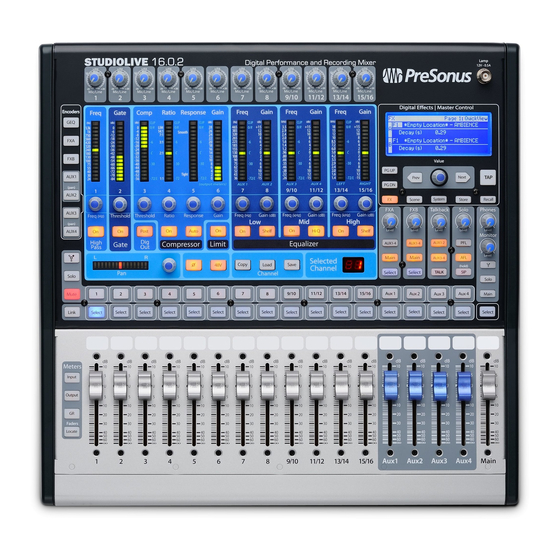
The Fat Channel Controls The Fat Channel The revolutionary Fat Channel is the heart of the StudioLive. The Fat Channel makes dynamics, routing, and panning for every input and output on the StudioLive available at the touch of a Select button. The 12 multipurpose knobs and meters located in the Fat Channel control nearly every adjustment you will need to make on your StudioLive. - Page 19 StudioLive™ 16.0.2 Owner’s Manual 4.1.2 Fat Channel Processing Guide The following table provides a quick guide to the processing that is available for each bus in the StudioLive, as well as which inputs and buses are available for recording. For more information on FireWire sends, please see Section 2.5 in the Software Library Reference Manual.
-
Page 20: The Fat Channel
Power User Tip: The “Gate” in to the input level. It is useful for your StudioLive 16.0.2 is actually lowering the dynamic range of a downward expander. In an instrument or vocal, making it... - Page 21 StudioLive™ 16.0.2 Owner’s Manual Compressor Auto Mode Compressor Response. Sets and Button. Enables Automatic Displays the Compressor Response Mode. Response Setting for the Selected Input Channel or Output Bus. When Auto mode is active, the Response control This encoder sets, and the meter becomes inoperative, and a displays, the compressor’s preprogrammed attack and...
-
Page 22: The Fat Channel
The Fat Channel Limiter On/Off. Turns on the Low EQ Gain Control. Sets and Limiter for the Selected Input Displays the Gain Attenuation or Channel or Output Bus. Boost of the Center Frequency. When the limiter is engaged This encoder sets, and the meter the button will illuminate. - Page 23 StudioLive™ 16.0.2 Owner’s Manual Mid EQ Gain Control. Sets and High EQ Frequency Control. Displays the Gain Attenuation or Sets and Displays the Center Boost of the Center Frequency for Frequency of the High EQ. the Mid Band. This encoder sets, and the meter This encoder sets, and the meter displays, the center frequency displays, the gain cut or boost...
-
Page 24: Fat Channel Panning And Stereo Link
Selected Channel LED read-out in the Fat Channel. On the StudioLive 16.0.2’s four stereo channels, the stereo link will enable the right side (channels 10, 12, 14, and 16) to be heard in your mix. Each of these stereo channels’... -
Page 25: Copying Fat Channel Settings
StudioLive™ 16.0.2 Owner’s Manual 4.1.6 Copying Fat Channel Settings In addition to being able to create and save custom Fat Channel presets, every setting in the Fat Channel can be copied from one channel or bus to any other channel or bus. Press the Copy button to copy the settings on the selected channel or bus. -
Page 26: Saving Fat Channel Presets
The Fat Channel 4.1.8 Saving Fat Channel Presets If you have created a channel-strip setting in the Fat Channel that you would like to save to the Channel Preset library, press the Fat Channel’s Save button. You will notice that the LCD will display the Channel Preset Save menu. 1. -
Page 27: Channel Presets Library
StudioLive™ 16.0.2 Owner’s Manual 4.1.9 Channel Presets Library Your StudioLive comes with 50 Fat Channel presets custom designed by professional PreSonus users. These presets can be altered, renamed, and overwritten; however, there are 49 additional empty storage locations for you to build your own custom library of channel-strip settings. DRM: Kick 1 GTR: Acoustic Strumming DRM: Kick 2... -
Page 28: Metering
Metering Metering The StudioLive offers flexible metering at the touch of a button. The 12 meters in the Fat Channel section can monitor: • The input signal for each channel, post-gain and pre-dynamics, pre-EQ, and pre-fader • The gain reduction for each input channel •... -
Page 29: Input Channel Strip
StudioLive™ 16.0.2 Owner’s Manual Input Channel Strip The StudioLive is equipped with all of the standard input controls of an analog mixer. In addition, the StudioLive provides the added flexibility of routing a playback stream from your audio-recording software to the mixer via the FireWire bus, just as if it were an analog input. -
Page 30: Aux And Fx Buses
Aux and FX Buses Aux and FX Buses The aux bus provides outputs to create auxiliary mixes that are separate from the main mix. Your StudioLive is equipped with 6 aux buses: Aux 1 through 4, which have physical output jacks, and EFX A and B, which are the internal effects buses. Aux buses can be used for many applications, the two most common of which are creating monitor mixes and inserting external effects processors into the mix. -
Page 31: Internal Fx Bus Controls
StudioLive™ 16.0.2 Owner’s Manual 4.4.2 Internal FX Bus Controls Internal Effects Bus Select Button. Enables Fat Channel Viewing. As described in section 4.1.1, the Select button routes its effects bus through the Fat Channel, allowing you to add dynamics processing and EQ. Main Assign Button. - Page 32 Aux and FX Buses the pan controls for each of their respective input channels. The meters will display the pan setting of each of the input channels. Use Aux 1 Encoder mode to set the send level of each channel to the aux pair. For more information on stereo linking, please review Section 4.1.4.
-
Page 33: Creating Monitor Mixes
StudioLive™ 16.0.2 Owner’s Manual 4.4.4 Creating Monitor Mixes Creating custom monitor mixes is critical. If musicians can’t hear themselves or their bandmates, their performance will suffer. A monitor mix can be mono or stereo. Most often, an individual live monitor mix is mono and is sent to a floor-wedge or sidefill monitor. -
Page 34: Creating Internal Fx Mixes
Aux and FX Buses 4.4.5 Creating Internal FX Mixes There are at least two main advantages to creating an FX mix, rather than inserting an effect in a channel. First, several channels can be sent to a single processor. In addition to greatly simplifying the number of parameters you have to control, this can create a cohesive sound in your mix. -
Page 35: Multimodes
StudioLive™ 16.0.2 Owner’s Manual MultiModes Each channel and aux on the StudioLive 16.0.2 features a MultiMode button. These buttons allow you to solo or mute a channel or aux, as well as engage the channel FireWire returns. The function of these buttons is determined by the control buttons directly to the left of the row of the MultiMode buttons. -
Page 36: Main Output Bus
Main Output Bus Main Output Bus Main Select Button. Enables Fat Channel Viewing. As previously described in Section 4.1.1, the Select button routes its channel through the Fat Channel, enabling you to add dynamics processing, EQ, panning, etc. Main Fader. Controls the Level of the Main Output. The fader controls the overall level of the main stereo output. -
Page 37: Solo Bus
StudioLive™ 16.0.2 Owner’s Manual Solo Bus The StudioLive features an independent Solo bus. This feature is extremely useful in setting levels for monitor mixes, dialing in dynamics processing on each channel, and fixing issues during a live show without interrupting the main mix. The Solo bus has three modes: AFL (default), PFL, and SIP: •... -
Page 38: Using The Solo Bus For Monitoring
Solo Bus 4.8.2 Using the Solo Bus for Monitoring When mixing live, or when recording multiple musicians at once, it is often necessary to quickly listen in on just one instrument or group. The Solo and Monitor buses can be used together for this purpose. It is important to note that if you wish to monitor with speakers, rather than headphones, it is necessary to connect the speakers to the Control Room outputs on the back of your StudioLive rather than to one of the main output pairs. -
Page 39: Using Solo In Place (Sip) To Set Up A Mix
StudioLive™ 16.0.2 Owner’s Manual 4.8.3 Using Solo in Place (SIP) to Set Up a Mix We started this manual with a quick and easy way to set up the input levels for your StudioLive, ensuring that you have the highest possible input level without clipping your analog-to-digital converters. -
Page 40: Monitor Bus
Monitor Bus Once you are satisfied, bring the fader back down. Kick snare Tom 1 Tom2 OH L Next, press the MultiMode button on the snare-mic channel and repeat steps 4-6. In this way continue with each drum mic, then move on to the other instruments that are connected to your StudioLive. - Page 41 StudioLive™ 16.0.2 Owner’s Manual Monitor Output Level Control. Adjusts the Overall Level of the Monitor Output. This knob adjusts the overall level of the control-room monitor outputs. FireWire Monitor Button. Assigns FireWire Returns 1 and 2 to the Monitor Bus. The FireWire Monitor button patches FireWire returns 1 and 2 to the monitor bus.
-
Page 42: Digital Effects | Master Control
The Digital FX (Effects) Menu Digital Effects | Master Control From the Digital Effects | Master Control section, you can select and change the parameters of the two internal effects processors, and you can store and recall every setting on the StudioLive. Because almost all StudioLive features are controlled from the mixing surface (rather than using menus and submenus), you will mainly use this section... -
Page 43: Creating Fx Presets
StudioLive™ 16.0.2 Owner’s Manual 5.1.1 Creating FX Presets Page 1 of the FX Menu provides access to your library of effects presets. Pages 2 and 3 provide access to the 13 FX types. An FX preset is made by adjusting the default parameters of an FX type, so one FX type can be the foundation for myriad different presets. -
Page 44: The Digital Fx (Effects) Menu
The Digital FX (Effects) Menu 8. Turn the Value encoder clockwise or counter-clockwise to change the letter. The StudioLive allows you to customize the name with uppercase and lowercase letters and a selection of numerals and punctuation marks. Press the Tap button to quickly insert a space. -
Page 45: Delay And Its Parameters
StudioLive™ 16.0.2 Owner’s Manual 5.1.3 Delay and its Parameters A delay essentially creates an echo, although you can often use delays to create more complex time-based effects. The source signal is delayed so that it is heard later than it actually occurred. The following parameters are available for the four delay types the StudioLive offers: Time. -
Page 46: Digital Effects Preset Library
The Digital FX (Effects) Menu 5.1.4 Digital Effects Preset Library POS. TYPE NAME POS. TYPE NAME AMBIENCE Natural Cathedral Lively Gymnasium SMALL ROOM Closet Arena Studio A PLATE PlateVerb Shimmer Studio B PlateVerb Thick Bedroom PlateVerb Drums BRIGHT ROOM Kitchen PlateVerb Vox Tile Floors MONO DELAY... -
Page 47: Digital Effects Types
StudioLive™ 16.0.2 Owner’s Manual 5.1.5 Digital Effects Types Your StudioLive contains 13 different effect types from which to create your own custom presets or to redesign the included library of presets. NAME PARAM (L1) PARAM (L2) PARAM (L2) PARAM (L2) PARAM (L2) PARAM (L2) PARAM (L2) -
Page 48: Scenes
Scenes Scenes The StudioLive allows you to create and store a library of Scenes. A Scene is like a snapshot of your mix. It stores each Fat Channel parameter for every input and bus, as well as each fader’s position, the aux and effects mixes, channel mutes and solos, and the input selection (analog input or FireWire playback stream). -
Page 49: Creating A Scene
StudioLive™ 16.0.2 Owner’s Manual 5.2.2 Creating a Scene Creating a Scene requires simply dialing in a mix that you would like to use at a later date and saving it. This has obvious benefits for both studio and live sound. For example, in the studio, saving and recalling a Scene allows you to move to another song or project and come back to the current mix later. - Page 50 Scenes EQ and Dyn: All Fat Channel dynamics processing, filter parameters, and pan position for every channel and bus. Aux Mix: All aux mixes parameters including: • Channel sends to aux mixes • Channel sends to FXA and FXB • Pre1/Pre2 position for each aux and FX bus Faders: All fader positions.
-
Page 51: Fader Locate
StudioLive™ 16.0.2 Owner’s Manual 5.2.4 Fader Locate If you enable fader positions as a part of your Scene recall, the StudioLive will automatically put the meters in Fader Locate mode after you press the Recall button. The Fader Locate button will illuminate, and the meter section of the Fat Channel will display the recalled fader position. -
Page 52: Graphic Equalizer
Graphic Equalizer Graphic Equalizer The StudioLive 16.0.2 features a 31-band, 1/3-octave graphic EQ that can be inserted on the main output bus. A graphic EQ is a multiband equalizer that uses sliders to adjust the amplitude for each frequency band. It gets its name from the positions of the sliders, which graphically display the resulting frequency-response curve. -
Page 53: The Graphic Eq Menu And Controls
StudioLive™ 16.0.2 Owner’s Manual that, when subtracted from the user’s curve, will produce the flattest possible response: 0 dB. The resulting response is then used to find coefficients for the second shelving filter through the same optimization process. Coefficients for all available shelving filters are found through a recursive process. Unlike conventional designs, the frequency and bandwidth of the “bands”... -
Page 54: Saving And Loading Geq Presets
System Menu 5.3.2 Saving and Loading GEQ Presets Like all other parameters on the StudioLive, graphic EQ settings can be stored and recalled. If you have created a graphic EQ setting that you would like to save to the GEQ Preset library, press the Save button in the Fat Channel while that graphic EQ is active. - Page 55 MIDI Control Mode The StudioLive 16.0.2 can be remotely controlled with a DAW, a MIDI footswitch, a MIDI keyboard, and an assortment of other MIDI control devices. Pages 4 and 5 of the System...
-
Page 56: Using Midi Control Mode To Remote-Control Studiolive
To enable MIDI Control Mode, navigate to page 4 of the System menu and set MIDI Control Mode to “On” by turning the value encoder. This will enable your StudioLive 16.0.2’s MIDI features so that the mixer can be controlled by any standard MIDI controller. -
Page 57: Recalling Scenes And Fx Presets Remotely
MIDI controller. 5.5.2 Using Control Change Messages to Control Volume and FX Assignments The other type of MIDI message your StudioLive 16.0.2 uses is the Control Change (CC) message. A MIDI Control Change message can be used for many things, including Volume, Pan, Sustain On/Off, and Modulation. -
Page 58: Controlling The Studiolive 16.0.2 With A Behringer Fcb1010
Change and Program Change messages on a given MIDI channel. 5.5.3 Controlling the StudioLive 16.0.2 with a Behringer FCB1010 This tutorial will show you how to quickly configure your StudioLive 16.0.2 so that you can control it with a Behringer FCB1010. The setup configuration detailed here is just an example;... - Page 59 StudioLive™ 16.0.2 Owner’s Manual Navigate to Pages 4 and 5 of your StudioLive system menu and set each page up as shown in these images: Setting Up Different MIDI Channels on Your FCB1010 Next, you need to configure the pedals on your FCB 1010 to send information on different MIDI channels.
- Page 60 Using MIDI Control Mode to Remote-Control StudioLive Scene Recall Select Bank 00 by using the Up or Down pedals. Press Pedal 1 to select Preset 1. Press and hold the Down pedal to enter Preset Configuration mode. (You’ll see a flashing green LED.) Press the Up pedal to confirm.
-
Page 61: Controlling The Studiolive
FXA output level, while the other will control the Main output volume. This tutorial will show you how to quickly configure your StudioLive 16.0.2 so that you can control it with a Roland FC-300. The setup configuration detailed here is just an example;... - Page 62 Using MIDI Control Mode to Remote-Control StudioLive Creating a New Patch on the Roland FC-300 Now that your StudioLive is set up to communicate with the Roland FC-300, you will need to create a new patch. Remember, you must follow all of the steps in this tutorial to control your StudioLive as previously described.
- Page 63 StudioLive™ 16.0.2 Owner’s Manual FXA Assign/Unassign to Mains Next, we will set CTL Pedal 2 to control the Main assignment (“mute”) for FXA. Press the right Parameter button until the LCD reads “CTL2: Assign. ” The curser should be on the CH# Tx field. Press the Value Down button until the MIDI channel value is “04.
-
Page 64: Resources
Stereo Microphone Placement Resources Stereo Microphone Placement The following are a few recording applications to help you get started with your StudioLive. These are by no means the only ways to record these instruments. Microphone selection and placement is an art. For more information, visit your library or local bookstore, as there are many books and magazines about recording techniques. - Page 65 StudioLive™ 16.0.2 Owner’s Manual Acoustic Guitar Point a small-diaphragm condenser microphone at the 12th fret, approximately 8 inches away. Point a large- diaphragm condenser microphone at the bridge of the guitar, approximately 12 inches from the guitar. Experiment with distances and microphone placement. Another popular method is using an XY microphone placement with two small-diaphragm condenser microphones.
-
Page 66: Stereo Microphone Placement
Stereo Microphone Placement Drum Overheads (XY example) Place two small-diaphragm condenser microphones on an XY stereo-microphone holder (bar). Position the microphones so that each one is at a 45-degree angle, pointed down at the drum kit, approximately 7 or 8 feet above the floor or drum riser. -
Page 67: Eq Frequency Guides
StudioLive™ 16.0.2 Owner’s Manual EQ Frequency Guides Table 1 Instrument What to Cut Why to Cut What to Boost Why to Boost Human Voice 7 kHz Sibilance 8 kHz Big sound 2 kHz Shrill 3 kHz and above Clarity 1 kHz Nasal 200-400 Hz Body... - Page 68 EQ Frequency Guides Table 2 BOOST • harder bass to low • vocal presence frequency • kick & tom attack instruments (kick, • tom, bass) more finger sound on bass • • guitar and snare brighten vocals, • piano and acoustic acoustic guitar, fullness •...
-
Page 69: Technical Specifications
StudioLive™ 16.0.2 Owner’s Manual Technical Specifications Microphone Preamp Type XLR Female, balanced Frequency Response to Direct Output (at unity gain) 20 Hz-40 kHz, ± 0.5 dBu Frequency Response to Main Output (at unity gain) 20 Hz-20 kHz, ± 0.5 dBu Input Impedance 1 kΩ... -
Page 70: Aux Outputs
Technical Specifications Aux Outputs Type ¼” TRS Female, balanced (mono) Rated Output Level +18 dBu Output Impedance 51Ω Monitor Outputs Type 1/4” TRS Female, balanced (stereo pair) Rated Output Level +18 dBu Output Impedance 51Ω System Crosstalk Input to Output (Ref = +4 dBu, 20 Hz-20 kHz, unwtd) -90 dBu Adjacent Channels (Ref = +4 dBu, 20 Hz-20 kHz, unwtd) -87 dBu Noise Gate (Expander) Threshold Range... -
Page 71: Digital Audio
StudioLive™ 16.0.2 Owner’s Manual Digital Audio ADC Dynamic Range (A-wtd, 48 kHz) 118 dB DAC Dynamic Range (A-wtd, 48 kHz) 118 dB FireWire S400, 400 Mb/s Internal Processing 32-bit, floating point Sampling Rate 44.1, 48 kHz A/D/A Bit Depth 24 bits Reference Level for 0 dBFS +18 dBu Clock... -
Page 72: Studiolive 16.0.2 Block Diagram
StudioLive 16.0.2 Block Diagram StudioLive 16.0.2 Block Diagram Input Channel Meter FireWire Return Streams 1- 8 Input Channels 1-8 Gain Mic -6 + 65 dB Line -20 +20 dB Phase Gate Equalizer Compressor Limit Main Mix L Mic Input Mic Pre A/D INPUT BUFFER H.P. - Page 73 StudioLive™ 16.0.2 Owner’s Manual Master Bus Dig Out FireWire Send Output Channel Meters 13/14 & 15/16 Gate Compressor Limit Equalizer BALANCE LINE DRIVERS On/Off Left Main Output Right Output Level Attenution 36 - 465Hz .26 - 3.5kHz 1.4k - 18kHz 0 to -40 dB D/A OUTPUT BUFFER Fat Channel...
-
Page 74: Studiolive 16.0.2 Recall Sheet
StudioLive 16.0.2 Recall Sheet StudioLive 16.0.2 Recall Sheet Artist Scene Date TRACK TRIM PRODUCTION NOTES TRACK TRIM PRODUCTION NOTES Instrument Instrument Mic used Mic used Notes Notes Instrument Instrument Mic used Mic used Notes Notes Instrument Instrument Mic used Mic used... -
Page 75: Troubleshooting And Warranty
StudioLive™ 16.0.2 Owner’s Manual Troubleshooting and Warranty Troubleshooting Please check the PreSonus Web site (www.presonus.com) regularly for software information and updates, firmware updates, and support documentation, including frequently asked questions. Online technical support is available at www.presonus. com/support/Contact-Technical-Support. Technical support is available via email at techsupport@presonus.com. PreSonus telephone technical support is available to customers in the USA on Monday through Friday from 9 a.m. -
Page 76: Presonus Limited Warranty
PreSonus Limited Warranty PreSonus Limited Warranty PreSonus Audio Electronics, Inc., warrants this product to be free of defects in material and workmanship for a period of one year from the date of original retail purchase. This warranty is enforceable only by the original retail purchaser. To be protected by this warranty, the purchaser must complete and return the enclosed warranty card within 14 days of purchase. - Page 77 StudioLive™ 16.0.2 Owner’s Manual Declaration of Conformity Responsible Party: PreSonus Audio Electronics Address: 7257 Florida Blvd., Baton Rouge, LA 70806 USA 1-225-216-7887 Phone: declares that StudioLive™ 16.0.2 complies with Part 15 of the FCC rules. Operation is subject to the following two conditions: 1.
- Page 78 Consult the dealer or an experienced radio/TV technician for help. CAUTION: Changes or modifications to this device not expressly approved by PreSonus Audio Electronics could void the user’s author- ity to operate the equipment under FCC rules. This apparatus does not exceed the Class A/Class B (whichever is ap-...
- Page 79 Serves 12 © 2012 PreSonus Audio Electronics, Inc. All Rights Reserved. AudioBox, DigiMax, FireStudio, Nimbit, PreSonus, QMix, StudioLive, and XMAX are trademarks or registered trademarks of PreSonus Audio Electronics, Inc. Capture, Impact, Mixverb Presence, RedLightDist, SampleOne, Studio One, and Tricomp are trademarks or registered trademarks of PreSonus Software Ltd.
- Page 80 StudioLive 16.0.2 ™ Performance and Recording Digital Mixer Owner’s Manual 7257 Florida Boulevard • Baton Rouge, ® Louisiana 70806 USA • 1-225-216-7887 Part# 820-SL0002-C www.presonus.com...
-
Page 81: Quick Start Guide
StudioLive 16.0.2 ™ Quick Start Guide English Español Deutsch ™ Français www.presonus.com... -
Page 82: Level Setting
RoHS This product is compliant with the EU Directive 2002/95/EG for 6. Clean only with dry a cloth. VSL lets you control your StudioLive 16.0.2 from a the Restriction of the use of Certain Hazardous Substances in Electrical laptop and vice-versa. Once you have it set up, you can 7. - Page 83 Your P.A. and studio equipment should be powered on in the following order: A. Sound sources (keyboards, direct boxes, microphones, etc.) connected to the StudioLive inputs B. StudioLive 16.0.2 C. Computer (if applicable) D. Power amplifiers or powered monitors When it’s time to power down, your system should be turned off in the reverse order.
- Page 84 PreSonus StudioLive ™ 16.0.2 Quick Start Guide Getting Started Overview Introduction Plug your StudioLive into a power outlet and turn it on. Overview If your microphone requires phantom power, press the Select button on Channel 1 of your StudioLive and engage the 48V button. Introduction Turn on your amplifier or powered monitors.
- Page 85 PreSonus StudioLive ™ 16.0.2 Quick Start Guide Overview Overview Rear-Panel Connections Basic Hookup Diagram Rear-Panel Connections Basic Hookup Diagram Stereo Inputs, Channels 9-16. Channels 9-12 are Line-level Input, lead vocal mic stereo inputs with Channels 1-8. Talkback Mic Trim ¼-inch, balanced Each channel of the Microphone Inputs.
- Page 86 MultiMode section. Q of 0.55. HiQ Monitor Bus lets you Each channel and Aux narrows the Q to monitor multiple sources on the StudioLive 16.0.2 2.0. from the Monitor features a MultiMode Outputs or Headphones, button. These buttons High EQ band...
- Page 87 2.1.2 Fat Channel Dynamics Processing and EQ Basic Operation For complete information, see Section 4.1.2 in your StudioLive 16.0.2 User Manual. The main function of the Fat Channel is to provide dynamics processing and The Fat Channel filtering for every input and output on the StudioLive. The rotary encoders work in conjunction with the meters directly above them to adjust the dynamics processing and EQ.
- Page 88 The Fat Channel StudioLive Metering Controls On the StudioLive 16.0.2’s four stereo channels, the stereo link will enable the Use the Value encoder to scroll to an empty position in right side (channels 10, 12, 14, and 16) to be heard in your mix. Each channel’s the Channel Preset library.
- Page 89 Displays the fader position of the stored scene. When recalling a fader position, For complete information, see Section 4.4.2 in your StudioLive 16.0.2 User Manual. adjust the fader until only the center LED is visible in its meter. To recall the stored position of an Aux or Main fader, simply move the fader.
- Page 90 Multimode Controls and the Buttons that Love Them Graphic Equalizer For complete information, see Section 4.5 in your StudioLive 16.0.2 User Manual. For complete information, see Section 5.3 in your StudioLive 16.0.2 User Manual. Each channel and aux on the StudioLive 16.0.2 features a multimode The StudioLive 16.0.2 features a 31-band, 1/3-octave graphic...
- Page 91 Monitor Section Creating and Recalling a Scene For complete information, see Section 4.7.3 in your StudioLive 16.0.2 User Manual. The StudioLive features a headphone output and control-room outputs, For complete information, see Section 5.1 in your StudioLive 16.0.2 User Manual.
- Page 92 Channels 1 and 2’s analog inputs. Virtual StudioLive For complete information, see Section 7.1 - 7. 2 in your StudioLive 16.0.2 User Manual. Virtual StudioLive (VSL) is an advanced editor/librarian and control application that is completely integrated with the StudioLive 16.0.2. Because of the continuous bidirectional communication between your StudioLive and VSL, whatever you do on the StudioLive‘s control surface will be reflected in VSL and vice versa.
- Page 93 Transfers Designated Scenes, Fat Channel, FX, and Graphic EQ Presets from VSL to StudioLive Memory. For complete information, see Section 7.2.1 in your StudioLive 16.0.2 User Manual. VSL makes reorganizing all the Scenes and presets When you first launch VSL, notice the Browser window along the right side of stored on your StudioLive as easy as dragging-and- the screen.
- Page 94 VSL Channel Tab quick views, it will load only that component (e.g., if For complete information , see Section 7.2.3 in your StudioLive 16.0.2 User Manual. you drag a preset over the Gate Quick View, only the Gate will be loaded).
- Page 95 Your StudioLive 16.0.2 can be remote-controlled via MIDI, using your favorite MIDI switch or DAW application. For For complete information see Section 7.4.2- 7.4.6 in your StudioLive 16.0.2 User Manual. more infomation about this feature, see Section 5.5 in your User Manual.
- Page 96 Creating a New Session A Session is the document type in which all recording For complete information see Section 7.3.3 in your StudioLive 16.0.2 User Manual. takes place in Capture. To create a new Session, do Capture features a single-window user interface so you don’t need to manage one of the following: multiple windows and views.
- Page 97 16.0.2 User Manual or Studio One User Manual. Link Button: Between each meter you will find a Link button When this Your StudioLive 16.0.2 comes with Studio One Artist recording and production button is active, Capture will record that track as a stereo-interleaved software.
- Page 98 At the top of the installation menu, select the location where You’ll notice a list of templates on the left. The you wish to install the content. Listed in the installation menu StudioLive 16.0.2 template will create a Song with a English English are separate entries for each available item.
- Page 99 PreSonus StudioLive ™ 16.0.2 Quick Start Guide Software: Universal Control with VSL, Capture, and Studio One Artist Software: Universal Control with VSL, Capture, and Studio One Artist Studio One Artist Quick Start Studio One Artist Quick Start 3. To begin recording, create an audio track, assign it to input 1, and connect a micro- Drag-and-Drop Effects phone to the first channel on the StudioLive.
- Page 100 Declaration of Conformity StudioLive 16.0.2 and Capture Information Complete information about your StudioLive 16.0.2 can be found in the User Manual. Your User Manual can be found on the Universal Control installation disk. The 16.0.2 User Manual contains complete operating Responsible Party: PreSonus Audio Electronics instructions for your mixer as well as Universal Control, VSL, and Capture.
- Page 101 Deutsch © 2011 PreSonus Audio Electronics, Inc. All Rights Reserved, PreSonus, StudioLive, Studio One, Capture, Virtual StudioLive and FireStudio are trademarks of PreSonus Audio Electronics, Inc. Macintosh is a trademark of Apple, Inc. in the U.S. and other countries. Windows is a registered trademark of Microsoft, Inc. in the U.S. and other countries. Other product names mentioned herein may be trademarks of their respective companies.
- Page 102 Consult the dealer or an experienced radio/TV technician for help. CAUTION: Changes or modifications to this device not expressly approved by PreSonus Audio Electronics could void the user’s authority to operate the equipment under FCC rules. This apparatus does not exceed the Class A/Class B (whichever is applicable) limits for radio noise emissions from digital apparatus as set out in the radio interference regulations of the Canadian Department of Communications.
- Page 103 StudioLive Software Library ™ Reference Manual Universal Control with Virtual StudioLive and Smaart ® System Check Wizards | StudioLive Remote for iPad ® QMix for iPhone /iPod touch ™ ® ® Capture | Studio One Artist ™ ® ® English www.presonus.com...
- Page 104 2.5.4 (16.4.2 and 24.4.2 only) — 37 Using Plug-In Effects as Inserts — 11 3.7.2 Flexible Inputs Router (StudioLive 16.0.2 only). — 38 Printing Fat Channel Dynamics and EQ — 12 3.7.3 MIDI Control Mode Menu Configuring the StudioLive (StudioLive 16.0.2 only). — 38 For Core Audio (Mac Only) —...
- Page 105 Smaart System Check Wizards QMix for iPhone (StudioLive 16.4.2 and 24.4.2 only) — 41 and iPod touch — 74 3.8.1 Smaart Room Analysis Wizard — 43 Networking your iPhone or iPod touch and 3.8.2 Smaart System Delay Wizard — 47 Computer —...
- Page 106 Creating Audio Tracks — 120 7.4.1 Anatomy of an Audio Track — 121 Creating MIDI Tracks — 121 7.5.1 Remote Controlling Your StudioLive 16.0.2 with Studio One — 123 Adding Virtual Instruments and Plug-in Effects to Your Song — 134 7.6.1 Drag-and-Drop Virtual Instruments —...
-
Page 107: Overview
StudioLive and its software provides you with a complete suite of tools. We encourage you to contact us with questions or comments regarding this product. PreSonus Audio Electronics is committed to constant product improvement, and we value your suggestions highly. We believe the best way to achieve our goal of constant product improvement is by listening to the real experts: our valued customers. -
Page 108: Summary Of Virtual Studiolive Features
StudioLive Software Library Overview ™ Reference Manual Summary of Virtual StudioLive Features Summary of Virtual StudioLive Features The Virtual StudioLive (VSL) application is completely integrated with your StudioLive mixer. VSL is a highly advanced editor/librarian and control panel. Because of the continuous bidirectional communication between your StudioLive and VSL, whatever you do on the StudioLive‘s control surface will be reflected in VSL and vice versa. -
Page 109: Summary Of Studiolive Remote For Apple Ipad Features
StudioLive Software Library Overview ™ Reference Manual Summary of StudioLive Remote for Apple iPad Features Summary of StudioLive Remote for Apple iPad Features StudioLive Remote (SL Remote) for iPad provides direct wireless control over PreSonus Virtual StudioLive software for Mac® and Windows®, which in turn controls any StudioLive-series digital mixer. -
Page 110: Summary Of Capture Features
StudioLive Software Library Overview ™ Reference Manual Summary of Capture Features Summary of Capture Features Included with StudioLive is Capture, a digital-audio multitrack-recording application designed to make recording quick and easy. Perfect for live recording and for mixing your audio in real time to a stereo audio file, Capture was designed to interface perfectly with StudioLive-series mixers, allowing instant setup and recording. -
Page 111: Connecting To A Computer
StudioLive Software Library Connecting to a Computer ™ Reference Manual Installation for Windows Connecting to a Computer The speed of your processor, amount of RAM, and capacity, size, and speed of your hard drives will greatly affect the overall performance of your recording system. -
Page 112: Installation For Mac Os X
StudioLive Software Library Connecting to a Computer ™ Reference Manual Installation for Mac OS X Installation for Mac OS X The Universal Control Installer will take you through each step of the installation process. Please read each message carefully, and be especially careful that you do not connect your StudioLive too soon. -
Page 113: Using The Studiolive As An Audio Interface
StudioLive Software Library Connecting to a Computer ™ Reference Manual Using the StudioLive as an Audio Interface Using the StudioLive as an Audio Interface The StudioLive features a built-in FireWire interface that can be used with any application that supports Core Audio or ASIO and can also be used as a WDM device for a Windows computer. - Page 114 StudioLive Software Library Connecting to a Computer ™ Reference Manual Using the StudioLive with Popular Audio Applications Apple Logic Pro/Express 7+: 1. Launch Logic Pro/Express. 2. Go to Logic | Preferences | Audio. 3. Click on the Devices Tab. 4. On the Core Audio tab, check Enabled. 5.
-
Page 115: Firewire Sends And Returns
• The StudioLive 24.4.2 has 32 available sends and 26 returns. • The StudioLive 16.4.2 has 32 available sends and 18 returns. • The StudioLive 16.0.2 has 16 available sends and 16 returns. 2.5.1 Channel FireWire Sends FireWire sends 1 through 24/16 are hard-coded to be sent pre- fader from the 24/16 input channels of the StudioLive. -
Page 116: Firewire Returns
You can process it in the Fat Channel, include in it Aux mixes, and send it to an FX mix. StudioLive 16.0.2 Owners: As discussed in Section 4.5 of the StudioLive 16.0.2 Owner’s Manual, you must first engage FireWire Return mode before you are able to use the MultiMode buttons to engage/disengage a FireWire return on a channel. -
Page 117: Main Firewire Return
The Main FireWire Return button is routed as follows: • StudioLive 24.4.2: FireWire Returns 25-26 • StudioLive 16.4.2: FireWire Returns 17-18 • StudioLive 16.0.2: FireWire Returns 1-2 Using Plug-In Effects as Inserts FireWire streaming on your StudioLive is continuously bidirectional. This... -
Page 118: Printing Fat Channel Dynamics And Eq
StudioLive Software Library Connecting to a Computer ™ Reference Manual Printing Fat Channel Dynamics and EQ 4. Press the FireWire Return button on Channel 4 of your StudioLive. You can now monitor the analog signal from Channel 4 on your StudioLive with your inserted effect (in this case, Beat Delay). - Page 119 StudioLive Software Library Connecting to a Computer ™ Reference Manual Printing Fat Channel Dynamics and EQ 4. Press the Link button in the Fat Channel to stereo-link Channels 3 and 4. Link 5. Press and hold the SIP button. 6. Solo Channel 3-4. You will notice that all other channels have muted. Select Select Select...
- Page 120 9. StudioLive 16.4.2 and 24.4.2 owners: In VSL, patch Main L/R to Auxiliary FireWire Returns 31 and 32. StudioLive 16.0.2 owners: In VSL, patch Main L/R to the Flexible Inputs. 10. In Studio One, create a new stereo audio track (see section 7.4 for more information).
-
Page 121: Configuring The Studiolive For Core Audio (Mac Only)
Mac. StudioLive 16.4.2 and 24.4.2 users will first need to route their Mac’s output to the Main FireWire Return. StudioLive 16.0.2 users can skip to Step 7. 1. Go to MacHD | Applications | Utilities and launch Audio MIDI setup. - Page 122 StudioLive Software Library Connecting to a Computer ™ Reference Manual Configuring the StudioLive For Core Audio (Mac Only) 5. Choose 2TrackIn L for the left speaker. Choose 2TrackIn R for the right speaker. 6. When you are finished, click Apply and then Done.
- Page 123 Control Room Outputs to connect your studio monitors and use the Main FireWire Return on your StudioLive as the Main Output for your DAW. For StudioLive 16.0.2 owners, this means that you should select Outputs 1-2 for your Main Bus.
-
Page 124: Universal Control And Vsl
StudioLive Software Library Universal Control and VSL ™ Reference Manual Universal Control Launch Window Universal Control and VSL Universal Control includes two windows: the Launcher window and the Device window. For the StudioLive, the Device window is the Virtual StudioLive (VSL) application. - Page 125 StudioLive Software Library Universal Control and VSL ™ Reference Manual Universal Control Launch Window Operation Mode. Changes How the StudioLive Driver’s Buffer Size is Set. • Low Latency. Input and Output buffers are both identical to the Buffer Size setting. •...
-
Page 126: Universal Control Launch Window
StudioLive Software Library Universal Control and VSL ™ Reference Manual Universal Control Launch Window Settings: Run at Startup. Launches the Universal Control Application Automatically on Startup (Windows Only). When this is enabled, the Universal Control application will automatically launch each time you boot your Windows PC. On the Mac, you can set this up first by dragging Universal Control to your dock, then by Option-clicking it and selecting Options>Open at Login. -
Page 127: Advanced Wdm Features (Windows Only)
By default, these streams are routed to Channels 1 and 2 on your StudioLive. Because of this, StudioLive 16.0.2 users do not need to do any further setup to use the Main FireWire Return in their monitor bus to listen to iTunes or the latest PreSonus video. - Page 128 StudioLive Software Library Universal Control and VSL ™ Reference Manual Universal Control Launch Window 3. Click on WDM 1 (front left) and drag it down to place it next to StudioLive 2 Track In Left. 4. Click on WDM 2 (front right) and drag it down to place it next to StudioLive 2 Track In Right.
-
Page 129: Vsl: Browser
StudioLive Software Library Universal Control and VSL ™ Reference Manual VSL: Browser VSL: Browser When you first launch VSL, notice the Browser window along the right side of the screen. The browser in VSL functions similarly to the browser in Studio One. From the browser, you can see all of the Scenes, Fat Channel presets, FX presets, and graphic EQ settings that are saved on your StudioLive and on your computer. - Page 130 StudioLive Software Library Universal Control and VSL ™ Reference Manual VSL: Browser Browser Tab Buttons. Displays the Different Preset Categories on Your StudioLive and on Your Computer. All of your Scenes and presets are contained in dedicated folders in VSL. To view a specific set of presets, simply click on its tab. •...
-
Page 131: Vsl: Overview Tab
StudioLive Software Library Universal Control and VSL ™ Reference Manual VSL: Overview Tab VSL: Overview Tab At the top of the VSL window, you will see four tabs: Overview, Fat Channel, GEQ, and Setup. The Overview tab provides you with a complete graphical representation of your StudioLive. -
Page 132: Tap Tempo
StudioLive Software Library Universal Control and VSL ™ Reference Manual VSL: Overview Tab The Masters view displays the controls for each aux output and FX bus as they appear on the StudioLive and displays a scribble strip to give each aux a custom name. From within the Masters view, you can also select each aux and FX bus to edit its Fat Channel insert. -
Page 133: Geq In Focus
StudioLive Software Library Universal Control and VSL ™ Reference Manual VSL: Fat Channel Tab Copy Channel (Drag-and-Drop) At the top of the VSL window, you will see the Copy Channel handle. This handle follows the selected channel and lets you drag-and-drop all the Fat Channel and bus assignments for that channel onto another channel or bus. -
Page 134: Loading Scenes And Presets From Vsl
StudioLive Software Library Universal Control and VSL ™ Reference Manual Loading Scenes and Presets from VSL Loading Scenes and Presets from VSL As stated in the previous section, the Browser window in VSL functions in much the same way as the browser in Studio One. To load a Scene or preset from the Browser window, simply select it and drag it over the mixer or channel on which you wish to load it. -
Page 135: Loading A Fat Channel Preset
StudioLive Software Library Universal Control and VSL ™ Reference Manual Loading Scenes and Presets from VSL 3.5.3 Loading a Fat Channel Preset To load every component in a Fat Channel preset (gate, compressor, EQ, etc.), select the preset from the Browser window and drag it over any part of the desired channel. -
Page 136: Loading A Geq Preset
EQs can be inserted on any of the 10/6 aux buses, the 4 subgroups, or the main bus. The StudioLive 16.0.2 features one stereo 31-band graphic EQ on the main bus. In addition to allowing you to control... -
Page 137: Enabling A Geq
Auxiliary Inputs 29 and 30 (StudioLive 16.4.2 and 24.4.2). StudioLive 16.0.2 Users: You must route your main mix to Flexible Inputs 15 and 16 in order to use Smaart analysis. If analog inputs 15 and 16 are patched to the Flexible Inputs, the Spectrograph and RTA buttons will not function. -
Page 138: Rta
StudioLive Software Library Universal Control and VSL ™ Reference Manual VSL: GEQ Tab Many audio signals that are encountered in the field are highly dynamic. Musical signals, speech, and even environmental noise contain significant changes in spectral content as a function of time. The Spectrograph can be thought of as a record of multiple RTA measurements taken over time, with color representing amplitude. -
Page 139: Monitors
StudioLive Software Library Universal Control and VSL ™ Reference Manual VSL: GEQ Tab 3.6.7 Using the Smaart Spectrograph to Ring Out Monitors The Spectrograph shows frequency data over time, so a constant frequency, such as feedback, results in a straight line in the spectrograph. Feedback is short term for a feedback loop, where a portion of the signal from the speaker returns to the microphone resulting in a constant tone at the offending frequency. -
Page 140: Using The Smaart Rta
StudioLive Software Library Universal Control and VSL ™ Reference Manual VSL: GEQ Tab In a main system, feedback is typically in the mid to low range. The frequencies that are regenerating and creating a feedback loop are those frequencies that are wrapping around the main system due to the loss of directional control of lower frequencies. - Page 141 StudioLive Software Library Universal Control and VSL ™ Reference Manual VSL: GEQ Tab Another powerful use for the RTA is to help you quickly EQ a problematic instrument when dialing in your mix during sound check. In this example we will be using the RTA to identify the offending frequency in a ringing Floor Tom.
- Page 142 StudioLive Software Library Universal Control and VSL ™ Reference Manual VSL: GEQ Tab 8. Watch the RTA as the Floor Tom is played. Notice there is a spike at 250 Hz that correlates to the boomy ring you keep hearing. 9.
-
Page 143: Vsl: Setup Tab
The Setup tab allows you to customize VSL and your StudioLive, route your Auxiliary FireWire inputs (StudioLive 16.4.2 and 24.4.2 only), route your Flexible Inputs (StudioLive 16.0.2 only), set up MIDI Control mode (StudioLive 16.0.2 only), and enable or disable functions on connected iOS devices. -
Page 144: Flexible Inputs Router (Studiolive 16.0.2 Only)
VSL: Setup Tab 3.7.2 Flexible Inputs Router (StudioLive 16.0.2 only). The StudioLive 16.0.2 allows you to choose between recording analog Inputs 15 and 16 or the main bus. This is done via the Flexible Inputs Router on the Setup tab. By default, your StudioLive is configured to record inputs 15 and 16 on FireWire Sends 15 and 16. -
Page 145: Default To Fader Locate Preference
StudioLive Software Library Universal Control and VSL ™ Reference Manual VSL: Setup Tab 3.7.7 Default to Fader Locate Preference With the Default to Fader Locate preference enabled, Fader Locate will automatically engage when a fader is moved remotely in VSL or StudioLive Remote. This preference allows you to quickly sync your StudioLive when you return to the board. -
Page 146: Enabling Lockout Mode
StudioLive Software Library Universal Control and VSL ™ Reference Manual VSL: Setup Tab Channel Rename. Allows channels, auxes, and subgroups (16.4.2 and 24.4.2 only) to be renamed remotely using SL Remote. Ignore. When Ignore is enabled, the device’s installation of SL Remote will have no control over VSL. -
Page 147: Smaart System Check Wizards (Studiolive 16.4.2 And 24.4.2 Only)
StudioLive Software Library Universal Control and VSL ™ Reference Manual Smaart System Check Wizards (StudioLive 16.4.2 and 24.4.2 only) 4. To lock your StudioLive, press the System button in the Digital Effects | Master Control section. System Navigate to the Lockout menu. Your StudioLive cannot be locked unless this page is active. - Page 148 StudioLive Software Library Universal Control and VSL ™ Reference Manual Smaart System Check Wizards (StudioLive 16.4.2 and 24.4.2 only) Clicking on the Smaart button at the top of the VSL window will launch Smaart System Check Mode. While in this mode you can launch any of the following wizards: •...
-
Page 149: Smaart Room Analysis Wizard
StudioLive Software Library Universal Control and VSL ™ Reference Manual Smaart System Check Wizards (StudioLive 16.4.2 and 24.4.2 only) 3.8.1 Smaart Room Analysis Wizard The SRA Wizard is an automated process that will guide you through the steps of acquiring a frequency-response trace for your audio system. A frequency- response trace is the plotted result (frequency and amplitude) of the system measurement. - Page 150 StudioLive Software Library Universal Control and VSL ™ Reference Manual Smaart System Check Wizards (StudioLive 16.4.2 and 24.4.2 only) 4. You will be asked which output you would like to analyze. Stereo-linked outputs will be listed as stereo. (e.g., If Sub 1 and Sub 2 are stereo-linked, they will be listed as Sub 1/2) 5.
- Page 151 StudioLive Software Library Universal Control and VSL ™ Reference Manual Smaart System Check Wizards (StudioLive 16.4.2 and 24.4.2 only) 5. To mute the pink noise at any time, simply click on the Speaker Icon. 6. Click OK when the pink noise is at the appropriate level. 7.
- Page 152 StudioLive Software Library Universal Control and VSL ™ Reference Manual Smaart System Check Wizards (StudioLive 16.4.2 and 24.4.2 only) 3. Click OK when your microphone is properly placed. 4. Raise the fader until the pink noise output through your speaker is louder than the ambient noise floor in the room.
-
Page 153: Smaart System Delay Wizard
StudioLive Software Library Universal Control and VSL ™ Reference Manual Smaart System Check Wizards (StudioLive 16.4.2 and 24.4.2 only) 12. Click Analyze to generate the third frequency-response trace. 13. Adjust the EQ to shape the frequency response into the correct trend for your application. - Page 154 StudioLive Software Library Universal Control and VSL ™ Reference Manual Smaart System Check Wizards (StudioLive 16.4.2 and 24.4.2 only) I just wanted to mix sound..I didn’t know there’d be math x-16 x-15 = x-16+15 x-15+16 = )=-1 )=-1 *Special thanks to our friends at www.roadie.net for the use of this awesome cartoon. The SSD Wizard is an automated process that calculates and sets the correct delay time between two full-range systems.
- Page 155 StudioLive Software Library Universal Control and VSL ™ Reference Manual Smaart System Check Wizards (StudioLive 16.4.2 and 24.4.2 only) When using the SSD Wizard for the above system, you would run the wizard four times. The first time, you’d use the main front-of-house left for the main system and the left sidefill for the delay system.
- Page 156 StudioLive Software Library Universal Control and VSL ™ Reference Manual Smaart System Check Wizards (StudioLive 16.4.2 and 24.4.2 only) Place your microphone on-axis in front of the speaker you want to delay. See Section 3.8.5 for tips in choosing the best primary mic position.
-
Page 157: Smaart Output Check Wizard
StudioLive Software Library Universal Control and VSL ™ Reference Manual Smaart System Check Wizards (StudioLive 16.4.2 and 24.4.2 only) 15. Click Apply to set that measure delay time on the subgroup out. 16. Click Exit to leave the wizard. Note: For delay times between 0 and 50 ms, the delay will be set to the nearest 0.5 ms;... -
Page 158: Go Remote
StudioLive Software Library Universal Control and VSL ™ Reference Manual Smaart System Check Wizards (StudioLive 16.4.2 and 24.4.2 only) Click on the Output Check tab to use the Smaart Output Check Wizard. You will be shown buttons for all outputs on your StudioLive. Click on an output’s button, and pink noise will fade in for three seconds. -
Page 159: Mic Position
StudioLive Software Library Universal Control and VSL ™ Reference Manual Smaart System Check Wizards (StudioLive 16.4.2 and 24.4.2 only) 5. From the Smaart System Check Wizards, click on the Go Remote button. This will pull down a menu of connected iPads. Select your iPad from the list. 6. - Page 160 StudioLive Software Library Universal Control and VSL ™ Reference Manual Smaart System Check Wizards (StudioLive 16.4.2 and 24.4.2 only) Secondary Mic Position You will use two different secondary positions in a multi-point measurement. These can be on- or off-axis measurements of a speaker within the listening area. This will allow the SRA wizard to create an average frequency response of your sound system.
-
Page 161: System Alignment Rules
StudioLive Software Library Universal Control and VSL ™ Reference Manual Smaart System Check Wizards (StudioLive 16.4.2 and 24.4.2 only) • Do a ground-plane measurement. • Do a multi-point measurement. Enough measurement positions will randomize the effect of the floor bounce. 3.8.6 System Alignment Rules The visual result of a sound-system test can be a powerful tool;... -
Page 162: Using The Trace: Spotting The Trend
StudioLive Software Library Universal Control and VSL ™ Reference Manual Smaart System Check Wizards (StudioLive 16.4.2 and 24.4.2 only) If you can’t find a physical solution and can’t mitigate the issue with level and delay control, it’s time to employ the system EQ. A frequency-response trace is not a video game. - Page 163 StudioLive Software Library Universal Control and VSL ™ Reference Manual Smaart System Check Wizards (StudioLive 16.4.2 and 24.4.2 only) Below are some examples of trends for various applications: Music Concert: Subs 2 to 4 kHz Rock Concert: Subs Extended LF 2 to 4 kHz Music Playback/Reproduction Subs...
- Page 164 StudioLive Software Library Universal Control and VSL ™ Reference Manual Smaart System Check Wizards (StudioLive 16.4.2 and 24.4.2 only) Spotting the Trend: Real World Example Let’s take a look at the following frequency response trace. In this example we can see a few peaks that don’t go along with our application, for our purposes, let’s make that a music concert.
- Page 165 StudioLive Software Library Universal Control and VSL ™ Reference Manual Smaart System Check Wizards (StudioLive 16.4.2 and 24.4.2 only) A parametric EQ is an ideal tool to shape your system’s frequency-response trace into a trend that will complement your application; with a parametric EQ, you have the ability to effect large areas of bandwidth, with minimal electronic smearing to the signal.
-
Page 166: Studiolive Remote For Ipad
StudioLive Software Library StudioLive Remote for iPad ™ Reference Manual Networking your iPad and Computer StudioLive Remote for iPad StudioLive Remote (SL Remote) for iPad provides an unprecedented level of remote control over your StudioLive. With SL Remote, you can adjust level, pan, dynamics, bus routing, FX mixes, aux mixes, and GEQ settings from an Apple iPad via a wireless network. - Page 167 StudioLive Software Library StudioLive Remote for iPad ™ Reference Manual Networking your iPad and Computer Windows 7 1. Open Start>Control Panel. 2. Click “Network and Internet. ” 3. Click “Network and Sharing Center. ” 4. Under “Change your networking settings, ” click “Set up a new connection or network.
-
Page 168: Step 2: Connect Your Ipad To Your Ad Hoc Network
StudioLive Software Library StudioLive Remote for iPad ™ Reference Manual Networking your iPad and Computer 4.1.2 STEP 2: Connect your iPad to your Ad Hoc Network 1. Tap on the Settings icon in your iPad. 2. Tap on “Network. ” 3. -
Page 169: Step 3: Connecting To Virtual Studiolive And Studiolive Mixers
StudioLive Software Library StudioLive Remote for iPad ™ Reference Manual Networking your iPad and Computer 4.1.3 STEP 3: Connecting to Virtual StudioLive and StudioLive Mixers Once you have created your ad hoc network and joined it from your iPad, you are ready to launch StudioLive Remote. Important: You must connect to your computer’s ad hoc network each time you plan on remote-controlling your StudioLive with StudioLive Remote, and Virtual StudioLive must be launched on your computer... -
Page 170: Overview Page
StudioLive Software Library StudioLive Remote for iPad ™ Reference Manual Overview Page Overview Page The Overview page in StudioLive Remote corresponds directly with most of the controls on the Overview page in VSL. The following parameters can be controlled and/or viewed from this page: •... -
Page 171: Channel Controls
StudioLive Software Library StudioLive Remote for iPad ™ Reference Manual Overview Page that component in focus; for example, if you tap on the EQ Microview, the Fat Channel zoom will open with the EQ in focus. The zoomed Fat Channel view corresponds directly to the Fat Channel tab in VSL. You can switch between the dynamics components in the zoomed Fat Channel view by swiping your finger to the left or right. -
Page 172: Masters Overview And Masters Section Page
In the upper right corner of every page in StudioLive Remote (Overview, Aux Mixer, and Graphic EQ), you will find the Masters Overview. This displays the metering for the subgroups (StudioLive 16.4.2 and 24.4.2), auxes (StudioLive 16.0.2 only), and Main bus. -
Page 173: Aux Mix Select And Aux Mixing
StudioLive Software Library StudioLive Remote for iPad ™ Reference Manual Aux Mix Page 4.3.1 Aux Mix Select and Aux Mixing To create an aux mix using StudioLive Remote, tap anywhere in the Aux Mix Select tab for that aux. The selected Aux Mix tab will be highlighted to alert you that its individual channel-send levels will be displayed below. -
Page 174: Fx Edit
StudioLive Software Library StudioLive Remote for iPad ™ Reference Manual Aux Mix Page To adjust the send levels for any channel, tap anywhere in its send level and move your finger up or down, while maintaining constant contact with the iPad screen. -
Page 175: Geq Page
StudioLive Software Library StudioLive Remote for iPad ™ Reference Manual GEQ Page GEQ Page As with StudioLive and VSL, StudioLive Remote includes a Graphic EQ page so that you can tune the room from any listening position or can dial in a monitor on stage while you are actually standing in front of it. -
Page 176: Scenes Page
StudioLive 16.4.2 users: Each of your graphic EQs is already assigned to either your main output or one of your auxes. These assignments cannot be changed. StudioLive 16.0.2 users have a graphic EQ available for the main bus only. Scenes Page The Scenes page allows you to remotely recall Scenes that have been stored on the computer to which you are networking SL Remote. -
Page 177: Settings Page
StudioLive Software Library StudioLive Remote for iPad ™ Reference Manual Settings Page Settings Page The Settings page allows you to set scrolling and metering functions and to create custom names for each channel, aux, and subgroup (16.4.2 and 24.4.2 only) in your mix. Scroll by Page. -
Page 178: Launching Smaart System Check Wizards Remotely
StudioLive Software Library StudioLive Remote for iPad ™ Reference Manual Settings Page Channel Naming. Creates Custom Names for Channels, Auxes, and Subgroups. To create a custom name for any channel, aux, or subgroup in your mix, simply tap on the text field next to it. -
Page 179: Channel Zoom Page
StudioLive Software Library StudioLive Remote for iPad ™ Reference Manual Channel Zoom Page Channel Zoom Page The Channel Zoom page opens automatically when you turn your iPad to the Portrait view. This page provides you with a look at every controllable parameter for a channel or bus. -
Page 180: Qmix For Iphone And Ipod Touch
StudioLive Software Library QMix for iPhone and iPod touch ™ Reference Manual Networking your iPhone or iPod touch and Computer QMix for iPhone and iPod touch QMix for iPhone and iPod touch puts each musician’s monitor (aux) mix in his or her own hands. -
Page 181: Step 2: Connect Your Iphone/Ipod Touch To Your Ad Hoc Network
StudioLive Software Library QMix for iPhone and iPod touch ™ Reference Manual Networking your iPhone or iPod touch and Computer 6. Click on “Next” twice. 7. Enter a network name, such as “StudioLive. ” 8. Select the Security WAP (or WEP). 9. -
Page 182: Step 3: Connecting Qmix To Studiolive Mixers
StudioLive Software Library QMix for iPhone and iPod touch ™ Reference Manual Networking your iPhone or iPod touch and Computer 5.1.3 Step 3: Connecting QMix to StudioLive Mixers Once you have created your ad hoc network and joined it from an iPhone/iPod touch, you are ready to launch QMix. -
Page 183: Aux Mix Page
StudioLive Software Library QMix for iPhone and iPod touch ™ Reference Manual Aux Mix Page Aux Mix Page The Aux Mix page shows the send level for each channel on each aux to which your iOS device has access. It corresponds directly to the aux mixes in VSL and has been streamlined to show only the send levels. -
Page 184: Wheel Of Me
StudioLive Software Library QMix for iPhone and iPod touch ™ Reference Manual Wheel of Me Lock Orientation. Locks Device in the Landscape View. Enabling the Lock Orientation button will lock your iPhone/iPod touch in Landscape view. While this button is enabled, you cannot open the Wheel of Me. Locking the view will also remove the Start Page button. -
Page 185: Settings Page
StudioLive Software Library QMix for iPhone and iPod touch ™ Reference Manual Settings Page Wheel of Me. Controls the Level of the Me Channels The Wheel of Me increases or decreases the level of your Me channels as a mix relative to the rest of the channels (the Band). -
Page 186: Capture
StudioLive Software Library Capture ™ Reference Manual Start Page Capture Capture™ is a digital audio multitracking application designed to make recording with your StudioLive quick and easy. With the look and feel of industry-standard digital multitrack hard-disk recorders, it is instantly familiar to every musician and engineer. - Page 187 StudioLive Software Library Capture ™ Reference Manual The Session Page Audio Device and Sample Rate Capture was specifically created for use with the PreSonus StudioLive series mixer and will only work with that device. It is not possible to configure any other audio device for use with Capture, as it relies on the StudioLive mix bus.
-
Page 188: The Session Page
StudioLive Software Library Capture ™ Reference Manual The Session Page Capture Playback Routing STUDIOLIVE 16.4.2 Digital Recording and Performance Mixer Mic/Line Mic/Line Mic/Line Mic/Line Mic/Line Mic/Line Mic/Line Mic/Line Mic/Line Mic/Line Mic/Line Mic/Line Mic/Line Mic/Line Mic/Line Mic/Line Input Input Input Input Input Input Input... -
Page 189: Meter Bridge
Capture will record that track as a stereo-interleaved file. By default, the routable bus pair (25-26/17-18) is link-enabled, as are the stereo channels on the StudioLive 16.0.2 (9-10/15-16). Record Arm Button. Below each meter is the Record Arm button for that track. -
Page 190: Editing Tools
StudioLive Software Library Capture ™ Reference Manual The Session Page 6.2.3 Editing Tools In the upper right corner, you will see four editing-tool buttons. These tools will determine the function of your mouse during editing. Power User Tip: The audio-editing process can be unforgiving: Small inaccuracies when splitting, moving, or performing other actions on recorded audio can lead to unwanted results. - Page 191 StudioLive Software Library Capture ™ Reference Manual The Session Page 6.2.3.2 Range Tool The Range tool is used to select a range, or area, within events. Click on the Range tool button or press [number 2] on the keyboard to select the Range tool. To select a range within an event, using the Range tool, click-and-drag over the area to be selected;...
-
Page 192: The Edit Window
StudioLive Software Library Capture ™ Reference Manual The Session Page 6.2.3.4 Eraser Tool The Eraser tool is used to delete an event. Click on the Eraser Tool button or press [number 4] on the keyboard to select the Eraser tool. To delete any event using the Eraser tool, simply click on the event. -
Page 193: Creating A New Capture Session
StudioLive Software Library Capture ™ Reference Manual Creating a New Capture Session • Track Mute: Each track features a Mute button. This mutes the track during playback. • Track Solo: Each track features a Solo button. This will solo the track and mute all other tracks during playback (similar to the SIP function on the StudioLive). -
Page 194: Recording In Capture
StudioLive Software Library Capture ™ Reference Manual Recording in Capture 3. Session Title. This will be the title of your Session and will be the Session file name, as well as the name of the new folder that contains all data related to your Session. 4. -
Page 195: Capture Main Source Selection (Studiolive 16.4.2 And 24.4.2 Only)
StudioLive Software Library Capture ™ Reference Manual Capture Session Navigation 6.4.3 Capture Main Source Selection (StudioLive 16.4.2 and 24.4.2 only) The Auxiliary Stereo Track in Capture is a stereo channel intended to be used to record a stereo mix from your StudioLive. This mix can be recorded while recording the individual input channels, so a mix is available immediately after a live show, or you can use this channel to route your final studio mixes through the StudioLive. -
Page 196: Inserting Markers
StudioLive Software Library Capture ™ Reference Manual Capture Session Navigation 6.5.3 Using Markers In Capture, the Marker Lane is used to place markers at desired places in the Timeline, after which navigation to the markers is easy. Markers are also helpful when exporting your Session to individual mixes or to work in another recording application. -
Page 197: Mixing Your Session
StudioLive 16.4.2 owners: In VSL, select “Main L/R” for Auxiliary Input 17 and 18. StudioLive 16.0.2 owners: In VSL, patch “Main L/R” to Flexible Inputs 15 and 16. Please Note: if you wish to create a mix using Capture, you will not be able to... -
Page 198: Mixing A Capture Session In Studio One
FireWire returns for all input channels on the StudioLive mixer are engaged. 3. In Capture, select the Auxiliary Stereo Track (StudioLive 16.4.2 and 24.4.2) or Track 15/16 (StudioLive 16.0.2) and enable Record Arm. 4. Bring the playback-cursor position to the beginning of the Session by clicking the Return to Zero button in the Transport. - Page 199 StudioLive Software Library Capture ™ Reference Manual Mixing Your Session 6.6.3.1 Save a Capture Session as OpenTL Many audio-recording programs can open OpenTL (Open Track List) files. An OpenTL file provides a reference for all of the audio tracks and audio events, with their corresponding positions, in a Capture Session, so that another audio program can reconstruct your Session automatically.
-
Page 200: Importing Audio Files
StudioLive Software Library Capture ™ Reference Manual Importing Audio Files 6.6.3.2 Import Capture Session Audio Files Directly Some audio-editing applications (such as digital audio workstations, or DAWs) do not support the OpenTL format, which makes the options somewhat limited when importing sessions created in other programs. In this case, you must manually import the audio events from your Capture Session into the audio- editing application, using whatever means possible in that program. -
Page 201: Preview Player
StudioLive Software Library Capture ™ Reference Manual Export Audio Files 4. Then click on Open to import the file into your Session. 5. An audio event for the imported file will be created and placed on the currently selected track in your Session, at the current playback-cursor position. 6.7.1 Preview Player When browsing for files in the Import File menu, it is possible to listen to the audio files as you are browsing in the Preview Player. - Page 202 StudioLive Software Library Capture ™ Reference Manual Export Audio Files Format Select the format of the mixdown audio file in the middle section of the Export to Audio File menu. Choose from WAV or AIFF, and then choose the desired resolution and sample rate. If you wish to put your audio on a standard audio CD, the format should be a WAV file with 16-bit resolution and a 44.1 kHz sample rate.
-
Page 203: Capture Key Commands
StudioLive Software Library Capture ™ Reference Manual Capture Key Commands Capture Key Commands Action Key Command Action Key Command File Menu Transport... continued New Session Cntrl/Cntrl/Cmd+N Record NumPad * Open Session Cntrl/Cntrl/Cmd+O Stop NumPad 0 Close Session Cntrl/Cmd+W Return to Zero NumPad Navigation Save Session... -
Page 204: Studio One Artist Quick Start
StudioLive Software Library Studio One Artist Quick Start ™ Reference Manual Installation and Authorization Studio One Artist Quick Start Your StudioLive mixer comes with Studio One Artist recording and production software. Whether you are about to record your first album or your fiftieth, Studio One Artist provides you with all of the tools necessary to capture and mix a great performance. -
Page 205: Creating A User Account
StudioLive Software Library Studio One Artist Quick Start ™ Reference Manual Installation and Authorization 7.1.2 Creating a User Account 1. After installing Studio One Artist, launch the program, and the Activate Studio One menu will appear. 2. Click on the Activate or Upgrade link to begin. 3. - Page 206 StudioLive Software Library Studio One Artist Quick Start ™ Reference Manual Installation and Authorization 4. Fill out the user registration form. You will be asked to create a username and password. This information will be used to access your PreSonus user account on the PreSonus Web site.
-
Page 207: Activating Studio One Artist Online
StudioLive Software Library Studio One Artist Quick Start ™ Reference Manual Installation and Authorization 7.1.3 Activating Studio One Artist Online Now that you have created a user account, you can activate your copy of Studio One Artist. 1. Click on the Activate Online link. 2. -
Page 208: Activating Studio One Artist Offline
StudioLive Software Library Studio One Artist Quick Start ™ Reference Manual Installation and Authorization 7.1.4 Activating Studio One Artist Offline 1. Click on the Activate Offline Link. 2. Write down the Activation Code listed under Step 3 in the onscreen instructions. You will need this for Step 9. Activation Code: ________________________________... - Page 209 StudioLive Software Library Studio One Artist Quick Start ™ Reference Manual Installation and Authorization 3. Visit http://www.presonus.com/registration/ on an Internet-connected computer and click on the Create New Account to create your PreSonus user account. 4. Fill out the PreSonus Registration form.
- Page 210 StudioLive Software Library Studio One Artist Quick Start ™ Reference Manual Installation and Authorization 5. Once you have created your user account, log in and click on the Software Registration link. 6. Enter the Product Key located on the Studio One Artist disc wallet and click “Submit.”...
- Page 211 StudioLive Software Library Studio One Artist Quick Start ™ Reference Manual Installation and Authorization 8. Click on the Activate link. 9. Enter the Activation Code you wrote down in Step 2. 10. You will see a list the available downloads for your product registration. This includes the latest application installers as well as installers for the Studio One Artist content packages.
- Page 212 StudioLive Software Library Studio One Artist Quick Start ™ Reference Manual Installation and Authorization 12. After installing Studio One Artist, launch the program, and the Activate Studio One menu will appear. 13. Click on the Activate or Upgrade link to begin. 14.
-
Page 213: Installing Bundled Content For Studio One Artist
StudioLive Software Library Studio One Artist Quick Start ™ Reference Manual Installation and Authorization 15. Drag the “Studio One 2 Artist.license” file onto the Offline Activation window to complete the activation. 7.1.5 Installing Bundled Content for Studio One Artist The Studio One Artist bundle includes all that you need to begin producing music. - Page 214 StudioLive Software Library Studio One Artist Quick Start ™ Reference Manual Installation and Authorization 2. At the top of the installation menu, select the source from which the content will be installed, as well as the location where you wish to install the content.
-
Page 215: Installing Third-Party Content
StudioLive Software Library Studio One Artist Quick Start ™ Reference Manual Installation and Authorization 7.1.6 Installing Third-Party Content To install any of the third-party content, click on the arrow button next to its name in the content list (Celemony Melodyne Trial and Native Instruments Komplete Player). Notice that next to Native Instruments Komplete a serial number is listed. -
Page 216: Enabling The Audio Driver
StudioLive Software Library Studio One Artist Quick Start ™ Reference Manual Installation and Authorization 7.1.7 Enabling the Audio Driver Studio One Artist was designed with PreSonus interfaces in mind, so the StudioLive setup is quick and easy. When Studio One Artist is launched, by default you will be taken to the Start page. -
Page 217: Configuring Midi Devices
StudioLive Software Library Studio One Artist Quick Start ™ Reference Manual Configuring MIDI Devices In the Audio Device menu, select “PreSonus FireStudio.” Click the Apply button and then OK. After you have verified that the PreSonus FireStudio driver has been detected (remember: StudioLive shares a driver with the PreSonus FireStudio family of interfaces), please continue to the next section to set up your external MIDI devices. - Page 218 Configuring MIDI Devices 1. Connect the MIDI Out of your external MIDI controller to a MIDI In on your StudioLive 16.0.2 or other MIDI interface (StudioLive 16.4.2 and 24.4.2. owners will need to use a separate MIDI interface). If you are using a USB MIDI controller, connect it to your computer and power it on.
- Page 219 StudioLive 16.0.2 MIDI I/O, select PreSonus FireStudio Port 1. 8. In the Send To drop-down menu, select the MIDI interface output (PreSonus FireStudio, for StudioLive 16.0.2 owners) from which Studio One Artist will send MIDI data to your keyboard. If your keyboard controller does not need to receive MIDI data from Studio One, you can leave this unselected.
-
Page 220: Setting Up An External Midi Sound Module From The Start Page
100 - 240 VAC 50-60Hz 1. Connect the MIDI In of your external sound module to the MIDI Out of your StudioLive 16.0.2 or other MIDI interface. (StudioLive 16.4.2 and 24.4.2 owners will need to use a separate MIDI interface.) - Page 221 6. In the Send To drop-down menu, select the MIDI-interface output from which Studio One Artist will send MIDI data to your sound module. Select the StudioLive 16.0.2, if you’re using it as a MIDI interface. 7. In the Receive From drop-down menu, select the MIDI-interface output (PreSonus FireStudio for StudioLive 16.0.2 owners) from which Studio One...
-
Page 222: Creating A New Song
StudioLive Software Library Studio One Artist Quick Start ™ Reference Manual Creating a New Song Creating a New Song Now that you’ve configured your MIDI devices, let’s create a new Song. 7.3.1 Creating a New Song from a StudioLive Template 1. - Page 223 StudioLive Software Library Studio One Artist Quick Start ™ Reference Manual Creating a New Song 3. Select Empty Song from the Templates list. 4. Select your preferred sample rate and bit depth. You can also determine the length of your Song and the type of time format you would like to use (Notation Bars, Seconds, Samples, or Frames).
- Page 224 StudioLive. If you plan on recording in stereo, you should also create a stereo bus and assign it to the appropriate set of inputs. StudioLive 16.0.2 users may wish to make a stereo input for channels 9/10 through 15/16.
- Page 225 StudioLive Software Library Studio One Artist Quick Start ™ Reference Manual Creating a New Song 13. Click on the Outputs tab, and you will see all of the available outputs on your StudioLive. We recommend that you create a mono output for each of your StudioLive’s FireWire Returns and a stereo output for the Main FireWire Return on your StudioLive.
-
Page 226: Creating Audio Tracks
StudioLive Software Library Studio One Artist Quick Start ™ Reference Manual Creating Audio Tracks Creating Audio Tracks In the upper left corner of the Arrange window, you will notice several buttons. The third button from the left is the Add Tracks button. -
Page 227: Anatomy Of An Audio Track
StudioLive Software Library Studio One Artist Quick Start ™ Reference Manual Creating MIDI Tracks 7.4.1 Anatomy of an Audio Track Solo Level Mute Track Name Track Color Select Rec Arm Meter ST/Mono Audio Input Select Monitor (in S1) Creating MIDI Tracks 1. - Page 228 StudioLive Software Library Studio One Artist Quick Start ™ Reference Manual Creating MIDI Tracks 5. If you selected your MIDI keyboard controller as the default keyboard, it will already be selected. If not, choose your MIDI controller from the Input menu directly below. 6.
- Page 229 MIDI data to an audio waveform by recording a new audio track. 7.5.1 Remote Controlling Your StudioLive 16.0.2 with Studio One The StudioLive 16.0.2’s MIDI Control mode enables you to MIDI-control several features on your mixer from a DAW or other MIDI source. When controlling the mixer from a DAW, you don’t need to worry about...
- Page 230 Creating MIDI Tracks 7.5.1.1 Configuring StudioLive 16.0.2 as a MIDI Device To configure your StudioLive 16.0.2 for control by Studio One Artist, you must first add the StudioLive as an external device. 1. From the Studio One Artist Start page, click on the External Devices link.
- Page 231 StudioLive Software Library Studio One Artist Quick Start ™ Reference Manual Creating MIDI Tracks 5. From the Send To menu, select “PreSonus FireStudio Port 1. ” 6. Click the All button to enable all MIDI channels. 7. Click OK. 8. In the StudioLive System menu, navigate to Page 4: MIDI Presets. 9.
- Page 232 StudioLive Software Library Studio One Artist Quick Start ™ Reference Manual Creating MIDI Tracks 3. Open the Inspector. 4. You will see that MIDI channel 1 is already selected so let’s change a StudioLive Scene. 5. Check the box next to Program. 6.
- Page 233 StudioLive Software Library Studio One Artist Quick Start ™ Reference Manual Creating MIDI Tracks 7.5.1.3 Controlling FXA, FXB, and Main Output Levels 1. In Studio One, select the Paint tool. 2. Using the Paint tool, draw a MIDI region several bars long. 3.
- Page 234 StudioLive Software Library Studio One Artist Quick Start ™ Reference Manual Creating MIDI Tracks 6. From the Automation window, select “External Devices StudioLive MIDI.” 7. Select CH 4.
- Page 235 StudioLive Software Library Studio One Artist Quick Start ™ Reference Manual Creating MIDI Tracks 8. Scroll through the MIDI Control Change list until you find Controls 40-42. 9. Select these controls and click Add.
- Page 236 StudioLive Software Library Studio One Artist Quick Start ™ Reference Manual Creating MIDI Tracks 10. Click Close. 11. Select Control 42 from the parameter pull-down menu on the automation track. 12. Using your Paint tool, draw an automation curve. 13. Press Play to hear Studio One control the main output level of your StudioLive. You can use the same steps to create volume-curve automation for FXA and FXB output levels on your StudioLive mixer.
- Page 237 StudioLive Software Library Studio One Artist Quick Start ™ Reference Manual Creating MIDI Tracks 7.5.1.4 Assigning/Unassigning FXA and FXB to the Main Bus 1. In Studio One, select the Paint tool. 2. Using the Paint tool, draw a MIDI region several bars long. 3.
- Page 238 StudioLive Software Library Studio One Artist Quick Start ™ Reference Manual Creating MIDI Tracks 6. From the Automation window, select “External Devices StudioLive MIDI.” 7. Select CH 4.
- Page 239 StudioLive Software Library Studio One Artist Quick Start ™ Reference Manual Creating MIDI Tracks 8. Scroll through the MIDI Control Change list until you find Sustain Pedal On/ Off (CC 64) and Sustenuto Pedal On/Off (CC 66). Unlike volume control, the mute controls require On/Off messages;...
-
Page 240: Adding Virtual Instruments And Plug-In Effects To Your Song
StudioLive Software Library Studio One Artist Quick Start ™ Reference Manual Adding Virtual Instruments and Plug-in Effects to Your Song 11. Using your Pencil tool, draw an “ON” message that lasts for several bars. Note that the FXA/FXB assignment to the main bus is a simple toggle, so when it receives its CC message, the button will be put into the opposite of its current state. - Page 241 StudioLive Software Library Studio One Artist Quick Start ™ Reference Manual Adding Virtual Instruments and Plug-in Effects to Your Song The Mix button opens and closes the mixer window. The Browse button opens the Browser window, which displays all of the available virtual instruments, plug-in effects, audio files, and MIDI files, as well as the pool of audio files loaded into the current session.
-
Page 242: Drag-And-Drop Virtual Instruments
StudioLive Software Library Studio One Artist Quick Start ™ Reference Manual Adding Virtual Instruments and Plug-in Effects to Your Song At the bottom of the Browser window, you will find six category tabs: • Home opens hot links to the other five tabs. •... -
Page 243: Drag-And-Drop Audio And Midi
StudioLive Software Library Studio One Artist Quick Start ™ Reference Manual Recording in Studio One Artist 7.6.3 Drag-and-Drop Audio and MIDI Files Audio and MIDI files can be quickly located, auditioned, and imported into your Song by dragging them from the file browser into the Arrange view. If you drag the file to an empty space, a new track will be created with that file placed at the position to which you dragged it. - Page 244 StudioLive Software Library Studio One Artist Quick Start ™ Reference Manual Recording in Studio One Artist 3. Connect a microphone to the channel 1 input on the StudioLive. 4. Select Record Enable on your track in Studio One Artist. 5. Turn up the Channel 1 level while speaking/singing into the microphone. You should see the input meter in Studio One Artist react to the input.
- Page 245 StudioLive Software Library Studio One Artist Quick Start ™ Reference Manual Recording in Studio One Artist Reference Monitors 8. If you wish to listen to your StudioLive with studio monitors, make sure to connect them to the StudioLive’s Control Room outputs. Main 9.
- Page 246 StudioLive Software Library Studio One Artist Quick Start ™ Reference Manual Recording in Studio One Artist 13. On the StudioLive, engage the Main FW Return button in the Monitor Bus. 14. Click the Return to Zero button in Studio One or press the “...
-
Page 247: Troubleshooting
Troubleshooting StudioLive™ 24.4.2/16.4.2 StudioLive Software Library Troubleshooting ™ Universal Control: Driver and General Connectivity Owner’s Manual Reference Manual Universal Control: Driver and General Connectivity Troubleshooting Many technical issues can arise when using a standard computer as a digital audio workstation (DAW) and when networking wireless devices. PreSonus can only provide support for issues that directly relate to the StudioLive mixer and interface, Universal Control control-panel software, Virtual StudioLive mixer-control software, StudioLive Remote, QMix, and Studio One. -
Page 248: Universal Control: Vsl
Troubleshooting StudioLive™ 24.4.2/16.4.2 StudioLive Software Library Troubleshooting ™ Universal Control: VSL Owner’s Manual Reference Manual Universal Control: VSL Universal Control: VSL VSL Will Not Launch (No Device Button in Universal Control Launch Window). VSL will not launch if the StudioLive is not connected and synced to your computer. -
Page 249: Troubleshooting Your Ipad Ad Hoc Network
Troubleshooting StudioLive™ 24.4.2/16.4.2 StudioLive Software Library Troubleshooting ™ Troubleshooting your iPad Ad Hoc Network Owner’s Manual Reference Manual Troubleshooting your iPad Ad Hoc Network Troubleshooting your iPad Ad Hoc Network Every once in a while, an iPad will accept an ad hoc network even though that network is not usable. - Page 251 Gulf fish. Also known as Reds or Red Drum, Redfish is not only fun to catch, it’s also delicious! © 2012 PreSonus Audio Electronics, Inc. All Rights Reserved. AudioBox, DigiMax, FireStudio, Nimbit, PreSonus, QMix, StudioLive, and XMAX are trademarks or registered trademarks of PreSonus Audio Electronics, Inc.
- Page 252 StudioLive Software Library ™ Reference Manual Universal Control with Virtual StudioLive and Smaart ® System Check Wizards | StudioLive Remote for iPad ® QMix for iPhone /iPod touch ™ ® ® Capture | Studio One Artist ™ ® 7257 Florida Boulevard • Baton Rouge, ®...
- Page 253 Capture ™ Software Reference Manual ® English www.presonus.com...
- Page 254 Capture 2.0 Reference Manual Addendum ™ Table of Contents 3.6.6 Looping — 19 3.6.7 Bounce Selection — 20 Getting Started — 1 Meter Bridge — 20 Introduction — 1 Record Arm — 20 3.7.1 Summary of Features — 2 3.7.2 Link Button.
-
Page 255: Getting Started
Capture 2.0 Software Getting Started ™ Reference Manual Introduction Getting Started Introduction PreSonus® Capture™ 2.0 is a multitrack digital-audio recording application designed to make recording with StudioLive™ mixers quick and easy. With the look and feel of a digital multitrack hard-disk recorder, it is instantly familiar. It uses the same high- quality audio engine as PreSonus’... -
Page 256: Summary Of Features
Capture 2.0 Software Getting Started ™ Reference Manual Summary of Features Summary of Features • Multitrack recording application (unlimited input channels plus stereo stream from StudioLive) • NEW! One-click recording with Record Now button • NEW! Prerecord captures audio up to a minute before you press Record •... -
Page 257: Installation Instructions
Capture 2.0 Software Getting Started ™ Reference Manual Installation Instructions Mac and Windows Systems • IEEE 1394 FireWire 400 Port • Internet connection (needed for activation) • DVD-ROM drive • Internal or external 7200 RPM storage drive highly recommended • Monitor with 1024x768 resolution Power User Tip: The speed of your processor, amount of RAM, and the size and speed of your hard drive will greatly affect the overall performance of your recording system. -
Page 258: Windows
Capture 2.0 Software Getting Started ™ Reference Manual Installation Instructions 1.4.2 Windows The Windows installer for Capture 2.0 was designed with easy to follow onscreen instructions to make the installation process quick and simple. 1. When you launch the Capture.exe file, a Welcome Screen will launch. If you haven’t already done so, close all other open applications before clicking “Next. -
Page 259: Start Page
Capture 2.0 Software Start Page ™ Reference Manual Tagging and Organizing a Session Start Page You will be taken to the Start page when Capture 2.0 is launched. The Start page allows you to create a new Session, open a Session stored on your computer, view recent Sessions, and verify that your StudioLive is properly communicating with its driver. -
Page 260: Creating A Session
Capture 2.0 Software Start Page ™ Reference Manual Creating a Session Creating a Session Below the Name Scheme fields, you will find the New Session button. Click on the New Session button to create an empty Session. Power User Tip: A Session is a Capture 2.0 file in which you record, arrange, and edit your audio files. -
Page 261: Record Now
Capture 2.0 Software Start Page ™ Reference Manual Open a Session 2.2.1 Record Now! Clicking the Record Now button on the Start page will launch a new Session, arm all tracks for recording, and begin recording immediately. If you do not have any of the Name Scheme fields customized, your Session will be labeled with today’s date. -
Page 262: Audio Device And Sample Rate
Capture 2.0 Software Start Page ™ Reference Manual Audio Device and Sample Rate Audio Device and Sample Rate Capture 2.0 was created for use with PreSonus StudioLive-series mixers and fully functions only with that device. The Audio Device menu displays the currently selected audio driver. -
Page 263: Audio Options
Capture 2.0 Software Start Page ™ Reference Manual Options Menu 2.5.1 Audio Options Audio Device. At the top of the Audio Options, you will find the Audio Device menu. This is the same menu that is on the Start page. See Section 2.4 for information. Device Block Size. -
Page 264: File Handling Options
Capture 2.0 Software Start Page ™ Reference Manual About Capture 2.0 2.5.3 File Handling Options As discussed in Section 2.1, Capture 2.0 provides an assortment of useful tools to organize and label Capture Sessions. Storage Location. By default, all Capture Sessions are stored in the Capture subfolder in your Documents folder. -
Page 265: The Session Page
Capture 2.0 Software The Session Page ™ Reference Manual About Capture 2.0 The Session Page Recording and Playback Routing Capture 2.0 features a single-window user interface so you don’t need to manage multiple windows and views. When a new Session is created, or an existing Session is opened, you will be taken to the Session page. -
Page 266: Track Column
Capture 2.0 Software The Session Page ™ Reference Manual Track Column Capture 2.0 Playback Routing Input Input Input Input Input Input Input Input Input Input Input Input Input Input Input Input There is no need to set up audio inputs and outputs in Capture 2.0, as the software automatically detects which StudioLive model is connected (a StudioLive 24.4.2, one or two 16.4.2s, or a 16.0.2) and auto-configures for it. -
Page 267: Transport
Capture 2.0 Software The Session Page ™ Reference Manual Transport Track Naming. To name a track, double-click on the default name to open a text- edit box. Enter the name you would like to use and hit Enter. There are several benefits to giving each track in your Session a name. First, it allows you to know at a glance what is being recording where. -
Page 268: Time Display
Capture 2.0 Software The Session Page ™ Reference Manual Time Display Fast Forward. Fast-forwards as long as this button is enabled. Next Marker. Jumps the playback cursor to the next marker. Go To End. Jumps the playback curser to the end of the recorded audio. Loop. -
Page 269: Scrolling
Capture 2.0 Software The Session Page ™ Reference Manual Editing Tools 3.5.2 Scrolling To scroll left and right through time in your Session, click-and-drag the horizontal scroll bar near the bottom of the Edit window. You can also scroll through your Session by clicking and dragging the Timeline Ruler left or right. -
Page 270: Arrow Tool
Capture 2.0 Software The Session Page ™ Reference Manual Editing Tools 3.6.1 Arrow Tool This is the default tool for access to most functions. Click on the Arrow tool button or press [number 1] on the keyboard to select the Arrow tool. The Arrow tool can be used for the following purposes: Move an Event. - Page 271 Capture 2.0 Software The Session Page ™ Reference Manual Editing Tools Size an Event. Events can be thought of as windows into audio files and musical performances, where what you see is what you hear. You can resize events to make them shorter or longer so that only a portion of the audio or musical data is seen and heard.
-
Page 272: Range Tool
Capture 2.0 Software The Session Page ™ Reference Manual Editing Tools 3.6.2 Range Tool The Range tool is used to select a range, or area, within events. Click on the Range tool button or press [number 2] on the keyboard to select the Range tool. To select a range within an event, using the Range tool, click-and-drag over the area to be selected;... -
Page 273: Eraser Tool
Capture 2.0 Software The Session Page ™ Reference Manual Editing Tools 3.6.4 Eraser Tool The Eraser tool is used to delete an event. Click on the Eraser Tool button or press [number 4] on the keyboard to select the Eraser tool. To delete any event using the Eraser tool, simply click on the event. -
Page 274: Bounce Selection
Between each meter you will find a Link button. When this button is active, Capture 2.0 will record that track as a stereo-interleaved file. By default, the routable bus pair (25-26/17-18) is link-enabled, as are the stereo channels on the StudioLive 16.0.2 (9-10/11-12/13-14/15-16). -
Page 275: Big Meter Mode
Capture 2.0 Software The Session Page ™ Reference Manual Markers and the Marker List 3.7.3 Big Meter Mode The Big Meter Mode button is located in the upper right corner of the Session page, above the editing tools. When this button is engaged, the lower three-quarters of the Session page will display detailed metering for every track. -
Page 276: Inserting, Naming, Deleting, And Moving Markers
Capture 2.0 Software The Session Page ™ Reference Manual Markers and the Marker List 3.8.3 Inserting, Naming, Deleting, and Moving Markers Marker Lane. Adding/Deleting Markers. At the top of the Track Column, you will see the Add/ Remove Marker buttons. To insert a new marker into the Marker Lane, with playback running or stopped, click on the Add Marker (+) button, or press [Insert] on the keyboard. -
Page 277: Navigating Markers
Capture 2.0 Software The Session Page ™ Reference Manual Markers and the Marker List 3.8.4 Navigating Markers It is possible to quickly jump the playback cursor between markers in the Marker Lane. Jumping to markers during playback allows quick comparisons between different sections of your Session. To navigate to a previous marker, do one of the following: •... -
Page 278: Recording A Session In Capture
Capture 2.0 Software Recording a Session in Capture ™ Reference Manual Setting up your recording Recording a Session in Capture Setting up your recording Setting Input Levels: Setting the proper input level is critical to making a good live mix and a good recording. The basic idea is to set the input gain on the StudioLive mixer as high as possible without overloading the input. -
Page 279: Virtual Soundcheck
Capture 2.0 Software Virtual Soundcheck ™ Reference Manual Setting up your Virtual Soud Check Virtual Soundcheck Setting up your Virtual Soud Check We’ve all been there. The drummer is stuck in traffic. The guitarist is stuck at work. And you’re stuck at front-of-house (FOH) with a hyped up lead singer and bass player and no way to dial in a FOH mix, let alone set up the singer’s in-ear mix. - Page 280 Capture 2.0 Software Virtual Soundcheck ™ Reference Manual Setting up your Virtual Soud Check 5. The saved Capture Session will open. 6. Engage the FireWire Return buttons on your StudioLive for the channels for which you don’t have live inputs. Input Input Input...
-
Page 281: Importing And Exporting Audio Files
Capture 2.0 Software Importing and Exporting Audio Files ™ Reference Manual Importing Audio Files into Capture Importing and Exporting Audio Files Importing Audio Files into Capture It is possible to import WAV and AIFF audio files into your Session. 1. To import an audio file, select Import Audio File from the Session menu, or [Ctrl]/[Cmd]+I on the keyboard, to open the Import File menu. -
Page 282: Export Audio Files
Capture 2.0 Software Importing and Exporting Audio Files ™ Reference Manual Export Audio Files Export Audio Files To export audio from your Session in Capture 2.0, navigate to Session/Export Tracks, or press [Ctrl]/[Cmd]+E on the keyboard to open the Export to Audio File menu. Location. - Page 283 Capture 2.0 Software Importing and Exporting Audio Files ™ Reference Manual Export Audio Files Options. The bottom section of the Export to Audio File menu has several options that will affect how files are created: • Export Session will export the entire range of your Session to the furthest point in time that any audio event on a track extends.
-
Page 284: Mixing Your Capture Sessions
StudioLive 16.4.2 owners: In VSL, select “Main L/R” for Auxiliary Input 17 and 18. StudioLive 16.0.2 owners: In VSL, patch “Main L/R” to Flexible Inputs 15 and 16. Please note: If you wish to create a mix using Capture 2.0, you will not be able to record using analog inputs 15 and 16. -
Page 285: Exporting Your Final Mix To An Audio File
Exporting Your Final Mix to an Audio File 3. In Capture 2.0, select the Auxiliary Stereo Track (StudioLive 24.4.2, and 16.4.2) or Track 15/16 (StudioLive 16.0.2) and enable Record Arm. 4. Bring the playback-cursor position to the beginning of the Session by clicking the Return to Zero button in the transport. -
Page 286: Import Capture 2.0 Session Audio Files
Capture 2.0 Software Mixing Your Capture Sessions ™ Reference Manual Mixing a Capture 2.0 Session in a Different Recording Application Name the file as usual, and choose OpenTL (*.tl) in the Save As Type selection box. Click on Save to save your Session as an OpenTL document and confirm the command by clicking Yes in the confirmation window. -
Page 287: Capture 2.0 Key Commands
Capture 2.0 Software Capture 2.0 Key Commands ™ Reference Manual Quick Reference Guide Capture 2.0 Key Commands Quick Reference Guide Action Key Command Action Key Command File Menu Transport New Session Cntrl/Cmd+N Toggle Start/Stop Space Bar Open Session Cntrl/Cmd+O Start Enter Close Session Cntrl/Cmd+W... - Page 289 Gulf fish. Also known as Reds or Red Drum, Redfish is not only fun to catch, it’s also delicious! © 2013 PreSonus Audio Electronics, Inc. All Rights Reserved. AudioBox, CoActual, DigiMax, Eris, FireStudio, Nimbit, PreSonus, QMix, Riff to Release, Sceptre, StudioLive, and XMAX are trademarks or registered trademarks of PreSonus Audio Electronics, Inc.
-
Page 290: Reference Manual Addendum
Capture ™ Reference Manual Addendum 7257 Florida Boulevard • Baton Rouge, ® Louisiana 70806 USA • 1-225-216-7887 Part# 820-CAP0007-2.0 www.presonus.com... - Page 291 StudioLive 16.0.2 Rack Ear Instructions 16.0.2 Instalación de orejas de rack Anbringen der Rackwinkel am 16.0.2 Installation des cornières de rack de la 16.0.2 CLICK! www.presonus.com 825-SL0020-A...
Need help?
Do you have a question about the StudioLive 16.0.2 and is the answer not in the manual?
Questions and answers