DEVI devireg 550 User Manual
Hide thumbs
Also See for devireg 550:
- User manual (22 pages) ,
- Instruction manual (2 pages) ,
- User instruction (49 pages)
Advertisement
Quick Links
Advertisement

Related Manuals for DEVI devireg 550


Summary of Contents for DEVI devireg 550
- Page 1 Article: 08090705 Version: 01.02 www.devi.com...
- Page 2 the nation’s favourite PLUMBING & HEATING SUPPLIES FREE SHIPPING SECURE PAYMENTS on all orders over £100 to mainland UK shop online with confidence FINANCE AVAILABLE PRICE MATCH spread the cost with low interest rates always get the best deals available we have H U G E R E D U C T I O N S...
- Page 3 User’s Guide - devireg™ 550 Thermostat...
-
Page 4: Set Temperature
U s e r ’ s G u i d e - d e v i r e g ™ 5 5 0 T h e r m o s t a t About the thermostat Pages 2 - 5 Configurations Pages 6 - 9 Set weekday and clock... - Page 5 Y o u r D E V I u n d e r f l o o r h e a t i n g s y s t e m Your property has been installed with a DEVI electric with minimal energy use.
- Page 6 550 at rest. By identifying the rate of heat loss from the your desired comfort temperature, devireg 550 room, the devireg™ 550 knows when to start hea- will then automatically adjust the heating to...
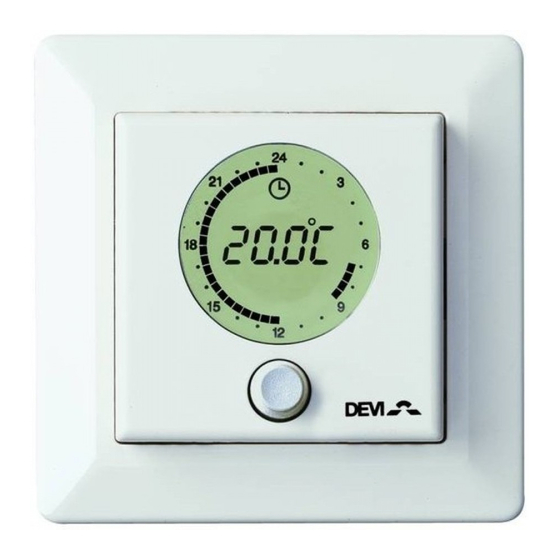
- Page 7 About the thermostat Symbol for timer On Symbol indicating that the room temperature is below the required temperature (set-point). Symbol for frost protection Symbol for degrees Numerical display 00:00 for time, temperature, text, etc. Indication of AM/PM time at 12 hour clock Weekdays 24 hour clock ring which shows actual time and timer program...
- Page 8 U s e r ’ s G u i d e - d e v i r e g ™ 5 5 0 T h e r m o s t a t Thermostat button You can use the button on the thermostat in three dif erent ways: - You can turn it.
- Page 9 About the thermostat Switch timer function on/of h e timer function is used for automatic switch- ing between periods with normal (comfort) tem- perature and periods with lowering of tempera- ture (e.g. at night). When switched on, a timer 20:0 C symbol (clock) is shown at the top of display.
- Page 10 U s e r ’ s G u i d e - d e v i r e g ™ 5 5 0 T h e r m o s t a t U s e r ’ s G u i d e - d e v i r e g ™ 5 5 0 T h e r m o s t a t Configurations Switch thermostat on/of Before you can switch the thermostat of , the...
- Page 11 Configurations Configurations In some situations you may be required to coni - gure the thermostat. If the thermostat is displaying ‘CODE’ , you will be presented with just step 1 and step 4, complete these steps as described below. Once you have either completed steps 1 and 4, or the controller is displaying something other than ‘CODE’...
- Page 12 U s e r ’ s G u i d e - d e v i r e g ™ 5 5 0 T h e r m o s t a t U s e r ’ s G u i d e - d e v i r e g ™ 5 5 0 T h e r m o s t a t Step 3-Temperature readout.
- Page 13 Configurations Configurations Step 7-Of periods. ‘LO’ should be displayed, you should rotate dial to select -30°C, then press button. Step 8-Clock display Rotate button to select clock display as either 24 hours or 12 hours AM/PM. Step 9-Save settings Press button once. Now you are ready to set the time and day on the controller.
- Page 14 U s e r ’ s G u i d e - d e v i r e g ™ 5 5 0 T h e r m o s t a t Set weekday and clock Set clock 3 sec. Hold the button for 3 seconds.
- Page 15 Set the clock to the current time by turning the button to the right or let . Press the button to save the settings.
- Page 16 U s e r ’ s G u i d e - d e v i r e g ™ 5 5 0 T h e r m o s t a t Set temperature Read more about how to set periods with lower- Manual thermostat (Constant temperature) ing of temperature on page 15.
- Page 17 Set temperature the display shows temperature on a scale of 1-10 Switch timer function on/of rather than degrees C. Recommended settings To switch the timer function on/of , press the in this situation are 5-6, which is 25-30°C (l oor button.
- Page 18 U s e r ’ s G u i d e - d e v i r e g ™ 5 5 0 T h e r m o s t a t Set periods with lowering of temperature (timer) h e timer is not factory set.
- Page 19 Set periods with lowering of temperature Turn the button clockwise to indicate the i rst time that normal temperatures are required 06:00 (comfort), e.g. 06:00. h e clock uses 30-mi- nute intervals. Press the button. Turn the button clockwise to indicate the time when the temperature should be lowe- red again.
- Page 20 U s e r ’ s G u i d e - d e v i r e g ™ 5 5 0 T h e r m o s t a t Turn the button clockwise once again to the next time that you require a period with lowe- Please note: If at any point a mistake is made, ring temperature to begin., e.g.
-
Page 21: Error Messages
Error messages Error messages You can read more in Installation Guide to devireg™ 550 has a built-in system that constant- WEB•HOME. Please see our website for more ly checks the heating system, the thermostat it- details. www.devi.co.uk self and a possible network for any malfunctions. If an error occurs, the 24hr clock ring will l ash A fault on the l oor sensor/sensor cable or together with a code for the detected fault,... - Page 22 U s e r ’ s G u i d e - d e v i r e g ™ 5 5 0 T h e r m o s t a t Maximum core floor temperature settings Floor Finish System Floor Construction Tiles...
- Page 23 T h e D E V I G u a r a n t e e You have purchased devireg 550™, which forms an integrated part of a DEVI™ system, which we are certain will improve your home comfort and economy. A DEVI™ system provides complete heating solutions with Devil ex™...
-
Page 24: Your Notes
U s e r ’ s G u i d e - d e v i r e g ™ 5 5 0 T h e r m o s t a t Your notes...
Need help?
Do you have a question about the devireg 550 and is the answer not in the manual?
Questions and answers