Table of Contents
Advertisement
Advertisement
Table of Contents

Related Manuals for DEVI devireg 540


Summary of Contents for DEVI devireg 540
- Page 1 User Instruction GB/DAS devireg 540/550 ™...
- Page 2 Table of contents Introduction Introducing devireg 540/550 ™ How to use your deviheat heating system ™ Daily operation Setting the clock & day Timer programming Warranty Do not cover the thermostat, e.g. by hanging towels etc. directly in front of it !
- Page 3 Introduction You have purchased a devireg 540/550 thermostat, which ™ forms an integrated part of a deviheat™ system. DEVI has developed the devireg 540/550 to make your ™ ™ fl oor heating an even more environmentally correct way of heating your home.
- Page 4 Introducing devireg 540/550 ™ devireg 540 is an advanced temperature controller, with a ™ built-in Timer. devireg 550 ONLY: ™ devireg 550 is an adaptive temperature controller, ™ specially designed for fl oor heating systems. The devireg 550 will measure the radiant comfort from the ™...
- Page 5 All this means that as soon as you have set your devireg ™ 550 at your desired comfort temperature, you do not have to do anything else. devireg 550 will automatically adjust ™ the heating to meet your requirements for comfort and economy, no matter how the weather is changing outside.
-
Page 6: Heating System
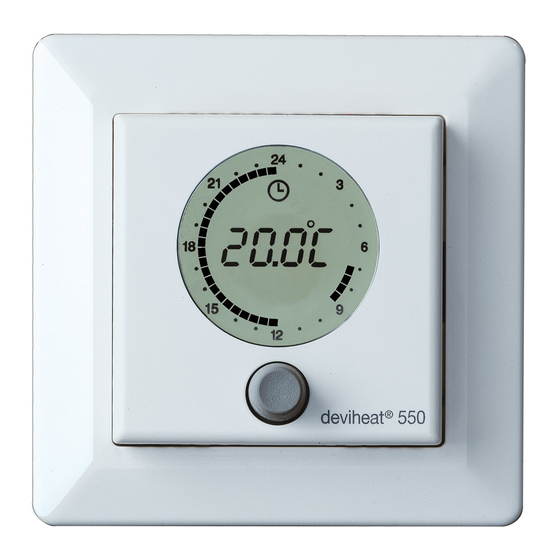
How to use your deviheat heating system ™ The function of the button The button can be turned both ways, is indicated by or the button can be pressed/held, is indicated by View of symbols in the display Symbol for Timer On Symbol for temperature below set-point... - Page 7 Daily operation devireg 540/550 has two temperature settings: ™ Constant temperature with the timer off. Can be used e.g. as ‘Party Mode’ or for con- stantly lowering the temperature when going on holiday. This is indicated by a continuous clock ring ... Timer setting with automatic switching between economy and comfort temperature.
- Page 8 You want to raise the temperature ... Turn clockwise to raise the tempera- ture. You want to lower the temperature ... Turn counter-clockwise to lower the temperature. Economy set-back You want to switch on or off the timer between 00 and 07 function ...
- Page 9 The marking on the clock-ring indi- cates when comfort temperature is chosen and when economy set-back is switched on. A fl ashing point indi- cates the actual clock (every half hour). If the temperature is lowered to mini- mum (+5ºC), a frost symbol will appear in the display, indicating that the thermostat will maintain minimum +5ºC in the room for frost protection.
- Page 10 Setting the clock & day You want to set/change the clock ... (The clock is not set from the factory) 3 sec. Hold the button for 3 sec. The clock can now be set forward or back by turning the button to the right or left respectively.
- Page 11 Timer programming You want to set/change the economy set-back programme ... (The timer is not set from the factory) Hold the button for 6 sec. The pro- 6 sec. gramme for economy set-back can now be edited. First, turn the button to choose the weekday which you want to programme ...
- Page 12 The button is alternately turned and pressed to choose periods with econ- omy set-back and periods with com- fort temperature respectively. The programming switches between low (economy set-back) and high (comfort) temperature every time you press the button. And between every time you press, you can turn the button and choose the period of time.
- Page 13 Example When you enter the programming menu choose a day and press the button ... Turn until you reach the fi rst time when you want comfort temperature, e.g. 06:00. Press ... Turn until the temperature must be lowered again, e.g. 07:30. Press ...
- Page 14 And turn to the next comfort period, e.g. 15:30, and press ... Then, turn until you reach the time when the next lowering of the temperature must start, e.g. 22:30, and press ...
- Page 15 If you continue to turn, the programme will automatically continue with the next day. This way, the programming can continue for the entire week. When you have ended the program- ming, the changes must be saved. 3 sec. This is done by holding the button for 3 sec.
- Page 16 CEE, and all relevant national laws which damage caused by others, or incorrect implies that: installation or any subsequent damage DEVI provides a warranty for devifl ex that may occur. If DEVI is required to ™ ™ ™...
- Page 17 Warranty is granted to: ™ Name: Address: Postal code: Phone: Please Observe! In order to obtain the DEVI Warranty, the following must be ™ carefully filled in. See other conditions on the overleaf. Electrical Installation by: Installation date: Type of thermostat:...
-
Page 20: Connection Diagram
Connection diagram: Network connection devireg 550 ONLY ™... - Page 21 Technical specifi cations: Temperature range: +5º to +35°C or OFF Floor temperature limit: +20º to +50ºC Voltage: 180 - 250 V ~ 50/60 Hz Resistive load: 250 V ~ 16 A Inductive load: 1 A (power factor 0.3) Power consumption: <...
- Page 22 Fault: What to do: Confi gured as Master, Only one unit may be con- but can detect another fi gured as a Master Master unit Sensor fault Change the fl oor sensor fl oor sensor open circuit Sensor fault Change the fl oor sensor fl...
-
Page 23: Error Messages
Error messages: devireg 540/550 has a built-in system that constantly ™ checks the heating system, the thermostat itself and a pos- sible network for any malfunctions. If an error occurs, the display will fl ash together with a reading of the detected fault, which will be shown indicated by the weekday numbers 1 to 7: Fault: What to do:... - Page 24 If more master units are confi gured on the network, an error message will fl ash in the display, and the unit will need to be reconfi gured. If a devireg 550 is confi gured as a slave unit, the following ™...
- Page 25 Network connections (devireg 550 ONLY): ™ The devireg 550 features a network capability. ™ All devireg 550’s installed in a building can be linked ™ together via the network facility, giving the possibility of central adjustment of programming and parameters e.g. clock setting.
- Page 26 Factory setting: The thermostat is preset with the following parameters: Operation Factory setting Choices Network type Alone Alone, Master or (devireg 550 ONLY) Slave ™ Temp. display Cº Cº or Fº Sensor Room + fl oor Room, fl oor or room + fl...
- Page 27 Finally, the type of clock must be set. Choose whether the clock must be 24 hours or 12 hours AM/PM. Turn to choose 12 or 24 hours, and press ... To fi nish the basic setting, press the button, and the display will return to the daily operation menu.
- Page 28 In connection with the built-in Timer, the thermostat can be programmed to lower the temperature (LO), e.g. during the night. The range is 0ºC to -15ºC. Turn to choose economy set-back level, and press ... (Choose -5ºC if the temperature must be lowered 5 degrees).
- Page 29 Offset (OFFS) can be used to adjust a variation between the thermostat and a thermometer in the room, if any. If the thermometer shows e.g. 1ºC more than the thermostat, it is pos- sible to adjust the offset with +1ºC. The range is -5.5ºC to +5.5ºC.
- Page 30 Maximum fl oor temperature is preset from the factory to 45ºC for cable temperature safety. Local building regulations must be observed, when chang- ing the maximum preset temperature. For wooden fl oor constructions DEVI recommend to limit ™ the temperature to maximum 27ºC.
- Page 31 devireg 540/550 is able to use two ™ sensors, one built-in sensor plus an external sensor which can be placed e.g. in the fl oor. Choose the sensor(s) which will be used for this heating system. Turn to choose Room Sensor (r S), Floor Sensor (FS) or both Room and Floor Sensor (rFS), and press ...
- Page 32 Choose whether the thermostat must show Celcius or Fahrenheit degrees. Turn to choose Cº or Fº, and press ...
- Page 33 devireg 550 ONLY: ™ The fi rst function to choose in the basic setting is whether devireg ™ must operate Alone or as Master or Slave thermostat. If several thermostats are linked in one network, only one of the thermo- stats can be choosen as Master ! For further information about network and Master/Slave, see section on...
- Page 34 Change of basic setting If it is necessary to change the basic setting, the button must be held for 12 sec. 12 sec. It is then possible to access the basic setting menu by choosing the code ! Turn to choose code ... Choose the code: 0044 When the code is chosen, press the button ...
- Page 35 devireg 540/550 is able to use two ™ sensors, one built-in sensor plus an external sensor which can be placed in the fl oor. Choose the sensor(s) which will be used for this heating system. Turn to choose Room Sensor (r S), Floor Sensor (FS) or both Room and Floor Sensor (rFS), and press ...
- Page 36 Activating devireg 540/550 ™ When the thermostat is connected to the mains voltage for the fi rst time, a code must be chosen and the sensor(s) selected. Turn to choose code ... Choose the code: 0044 When the code is chosen, press the button ...
- Page 37 DO NOT over tighten !
- Page 38 Reassemble the thermostat by fi rst placing the frame, then mount the display module and fi nally press the front cover into place. Note: The display must be gently remounted on the base module, ensuring that the 8-pin plug is placed accurately by using the four tabs sur- rounding it.
- Page 39 In order to get the best possible result when using the devireg 540/550, the thermostat ™ should be installed in the wall, following a few basic rules: Installation height, typically between 80-150 cm. On a wall NOT facing the outside On a wall where it will NOT be subjected to direct sunlight Away from windows/doors that will open...
- Page 40 Warning (devireg 550 ONLY): ™ Please note, when working on thermostats connected to a network, ensure that the mains supply for all thermostats in the network is disconnected before the work is started. Screw holes You can now mount the ther- mostat in the wall, by using any of the eight screw...
- Page 41 - A fl oor sensor is not present, and cannot be installed. - Choose Room sensor only in Basic Settings. - Be aware that temperature control is less accurate without the fl oor sensor. DEVI recommend that a fl oor sensor is ™...
- Page 42 Connection of the thermostat must be carried out as shown below. Mains supply NTC sensor 180-250 V 50/60 Hz Network Heating element connection Max. load 16 Amp. devireg 550 ONLY ™ As the devireg 540/550 is not equipped with an earth ™...
- Page 43 Remove the frame from the thermostat. Frame...
- Page 44 Remove the two screws, one in each side, and gently pull off the display module. Screws...
- Page 45 Installation of devireg 540/550: ™ When installing devireg 540/550 you must fi rst ™ dismantle the thermostat. Remove the front cover by gently pressing the release tab in the top (center hole), and lift out the cover. Release tab...
- Page 46 Table of contents Installation of devireg 540/550 ™ Activating devireg 540/550 ™ Change of basic setting Factory settings Network Error messages Technical specifi cations Connection diagram Please Note: The devireg 540/550 must be connected and the basic ™ setting must be done by an authorised electrician. In-appropriate installation and basic setting may cause damage to the heating system or fl...
- Page 48 Installation Instruction Installation Instruction Installation Instruction GB/DAS devireg 540/550 ™...
Need help?
Do you have a question about the devireg 540 and is the answer not in the manual?
Questions and answers
It’s been off the warmer weather. I went to turn on it it’s just flashing and a 5 shows. Is this something that needs fixing or can I reset? How do I reset? It’s an older model with the one Button.
To reset the DEVI 540 thermostat:
1. Turn the thermostat off by flipping the circuit breaker.
2. Leave it off for 30 seconds.
3. Turn the circuit breaker back on.
This method applies to mechanical thermostats like the DEVI 540.
This answer is automatically generated