
Related Manuals for Motorola IT6


Summary of Contents for Motorola IT6
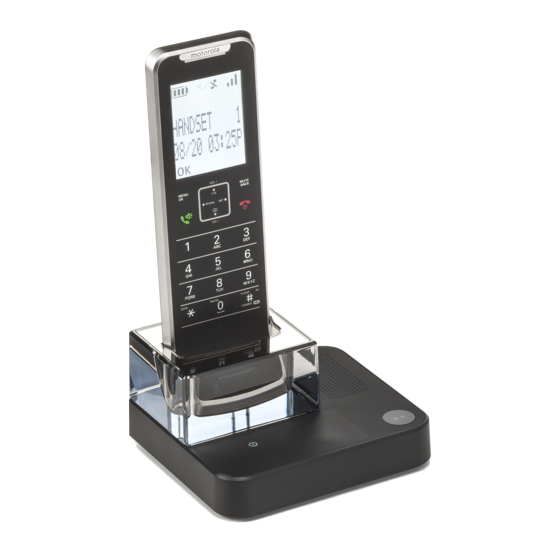
- Page 1 Digital Cordless Telephone with Answering Machine Motorola IT6 For IT6 and IT6-2 Note: Please charge the handset for 24 hours before initial use.
- Page 2 Need help? If you have any problems setting up or your using your IT6 Digital Cordless Telephone with Answering Machine, please contact Customer Service at 1-888-331-3383. Alternatively, you may find the answer in the ‘Help’ section at the back of this guide.
- Page 3 • Cordless base • Power adapter for the base • Telephone line cord If you have purchased the IT6-2 multiple pack you will also have the following additional items: • Cordless handset & charger • Power adapter for the charger •...
-
Page 4: Table Of Contents
1. Getting started ..............7 2. Getting to know your phone ..........10 3. Using the phone ..............16 Make a call .....................16 Pre-dial ......................16 Dial direct memory numbers 1 through 9 .............16 Call from the phonebook ................16 Call from the Calls list ..................16 Answer a call ....................16 Adjust volume ....................17 Mute .......................17... - Page 5 5.2.4 Delete a redial list entry ..............25 5.2.5 Delete entire redial list ................25 6. Clock & Alarm ..............26 Setting the date and time ................26 Setting the alarm ....................26 Setting the alarm melody ................26 Switch auto clock ON / OFF.................27 7.
- Page 6 Outgoing messages ..................36 9.6.1 Record also (Answer and record) ............36 9.6.2 Answer Only ..................36 9.6.3 Set answer mode ................36 9.6.4 Record, play or delete your personalized outgoing message ......37 Answering machine settings .................37 9.7.1 Ring delay ...................37 Remote access....................38 9.8.1 Remote access ON / OFF and change remote PIN ......38 Call screening ....................38 9.9.1...
-
Page 7: Getting Started
Do not place your IT6 in the bathroom or other humid areas. Location You need to place your IT6 base within 6 feet of an electrical outlet and a telephone wall socket to provide the power to supply the device and to connect to telephone service. -
Page 8: Charging The Handset
Charging the handset 3. If you are charging the battery for the first time, place the handset on the base to charge for at least 24 hours continuously. 4. When the handset is fully charged, icon will appear steady on the display. Plug the other end of the telephone line cord (make sure that one end is already plugged into the base) into the telephone wall socket. -
Page 9: Date And Time
3. Enter the date using the format MM/DD e.g. 08/04 for August 4th and press 4. Enter the time using the 12 hour format HH:MM, e.g. 02:45. 5. Press to change from (am) to (pm) and press 6. Press to return to standby. Your IT6 is now ready for use. Getting started... -
Page 10: Getting To Know Your Phone
2. Getting to know your phone Overview of your handset A Earpiece B Display See page 12 for display icons. C Call Log / Scroll Up / Volume up Open the Call log. Press to enter Call Log menu and then press to select Call List... - Page 11 E Redial Open the redial list. F Talk / Hands-free key Make or answer a call. Activate and deactivate hands-free during a call. IMPORTANT Hands-free activation can suddenly increase the volume in the earpiece to a very high level. Make sure the handset is not too close to your ear. G Pulse to Tone Dialing / * / Keypad lock During a call, press and hold to switch from pulse dialing to tone dialing.
-
Page 12: Handset Display
Handset display Display icons On when the line is in use. Flashes when there is an incoming call. Flashes when you have missed calls and new number(s) are in the Calls list. Handset ringer is off. Steady when the handset is registered and within range of the base. Disappears when the handset is out of range and flashes when searching for the base. -
Page 13: Overview Of The Base
Overview of the base A Delete B Answering machine ON/OFF C Skip back D Skip forward E Volume Up F Volume Down G Play / Stop H Paging key Paging is a useful way to find lost handsets. 1. Press on the base. -
Page 14: Navigating The Menus
Navigating the menus The basic steps of navigating through the menu and on-screen options. 1. From the standby screen, press The main menu is opened. 2. Use the ) or ) keys to scroll through the menu. 3. Soft key options are displayed. - Page 15 Menu map Auto Hang-Up Phonebook Language List Entry Backlight when entries have not been Advanced Set stored is shown, if entries List empty Call List are stored scroll to the required entry and press Conference Area code Edit Flash Time Delete Dial Mode New Entry...
-
Page 16: Using The Phone
3. Using the phone Make a call 1. Press 2. Dial the telephone number. Pre-dial 1. Enter the phone number (maximum 24 digits). If you make a mistake press 2. Press to dial the phone number entered. Dial direct memory numbers 1 through 9 1. -
Page 17: Adjust Volume
IMPORTANT When the phone is ringing, avoid holding the earpiece too close to your ear as it may damage your hearing. NOTE If Auto Pick up mode (see page 29) is ON, simply lift up the handset from its base to answer the call. -
Page 18: Transfer An External Call To Another Handset
NOTE If the handset is not in IT6 range, this function may not be available. 3.11.2 Transfer an external call to another handset 1. During an external call, press Your caller is put on hold. 2. Enter the number of the handset you want to call or press to ring all handsets. -
Page 19: Phonebook
4. Phonebook The IT6 handset phonebook can store up to 100 names and numbers. Numbers can be up to 24 digits long and names up to 12 characters long. Entries are stored in alphabetical order. View and dial phonebook entries 1. -
Page 20: Character Map
ABC, abc, Abc Enter a pause If your IT6 is connected to a PABX, you may need to enter a pause in a stored number. This gives the switchboard time to get an outside line. A pause is normally stored after the switchboard access code (e.g. -
Page 21: View An Entry
View an entry In standby: 1. Press 2. Enter the first letter of the name to search alphabetically then scroll to the exact entry. The name is displayed. 3. Press to display the number. If there are more than 12 digits, press again to see the rest of the number. -
Page 22: Delete All Entries
4.10 Delete all entries 1. Press twice. 2. Scroll Delete All and press 3. Display shows Confirm?. Press 4. Press to return to standby. 4.11 Store a direct memory number 1. Press twice. 2. Scroll Direct Mem and press Key 1 is displayed. -
Page 23: Caller Id And Calls List
5. Caller ID and Calls list If you have subscribed to Caller ID and provided the identity of the caller is not withheld, the number of the caller will be displayed together with the date and time of the call (if provided by the network). -
Page 24: Dial From The Calls List
3. Display shows Confirm?. Press to confirm. 4. Press to return to standby. Redial The IT6 lets you redial any of the last 10 numbers called. Numbers can be up to 24 digits long. 5.2.1 Redial the last number 1. Press . -
Page 25: View And Dial A Number In The Redial List
2. Press to dial. 5.2.2 View and dial a number in the redial list 1. Press . The last number dialled is displayed. If required, scroll to display the number you want. 2. Press to dial the number. 5.2.3 Copy a redial number to the phonebook 1. -
Page 26: Clock & Alarm
6. Clock & Alarm If you subscribe to your network’s Caller ID service and Auto clock is set to ON, the time on your IT6 may be set automatically each time you receive a call, depending on your network provider. -
Page 27: Switch Auto Clock On / Off
Switch auto clock ON / OFF. If you have subscribed to Caller ID Service, the date and time will be set on all your handsets whenever a call is received. This feature can be set to ON or OFF. 1. Press , scroll to Clock/Alarm and press... -
Page 28: Personal Settings
7. Personal settings Handset tones IMPORTANT When the phone is ringing, avoid holding the earpiece too close to your ear as it may damage your hearing. 7.1.1 Ring volume Choose from 5 levels and off. 1. Press , scroll Personal set and press Handset Tone is displayed. -
Page 29: Base Tone
5. Press to return to standby. Base tone 7.2.1 Ring melody Choose from 5 ringer melodies. 1. Press , scroll Personal Set and press 2. Scroll Base Tone. Press Base Melody is displayed. Press 4. Scroll to select the melody. A sample of the melody is played. 5. -
Page 30: Auto Hang Up
3. Scroll to select or Off. 4. Press to confirm. 5. Press to return to standby. Auto hang up With Auto hang up switched ON, you can end a call by simply replacing the handset on the base or charger. If switched OFF, you have to press to hang up. -
Page 31: Advanced Settings
This setting is useful to access certain network and PABX services. The default IT6 flash time is suitable for your country and network operator. It is unlikely that you should need to change this setting unless advised to do so. -
Page 32: Dial Mode
The use of your IT6 cannot be guaranteed on all PABX. Dial mode The default IT6 dialling mode is suitable for your country and network operator. It is unlikely that you should need to change this setting unless advised to do so. -
Page 33: Pin
The 4-digit master PIN is used when registering or Un-register a handset and when changing some settings on your IT6. The default setting is 0000. You can change this PIN for more security. 1. Press... -
Page 34: Set A Number To Be Barred
Mode is displayed. Press 5. Press to select or Off. Press to confirm. 6. Press to return to standby. You can now set the number. (See below) 8.11.2 Set a number to be barred 1. Press , scroll Advanced Set and press 2. -
Page 35: Using Your Answering Machine
9. Using your Answering Machine Your IT6 answering machine records unanswered calls when it is activated. It can store up to 59 messages within the maximum recording time up to 30 minutes. Each message can be up to 3 minutes long. Your personal outgoing messages can be up to 3 minutes long. -
Page 36: Delete All Messages
Delete all messages 1. Press , scroll Answ Machine and press 2. Scroll Delete All and press 3. Display shows Confirm?. Press to confirm. 4. Press to return to standby. Record a memo You can record a memo which is stored on your answering machine is played back like a normal message. -
Page 37: Record, Play Or Delete Your Personalized Outgoing Message
9.6.4 Record, play or delete your personalized outgoing message Record also invites your callers to leave a message. Answer Only lets callers hear your announcement but they cannot leave a message. 1. Press , scroll Answ Machine and press 2. Scroll Answer Mode and press 3. -
Page 38: Remote Access
- You hear a confirmation beep. NOTE Change this code for increased security, see “PIN” on page 33. 3. After entering your PIN as stated above, use the keypad to operate your IT6 answering machine. Play messages Play previous message... -
Page 39: Switch Handset Call Screening On / Off
At the handset: If you want to interrupt and take the call press At the base: 1. When a caller is leaving a message, press + or - to adjust the volume to listen to your caller. 2. To interrupt and take the call on the handset, press 9.9.1 Switch handset call screening ON / OFF 1. -
Page 40: Memory Full
2. Press Answ Machine is displayed. 3. Press Play is displayed. 4. Press , the handset will start the new message playback. Once all messages are played, the handset will return to standby. NOTE During message playback, press anytime to return to standby. 9.12 Memory full The memory is full if there is less than 15 seconds of recording time left or if the maximum... -
Page 41: Technical Specifications
10. Technical Specifications RF frequency band 1921.536 MHz – 1928.448 MHz Channels Operation temperature 10°C~40°C Base voltage 100~230V AC (AC voltage, 50Hz/60Hz) Base voltage 6.5V DC / 0.3A and 7.5V DC / 0.2A (Adapter output) Handset voltage 3.7V 277mAh Lithium battery Charger voltage 7.5V DC / 0.2A (Adapter output) -
Page 42: Help
11. Help icon is not scrolling during charge • Bad battery contact – move the handset slightly. • Dirty contact – Clean the battery contact with a cloth moistened with alcohol. • Battery is full – no need to charge. No dialling tone •... - Page 43 Cannot access messages remotely • Remote access may be switched off. • If wrong PIN is entered a beep is played. You can enter the PIN once again. Cannot record outgoing message • The memory may be full. If so, you will need to delete some messages. Answering machine stops automatically •...
-
Page 44: General Information
12. General information If your product is not working properly... 1. Read this User’s Guide. 2. Visit our website: www.motorola.com 3. Contact Customer Service in the US and Canada at 1-888-331-3383 Email: motorola@encompass.com Important safety instructions Follow these safety precautions when using your phone to reduce the risk of fire, electric shock, and injury to persons or property: 1. -
Page 45: Installation Guidelines
Unplug this cordless phone immediately from an outlet if: • The power cord or plug is damaged or frayed. • Liquid has been spilled on the product. • The product has been exposed to rain or water. Do not retrieve the handset or base until after you have unplugged the power and phone from the wall. - Page 46 Consumer Products and Accessories Limited Warranty (“Warranty”) Thank you for purchasing this Motorola branded product manufactured under license by Binatone Electronics International LTD (“BINATONE”). What Does this Warranty Cover? Subject to the exclusions contained below, BINATONE warrants that this Motorola branded product (“Product”) or certified accessory (“Accessory”) sold for use with this...
- Page 47 MOTOROLA or BINATONE., are excluded from coverage. Use of Non-Motorola branded Products and Accessories. Defects or damage that result from the use of Non-Motorola branded or certified Products or Accessories or other peripheral equipment are excluded from coverage. Unauthorized Service or Modification.
- Page 48 card was included in your box, a completed warranty card showing the serial number of the Product; (d) a written description of the problem; and, most importantly; (e) your address and telephone number. These terms and conditions constitute the complete warranty agreement between you and BINATONE.
-
Page 49: Fcc Part 68 And Acta
FCC Part 68 and ACTA This equipment complies with Part 68 of the FCC rules and with technical requirements adopted by the Administrative Council for Terminal Attachments (ACTA). This Product Complies With 47CFR PART 68. The plug and jack used to connect this equipment to premises wiring and the telephone network must comply with applicable Part 68 rules and technical requirements adopted by ACTA. -
Page 50: Industry Canada
Industry Canada Operation is subject to the following two conditions: (1) this device may not cause harmful interference, and (2) this device must accept any interference, including interference that may cause undesired operation. The term “IC: “ before the certification/registration number only signifies that the Industry Canada technical specifications were met. - Page 52 Manufactured, distributed or sold by Binatone Electronics International LTD., official licensee for this product. MOTOROLA and the Stylized M Logo are trademarks or registered trademarks of Motorola Trademark Holdings, LLC. and are used under license. All other trademarks are the property of their respective owners.
Need help?
Do you have a question about the IT6 and is the answer not in the manual?
Questions and answers