Table of Contents
Advertisement
Quick Links
Download this manual
See also:
Operating Manual
Advertisement
Table of Contents

Related Manuals for CYP SY-P290


Summary of Contents for CYP SY-P290
- Page 1 SY-P290 PC/DVD/HD to HDMI Scaler OPERATION MANUAL...
- Page 2 Precautions Failure to follow the precautions described below may cause damage to this device and void the warranty. • DO NOT open the case. This will void the warranty, if you find a problem with this product, please return it to your retailer or seller who will assist you or provide you with a solution.
-
Page 3: Table Of Contents
Table of Contents Introduction Application Package Contents System Requirements Features Operation Controls and Functions Front Panel Rear Panel Connection Diagram Specifications... -
Page 4: Introduction
1. Introduction The SY-P290 is designed to convert and scale Digital or Analogue RGBHV or YUV to HDMI for improved viewing. This unit offers a wide selection of output resolutions/ format, colour space and adjustment to obtain the best picture quality. -
Page 5: System Requirements
4. System Requirements • Source with PC,DVI-D or Component output and HDTV/Monitor. • RCA - D-SUB cable (for connecting component sources) / D-SUB to D-SUB cable for connecting a PC, DVI/HDMI to DVI-D cable for connecting a HDMI source to the input or a DVI display. -
Page 6: Operation Controls And Functions
6. Operation Controls and Functions 6.1 Front Panel VIDEO IN DC 5V DVI-D PC/HD DVI-D IN: Connect the DVI (29 pin) port to the DVI output port of your source equipment such as a PC. Supported Resolutions: VGA~ WUXGA Note: DVI-D input can only accept a DVI-D signal. PC/HD input: Connect the PC input D-Sub (15-pin) port to the D-Sub output port of your source equipment such as a PC or use a D-Sub to 3RCA cable to connect to a component video source such as a DVD player. -
Page 7: Rear Panel
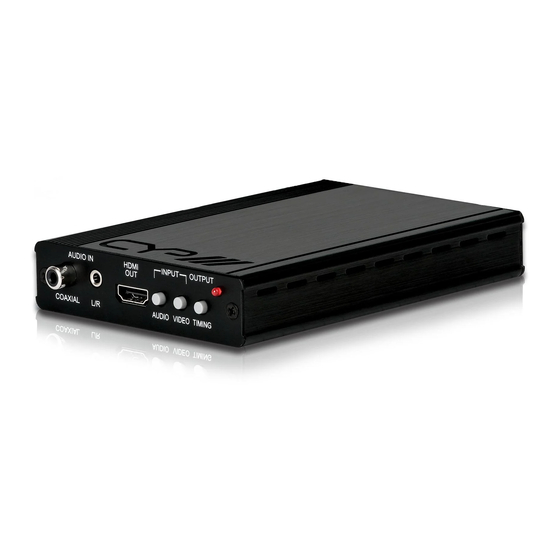
6.2 Rear Panel AUDIO IN HDMI INPUT OUTPUT COAXIAL AUDIO VIDEO TIMING 1. Coaxial input: Connect the coaxial audio output of the source device to this input. 2. L/R audio input (3.5mm): Connect the L/R audio from the source device to this input. -
Page 8: Connection Diagram
7. Connection Diagram Page 5... -
Page 9: Specifications
8. Specifications 1 x PC/HD 1 x DVI-D Input ports 1 x Coaxial Audio 1 x L/R Audio Output ports 1 x HDMI Power Supply 5V/2.6A DC (US/EU standards, CE/FCC/UL certified) Dimensions (mm) 102 (W) x 160 (D) x 25 (H) Weight (g) Chassis Material Aluminium...
Need help?
Do you have a question about the SY-P290 and is the answer not in the manual?
Questions and answers