Advertisement
Instructions for installation and use
Read this entire manual before you install and use your new room heater. If this room heater is not properly
installed, a house fire may result. To reduce the risk of fire, follow the installation instructions. Failure to
follow instructions may result in property damage, bodily injury, or even death.
Contact local building officials about restrictions and installation inspection-equirements in your area.
www.morsoe.com
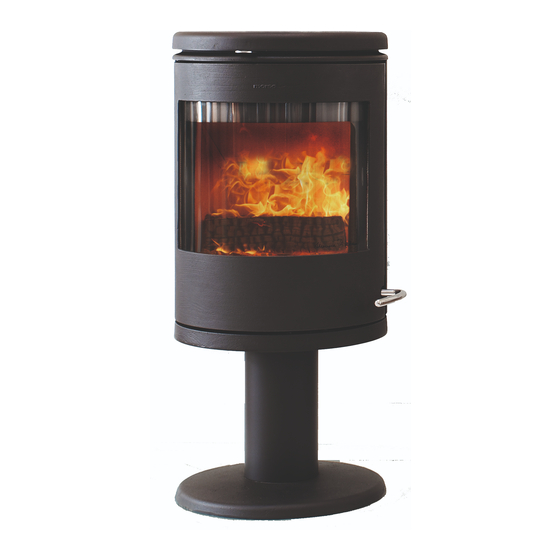
7600 series
Design Monica Ritterband
AS/NZS 4012/4013 (1999)
Save these instructions
Distributed by: Castworks · 8 Roosevelt St.
North Coburg ·VIC 3058 · Australia
Advertisement

Related Manuals for Morso 7600 series


Summary of Contents for Morso 7600 series
- Page 1 Instructions for installation and use 7600 series Design Monica Ritterband AS/NZS 4012/4013 (1999) Read this entire manual before you install and use your new room heater. If this room heater is not properly installed, a house fire may result. To reduce the risk of fire, follow the installation instructions. Failure to follow instructions may result in property damage, bodily injury, or even death. Contact local building officials about restrictions and installation inspection-equirements in your area. Save these instructions Distributed by: Castworks · 8 Roosevelt St. North Coburg ·VIC 3058 · Australia www.morsoe.com...
-
Page 2: Table Of Contents
Enjoy your new Morsø stove! Morsø, the biggest stove company in the Danish market, has been making wood-burning stoves of the highest quality since 1853. Just follow the in- structions below, and we are certain that you will be able to use and enjoy your new stove for many years to come. 1.0 Installing your Morsø stove Unpacking the stove Installing the stove Chimney sweep Location of the stove/distance requirements The chimney Pipe connections Connecting to a brick chimney Connecting to a steel chimney Draught 2.0 Firing/using the stove Lighting instructions and fuelling intervals 3.0 Routine stove maintenance External maintenance... -
Page 3: Unpacking The Stove
1.0 Installing your Morsø stove 1.1 Unpacking the stove The Morsø 7600 stoves weigh between 130 and 160 kg. In order to avoid damage when un- packing and assembling the stove, we recommend that this job be undertaken by 2 people. Remove the top cover, which is lying loose, before lifting the combustion chamber off the wooden pallet. -
Page 4: The Chimney
We recommend that the stove be installed at least 10 - 15 cm from masonry, in order to allow heat to circulate and to facilitate the cleaning of the inside and outside of the stove. A layer of wallpaper on a brick wall is normally viewed as non-flammable material. The floor If the stove is installed on a flammable floor, national and local regulations must be observed with regard to the size of the non-flammable underlying surface that must cover the floor be-... - Page 5 1.6 Connecting the flue pipe Lift the upper cast iron top plate off the stove. Note: the round cast iron cover plate in the top plate must remain mounted if the stove is being installed with the flue pipe to the rear, but unscrewed from the upper top plate if the flue pipe is being installed pointing upwards. Mounting the flue collar pointing upwards From the factory, the stove is prepared for installation with the included flue collar (1) poin- ting upwards with included ball stop and screws.
-
Page 6: Connecting To A Brick Chimney
1.7 Connecting to a brick chimney Brick a flue bushing securely into the wall, and insert the flue pipe into it. The pipe must not extend into the actual chimney opening, but only to the inside of the chimney aperture. The joints between the stove/pipe and pipe/wall bushing must be sealed with the glass tape pro- vided. -
Page 7: Draught
1.9 Draught If smoke comes out of the stove when the fire door is opened, it will be due to the poor draught in the chimney. This type of stove requires at least 12 PA of chimney draught to achieve satisfactory combustion, and to prevent smoke from escaping. Smoke may, however, escape in any event, if the stove door is opened during very vigorous burning, so this should be avoided. - Page 8 2.0 Firing/using the stove Your stove is constructed with air inlets in two places. Pre-heated, fast-moving combustion air is added to the fire above the glass window, and is regulated using the handle above the door. The combustion air is let in when the handle is pushed to the right, and shut off when the handle is pushed to the left. Another air inlet provides a constant, pre-heated air supply which cannot be adjusted, and which comes into the combustion chamber just above the fire.
- Page 9 2.1 Lighting and fuelling intervals A lot of air is needed when lighting the stove. If you are starting with a cold stove, the door should be left ajar for the first few minutes, and the combustion air supply opened to maxi- mum. Always keep approximately 1 cm of ash in the bottom of the combustion chamber. This will have an insulating effect, and ensures good combustion.
- Page 10 5. If the condition in step 4 is met, place max. 2 pieces of wood with a total weight of 1.5-2 kg and a length of 25- 30 cm over the embers in a single layer, with a distance of approximately 1 cm.
- Page 11 The stove door must be opened gently the first 2 - 3 centimetres, then you should wait until the pressure has equalised before opening the door all the way. This technique will prevent smoke from getting out, particularly when there is a poor draught. The stove door should never be opened when the stove is being fired vigorously.
-
Page 12: External Maintenance
3.0 Routine stove maintenance 3.1 External maintenance The cast surface of the stove is painted with heat-resistant Senotherm paint. It is best main- tained by simply vacuuming it with a soft brush attachment or wiping it down with a dry, dust- free cloth. If the stove is used too vigorously, the painted surface may assume a greyish tinge over time, but the stove can easily be freshened up with Morsø... -
Page 13: Cleaning The Stove
Gaskets The gaskets in the door will wear out over time, and should be replaced as required in order to prevent runaway combustion. Use the original Morsø gasket kit. NOTE: Normal wearing parts are not covered by Morsø’s extended warranty. A selection of maintenance products (spare parts, glass cleaner, paint, gasket kit, etc.) is available from your Morsø... - Page 16 Morsø Jernstøberi A/S - 2011.03.28 - 72762500 www.morsoe.com...
Need help?
Do you have a question about the 7600 series and is the answer not in the manual?
Questions and answers