Morso 7110 Installation And Operating Instructions Manual
Hide thumbs
Also See for 7110:
- Instructions for installation and use manual (16 pages) ,
- Installation instructions (4 pages) ,
- Instructions for installation and use manual (36 pages)
Table of Contents
Advertisement
Installation and Operating Instructions
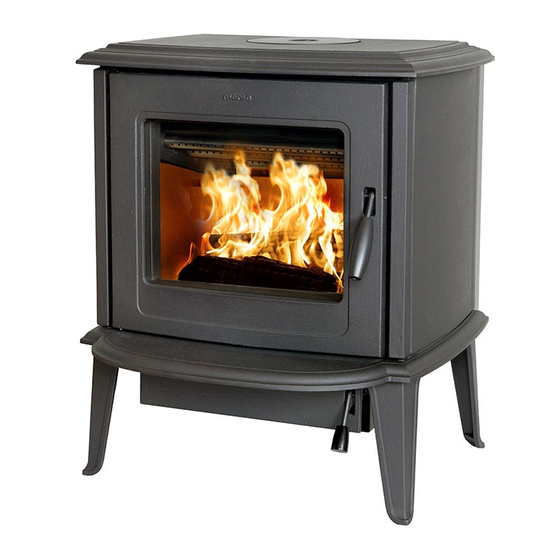
7110
For use in North America
Read this entire manual before you install and use your new room heater. If this room
heater is not properly installed, a house fire may result. To reduce the risk of fire, follow
the installation instructions. Failure to follow instructions may result in property damage,
bodily injury, or even death.
Contact local building officials about restrictions and installation/inspection-requirements
in your area.
Save these instructions
MORSØ JERNSTØBERI A/S . DK-7900 NYKØBING MORS
E-Mail: stoves@morsoe.com · Website: www.morsoe.com
Distributed by: MORSO US LLC
1
1011 Highway 52 West - Portland TN - 37148 - USA
Advertisement
Table of Contents

Related Manuals for Morso 7110


Summary of Contents for Morso 7110
- Page 1 Contact local building officials about restrictions and installation/inspection-requirements in your area. Save these instructions MORSØ JERNSTØBERI A/S . DK-7900 NYKØBING MORS E-Mail: stoves@morsoe.com · Website: www.morsoe.com Distributed by: MORSO US LLC 1011 Highway 52 West - Portland TN - 37148 - USA...
- Page 2 The Morsø 7110 meets the U.S. Environmental Protection Agency’s emission limits for wood heaters sold on or after July 1, 1990 The Morsø 7110 have been tested by OMNI-Test Laboratories, Inc. The test standards are ANSI/UL-1482 for the United States and ULC S627 for Canada.
-
Page 3: Table Of Contents
CONTENTS: Installation of your Morsø stove Checking loose parts in the stove The chimney / flue system Flue Connection Connection to existing chimney Positioning the stove Mobile Home Installation Operation Before you start firing Lighting and loading intervals Maintenance Exterior maintenance Internal maintenance Cleaning the Stove and the Flue Leaving the stove for extended periods... -
Page 4: Installation Of Your Morsø Stove
1.0 Installation of your Morsø stove Installation of woodburning stoves must be safe and legal. If your Morsø stove is not installed correctly, it may cause a house fire. To reduce the risk of fire, the installation instructions must be followed carefully. Contact the local building officials about restrictions and installation inspection in your area. -
Page 5: The Chimney / Flue System
1.2 The chimney / flue system Note that the flue system must be independently secured and must not rely on the stove for support. The stove must not be connected to a chimney flue serving any other appliance. (Several flues may run up a single chimney stack; use one flueway per appliance). Use a residential type masonry or listed type HT factory-built chimney. -
Page 6: Flue Connection
1.3 Flue Connection The stove is supplied from the factory with a flue collar fitted to the top plate and a round blanking plate blocking off the rear flue exit (behind the rear shield plate). Use a 24 MSG black or blue chimney connector or listed double wall chimney connector. Refer to local codes and the chimney manufacturer’s instructions for precautions required for passing a chimney through a combustible wall or ceiling. -
Page 8: Positioning The Stove
1.5 Positioning the stove Distance to walls and lintel When the stove is positioned near combustible materials, observe all current local and national building regulations with regards to clearances. Whatever regulations apply to your area, do not in any case install the stove within 8 inches of combustible materials around the sides or 16 inches above the top of the stove (fireplace installations require greater clearances above the stove - see below in the clearance chart). -
Page 9: Mobile Home Installation
1.6 Mobile Home Installation The Morsø 7110 can be installed in a mobile home if equipped with an outside combustion air kit, a terminal cap with a spark arrestor, and if it meets the following installation requirements: •... - Page 10 CAUTION: THE STRUCTURAL INTEGRITY OF THE MOBILE HOME FLOOR, WALL, AND CEILING/ ROOF MUST BE MAINTAINED (I.E., DO NOT CUT THROUGH FLOOR JOIST, WALL STUD, CEILING TRUSS, ETC.) DO NOT USE A GRATE TO ELEVATE FIRE - BUILD FIRE DIRECTLY ON HEARTH. Note: Acid Protection If acid-washing the masonry around the stove, protect the stove surface with an acid-proof...
-
Page 11: Operation
2.0 Operation 2.1 Before you start firing For Use with Solid Wood Fuel Only. Do Not Overfire, If Heater or Chimney Connector Glows You Are Overfiring. Inspect and Clean Chimney Frequently. Under Certain Conditions of use creosote buildup may occur rapidly. Because of risk of smoke and flame spillage, operate only with door fully closed. -
Page 12: Lighting And Loading Intervals
control lever to right position will open the air inlet and will allow a supply of preheated air to enter the firebox via the ‘airwash’ system situated inside the stove and the above glass. Secondary Air is left to the firebox using the specially designed baffle at the back of the firebox. The secondary air is injected into the flue gases above the fire resulting in a cleaner, more efficient combustion process. - Page 13 4. After the paper/fire lighters have caught fire, leave the fire door ajar about 2-3 cm, so that the chimney draws well. 5. After 5-10 minutes the chimney draft should be established, at this point close the fire door. If all the necessary conditions are met, a nice layer of embers will start to accumulate after another 15 - 20 minutes.
- Page 14 7. Place two pieces of fuel weighing roughly 2-4 pound and measuring about 25 cm in length across the embers in one layer, with spacing of roughly 1 cm between the pieces of wood. 8. When the primary air supply is opened all the way and the door is closed, the new fuel will ignite in a few minutes.
- Page 15 Do not for any reason attempt to increase the firing of your heater by altering the air control adjustment range outlined in these directions. Warning: Fireplace stoves must never be left unattended with doors open. If doors are left partly open, gas and flame may be drawn out of the fireplace stove opening, creating risks from both fire and smoke.
-
Page 16: Maintenance
3.0 MAINTENANCE When perfoming maintenance on your stove, always protect yourself, using safety goggles and gloves 3.1 Exterior Maintenance The stove surface is painted with heat-resistant Senotherm paint. It is best kept clean by vacuuming with a soft brush attachment or by wiping with a lint-free cloth. Over a period of time, the painted surface may become slightly grey. - Page 17 Ceramic glass replacement Ceramic glass cannot be recycled because it has a higher melting point that ordinary glass. If ceramic glass is mixed with ordinary glass, the raw material is spoiled, and the reclaiming process may be halted. Take care that the ovenproof glass does not end up among ordinary recycled waste.
-
Page 18: Cleaning The Stove And The Flue
To reduce the risk of breaking the glass, avoid striking the glass or slamming the door. Internal service parts The flame-path equipment - consisting of the ashpan, grate, firebricks, Cast iron fire plates, glass, baffle and flue collar - are subject to the extremes of heat produced by the fire. From time to time, one or other of these parts may need replacing as a matter of routine maintenance. - Page 19 Dispose the ash in a metal container with a tight fitting lid. The closed container of ashes should be placed on a noncombustible floor or on the ground, well away from all combustible materials, pending final disposal. If the ashes are disposed of by burial in soil or otherwise locally disperded, they should be retained in the closed container until all cinders have thoroughly cooled.
-
Page 20: Leaving The Stove For Extended Periods
3.4 Leaving the stove for extended periods Important: If the stove is to be left unused for any period of time, clean it out thoroughly and leave the air control slightly open to allow airflow. Make sure that the flue does not allow rainwater to come anywhere near the stove;... -
Page 21: Parts Diagram
3.5 Parts diagram for model Morsø 7110... -
Page 22: Parts List
3.6 Parts list for model Morsø 7110 Pos.No. Parts Base plate 447101xx Front frame 447102xx Door 447103xx Side plate, right 447119xx Side plate, left 447120xx Rear plate 447106xx Top plate 447107xx Rear air duct 447108xx Button air duct 447109xx Front air duct... - Page 23 Screw Screw Screw Screw Screw Screw Screw Screw Screw Screw Screw Washer Washer Washer Washer Screw Baffle plate, cast iron 34711800 Tightening tape for glass 79074500 Insulation 79710500 Primary handle 71711161 Baffle plate, upper 79710400 Stop fitting, left, for baffle plate 71711200 Stop fitting, right, for baffle plate 71711300...
- Page 24 Morsø Jernstøberi A/S - 10.11.2010 - 72711000...
Need help?
Do you have a question about the 7110 and is the answer not in the manual?
Questions and answers
what size gasket rope does this wood burning stove use? I **** needing to replace mine in my stove>