Table of Contents
Advertisement
Quick Links
ATLAS Single Board Computer
PCI/104-Express SBC with Intel N2800 Cedar Trail CPU
Revision
Date
Rev A.00
1/17/2014
FOR TECHNICAL SUPPORT
PLEASE CONTACT:
support@diamondsystems.com
Comments
Initial Release
Copyright 2014
Diamond Systems Corporation
555 Ellis Street
Mountain View, CA 94043 USA
Tel 1-650-810-2500
Fax 1-650-810-2525
www.diamondsystems.com
Advertisement
Table of Contents

Related Manuals for Diamond Systems Atlas


Summary of Contents for Diamond Systems Atlas
- Page 1 ATLAS Single Board Computer PCI/104-Express SBC with Intel N2800 Cedar Trail CPU Revision Date Comments Rev A.00 1/17/2014 Initial Release Copyright 2014 FOR TECHNICAL SUPPORT Diamond Systems Corporation PLEASE CONTACT: 555 Ellis Street Mountain View, CA 94043 USA support@diamondsystems.com Tel 1-650-810-2500 Fax 1-650-810-2525 www.diamondsystems.com...
-
Page 2: Table Of Contents
Mass Storage Devices ........................14 3.2.4 Connecting Power ..........................14 3.2.5 Display ............................... 14 3.2.6 Installing Atlas in an Enclosure (optional) ..................14 Booting the System ............................ 15 3.3.1 BIOS Setup ............................15 3.3.2 Operating System Drivers ........................15 Interface Connector Details .......................... 16 External Battery (BAT) .......................... -
Page 3: Www.diamondsystems.com Page
10. Battery Backup ............................... 36 11. Thermal Pad ..............................37 12. Specifications ..............................38 Operating System Support ......................... 38 Mechanical, Electrical, Environmental ......................38 All trademarks are the property of their respective owners. www.diamondsystems.com Page Atlas User Manual Rev A.00... -
Page 4: Important Safe-Handling Information
The list here describes common causes of failure found on boards returned to Diamond Systems for repair. This information is provided as a source of advice to help you prevent damaging your Diamond (or any vendor’s) embedded computer boards. -
Page 5: Introduction
INTRODUCTION Atlas is a high performance, highly integrated small form factor single board computer in the PCI/104-Express form-factor. Atlas incorporates a wealth of standard PC-style I/O plus on-board digital I/O. Atlas provides PCIe/104 I/O expansion by means of a new miniature, cost-effective expansion connector that supports most PCIe/104 I/O modules. -
Page 6: Atlas Sbc Features
1.1 Atlas SBC Features Atlas is a compact, rugged, single board computer that features the Intel Atom N2800 Cedar Trail processor in the PC/104-Plus form factor. Functions Intel Atom N2800 processor clocked at 1.86GHz Cooling: Fanless design incorporates heatspreader and conduction cooling to the enclosure... -
Page 7: Thermal Considerations
LED Indicators Atlas provides a set of LED indicators for various features as follows. All LEDS are located near their respective function. Power input: Green LED when +5VDC is applied Power on: Green LED when SBC is powered on Ethernet: Green / yellow / orange;... -
Page 8: Functional Overview
FUNCTIONAL OVERVIEW 2.1 Block Diagram Figure 2 shows Atlas’ functional blocks. Figure 2: Atlas SBC Functional Block Diagram www.diamondsystems.com Page Atlas User Manual Rev A.00... -
Page 9: Atlas Dimensions
2.2 Atlas Dimensions Figure 3 shows the overall dimensions of the Atlas SBC. Atlas conforms to PC/104 specifications for the 4 corners and 4 mounting holes as well as component height limits on the top and bottom sides. Wings, or extensions on the left and right sides, provide additional room for I/O connectors. -
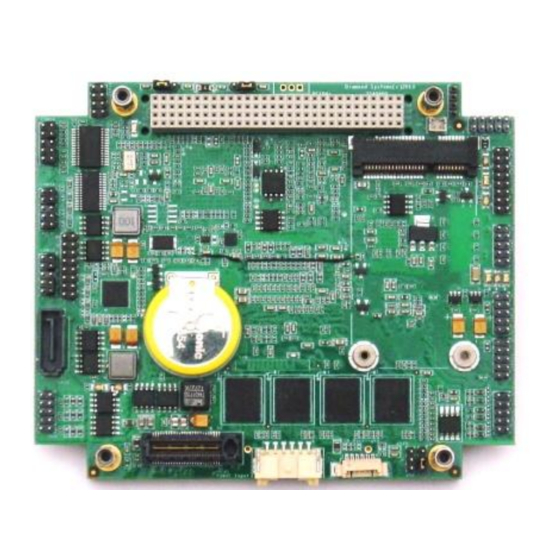
Page 10: Connector And Jumper Locations
2.3 Connector and Jumper Locations Figure 4 illustrates the position of interface connectors, bus connectors, and jumper blocks located on the Atlas SBC, which features PCI-104 and PCIe/104 stackable I/O. PCIe MiniCard / mSATA PCI-104 External Battery GPIO COM56 Utility... -
Page 11: Connector Summary
The following table summarizes the functions of Atlas’s interface, utility, and power connectors. Signal functions relating to all of Atlas’s interface connectors are discussed in greater detail in Section 4 of this document. Diamond offers an optional Atlas Cable Kit (number C-ATLN-KIT), which provides mating cable assemblies for most of Atlas’... -
Page 12: Getting Started
The Atlas Development Kit provides everything required for Atlas-based rapid application development. The table on the next page lists the boards, cables, and other items included. Each kit contains an Atlas SBC and mSATA flashdisk pre-loaded with a bootable operating system image, either Linux (LNX) or Windows Embedded Standard 7 (WE7). -
Page 13: Atlas Cable Kit
3.1.1 Atlas Cable Kit The Atlas Cable Kit (number C-ATLN-KIT) provides convenient access to most of Atlas’s I/O features. The kit’s cable assemblies are shown in the photo below, and identified in the table that follows. Connects to… Item Description... -
Page 14: System Setup
Mass Storage Devices If desired, connect SATA hard drives to Atlas by connecting a SATA cable to the SATA connector and then to the SATA drive. Atlas can operate with a combination of SATA and CD-ROM drives, and can boot from either of them. -
Page 15: Booting The System
3.3 Booting the System Power-up the VGA video monitor. Then plug the PS-5V-04 AC power adapter to an AC outlet. Atlas should begin its boot-up sequence immediately, as evidenced by BIOS messages on the connected VGA display. You can run the BIOS Setup utility and proceed to install an operating system on the boot drive just as you would on a normal desktop PC. -
Page 16: Interface Connector Details
INTERFACE CONNECTOR DETAILS This section describes the functions associated with the Atlas SBC, bus expansion, utility, I/O interfaces, and power connectors in greater detail. Section 3.1.1 contains a list of ready-to-use interface cables included in Diamond’s Atlas Cable Kit. 4.1 External Battery (BAT) Atlas has provision for an external battery connection via connector BAT, a two-pin connector. -
Page 17: Ethernet (Lan)
4.4 Serial Ports (COM12, COM34 & COM56) Atlas provides six serial ports of which Ports 1-4 support RS-232/422/485 multiprotocol with the TX, RX, RTS and CTS signals. Ports 5 and 6 support RS-232 with the TX, RX, RTS and CTS signals as shown in the pinouts below. -
Page 18: Usb 1-2 (Usb12)
USB4 GND USB3 GND USB4 Data+ USB3 Data+ USB4 Data- USB3 Data- USB4 Pwr USB3 Pwr Connector type: 2x5 2mm pitch vertical pin headers with 4.0mm min high posts and gold flash plating www.diamondsystems.com Page Atlas User Manual Rev A.00... -
Page 19: Utility Signals (Utility)
4.7 Utility Signals (Utility) This connector provides utility signals and LED indicator signals for Atlas as follows. Reset- PWRBTN- Speaker +3.3V Power On LED +3.3V LAN Activity LED +3.3V LAN Link 100 LED +3.3V Lan Link 1000 LED Speaker PC speaker. Connect a speaker between this pin and +5V. -
Page 20: Lcd Panel (Lvds Interface) (Lcd)
4.9 LCD Panel (LVDS Interface) (LCD) This connector is mounted on the top side of Atlas. It provides connection to an LVDS LCD display. The LCD panel power is jumper selectable for 3.3V (default) or 5V. LVDS_DATA3+ LVDS_DATA3- SCAN_DIRECTION LVDS_MAP... -
Page 21: Pcie/104 Connector
4.11 PCIe/104 Connector This connector is implemented to facilitate I/O expansion modules to be plugged onto the Atlas SBC. USB-OC- PCIe Reset- +3.3V +3.3V USB 5+ USB 6+ USB 5- USB 6- PCIe 4 T+ PCIe 1 T+ PCIe 4 T-... -
Page 22: Gpio (Gpio)
4.13 GPIO (GPIO) Atlas provides eight general purpose I/O lines on a pin header derived from the NM10 chipset. These I/O lines are protected with ESD devices to minimize potential damage to the NM10 from environmental conditions. The GPIO connector provides the digital IO signals as shown below. -
Page 23: Audio (Audio)
The VGA connector provides support for standard VGA CRTs. Ground Green Blue Ground HSync DDC-Data VSync DDC-Clock Connector type: 2x5 2mm pitch vertical pin header with 4.0mm min high posts and gold flash plating www.diamondsystems.com Page Atlas User Manual Rev A.00... -
Page 24: Configuration Jumper Details
This section explains the use of the jumper options on the Atlas SBC. Atlas contains jumper blocks for configuring the following features. The board also contains locations for installation of 0-ohm resistors in place of all valid jumper positions for a rugged configuration. The 0-ohm resistors are oriented and labeled in a way that provides easy understanding of their use and easy interpretation of their settings. -
Page 25: Rs-422/485 Termination Resistors (Jp4)
Jumper block JP6 must be configured according to input voltage required by the type of LCD panel that will be attached to Atlas’s LCD panel interface connector. The jumper sets the LCD panel power as either +3.3V or +5V. This power is protected with a polyswitch resettable fuse. -
Page 26: Bios
BIOS Atlas’ BIOS provides access to many valuable features including: Boot from LAN (PXE) as well as USB, SATA, and mSATA ports Free boot sequence configuration to allow different boot sequences as first, second and third boot devices. Support for various LCD configurations supported by the video chipset ( default should be 1024x768 ) -
Page 27: Restoring Default Bios Settings
Setup Utility Settings This section describes the screen displays for the Setup Utility section. The data in the fields are examples only and may be different depending on future product releases from Diamond Systems or the user’s configuration. 6.4.1 Main Menu The Main menu provides a quick overview of basic system information. -
Page 28: Advanced Menu
6.4.2.2 Peripheral Configuration Menu Available from the Advanced menu, the Peripheral Configuration menu provides for configuration of the digital I/O lines. Selecting the GPIO Configuration sub menu provides line-by-line configurability. www.diamondsystems.com Page Atlas User Manual Rev A.00... - Page 29 Available from the Advanced menu, the IDE Configuration menu allows the user to select the IDE controller and hard disk drive type. 6.4.2.4 Video Configuration Menu Available from the Advanced menu, the Video Configuration menu allows the user to configure the video output including the display type and resolution. www.diamondsystems.com Page Atlas User Manual Rev A.00...
- Page 30 Available from the Advanced menu, the USB Configuration menu allows the user to configure each USB port. 6.4.2.6 ACPI Table/Features Control Menu Available from the Advanced menu, the ACPI Table/Features Control menu allows the user to enable or disable the ACPI features. www.diamondsystems.com Page Atlas User Manual Rev A.00...
- Page 31 Available from the Advanced menu, the PCI Express Configuration Setup menu allows the user to set up and configure console redirection for remote access. The detailed screen on the next page shows the PCIe configuration options for each port. www.diamondsystems.com Page Atlas User Manual Rev A.00...
- Page 32 6.4.2.9 Hardware Monitor This screen displays the current health status of the SBC including temperature and various voltage levels. www.diamondsystems.com Page Atlas User Manual Rev A.00...
-
Page 33: Security Menu
6.4.3 Security Menu The Security Menu provides configuration for the system’s password settings. 6.4.4 Power Menu The Power Menu provides configuration options used to manage the consumption of system power. www.diamondsystems.com Page Atlas User Manual Rev A.00... -
Page 34: Boot Menu
6.4.5 Boot Menu The Boot Menu provides configuration and sequencing of various boot devices. 6.4.6 Exit Menu The Exit Menu provides various options for saving and exiting, and for loading default settings. www.diamondsystems.com Page Atlas User Manual Rev A.00... -
Page 35: Watchdog Timer
WATCHDOG TIMER Atlas provides a watchdog timer (WDT) circuit with programmable delay time based on the WDT in the SCH3116. The WDT can be enabled, disabled, and retriggered in the BIOS. If the WDT times out before it is retriggered, it will cause a system reset. -
Page 36: Features
Atlas SBC. The +5VDC/+12VDC power source is interfaced to the board on the locking connector labeled Power Input. The +5VDC is used by the Atlas SBC for all its power subsystems. The +12VDC is used for the LVDS panel backlight inverter. -
Page 37: Thermal Pad
THERMAL PAD A thermal pad is included with every Atlas. It is the same size as the heatspreader and attaches to the bottom of the heatspreader, but is shipped loose with the product. Customers can choose to affix the thermal pad or not depending on their needs. -
Page 38: Specifications
Power consumption: 7.53W idle Optional +12VDC for the LCD backlight ONLY. No on-board circuits can depend on +12VDC. Dimensions: 4.55" x 3.775" x 0.9” (125mm x 96mm x 23mm) Weight: 7.6oz (215.5 grams) with heatspreader www.diamondsystems.com Page Atlas User Manual Rev A.00...
Need help?
Do you have a question about the Atlas and is the answer not in the manual?
Questions and answers