Table of Contents
Advertisement
Advertisement
Table of Contents

Related Manuals for Samsung SR10F71U series


Summary of Contents for Samsung SR10F71U series
- Page 1 ✻ Before operating this unit, please read the instructions carefully. English ✻ For indoor use only. imagine the possibilities Thank you for purchasing a Samsung product. To receive a more complete service, please register your product at www.samsung.com/register...
- Page 2 safety information SAFETY INFORMATION • Before operating the appliance, please read this manual thoroughly and retain it for your reference. WARNING • Because these following operating instructions cover various models, the characteristics of your vacuum cleaner may differ slightly from those described in this manual. WARNING CAUTION/WARNING SYMBOLS USED Indicates that a danger of death or serious injury exists.
- Page 3 IMPORTANT SAFETY INSTRUCTIONS When using an electrical appliance, basic precautions should be observed, including the following: READ ALL INSTRUCTIONS BEFORE USING YOUR VACUUM CLEANING ROBOT. Unplug from outlet when not in use and before conducting maintenance. WARNING: to reduce the risk of fire, electric shock, or injury: GENERAL • Use only as described in this manual.
- Page 4 safety information • Do not pull or carry by the cord, use the cord as a handle, close the door on the cord, or pull the cord around sharp edges or corners. Keep the cord away from heated surfaces. • Do not use extension cords or outlets with inadequate current carrying capacity.
-
Page 5: Table Of Contents
contents SAFETY INFORMATION 06 Power Related 07 Before Use 10 In Use 11 Cleaning and Maintenance PRODUCT FEATURES ASSEMBLING THE CLEANER 15 Components 16 Name of each part OPERATING THE CLEANER 20 Installing the vacuum cleaning robot Installation order Turning the Power Switch on or off Installing the charger Charging About the Battery... -
Page 6: Safety Information
safety information POWER RELATED Do not bend the power cord forcefully or place a heavy object on it that could break it. WARNING - This may result in fire or electric shock. Make sure to remove any dust or water from the power plug. WARNING - Failing to do so may result in a malfunction or electric shock. -
Page 7: Before Use
BEFORE USE Before activating the vacuum cleaning robot, make sure that the dust bin is assembled. CAUTION - If the dust bin is not inserted, vacuum cleaning robot will not operate. Never use vacuum cleaning robot in locations with combustible material such as. - Page 8 Remove small objects or brittle items from the area to be cleaned in advance. CAUTION - Make sure to clear any objects before cleaning. - Make sure to remove fragile items such as china, glass objects, flowerpots, etc. - Vacuum cleaning robot does not recognize coins, rings or other valuable items such as jewelry.
- Page 9 Install the charger in a location that can be easily accessed by the vacuum cleaning robot. CAUTION - If the charger is installed in a corner, this may cause extra movements and may disturb the automatic recharging process. Objects in front of the charger will prevent the vacuum cleaning robot from auto-charging itself.
-
Page 10: In Use
IN USE You cannot use the vacuum cleaning robot on thick carpets. CAUTION - This may result in problems with the vacuum cleaning robot. - This may result in damage to carpets. Do not use the vacuum cleaning robot on a table or other high locations. -
Page 11: Cleaning And Maintenance
Do not move the robotic vacuum cleaner holding the dustbin part. CAUTION - This may cause the dustbin to separate, resulting in injury or serious damage to the product. Vacuum cleaning robot may not be able to continue its operation if it is stuck at the entrance or veranda doorsill. NOTE - To resume operating, turn the Power Switch off and then on again after moving it to a location where it can continue cleaning. - Page 12 - Failing to do so may result in fire or electric shock. Before cleaning the charger, make sure to disconnect the power cord for safety. WARNING Contact the Samsung Electronics customer care center to replace the battery. WARNING - Failing to use original batteries will result in product failure.
-
Page 13: Product Features
product features CONVENIENT VIRTUAL GUARD FUNCTION You can confine the vacuum cleaning robot to a particular section by using the Fence (virtual wall) mode. • What is ceiling shape recognition (Visionary mapping plus™)? This function recognizes the shape of the ceiling using the camera on top to identify the area to be cleaned and determines the best way to pass over and clean every section of the floor. - Page 14 AUTO CHARGING When the battery is low, the vacuum cleaning robot is automatically guided to the charger to enable it to perform a quick auto charge. EDGE-CLEANING SIDE ROTATING BRUSH The edge-cleaning side rotating brush cleans dust from the edges. DOORSILL CROSSING The vacuum cleaning robot innovative driving system makes it possible for it to cross over doorsills with a height of about...
-
Page 15: Assembling The Cleaner
assembling the cleaner COMPONENTS ■ Main Body ■ Remote Control ■ Charger (Station) ■ Others Components (AAA-Type Batteries) User Manual (CD-ROM) / VIRTUAL GUARD Spare Filter Cleaning Brush Quick Start Guide 2 Battery assembling _15... -
Page 16: Name Of Each Part
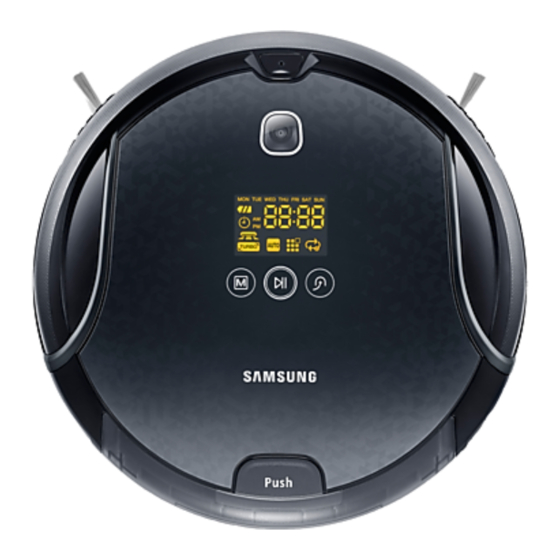
NAME OF EACH PART ■ Main unit Dustbin Eject Button Display panel Virtual Guard Sensor Camera Remote Control Sensor Obstacle Sensor Obstacle Sensor Bumper Sensor Front Dustbin Eject Button Dust bin Remote Control Sensor Side Cliff Sensor Driving Wheel Dynamic Side Brush Power Switch Charge Pin Power Brush... -
Page 17: Installing The Batteries
■ Charger (Station) Charging lamp (Green) Power lamp (Red) Cord winder Charging terminals Front Back ■ VIRTUAL GUARD Power Button Lamp Main Body Detection Sensor Distance Detection Sensor ■ Installing the batteries Batteries are not supplied with the product. You have to purchase the batteries separately. Install the alkaline batteries (type D) before use. -
Page 18: Remote Control
■ Remote Control Power Recharging Auto Directional Spot Buttons (moving backwards is Start/Stop not supported.) Manual Dust Sensor Turbo Sound Clock Timer/Weekly ■ Installing the Remote Control Batteries Batteries are not installed in the remote control when purchasing the product. Install the batteries (type AAA) before use. - Page 19 ■ Display panel DISPLAY PART 1. Number Display - Shows the timer display, progress status, and error codes using numbers, letters and graphics. 2. Weekly Reservation - When you set a weekly reservation to start cleaning from the specified time on the specified day of the week, the icon for the selected day of the week is turned on.
-
Page 20: Operating The Cleaner
operating the cleaner INSTALLING THE VACUUM CLEANING ROBOT Installation order 1. Turning the Power Switch on or off To use the vacuum cleaning robot, you must turn on the Power Switch at the bottom of the main unit. 2. Installing the Charger To charge the vacuum cleaning robot, you must first install the charger. - Page 21 Installing the charger Charging lamp Power lamp 1. Install the charger on a flat surface. 2. There should be no obstacles and cliffs 0.5m to the left and right and within 1 m of the front. 3. Install the charger in a location where it can be easily accessed by the vacuum cleaning robot.
-
Page 22: Charging
Charging When the product is initially purchased, the battery is fully Charging lamp discharged, and you must charge the vacuum cleaning robot Power lamp manually. Turn on the Power Switch at the bottom of the product. 1. After aligning the charge pins of the main unit with the charge pin of the charger station, press the main Power lamp Charging lamp... -
Page 23: About The Battery
( ) and model number before purchasing it. - This battery is only for Samsung vacuum cleaning robot. It is strictly prohibited to use it for other appliances or for other purposes. - Do not disassemble or modify the battery. -
Page 24: Setting The Time
Setting the Time The clock displays the current time. You can change the current time with the following steps. ■ You can only set the time using the remote control. Remote Control Configuration Sequence Blinks 1. Press the Clock button. - The current time is displayed. -
Page 25: Installing The Virtual Guard
Installing the VIRTUAL GUARD You can confine the vacuum cleaning robot to a Power Button particular section by using Fence (virtual wall) mode. Lamp Main Body Detection Distance Sensor Detection Sensor Button operations 1. Lamp operations - Fence (virtual wall) Mode: The red lamp flashes. - Off :The lamp is turned off. - Page 26 About the IrDA sensor • The infrared signal transmission may not be [Infrared Signal Priority] smooth in locations exposed to halogen lamps or CAUTION in outdoor locations. > > • Vacuum cleaning robot uses 3 types of infrared devices and a device may not work in front of another device with a higher priority.
-
Page 27: Using The Vacuum Cleaning Robot
USING THE VACUUM CLEANING ROBOT Starting/Stopping Cleaning You can run or stop all vacuum cleaning robot functions. ■ Each vacuum cleaning robot function only runs when the Power Switch is turned on. ■ When the vacuum cleaning robot is operating, press the button to cancel the operation and select a function. -
Page 28: Recharging
Recharging You can have the vacuum cleaning robot return to the charger to charge the battery by using the Recharging button. ■ When the vacuum cleaning robot is operating, press the button to cancel the operation and press the Recharging button. 1. -
Page 29: Auto Cleaning
Auto Cleaning The vacuum cleaning robot will move by itself and automatically clean the house until cleaning is completed once. ■ If you press the Start/Stop button on the main unit or remote control without selecting a cleaning mode, an automatic cleaning run starts. ■... -
Page 30: Spot Cleaning
Spot Cleaning You can conveniently clean a specific area that has a a lot of About 1.5m cookie crumbs, dust, and etc. ■ Move the vacuum cleaning robot to the location where you want to perform a spot clean. Remote control Configuration Main unit button button... -
Page 31: Max Cleaning
Max Cleaning The vacuum cleaning robot automatically moves and cleans until the battery runs out and the battery level flashes only one level. ■ If cleaning begins when the vacuum cleaning robot is docked with the charger station, the time to return to the charger is decreased since the vacuum cleaning robot remembers its original position while moving. -
Page 32: Manual Cleaning
Manual Cleaning You can move the vacuum cleaning robot to clean a particular location directly by using the remote control. ■ Move the vacuum cleaning robot to the location where you want to perform manual cleaning. ■ You can manually clean using the remote control only. Remote control button Configuration Sequence 1. -
Page 33: Timer Reservation
Timer Reservation In this mode, you can schedule the cleaner to start a once-off cleaning run from a particular time. ■ A scheduled cleaning run is only performed when the cleaner is docked to the charger station. Remote Control Configuration Sequence 1. -
Page 34: Weekly Reservation
Weekly Reservation In this mode, you can schedule the cleaner to start a once-off cleaning run from the specified time on the specified days of the week. ■ A scheduled cleaning run is only performed when the cleaner is docked to the charging station. Remote Control Configuration Sequence Standby mode... - Page 35 Remote Control Configuration Sequence 4. Press the Timer/Weekly Blinks button. Press the or Decrease Increase button to set the cleaning mode. - You can select either Auto or Blinks Repeat cleaning mode. 5. Press the Timer/Weekly button. - The value you set blinks and Blinks the settings are completed.
-
Page 36: Additional Functions
ADDITIONAL FUNCTIONS Using additional functions You can use the cleaning robot more easily and conveniently using various additional functions. ■ You can only configure the additional functions with the remote control. Turbo Mode Each time you press the Turbo button, the Turbo icon on the display panel is turned on or off sequentially. -
Page 37: Maintain Tools And Filters
maintain tools and filters CLEANING THE VACUUM CLEANING ROBOT Please keep the cleaning and maintenance methods in mind ■ When the Power Switch is damaged, please contact the service agent so that it does not cause any accidents. ■ Do not use any means or mechanical devices not installed by the manufacturer that could accelerate the deformation of the vacuum cleaning robot. -
Page 38: Cleaning The Dust Bin And The Filters
Cleaning the Dust Bin and the Filters First, empty the dust bin before cleaning it. ■ When separating the dust bin, take care not to spill the dust out of the dust bin. ■ Empty the dust bin in the following cases. 1. -
Page 39: Cleaning The Vacuum Cleaning Robot
CLEANING THE VACUUM CLEANING ROBOT Cleaning the Power Brush You must turn off the Power Switch at the bottom of the main unit before cleaning the vacuum cleaning robot. • Because the dust in the dust bin may come out, separate the dust bin first before cleaning the power brush. - Page 40 4. After a cleaning run, first fix the side of the power brush opposite to the Power Switch and then fix the other side. 5. Insert the side into the two grooves and assemble it by slightly sliding it down until it clicks into place. • To prevent the vacuum cleaning robot from becoming clogged, be careful not to vacuum tooth picks or cotton swabs.
-
Page 41: Cleaning The Edge-Cleaning Side Rotating Brush
Cleaning the Edge-Cleaning Side rotating Brush You must turn off the Power Switch at the bottom of the main unit before cleaning the vacuum cleaning robot. 1. Check whether the side rotating brush is bent or whether there are any foreign substances stuck on the brush. 2. -
Page 42: Cleaning The Driving Wheel
Cleaning the Driving Wheel You must turn off the Power Switch at the bottom of the main unit before cleaning the robot. ■ If the vacuum cleaning robot suddenly starts to zigzag, there may be foreign substances stuck on the driving wheel. 1. -
Page 43: Troubleshooting
troubleshooting CHECKLIST BEFORE SVC CALLS Symptom Checklist Measure to Take Vacuum cleaning • Is the dust bin assembled? • Install the dust bin. robot does not • Is the Power Switch turned on? • Turn on the Power Switch. operate at all before cleaning. - Page 44 Symptom Checklist Measure to Take Vacuum cleaning • Check whether the power plug of robot cannot find the the charger is plugged correctly charger. into the outlet. • If there are any obstacles within a range of about 1m in front of the charger and about 0.5m range to the left and right of the charger, you should remove the obstacles.
-
Page 45: Troubleshooting For Error Codes
TROUBLESHOOTING FOR ERROR CODES ERROR CODE CAUSE SOLUTION • A foreign substance (string, • Turn off the Power Switch at the bottom and paper, toy etc.) is caught in remove the foreign substance from the power the power brush. brush. • A foreign substance (string, • Turn off the Power Switch at the bottom and paper, toy etc.) is caught in... - Page 46 product specification 80 mm (Height) 116 mm (Height) 350 mm (Length) 350 mm (Width) 166 mm (Length) 228 mm (Width) Main Body Charger(Station) Classification Item SR10F71UB Diameter 350mm Mechanical Height 80mm Specifications Weight 3.5kg Power voltage AC220-240V~, 50-60Hz Charge power consumption 40 W Electrical Specifications...
- Page 47 You may obtain the complete Corresponding Source code from us for a period of three years after our last shipment of this product by sending email to: oss.request@samsung.com If you want to obtain the complete Corresponding Source code in the physical medium such as CD-ROM, the cost of physically performing source distribution may be charged.
- Page 48 You may charge a fee for the physical act of transferring a copy, and you may at your option offer warranty protection in exchange for a fee. 2. You may modify your copy or copies of the Program or any portion of it, thus forming a work based on the Program, and copy and distribute such modifications or work under the terms of Section 1 above, provided that you also meet all of these conditions: a) You must cause the modified files to carry prominent notices stating that you changed the files and the date of any change.
- Page 49 It is not the purpose of this section to induce you to infringe any patents or other property right claims or to contest validity of any such claims; this section has the sole purpose of protecting the integrity of the free software distribution system, which is implemented by public license practices.
- Page 50 type `show w’. This is free software, and you are welcome to redistribute it under certain conditions; type `show c’ for details. The hypothetical commands `show w’ and `show c’ should show the appropriate parts of the General Public License. Of course, the commands you use may be called something other than `show w’...
- Page 51 a combined work, a derivative of the original library. The ordinary General Public License therefore permits such linking only if the entire combination fits its criteria of freedom. The Lesser General Public License permits more lax criteria for linking other code with the library.
- Page 52 which is a work based on the Library, the distribution of the whole must be on the terms of this License, whose permissions for other licensees extend to the entire whole, and thus to each and every part regardless of who wrote it. Thus, it is not the intent of this section to claim rights or contest your rights to work written entirely by you;...
- Page 53 accompany the operating system. Such a contradiction means you cannot use both them and the Library together in an executable that you distribute. 7. You may place library facilities that are a work based on the Library side-by-side in a single library together with other library facilities not covered by this License, and distribute such a combined library, provided that the separate distribution of the work based on the Library and of the other library facilities is otherwise permitted, and provided that you do these two things: •...
- Page 54 OUT OF THE USE OR INABILITY TO USE THE LIBRARY (INCLUDING BUT NOT LIMITED TO LOSS OF DATA OR DATA BEING RENDERED INACCURATE OR LOSSES SUSTAINED BY YOU OR THIRD PARTIES OR A FAILURE OF THE LIBRARY TO OPERATE WITH ANY OTHER SOFTWARE), EVEN IF SUCH HOLDER OR OTHER PARTY HAS BEEN ADVISED OF THE POSSIBILITY OF SUCH DAMAGES.
- Page 55 OpenSSL This product includes software developed by the OpenSSL Project for use in the OpenSSL Toolkit. (http://www.openssl.org/) This product includes cryptographic software written by Eric Young (eay@cryptsoft.com) 본 제품에는 OpenSSL Toolkit 사용을 위해 OpenSSL Project에 의해 개발된 소프트웨어가 사용되었습니다. LICENSE ISSUES ============== The OpenSSL toolkit stays under a dual license, i.e.
Need help?
Do you have a question about the SR10F71U series and is the answer not in the manual?
Questions and answers