Studer COMPACT - C 1600-12 User's And Installer's Manual
Sine wave inverter, battery charger, transfersystem
Hide thumbs
Also See for COMPACT - C 1600-12:
- User and installation manual (23 pages) ,
- User's and installer's manual (85 pages)
Table of Contents
Advertisement
Quick Links
Sine wave Inverter, Battery charger, Transfersystem
Remote control - Power sharing RPS-01
STUDER INNOTEC
Rue des Casernes 57
CH – 1950 Sion
User's and installer's Manual
COMPACT - C 1600-12
COMPACT - C 2600-24
COMPACT - C 4000-48
Temperature sensor CT-35
Remote control RCC-01
Solar charge regulator Cxxxx-S
AC cable cover CFC-01
IP-23 top cover C-IP23
TEL : ++41 (0)27 205 60 80
FAX : ++41 (0)27 205 60 88
E-MAIL : info@studer-innotec.com
Advertisement
Table of Contents

Subscribe to Our Youtube Channel
Related Manuals for Studer COMPACT - C 1600-12


Summary of Contents for Studer COMPACT - C 1600-12
- Page 1 User’s and installer’s Manual Sine wave Inverter, Battery charger, Transfersystem COMPACT - C 1600-12 COMPACT - C 2600-24 COMPACT - C 4000-48 Temperature sensor CT-35 Remote control RCC-01 Solar charge regulator Cxxxx-S Remote control - Power sharing RPS-01 AC cable cover CFC-01...
-
Page 2: Table Of Contents
STUDER Innotec COMPACT English description ........................5 General Information..................5 Operating instructions ..................5 Quality and Warranty ..................5 Warranty Disclaimer................... 5 Liability Disclaimer....................6 Warning ........................ 6 Special precautions .................... 6 Introduction......................7 Principle schematic .................... 7 Description of the main functions..............8 Battery connecting.................... -
Page 3: English Description
− Running liquid or oxidation through condensation in the appliance − Defects caused by force, physical or mechanical means − Changes not explicitly authorized by STUDER INNOTEC − Not or only partly tightened screws and nuts after change of fuses or cables connecting −... -
Page 4: Liability Disclaimer
Similarly, we do not accept any liability for any violation of the patents rights or violation of any third party’s rights resulting from the use of this appliance STUDER INNOTEC reserves the right to modify the technical data or these operating instructions without any prior notice. -
Page 5: Introduction
STUDER Innotec COMPACT − Plenty of fresh water and soap must be ready at hand so that in case of acid coming in contact with skin, eyes and clothes, the areas in question can be thoroughly washed. − If acid enters the eyes, you must thoroughly wash them with cold running water for at least 15 minutes. -
Page 6: Description Of The Main Functions
STUDER Innotec COMPACT Notes: (1) The neutral of the appliance is not connected to the earth whatever the function mode is. If requested and according to the local regulation, an automatic connection between Neutral and earth in inverter mode only may be done by installing a bridge internally to the unit. -
Page 7: Battery Connecting
STUDER Innotec COMPACT 2.2.6 Remote control for Power Sharing This remote control RPS-01 can be connected to the COMPACT in the dedicated plug. The maximum current available from the energy source can be adjusted by the turning button. Battery connecting Lead-acid batteries are normally available in blocks of 2V, 6V or 12V. -
Page 8: Mounting And Installing
STUDER Innotec COMPACT 2.3.3 Serial and parallel connection Mounting and installing Installation place The location of the COMPACT must be driven by the following criteria: − Protection from unauthorized handling − Dry dust free room, no condensation − Never install directly over the battery and never in a cabinet together with the batteries −... - Page 9 STUDER Innotec COMPACT − To protect the battery cable, a fuse corresponding to the conductor cross section must be fixed directly on to the battery. − All cables must be tightly screwed in place. For safety, a yearly control is recommended.
-
Page 10: Connection Plan
STUDER Innotec COMPACT Connection Plan A Battery +/- Battery cable (already installed) B SOLAR +/- Connection terminal for Solar modules C Remote contr. Connection terminal for Remote Control RCC-01 D Equalize Slide switch for equalization of the Battery E Transfer delay Slide switch for Transfer Delay F Temp. -
Page 11: Cabling
STUDER Innotec COMPACT Cabling Connecting the COMPACT is a very important step of the installation. You must take care that all connection work is carried out in a clean and correct way and that under no circumstance a cable is connected to a wrong terminal. - Page 12 STUDER Innotec COMPACT 3.6.4 Connect the solar modules: SOLAR +/- (Only for solar option) Solar modules are connected on these terminals. Under no circumstances should any other energy source i.e. wind generator be connected to these terminals! Only solar modules must be connected with two cables +/-. Depending on the power of the modules, the cable cross section should be 2.5 up to 6mm2.
-
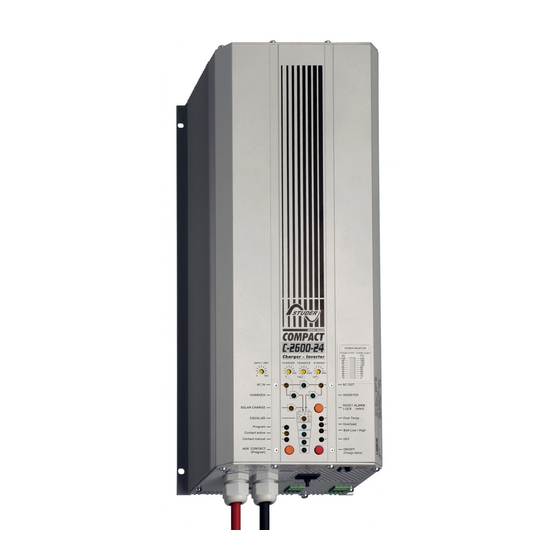
Page 13: Control
STUDER Innotec COMPACT Control Display and control parameters COMPACT V6.4 15/85... -
Page 14: Light Emitting Diodes (Led)
STUDER Innotec COMPACT Light Emitting Diodes (LED) Marking LED lit LED blinks Voltage A voltage outside the self-adjusted corresponding to values is at the AC IN input, or the AC IN self-adjusted COMPACT is in synchronization values is at the AC phases IN input. -
Page 15: Push Buttons
STUDER Innotec COMPACT Display the value of the output power in % of Pnom (in POWER Inverter Mode) and the charge current in Amps (in Charger MONITOR Mode). In this mode the red LED indicates that power sharing is in use (>100A). - Page 16 STUDER Innotec COMPACT time, then it no longer switches on automatically. The LED 13 remains lit. Press the push button 19 „ON/OFF“ in order to switch on the Inverter. 4.5.3 Overheating (Over Temp.) If the Inverter has been overloaded for a long time or it has been working in too high surrounding temperatures, it will switch off.
-
Page 17: The Battery Charger
STUDER Innotec COMPACT The battery charger 4.6.1 Cycle of charge The full automatic COMPACT Battery Charger is adjusted at the factory so that most lead-acid and lead-gel batteries can be charged to the maximum. As soon as the minimum alternating voltage for the AC IN set on the Turning Knob 23 is available at the input (LED 1 AC IN is lit), the Battery Charger is switched on automatically (LED 2 CHARGER is lit). - Page 18 STUDER Innotec COMPACT from “OFF” to the “ON” position. The LED 14 will light up. If the periodic equalization is not required, slide switch must be slid back to the „OFF“ position after the completion of the manual cycle. The equalizing voltage can be changed. How to proceed is explained in chap. 5.3.
-
Page 19: The Transfer System
STUDER Innotec COMPACT state of charge is displayed accurately. In the following cases of use the display can diverge: − Battery charge or discharge with too high currents − Battery cable cross section too small − Battery connections badly tightened or corroded −... -
Page 20: The Solar Charge Controller (Option)
STUDER Innotec COMPACT 4.7.1 Set the transfer voltage threshold The voltage threshold of the transfer can be adjusted between 150 to 230V with the turning knobs (23). From factory this value is 200V. Most appliances can work on this voltage. When the Input voltages reach the selected value on turning knob, the inverter switches off and the AC INPUT goes directly on the AC OUTPUT. -
Page 21: The Multifunctional Contact
STUDER Innotec COMPACT The Multifunctional Contact In the COMPACT there is a built-in programmable power relay. The potential-free change-over contact (NO – NC) of this power relay is connected to the screw terminal AUX CONTACT. Maximum Contact load: 230Vac / 12Vdc / 24Vdc / 16A ! >... -
Page 22: The Temperature Sensor Ct-35
STUDER Innotec COMPACT Auxiliary Contact COMPACT. This con-tact is active in case of an alarm of the COMPACT. The Control Input is connected in parallel to the ON/OFF- push button. The COMPACT can be switched on or off through this input with an impulse button or an impulse contact. -
Page 23: Programming
STUDER Innotec COMPACT Programming The COMPACT (except for 60Hz versions) is equipped with a Flash processor fitted out with EEPROM Memory, which means that even when it is disconnected from the battery, the parameters that were programmed for the application remain after a new connection to the battery. -
Page 24: Auxiliary Contact
STUDER Innotec COMPACT With the Push Button 19 (Change status) set the desired parameter (voltage or time) to modify (LED 14/ 15/16/17/18). Push Button 19 (Change status) to set the desired value according to the table 5.3.2. If desired, repeat the operation with any other parameter (voltage or time) to be changed. - Page 25 STUDER Innotec COMPACT are automatically stored and the COMPACT switches back to normal operating condition. 5.4.3 Auxiliary Contact as generator starter As per the battery capacity When in the programming of the Auxiliary Contact, the Battery Capacity (LED 15-18) is used as a condition, you must then take note of the following requirements.
-
Page 26: Disabling Some Of The Hp-Compact Functions
STUDER Innotec COMPACT Programming must be carried out in steps and in accordance with the description for the programming of the Auxiliary Contact. 5.4.5 Power cut of the second priority loads The auxiliary contact can also be used to cut the power of less priority loads when the battery state of charge is lower than a given threshold. -
Page 27: Installation Maintenance
Hereby we state that the products described in this user manual comply with the following standards: EN 61000-6-1, EN 61000-6-3, EN 55014, EN 55022, EN 61000-3-2, Dir. 89/336/EEC, LVD 73/23/EEC, EN 50091-2, EN 60950-1. CH - 1950 Sion, the 31st of March 2000 STUDER INNOTEC (R. Studer) COMPACT V6.4 29/85... -
Page 28: Technical Data
STUDER Innotec COMPACT Technical Data COMPACT V6.4 30/85...
Need help?
Do you have a question about the COMPACT - C 1600-12 and is the answer not in the manual?
Questions and answers