Advertisement
Quick Links
Download this manual
See also:
Quick User Manual
Advertisement

Related Manuals for Satel INT-KSG


Summary of Contents for Satel INT-KSG
- Page 1 INT-KSG Keypad Installer Manual Firmware version 1.02 int-ksg_i_en 01/13 SATEL sp. z o.o. ul. Schuberta 79 80-172 Gdańsk POLAND tel. + 48 58 320 94 00 info@satel.pl www.satel.eu...
- Page 2 Changes, modifications or repairs not authorized by the manufacturer shall void your rights under the warranty. The SATEL's goal is to continually upgrade the quality of its products, which may result in alterations of their technical specifications and firmware. The current information on the introduced modifications is available on our website.
-
Page 3: Installation And Hook-Up
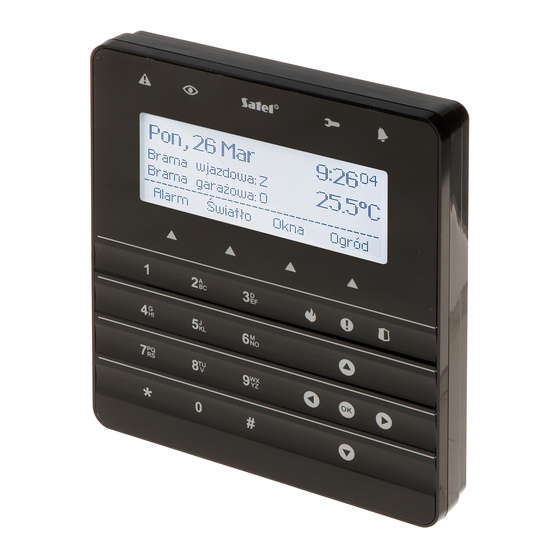
The INT-KSG keypad is provided with touch keys and a large display which enables presenting functions in four lines after entering the menu. The dynamic menu adjusts automatically to the user's authority level and the system configuration. When in the screensaver mode, the display can show a wide array of information in a customized form. - Page 4 INT-KSG SATEL 4. Screw down the wires connecting the keypad to the control panel keypad bus to the DTM, CKM and COM terminals (see Fig. 3). The wires should be run in one cable. 5. Connect the wires to the terminals of additional zones, if any detectors are to be connected to them (the detectors are to be connected in the same way as to the control panel onboard zones).
- Page 5 2 - tamper contact (NC). 3 - sounder. 4 - RS-232 (TTL) port – enables connecting the keypad to the computer COM port by means of the SATEL made cable, available with the DB9FC/RJ-KPL kit, and updating the keypad firmware afterwards.
- Page 6 INT-KSG SATEL Fig. 3. Connection of the keypad to the control panel. 3. Addressing Each keypad must have an individual address set in it: from the 0 to 3 range, if it is connected to the INTEGRA 24 or INTEGRA 32 control panel;...
-
Page 7: Keypad Identification
X program („Structure” window ARDWARE DENTIFICATION KEYPADS ID LOAD „Hardware” tab „Keypads” branch „Keypads identification” button). 5. Configuration of keypad settings Parameters and options of the INT-KSG keypad can be programmed by means of any LCD S H LCD S keypad keypad (S... - Page 8 INT-KSG SATEL Zone disabling CHIME [Chime bps. zone] – number of zone, which, if violated, will disable the CHIME feature for specified time. Bypass time [Chime bps. time] – time during which the CHIME signal will be disabled after violation of the zone which disables the signaling (time is counted from the zone restore). If the value 0 is programmed, the signaling will not be disabled.
- Page 9 SATEL INT-KSG Date/Time format – selection of the format of time and date display on the keypad. LCD backlight – selection of the display backlight type. Keys backlight – selection of the keypad backlight type. Alarm messages – you can define whether the keypad is to display text messages about alarms: ...
- Page 10 INT-KSG SATEL Quick control [Control (8#)] – if this option is enabled, the O user function UTS CONTROL can be started by pressing in turn the 8 keys (without the need to enter the user code). Sound volume – the function makes it possible to control loudness level of the keypad sounder.
- Page 11 SATEL INT-KSG Fig. 6. "User functions definition" tab, D X program. LOAD 5.2 Macro commands The macro commands related data are stored in the keypad memory. Before you proceed to defining the macro commands, read out the data from the keypad ("Read"...
- Page 12 INT-KSG SATEL Fig. 7. "Groups" tab, D X program. LOAD Autoexecute – if this option is enabled and there is just one macro command in the group, touching the key will not display the list of macro commands, but will run the macro...
- Page 13 SATEL INT-KSG The outputs must be the 24. MONO S , 25. BI S , 105. S WITCH WITCH HUTTER UP 106. S or R type (they need not be assigned to any group HUTTER DOWN EMOTE SWITCH of outputs).
- Page 14 INT-KSG SATEL 5. If running the macro command is to be each time preceded by user authorization, enable the A option. UTHORIZATION REQUIRED 6. If the macro command is not to be available, when any of the partitions operated by the keypad is armed, enable the D option.
- Page 15 SATEL INT-KSG Fig. 9. "Screensaver" tab, D X program. LOAD There are two font sizes available for use in the screensaver mode. Using the "drag and drop" method, you can easily select the place where the given information will be presented on the display.
-
Page 16: Specifications
INT-KSG SATEL Fig. 10. Numbering of EOL resistors (same for the NO detector). T – tamper. A – alarm. 6. Specifications Supply voltage ....................12 V DC ±15% Standby current consumption ..................165 mA Maximum current consumption..................175 mA Environmental class according to EN50130-5 .................II Working temperature range ................
Need help?
Do you have a question about the INT-KSG and is the answer not in the manual?
Questions and answers