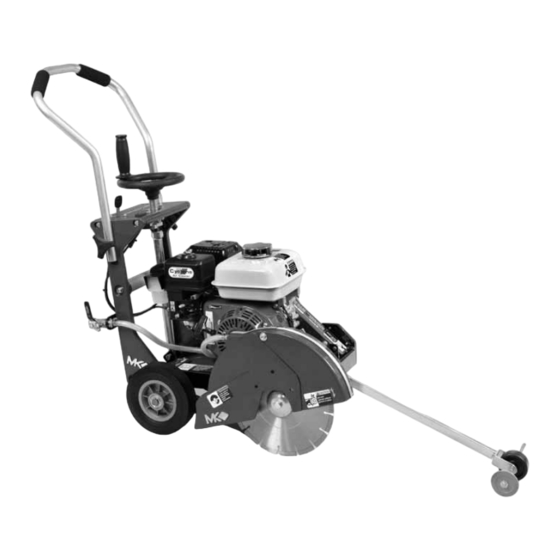
MK Diamond Products CX-3 Owner's Manual & Operating Instructions
Gas powered concrete saw
Hide thumbs
Also See for CX-3:
- Owner's manual (45 pages) ,
- Owner's manual & operating instructions (36 pages)
Table of Contents
Advertisement
Quick Links
Advertisement
Table of Contents
Troubleshooting

Related Manuals for MK Diamond Products CX-3


Summary of Contents for MK Diamond Products CX-3
-
Page 1: Operating Instructions
CX-3 ® OWNER’S MANUAL & OPERATING INSTRUCTIONS Gas Powered Concrete Saw 07.2012 Revision 105 Manual Part# 159345 Caution: Read all safety and operating instructions before using this equipment. This owner’s manual MUST accompany the equipment at all times. - Page 2 Concrete Saw by reading and reviewing this manual. ® Read and follow all safety, operating and maintenance instructions. If you should have questions concerning your CX-3 Concrete Saw, please feel free to call our friend- ® ly customer service department at: 800 421-5830...
-
Page 3: Table Of Contents
TABLE OF CONTENTS SAFETY Safety Messages Damage Prevention Message General Safety Precautions and Hazard Symbols California Proposition 65 Message Prestart Safety Safety Label Locations Product Specifications UNPACKING, TRANSPORT and ASSEMBLY Unpacking Contents Transport Assembly 14-15 STARTUP, OPERATION and SHUTDOWN Startup 16-17 Operation Shutdown... -
Page 4: Damage Prevention Message
Safety Precaution and Operating Instructions could result in injury to yourself and others. This Operation Manual has been developed to provide complete instructions for the safe and efficient operation of the CX-3 Concrete Saw. ® Before using this saw, ensure that the person operating the equipment has read and understands all instructions in this manual. -
Page 5: Safety
CX-3 SAFETY ® GENERAL SAFETY PRECAUTIONS AND HAZARD SYMBOLS SAFETY PRECAUTIONS In order to prevent injury, the following safety precautions and symbols should be followed at all times! GENERAL SAFETY DO NOT operate or service this equipment before reading this entire manual. - Page 6 CX-3 SAFETY ® ACCIDENTAL STARTS Before starting the engine, be sure the ON/OFF switch is in the “OFF” position to prevent accidental starting. Place the ON/OFF switch in the OFF position before performing any service operation. ROTATING OR MOVING PARTS Keep hands, feet, hair, and clothing away from all moving parts to prevent injury.
- Page 7 CX-3 SAFETY ® DO NOT FORCE THE TOOL A power tool will do a job better and safer operating at the rate for which it was designed. USE THE RIGHT TOOL Do not force a tool or an attachment, to do a job that it was not designed to do.
-
Page 8: California Proposition 65 Message
CX-3 SAFETY ® SILICA DUST WARNING Grinding/cutting/drilling of masonry, concrete, metal and other materials with silica in their composition may give off dust or mists containing crystalline silica. Silica is a basic component of sand, quartz, brick clay, granite and numerous other minerals and rocks. Repeated and/or substantial inhalation of airborne crystalline silica can cause serious or fatal respiratory diseases, including silicosis. -
Page 9: Prestart Safety
CX-3 PRE-START ® Before starting the machine, ALWAYS check that all guards are in position and correctly fitted. Check the machine for loose bolts before starting. Keep area around the machine clear of obstructions which could cause persons to fall onto moving parts. -
Page 10: Safety Label Locations
CX-3 SAFETY ® OPERATION & SAFETY DECALS The CX-3 Concrete Saw is equipped with a number of safety decals. These decals are provided for ® operator safety and maintenance information. Should any of these operation or safety decals become unreadable, replacements can be obtained by calling (800) 262-1575. -
Page 11: Product Specifications
Subaru, Honda or Kohler gas ® engine. The saw is capable of cutting up to five and half (5-1/2) inches in depth. Motor and Weight Specifications Motor and Weight specifications for the CX-3 are listed below. ® Motor Type... -
Page 12: Unpacking
In the containers, you will find one (1) CX-3 , two (2) Blade Shaft Wrenches, one (1) Handlebar, two ® (2) Handlebar Tri-Knobs, two (2) Tri-Knob Washers, one (1) CX-3 Owner’s Manual, one (1) Engine ® Owners Manual, one (1) Warranty Card, one (1) Handle, and one (1) Pointer. -
Page 13: Transport
(116 pounds), ® use care when transporting. 2. Two people are required to lift and transport the CX-3 ® To lift the CX-3 , one person will lift by grasping the Handlebar (either extended or folded) and one ®... -
Page 14: Assembly
CX-3 ASSEMBLY ® Diamond Blade Installation When installing the diamond blade retaining-bolt, ensure the threads of the bolt are aligned NOTE: with the threads of the drive shaft so as not to “cross-thread” the bolt. Locate Blade Guard lock. Push Lock Button. Open the Locate the Blade Retaining Bolt Blade Guard cover. -
Page 15: Assembly
CX-3 ASSEMBLY ® Filling Oil Reservoir NOTE: The engine is shipped with no oil in the crankcase. Refer to Engine Manual for details on type and amount of oil required. Verify the Oil Drain Cap is installed onto the Oil Drain Line and is tight. -
Page 16: Startup
The pre-start inspection should be performed before beginning any job. If Diamond Blade is worn, replace the blade before starting work. Inspect Blade for damage for Inspect Engine for leaks. Inspect the CX-3 ® for general cracks Verify the Blade is correct damage and/or loose hardware. - Page 17 CX-3 STARTUP ® 1 inch (25mm) Proper Oil Level from throat Maximum Maximum Fuel Level Fuel Level Low Level Check for proper oil level. Ensure fuel level is 1” below the Ensure fuel level is below the Refer to Engine Manual for throat of the Fuel Tank.
-
Page 18: Operation
CX-3 OPERATION ® Standard Operation The following is a brief overview of operating the CX-3 ® Lower the Pointer. Align a straight- Use the depth control wheel to Attach the cooling supply raise the blade clear of the floor. hose to the Cooling Inlet. -
Page 19: Shutdown
CX-3 SHUTDOWN ® Perform the cut using only enough pressure to follow the NOTE: original marked line. The saw has a natural tendency to pull towards the side on which the blade is mounted. To assure straight line cutting, apply pressure to the appropri- ate handle. -
Page 20: Cleanup
3. Use care when cleaning around electrical components. Verify the engine is off and cool Clean around the Console. Clean the Depth Control Screw. before beginning to clean. Clean the CX-3 ® with soap and water. Clean water system outlets, includ- Clean the remainder of the exte- ing water tubes in blade guard. -
Page 21: Maintenance
CX-3 MAINTENANCE ® MAINTENANCE SAFETY • NEVER lubricate components or attempt service on a running machine. • Keep the machinery in proper running condition. • Fix damage to the machine immediately and always replace broken parts, or missing decals. New Maintenance Perform the following after initial purchase and operation of the saw. - Page 22 CX-3 MAINTENANCE ® Weekly (50 hours) and Monthly (200 hours) The following should be performed monthly. Items should be lubricated using waterproof grease. Change engine oil every 100 Lubricate the Depth Control Lubricate the Blade Shaft Bear- hours. Refer to Engine Manual Screw (Monthly).
- Page 23 CX-3 MAINTENANCE ® 500 Hours and 1000 Hour Maintenance Perform the following maintenance every 500 hours. Replace Spark Plug. Refer to Have Authorized Repair Shop Have Authorized Repair Shop Engine Manual for details. perform 500-hour perform 1000-hour maintenance. maintenance. Yearly and Two-Year Maintenance Perform the following maintenance every year.
-
Page 24: Maintenance And Troubleshooting
CX-3 MAINTENANCE ® Check Fuel Level For all Engine related maintenance and troubleshooting refer to the Engine Manual. 1. Gasoline is highly flammable and explosive. You can be burned or seriously WARNING injured when handling fuel. 2. To fuel, stop engine if running and allow it to cool. - Page 25 2. Conform to Federal, State, and Local laws, codes and ordinances relative to environmental protection for oil disposal. Remove the Diamond Blade. Free the Oil Drain Line. Lower the CX-3 ® to its lowest See Blade removal section. Place a catch basin below the position.
- Page 26 CX-3 MAINTENANCE ® Diamond Blade Removal Locate Blade Guard lock. Push Lock Button. Open the Remove the Blade Retaining Bolt Blade Guard Cover. and the Outer Flange. Remove blade. Install the new Blade, Retaining Tighten Blade Retaining Bolt Bolt and Outer Flange.
-
Page 27: Maintenance And Troubleshooting
CX-3 MAINTENANCE ® Spark Plug Adjustments and Replacement For all Engine related maintenance and troubleshooting refer to the Engine Manual. CAUTION DO NOT work around the engine while hot. When installing the Spark Plug, ensure the threads are aligned with the threads in the engine so as not to “cross-thread”... - Page 28 CX-3 MAINTENANCE ® Locate the three Blade Guard Remove the Blade Guard Locate the Blade Shaft Cover Retaining Bolts. Retaining Bolts and remove the Retaining Bolts. Blade Guard. Remove the Blade Shaft Cover Install the Blade Guard on the Install the Inner Blade Flange, Retaining Bolts and the Blade opposite side.
- Page 29 Install the Pointer on the oppo- site side, next to Blade Guard. Belt Adjustment and Replacement In order to ensure the CX-3 operates at peak efficiency, the power transmission belt should be inspect- ® ed monthly and changed if any signs of damage and/or excessive wear is observed.
- Page 30 CX-3 MAINTENANCE ® Loosen the Motor Tension Remove the old belt from the Clean and verify the alignment Arm. Push the Motor forward to Engine and Blade Shaft Pulleys. of the Engine and Blade Shaft loosen the belt. Pulleys. Obtain and install a new Verify the belt is seated in all Tighten the Motor Tension Arm.
- Page 31 CX-3 MAINTENANCE ® Install the Belt Guard and Belt Install the Blade (See Blade Guard Retaining Bolts. Installation section).
-
Page 32: Theory
CX-3 THEORY ® THEORY OF DIAMOND BLADES Diamond blades do not really cut; they grind the material through friction. Diamond crystals, often visible at the leading edge and sides of the rim/segment, remove material by scratching out par- ticles of hard, dense materials, or by knocking out larger particles of loosely bonded abrasive mate- rial. -
Page 33: Accessories
CX-3 ACCESSORIES ® ACCESSORIES ITEM NUMBER DECRIPTION MK – CX10 159615 12” x .100 x 1” Premium Grade for Cured Concrete MK – CX10 159616 14” x .125 x 1” Premium Grade for Cured Concrete MK – AX10 159617 12” x .125 x 1”... -
Page 34: Ordering Information
ORDERING & RETURN ® ORDERING INFORMATION You may order MK Diamond products through your local MK Diamond distributor or, you may order direct from MK Diamond. When ordering direct from MK Diamond, please have the following information ready before calling: •... -
Page 35: Warranty
© COPYRIGHT 2012, MK DIAMOND PRODUCTS, INC. ALL RIGHTS RESERVED. The MK Diamond logo is a registered trademark of MK Diamond Products, Inc. and may not be used, reproduced, or altered without written permission. All other trademarks are the property of their re- spective owners and used with permission. - Page 36 CX-3 Concrete Saw ® OWNERS MANUAL & OPERATING INSTRUCTIONS MK Diamond Products, Inc. 1315 Storm Parkway Torrance, CA 90501 Toll-Free: (800) 421-5830 Phone: (310) 539-5221 Fax: (310) 539-5158 www.mkdiamond.com...
Need help?
Do you have a question about the CX-3 and is the answer not in the manual?
Questions and answers