Table of Contents
Advertisement
Advertisement
Table of Contents

Related Manuals for Fuji Xerox DocuPrint P255 d


Summary of Contents for Fuji Xerox DocuPrint P255 d
- Page 1 DocuPrint P255 d/P255 dw User Guide...
-
Page 2: Table Of Contents
Contents Preface ........................7 Trademarks and Document Disclaimer ..............8 About License......................9 Types of Manuals ..................... 10 Using This Guide...................... 11 Organization ....................11 Conventions....................12 Safety Notes......................13 Electrical Safety................... 14 Machine Installation..................16 Operational Safety..................18 Consumable ....................20 Warning and Caution Labels ............... - Page 3 User Setup Disk Creating Tool (Windows Only).......... 45 Printer Connection and Software Installation......47 Overview of Network Setup and Configuration..........48 Connecting Your Printer ................49 Connecting Printer to a Computer or a Network......50 Setting the IP Address................. 52 TCP/IP and IP Addresses...............
- Page 4 Loading Print Media in the Paper Tray ......... 126 Loading Print Media in the Priority Sheet Inserter (PSI) ....134 Using the Output Tray Extension..........139 Setting Paper Sizes and Types ..............140 Setting Paper Sizes ..............140 Setting Paper Types ..............140 Printing ......................
- Page 5 Checking Printer Status with the SimpleMonitor (Windows Only) ..............238 Checking Printer Status Through E-mail ........239 Conserving Supplies.................. 240 Checking Page Counts................241 Moving the Printer ..................242 Contacting Fuji Xerox ................. 245 Technical Support..................246 Online Services ..................247 Contents...
- Page 6 Contents...
-
Page 7: Preface
Preface Thank you for purchasing the DocuPrint P255 d/P255 dw. This guide is intended for users who use the printer for the first time, and provides all the necessary operating information about the printer. Please read this guide to achieve the best performance from your printer. -
Page 8: Trademarks And Document Disclaimer
In this manual, safety instructions are preceded by the symbol . Always read and follow the instructions before performing the required procedures. Fuji Xerox is not responsible for any breakdown of machines due to infection of computer virus or computer hacking. IMPORTANT: 1. -
Page 9: About License
About License RSA BSAFE Your printer includes RSA BSAFER Cryptographic software from EMC Corporation. This product includes software developed by Eric Young. (eay@mincom.oz.au) Copyright© 2003, Dr BrianGladman, Worcester, UK. All rights reserved. This product uses published AES software provided by Dr Brian Gladmanunder BSD licensing terms. TIFF(libtiff) LibTIFFCopyright©... -
Page 10: Types Of Manuals
Types of Manuals Safety Guide Describes the information you need to know before using the printer and to operate the printer safely. Setup Guide Provides step-by-step instructions on how to set up your printer. Also describes how to setup wireless network. (The wireless LAN feature is available only on the DocuPrint P255 dw model.) User Guide (CHM Help) Describes how to get ready to print and set various features. -
Page 11: Using This Guide
Describes the troubleshooting tips for printer problems such as paper jams. 8 Maintenance Describes how to clean the printer, how to replace the toner cartridge, and how to see the printer status. 9 Contacting Fuji Xerox Describes support information. Using This Guide... -
Page 12: Conventions
Conventions In this guide, personal computers and workstations are collectively called “computers”. The following terms are used throughout this guide: IMPORTANT: • Important information that must be read and followed. NOTE: • Additional information that merits emphasis. See also: •... -
Page 13: Safety Notes
• Any unauthorized alteration including an addition of new functions or connection to external devices may not be covered by the product warranty. Contact your local Fuji Xerox representative for more information. Follow all warning instructions marked on this product. The warning marks stand for the followings: Used for item that if not followed strictly, can lead death or severe or fatal injuries and the possibility to do it is comparatively high. -
Page 14: Electrical Safety
If the power cord is damaged or insulated wires are exposed, contact your local Fuji Xerox representative for its replacement. Do not use a damaged or uninsulated cord to avoid the risk of electric shock and a fire accident. - Page 15 • the power cord is not cracked or worn down. Once you notice any unusual condition, switch off and unplug this product first and contact your local Fuji Xerox representative. Safety Notes...
-
Page 16: Machine Installation
Machine Installation WARNING Do not locate this product where people might step on or trip over the power cord. Friction or excessive pressure may generate heat and eventually cause electric shock or a fire accident. CAUTION Never locate this product in the following places: •... - Page 17 Rear 1° 1° To bundle wires and cables, always use the cable ties and spiral tubes that Fuji Xerox supplies. Otherwise, it may cause some defects. Others To keep this product in a good performance and condition, always use it in the following environment: •...
-
Page 18: Operational Safety
If you cannot remove the paper jam by doing the procedures in the manual, do not try to forcibly remove the jam. Doing so may cause injuries. Contact your local Fuji Xerox representative. Never play the CD-ROM supplied with the product on an audio player. Always use a CD-ROM player. - Page 19 Otherwise, it may cause injuries or burns. Switch off the product immediately and contact your local Fuji Xerox representative. Ventilate well during extended operation or mass printing. It may affect the office air environment due to odor such as ozone in a poorly ventilated room.
-
Page 20: Consumable
Never throw a toner cartridge into an open flame. Remaining toner in the cartridge may catch fire and cause burn injuries or explosion. If you have a used toner cartridge no longer needed, contact your local Fuji Xerox representative for its disposal. -
Page 21: Warning And Caution Labels
Warning and Caution Labels Always follow all warning instructions marked on or supplied with this product. To avoid the risk of burn injuries and electric shock, never touch the area with the "High Temperature" or "High Voltage" marks on. NOTE: •... -
Page 22: Environment
Environment • For environmental protection and efficient use of resources, Fuji Xerox reuses returned toner cartridges and drums (photoreceptors) to make recycle parts, recycle materials or energy recovery. • Proper disposal is required for toner cartridges no longer needed. Do not open toner cartridges. -
Page 23: Regulation
• Consult the dealer or an experienced radio/TV technician for help. Changes and modifications to this product not specifically approved by Fuji Xerox may void the user’s authority to operate this product. Product Safety Certification (UL, CB) This product is certified by the following agency using the safety standards listed. -
Page 24: Illegal Copies And Printouts
Illegal Copies and Printouts Copying or printing certain documents may be illegal in your country. Penalties of fines or imprisonment may be imposed on those found guilty. The following are examples of items that may be illegal to copy or print in your country. •... -
Page 25: Product Features
Product Features This section describes the product features and indicates their links. Duplex Print Multiple Up Print With the Multiple Up print feature of the printer, you When you have multiple pages to print, you can use can print multiple pages on a single sheet of paper the duplex feature of the computer to print on either to save paper consumption. - Page 26 Product Features...
-
Page 27: Specifications
This chapter lists the main specifications of the printer. Note that the specifications of the product may change without prior notice. Items Description Product Code DocuPrint P255 dw 110V: TL300673 DocuPrint P255 dw 220V: TL300674 DocuPrint P255 d 220V: TL300675 DocuPrint P255 dw 220V: TL300687 Type Desktop Printing Method LED Xerography IMPORTANT: •... - Page 28 Plain (60 - 105 gsm), Lightweight Cardstock (106 - 163 gsm), Labels, Envelope, Recycled, Postcard JPN IMPORTANT: • Fuji Xerox P paper (64 gsm) • Use only the recommended paper. Using paper other than that recommended for the printer can cause printing problems. For more information, see "Print Media That Can Damage Your...
- Page 29 Items Description Memory Capacity Standard: 128 MB (Onboard) IMPORTANT: • The above memory capacity does not guarantee print quality depending on the type and content of print data. Hard Disk — Page Description Language Standard: PCL 5e, PCL 6, PostScript Level3 Compatible, PDF, TIFF, JPEG ®...
- Page 30 Items Description Weight 6.8 kg (including consumables) Usage Environment Temperature: 10 - 32 °C; Humidity: 10 - 85% (except malfunctions due to dew condensation) Non-Use: Temperature: -20 - 40 °C; Humidity: 5 - 85% (except malfunctions due to dew condensation) IMPORTANT: •...
-
Page 31: Basic Operation
Basic Operation This chapter includes: • "Main Components" on page 32 • "Turning On the Printer" on page 35 • "Printing the Panel Settings Page" on page 36 • "Power Saver Mode" on page 37 Basic Operation... -
Page 32: Main Components
Main Components This section provides an overview of your printer. This section includes: • "Front View" on page 32 • "Rear View" on page 33 • "Operator Panel" on page 34 Front View Front Cover Output Tray Extension Priority Sheet Inserter (PSI) Center Output Tray Operator Panel Power Switch... -
Page 33: Rear View
Rear View 8 9 10 USB Port Rear Cover Handle Levers Ethernet Port Power Connector Rear Cover Paper Chute Transfer Roller Registration Roller 10 OPC Drum Basic Operation... -
Page 34: Operator Panel
Operator Panel The operator panel has a 2-line liquid crystal display (LCD), buttons, and LEDs. (Energy Saver) Button/LED • Lights up in the Sleep mode. Press this button to exit the Sleep mode. Buttons • Scrolls through menus or items in the Menu mode. To enter numbers or passwords, press these buttons. -
Page 35: Turning On The Printer
Turning On the Printer IMPORTANT: • Do not use extension cords or power strips. • Do not connect the printer to an uninterruptible power supply (UPS) system. Connect one end of the power cord to the power connector on the rear of the printer (see "Rear View"... -
Page 36: Printing The Panel Settings Page
To launch the Printer Setting Utility used in the following procedure, click @@@002@. • The reports and lists are all printed in English. Click Start All Programs Fuji Xerox Fuji Xerox Printer Software for Asia-Pacific your printer Printer Setting Utility. NOTE: •... -
Page 37: Power Saver Mode
Power Saver Mode The printer has a power saving feature that reduces power consumption during periods of inactivity and operates in two modes: Low Power and Sleep. In Low Power mode, only the LCD panel goes blank. In Sleep mode, all LEDs, except for the (Energy Saver) LED, on the operator panel go out and the LCD panel goes blank. - Page 38 Basic Operation...
-
Page 39: Printer Management Software
Printer Management Software Use the Software Pack CD-ROM supplied with your printer to install a combination of software programs, depending on your operating system. This chapter includes: • "Print Drivers" on page 40 • "CentreWare Internet Services" on page 41 •... -
Page 40: Print Drivers
Print Drivers To access all of your printer’s features, install print drivers from the Software Pack CD-ROM. A printer driver enables communications between your computer and printer and provides access to your printer features. See also: • "Installing Print Drivers on Computers Running Windows" on page 58 •... -
Page 41: Centreware Internet Services
CentreWare Internet Services This section provides information on the CentreWare Internet Services. The CentreWare Internet Services is a hyper text transfer protocol (HTTP)-based web page service that is accessed through your web browser. Using the CentreWare Internet Services, you can confirm the printer status, and change the printer configuration options easily. -
Page 42: Printer Setting Utility (Windows Only)
Printer Setting Utility (Windows Only) The Printer Setting Utility allows you to view or specify the system settings. You can also diagnose the system settings with the Printer Setting Utility. The Printer Setting Utility consists of the Printer Settings Report, Printer Maintenance, and Diagnosis tabs. -
Page 43: Simplemonitor (Windows Only)
SimpleMonitor (Windows Only) You can check the printer status with the SimpleMonitor. Double-click the SimpleMonitor printer icon on the taskbar at the bottom right of the screen. The Printer Selection window appears, which displays the printer name, printer connection port, printer status, and model name. Check the column Status to know the current status of your printer. -
Page 44: Launcher (Windows Only)
To use the Launcher, select to install the Launcher when you install print drivers. The following procedure uses Windows 7 as an example. To start the Launcher: Click Start All Programs Fuji Xerox Fuji Xerox Printer Software for Asia-Pacific your printer Launcher. The Launcher-Btype window appears. -
Page 45: User Setup Disk Creating Tool (Windows Only)
User Setup Disk Creating Tool (Windows Only) You can use the User Setup Disk Creating Tool program in the MakeDisk folder within the Utilities folder and drivers in the respective folders of the Software Pack CD-ROM to create a driver installation package. - Page 46 Select your printer and click Create Disk. The Setup Disk Settings window appears. Enter a description of your printer settings in the Comment field and select an output port from the Port list box. NOTE: • Alternatively, you can click Add Port to create your desired port. •...
-
Page 47: Printer Connection And Software Installation
Printer Connection and Software Installation This chapter includes: • "Overview of Network Setup and Configuration" on page 48 • "Connecting Your Printer" on page 49 • "Setting the IP Address" on page 52 • "Installing Print Drivers on Computers Running Windows" on page 58 •... -
Page 48: Overview Of Network Setup And Configuration
Overview of Network Setup and Configuration To set up and configure the network: Connect the printer to the network using the recommended hardware and cables. Turn on the printer and the computer. Print the System Settings page and keep it for referencing network settings. Install the driver software on the computer from the Software Pack CD-ROM. -
Page 49: Connecting Your Printer
Connecting Your Printer The interface cables of your printer must meet the following requirements: Connection Type Connection Specifications Ethernet 10 Base-T/100 Base-TX compatible USB 2.0 compatible Wireless (DocuPrint P255 dw only) IEEE 802.11b/802.11g 1 USB Port 2 Ethernet Port Printer Connection and Software Installation... -
Page 50: Connecting Printer To A Computer Or A Network
Connecting Printer to a Computer or a Network Connect your printer via a USB, Ethernet, or wireless (DocuPrint P255 dw only) connection. Hardware and cabling requirements vary for the different connection methods. Ethernet cables and hardware are not supplied with your printer and must be purchased separately. The available features for each connection type are shown in the following table. -
Page 51: Network Connection
Network Connection To connect the printer to an Ethernet network: Ensure that the printer, computer and any other connected devices have been turned off and all cables have been disconnected. Twist the Ethernet cable around the ferrite core shipped with the printer as shown in the figure, and then close the ferrite core. -
Page 52: Setting The Ip Address
Setting the IP Address This section includes: • "TCP/IP and IP Addresses" on page 52 • "Automatically Setting the Printer’s IP Address" on page 52 • "Dynamic Methods of Setting the Printer’s IP Address" on page 53 • "Assigning an IP Address (for IPv4 Mode)" on page 54 •... -
Page 53: Dynamic Methods Of Setting The Printer's Ip Address
Dynamic Methods of Setting the Printer’s IP Address There are two protocols available for dynamically setting the printer’s IP address: • DHCP • DHCP/Auto IP (enabled by default) You can turn on/off either protocol using the operator panel, or use the CentreWare Internet Services to turn on/off the DHCP protocol. -
Page 54: Assigning An Ip Address (For Ipv4 Mode)
Assigning an IP Address (for IPv4 Mode) NOTE: • When you assign an IP address manually in IPv6 mode, use the CentreWare Internet Services. To display the CentreWare Internet Services, use the link local address. To check a link local address, see "Printing and Checking the System Settings Page"... - Page 55 When you use IPv6 mode for network printing, you cannot use the Printer Setting Utility to assign an IP address. Click Start All Programs Fuji Xerox Fuji Xerox Printer Software for Asia-Pacific your printer Printer Setting Utility.
-
Page 56: Verifying The Ip Settings
The System Settings page is printed. Confirm the IP address next to IP Address under Wired Network (DocuPrint P255 d) or Wired Network/Wireless Network (DocuPrint P255 dw) on the System Settings page. If the IP address is 0.0.0.0, wait for a few minutes to resolve the IP address automatically, and then print the System Settings page again. - Page 57 To launch the Printer Setting Utility used in the following procedure, click @@@002@. • The reports and lists are all printed in English. Click Start All Programs Fuji Xerox Fuji Xerox Printer Software for Asia-Pacific your printer Printer Setting Utility. NOTE: •...
-
Page 58: Installing Print Drivers On Computers Running Windows
Installing Print Drivers on Computers Running Windows You can use three types of print drivers on your printer: PCL, PostScript Level3 Compatible, and XML Paper Specification print drivers. This section provides information on the PCL print driver. For information on the other drivers, see the following: PostScript Level3 Compatible print driver: PostScript Level3 Compatible User Guide XML Paper Specification print driver:... -
Page 59: Identifying Print Driver Pre-Install Status (For Network Connection Setup)
The following procedure uses Windows 7 as an example. NOTE: • The reports and lists are all printed in English. Click Start All Programs Fuji Xerox Fuji Xerox Printer Software for Asia-Pacific your printer Printer Setting Utility. NOTE: •... -
Page 60: Inserting The Software Pack Cd-Rom
Disabling the Firewall Before Installing Printer Drivers If you are running one of the following operating systems, you must disable the firewall before installing print drivers: • Windows 7 • Windows Vista • Windows Server 2008 R2 • Windows Server 2008 •... -
Page 61: Network Connection Setup
Network Connection Setup NOTE: • To use your printer in a Linux environment, you need to install print drivers for the Linux operating systems. For details on how to install and use the drivers, see also "Installing Print Drivers on Computers Running Linux (CUPS)"... -
Page 62: Configuring Wireless Network Settings (Docuprint P255 Dw Only)
Configuring Wireless Network Settings (DocuPrint P255 dw only) You can configure wireless network settings with the Easy Install Navi. IMPORTANT: • Be sure to obtain the SSID and security information from a system administrator in advance when you use a communications standard other than WPS to configure wireless network settings. - Page 63 Using Wizard Setup to Configure Wireless Network Settings The following procedure uses Windows 7 as an example. Insert the Software Pack CD-ROM into your computer's CD/DVD drive. When the AutoPlay window appears, click Run setup.exe to start the Easy Install Navi. Click Start Setup.
- Page 64 Ensure that Wizard is selected, and then click Next. Follow the on-screen instructions to connect the USB cable and perform other setup until the Printer Setup Utility screen appears. Select either of the following: • Click the Select from the found Access Points radio button and select the SSID. •...
- Page 65 Select IP Mode depending on your network scheme. When IPv4 is selected, configure the following: Select Type. If you have selected Use Manual Address from Type, enter the following items: • IP Address of your printer • Subnet Mask • Gateway Address When Dual Stack is selected, configure the following: Configure IPv4 Settings.
- Page 66 Click Next. The Confirm the settings screen appears. Ensure that the wireless network settings are displayed, and then click Apply. A confirmation window appears. Click Yes. Wait a few minutes until the printer restarts to establish a wireless network connection and the Configuration Complete screen appears.
- Page 67 Confirm that "Link Quality" is shown as "Good", "Acceptable", or "Low" on the report. NOTE: • When "Link Quality" is shown as "No Reception", check if the wireless network settings are correctly configured. To reconfigure the wireless network settings, click Next on the Configuration Complete screen and then click Return.
- Page 68 Using Advanced Setup to Configure Wireless Network Settings To use the Advanced setup, display the Configure Wireless Settings screen. The following procedure uses Windows 7 as an example. • Displaying the Configure Wireless Settings Screen Insert the Software Pack CD-ROM into your computer's CD/DVD drive. When the AutoPlay window appears, click Run setup.exe to start the Easy Install Navi.
- Page 69 Select Advanced. Printer Connection and Software Installation...
-
Page 70: Ethernet Cable
• Select a connection method from the following • "Ethernet Cable" on page 70 • "WPS-PIN" on page 74 • "WPS-PBC" on page 75 • "Operator Panel" on page 76 • "CentreWare Internet Services" on page 77 • Ethernet Cable Select Ethernet Cable, and then click Next. - Page 71 Select IP Mode depending on your network scheme. When IPv4 is selected, configure the following: Select Type. If you have selected Use Manual Address from Type, enter the following items: • IP Address of your printer • Subnet Mask • Gateway Address When Dual Stack is selected, configure the following: Configure IPv4 Settings.
- Page 72 Click Next. The Confirm the settings screen appears. Ensure that the wireless network settings are displayed, and then click Apply. A confirmation window appears. Click Yes. Wait a few minutes until the printer restarts to establish a wireless network connection and the Configuration Complete screen appears.
- Page 73 Print the System Settings page using the operator panel. "Printing the System Settings Page" on page 156. Confirm that "Link Quality" is shown as "Good", "Acceptable", or "Low" on the report. NOTE: • When "Link Quality" is shown as "No Reception", check if the wireless network settings are correctly configured.
- Page 74 • WPS-PIN NOTE: • WPS-PIN (Wi-Fi Protected Setup-Personal Identification Number) is a method to authenticate and register devices required for wireless configuration, by entering PIN code to a printer and computer. This setting, performed through access point, is available only when the access points of your wireless router supports WPS.
- Page 75 • WPS-PBC NOTE: • WPS-PBC (Wi-Fi Protected Setup-Push Button Configuration) is a method to authenticate and register devices required for wireless configuration, by pressing the button provided on the access point via wireless routers, and then performing WPS-PBC setting on the operator panel. This setting is available only when the access point supports WPS.
- Page 76 When the WPS-PBC operation is successful and the printer is rebooted, wireless LAN connection is completed. • Operator Panel Select Operator Panel, and then click Next. Follow the on-screen instructions until the Check Setup screen appears. Confirm there are no errors displayed on the LCD panel, and then click Start Installation. If you see any errors, click Trouble Shooting Guide and follow the instruction.
- Page 77 • CentreWare Internet Services Select CentreWare Internet Services, and then click Next. Follow the on-screen instructions until the Check Setup screen appears. Confirm there are no errors displayed on the LCD panel, and then click Start Installation. If you see any errors, click Trouble Shooting Guide and follow the instruction. If you agree to the terms of the License Agreement, click I accept the terms of the license agreement to continue the installation process, and then click Next.
- Page 78 Setting Up a New Wireless Network Environment for Your Computer (When You Need to Set Up Your Wireless Connectivity With Your Computer) • For DHCP Networks: Setting up your computer for wireless connectivity: NOTE: • You can also change the wireless network settings using the wireless application that may be installed on your computer.
- Page 79 On the Association tab, enter the following information and click OK. Network name (SSID): xxxxxxxx (xxxxxxxx indicates a wireless device’s SSID which you use) Network Authentication: Open Data encryption: Disabled Click the Move up button to move the newly added SSID to the top of the list. Click OK to close the Wireless Network Connection Properties dialog box.
- Page 80 For Windows Server 2008 R2 and Windows 7: Display Control Panel. Select Network and Internet. Select Network and Sharing Center. Select Connect to a network. Select xxxxxxxx (xxxxxxxx indicates a wireless device’s SSID which you use) from the network items listed in the available network list, and click Connect. Check the IP address assigned by AutoIP on the printer.
- Page 81 Enter the IP address of the printer in the address bar, and then press the Enter key. The CentreWare Internet Services appears on your browser. Configure wireless network settings for the printer on the CentreWare Internet Services. Reboot the printer. Restore the wireless network settings on your computer.
- Page 82 For Windows Vista: Display Control Panel. Select Network and Internet. Select Network and Sharing Center. Select Connect to a network. Select the network, and then click Connect. Click Close in the dialog box after confirming the connection is a success. For Windows Server 2008: Display Control Panel.
- Page 83 On the Association tab, enter the following information and click OK. Network name (SSID): xxxxxxxx (xxxxxxxx indicates a wireless device’s SSID which you use) Network Authentication: Open Data encryption: Disabled Click the Move up button to move the newly added SSID to the top of the list. Click OK to close the Wireless Network Connection Properties dialog box.
- Page 84 For Windows Server 2008 R2 and Windows 7: Display Control Panel. Select Network and Internet. Select Network and Sharing Center. Select Connect to a network. Select xxxxxxxx (xxxxxxxx indicates a wireless device’s SSID which you use) from the network items listed in the available network list, and click Connect. Check the IP address on your computer.
- Page 85 Enter the IP address of the printer in the address bar, and then press the Enter key. The CentreWare Internet Services appears on your browser. Change the wireless network settings for the printer on the CentreWare Internet Services. Reboot the printer. Restore the wireless network settings on your computer.
- Page 86 Click Add to display Wireless network properties. Enter the setting that you will send to the printer and click OK. Click Move up to move the setting to the top of the list. Click OK to close the Wireless Network Connection Properties dialog box. For Windows Vista: Display Control Panel.
-
Page 87: Setting Up The Printer For Shared Printing
Setting Up the Printer for Shared Printing One way to make a new printer available for other computers on a network is to use the Software Pack CD-ROM supplied with your printer. Using the supplied CD is helpful in a way that it will install utilities including the SimpleMonitor as well. - Page 88 • For Windows Server 2008 and Windows Server 2008 64-bit Edition Click Start Control Panel Hardware and Sound Printers. Right-click the printer icon and select Sharing. Select the Share this printer check box, and then enter a name in the Share name text box. Click Additional Drivers and select the operating systems of all network clients using your printer.
- Page 89 Installing Print Drivers Now that the printer is set for shared printing, you need to install print drivers for the shared printer using either of the two Windows features. • Using the Point and Print Feature The Point and Print feature is a Microsoft Windows technology that automatically downloads and installs a print driver necessary for using the shared printer on the network.
- Page 90 For Windows Vista and Windows Vista 64-bit Edition Click Start Network. Locate and double-click the host name of the server computer. Right-click the shared printer name, and then click Connect. Click Install driver. Click Continue in the User Account Control dialog box. Wait until the driver is copied from the server to the client computer and a new printer object is added to the Printers folder.
- Page 91 For Windows 7, Windows 7 64-bit Edition, and Windows Server 2008 R2 Click Start Computer Network. Locate the host name of the server computer, and then double-click the host name. Right-click the shared printer name, and then click Connect. Click Install driver.
- Page 92 • Using the Peer-to-Peer Feature With the peer-to-peer feature, you need to specify the shared printer to install a print driver. For Windows XP, Windows XP 64-bit Edition, Windows Server 2003, and Windows Server 2003 x64 Edition Click start (Start for Windows Server 2003/Windows Server 2003 x64 Edition) Printers and Faxes.
- Page 93 For Windows Vista and Windows Vista 64-bit Edition Click Start Control Panel Hardware and Sound Printers. Click Add a printer to launch the Add Printer wizard. Select Add a network, wireless or Bluetooth printer. If the printer is listed, select the printer and click Next, or select The printer that I want isn't listed and enter the path to the printer in the Select a shared printer by name text box and click Next.
- Page 94 For Windows Server 2008 and Windows Server 2008 64-bit Edition Click Start Control Panel Hardware and Sound Printers. Click Add a printer to launch the Add Printer wizard. Select Add a network, wireless or Bluetooth printer. If the printer is listed, select the printer and click Next, or select The printer that I want isn't listed and enter the path to the printer in the Select a shared printer by name text box and click Next.
- Page 95 For Windows 7, Windows 7 64-bit Edition, and Windows Server 2008 R2 Click Start Devices and Printers. Click Add a printer to launch the Add Printer wizard. Select Add a network, wireless or Bluetooth printer. If the printer is listed, select the printer and click Next, or select The printer that I want isn't listed.
-
Page 96: Using The Xml Paper Specification Print Driver
Using the XML Paper Specification Print Driver To use the XML Paper Specification print driver, you may need to install an additional Microsoft package depending on your operating system. Windows Vista VC++2008 Redistribution Package Windows Server 2008 .Net Framework 3.5 SP1 Windows Server 2008 R2 .Net Framework 3.5.1 (Use the Server Manager interface to manually install it.) -
Page 97: Installing Print Drivers On Computers Running Mac Os X
Installing Print Drivers on Computers Running Mac OS X For information on how to install print drivers, refer to the PostScript Level3 Compatible User Guide. This section includes: • "Mac OS X Wireless Settings on the Operator Panel (DocuPrint P255 dw only)" on page 98 Printer Connection and Software Installation... -
Page 98: Mac Os X Wireless Settings On The Operator Panel (Docuprint P255 Dw Only)
You can configure wireless settings on the operator panel. IMPORTANT: • The Wireless LAN feature is not available in all locations. Please check with your local Fuji Xerox representative for availability of wireless in your location. • If you are using a method other than WPS to configure your wireless setting, be sure to get the SSID and security information from a system administrator before starting the setup procedure. - Page 99 Confirm that “Link Quality” is shown as “Good”, "Acceptable" or "Low" on the report. NOTE: • When "Link Quality" is "No Reception", check if the wireless settings are correctly configured. • If the wireless setting does not work, contact your system administrator or Fuji Xerox Customer Support Center. Printer Connection and Software Installation...
- Page 100 Confirm that "Link Quality" is shown as "Good", "Acceptable" or "Low" on the report. NOTE: • When "Link Quality" is "No Reception", check if the wireless settings are correctly configured. • If the wireless setting does not work, contact your system administrator or Fuji Xerox Customer Support Center. Printer Connection and Software Installation...
- Page 101 Confirm that "Link Quality" is shown as "Good", "Acceptable" or "Low" on the report. NOTE: • When "Link Quality" is “No Reception”, check if the wireless settings are correctly configured. • If the wireless setting does not work, contact your system administrator or Fuji Xerox Customer Support Center. Printer Connection and Software Installation...
- Page 102 Confirm that “Link Quality” is shown as “Good”, “Acceptable” or “Low” on the report. NOTE: • When “Link Quality” is “No Reception”, check if the wireless settings are correctly configured. • If the wireless setting does not work, contact your system administrator or Fuji Xerox Customer Support Center. Printer Connection and Software Installation...
-
Page 103: Installing Print Drivers On Computers Running Linux (Cups)
Installing Print Drivers on Computers Running Linux (CUPS) This section provides information on installing and setting up print drivers with CUPS (Common UNIX ® ® ® Printing System) on Red Hat Enterprise Linux 6 Desktop (x86), SUSE Linux Enterprise Desktop 11 (x86), and Ubuntu 10 (x86). For the information on the previous versions of the Linux operating systems, visit respective web sites. -
Page 104: Installing Print Drivers
Installing Print Drivers NOTE: • The print driver fx-docuprint-p255-xx-xnoar.rpm or fx-docuprint-p255_X-X_all.deb is included in the linux folder on the Software Pack CD-ROM. • For Red Hat Enterprise Linux 6 Desktop (x86) Double-click fx-docuprint-p255-xx-xnoar.rpm on the Software Pack CD-ROM. Click Install. Enter the administrator's password, and then click Authenticate. -
Page 105: Specifying The Queue
For a USB printer connected to a computer running the Red Hat Enterprise Linux 6 Desktop (x86): Select FUJI XEROX DocuPrint P255 X (FUJI XEROX DocuPrint P255 X) from the Local Printers menu, and then click Continue. Enter the name of the printer in Name in the Add Printer dialog box, and then click Continue. - Page 106 Select Line Printer Daemon (LPD) Protocol from Access Network Printer or Printserver Box via. Enter the IP address of the printer in IP Address or Host Name:. Select Fuji Xerox in Select the printer manufacturer:. Click OK. The Add New Printer Configuration dialog box appears.
- Page 107 If you want to share the printer, select the Share This Printer check box. For a USB printer connected to a computer running the Ubuntu 10 (x86): Select FUJI XEROX DocuPrint P255 X (FUJI XEROX DocuPrint P255 X) from the Local Printers menu, and then click Continue.
-
Page 108: Specifying The Default Queue
Specifying the Default Queue • For Red Hat Enterprise Linux 6 Desktop (x86) Select Applications System Tools Terminal. Enter the following command in the terminal window. (Enter the administrator password) lpadmin -d (Enter the queue name) • For SUSE Linux Enterprise Desktop 11 (x86) Select Computer ... -
Page 109: Specifying Printing Options
Specifying Printing Options You can specify printing options such as the duplex (2-sided) printing. • For Red Hat Enterprise Linux 6 Desktop (x86) Open the URL "http://localhost:631" using a web browser. Click Administration. Click Manage Printers. Click the queue name for which you want to specify printing options. Click the Administration drop down box, and then select Modify Printer. - Page 110 • For Ubuntu 10 (x86) Open the URL "http://localhost:631" using a web browser. Click Administration. Click Manage Printers. Click the queue name for which you want to specify printing options. Click the Administration drop down box, and then select Modify Printer. Enter the User Name and the Password, and then click OK.
-
Page 111: Setting The Password For Authority As The Printer Administrator
Setting the Password for Authority as the Printer Administrator For SUSE Linux Enterprise Desktop 10 and 11, you must set the password for authority as the printer administrator to do operations as the printer administrator. • For SUSE Linux Enterprise Desktop 11 (x86) Select Computer ... -
Page 112: Uninstalling Print Drivers
Uninstalling Print Drivers • For Red Hat Enterprise Linux 6 Desktop (x86) Select Applications System Tools Terminal. Enter the following command in the terminal window to delete the print queue. (Enter the administrator password) lpadmin -x (Enter the print queue name) Repeat the command above for all queues for the same model. - Page 113 • For Ubuntu 10 (x86) Select Applications Accessories Terminal. Enter the following command in the terminal window to delete the print queue. sudo lpadmin -x (Enter the print queue name) (Enter the user password) Repeat the command above for all queues for the same model. Enter the following command in the terminal window.
- Page 114 Printer Connection and Software Installation...
-
Page 115: Printing Basics
Printing Basics This chapter includes: • "About Print Media" on page 116 • "Supported Print Media" on page 118 • "Loading Print Media" on page 125 • "Setting Paper Sizes and Types" on page 140 • "Printing" on page 141 •... -
Page 116: About Print Media
About Print Media Using paper that is not appropriate for the printer can cause paper jams, image quality problems, or printer failures. To achieve the best performance from your printer, we recommend you use only the paper described in this section. When using paper other than that recommended, contact our local representative office or authorized dealer. -
Page 117: Print Media That Can Damage Your Printer
Print Media That Can Damage Your Printer Your printer is designed to use a variety of media types for print jobs. However, some media can cause poor output quality, excessive paper jams, or damage to your printer. Unacceptable media includes: •... -
Page 118: Supported Print Media
Supported Print Media Using unsuitable print media may lead to paper jams, poor print quality, breakdown and damage to your printer. To use the features of your printer effectively, use the suggested print media that is recommended here. IMPORTANT: • The toner may come off the print media, if it gets wet by water, rain, steam and so on. -
Page 119: Usable Print Media
Usable Print Media The types of print media that can be used on your printer are as follows: Paper Tray A4 SEF (210 297 mm) Paper Size B5 SEF (182 257 mm) A5 SEF (148 210 mm) Letter SEF (8.5 ... - Page 120 Priority Sheet Inserter (PSI) A4 SEF (210 297 mm) Paper Size B5 SEF (182 257 mm) A5 SEF (148 210 mm) Letter SEF (8.5 11 inches) Executive SEF (7.25 10.5 inches) Legal 13 (Folio) SEF (8.5 13 inches) Legal 14 SEF (8.5 ...
-
Page 121: Standard Paper And Tested Paper
When you print a generally used paper (which called general paper), please use a paper that suits the standard. To print clearly, we recommend the standard paper shown in the following table. For information about the other paper and media, contact Fuji Xerox Customer Support Center. Paper Name... - Page 122 Paper Name Size Weight Paper Type Notes Supported FX C2 70 gsm Recycled Paper for general office Paper use with minimum see- (Cont’d) through. FX C2R Recycled 70% recycled pulp paper. XC Premier 80 80 gsm Plain XC Business 80 Plain Data Copy Plain...
- Page 123 Paper Name Size Weight Paper Type Notes IMPORTANT: Special Official Postcard Japanese Postcard Postcard JPN Paper Postcard 190 gsm • Do not use a special (Cont’d) ink jet printer Official Postcard Reply-paid Postcard JPN postcard. It can Postcard cause the printer failure.
- Page 124 Paper Name Size Weight Paper Type Notes IBG Paper PFX Red & White 80 gsm Plain (Cont’d) Packaging FXA Professional Plain FXCL Xcite Plain FXCL Xcellence 80 Plain FXCL Xceed 80 Plain Double A Laser Paper A4 Plain KX H-Paper Plain Green Member Plain...
-
Page 125: Loading Print Media
Loading Print Media Loading print media properly helps prevent jams and ensures trouble-free printing. Before loading print media, identify the recommended print side of the print media. This information is usually on the print media package. NOTE: • After loading paper in the paper tray or the Priority Sheet Inserter (PSI), specify the same paper type on the operator panel. -
Page 126: Loading Print Media In The Paper Tray
Loading Print Media in the Paper Tray NOTE: • When you are printing on any print media that is smaller than the A5 size paper, be sure to load it in the paper tray. • To avoid paper jams, do not remove the paper tray while printing is in progress. •... - Page 127 Hold the paper tray end with one hand, push and hold the paper tray extension lever with the other hand, and then extend the tray to your desired length. NOTE: • The paper tray can accommodate a stack of A5 paper by default, and is designed to extend in two lengths.
- Page 128 Load the print media into the paper tray with the recommended print surface facing up. NOTE: • Do not load paper media above the fill line on the paper width guides of the paper tray as it may cause paper jams. Slide the paper width guides and then the length guide inward until they rest lightly against the edges of the print media stack.
- Page 129 Open the output tray extension. Select the paper type on the print driver if the loaded print media is not standard plain paper. If a user-specified print media is loaded in the paper tray, you must specify the paper size on the print driver.
-
Page 130: Loading Envelopes In The Paper Tray
Loading Envelopes in the Paper Tray Follow the guidelines below to load envelopes in the paper tray. NOTE: • When you print on envelopes, be sure to specify the envelope on the print driver. If not specified, the print image will be rotated 180 degrees. •... - Page 131 • Loading Com-10, Yougata 4/6, or Younaga 3 Envelopes Load envelopes with the print surface facing up. Ensure that the flapped edge is pointing toward the right of the printer and each flap is folded under the envelope. • Loading Monarch, DL, or Yougata 2/3 Envelopes You can load Monarch, DL, and Yougata 2/3 Envelopes in either of the following orientations: SEF: Load envelopes with the print surface facing up.
-
Page 132: Loading Postcards
Loading Postcards in the Paper Tray NOTE: • When you print on postcards, be sure to specify the postcard on the print driver for the optimum print result. • Before loading postcards, smooth them out, but bend the leading edge as shown in the following illustration. Bend them about 5 mm (0.20 inches). - Page 133 • Loading W-Postcards Load W-postcards with the print surface facing up and the left edge first. NOTE: • To confirm the correct orientation of each print media such as postcards, see the instructions on the Envelope/Paper Setup Navigator dialog box of the print driver. Printing Basics...
-
Page 134: Loading Print Media In The Priority Sheet Inserter (Psi)
Loading Print Media in the Priority Sheet Inserter (PSI) NOTE: • Before you use the Priority Sheet Inserter (PSI), make sure that the printer has the paper tray inserted. • Use only laser print media. Do not use ink jet paper on your printer. •... - Page 135 If print media are still not fed correctly, add some bending to the leading edge of the print media as shown in the following illustration. The amount of the bending shall be 5 mm (0.20 inches) or less. Printing Basics...
- Page 136 Load print media in the PSI with the top edge first and the recommended print surface facing up. Slide the paper width guides inward until they rest lightly against the edges of the print media stack. Open the output tray extension. Select the paper type on the print driver if the loaded print media is not plain paper.
-
Page 137: Loading Envelopes In The Priority Sheet Inserter (Psi)
Loading Envelopes in the Priority Sheet Inserter (PSI) Follow the guidelines below to load envelopes in the PSI. NOTE: • Be sure to insert envelopes all the way in. Otherwise, print media that is loaded in the paper tray will be fed. •... - Page 138 • Loading Com-10, DL, Yougata 4, or Younaga 3 Envelopes Load envelopes with the print surface facing up. Ensure that the flapped edge is pointing toward the right of the printer and each flap is folded under the envelope. • Loading C5, Nagagata 3, or Kakugata 3 Envelopes Load envelopes with the print surface facing up.
-
Page 139: Using The Output Tray Extension
Using the Output Tray Extension The output tray extension is designed to prevent print media from falling from the printer after the print job is complete. Before printing a long length document, be sure to open the output tray extension. Printing Basics... -
Page 140: Setting Paper Sizes And Types
Setting Paper Sizes and Types When loading print media, set the paper size and type on the operator panel before printing. This section describes how to set the paper size and type on the operator panel. See also: • "Understanding the Operator Panel Menus" on page 162 This section includes: •... -
Page 141: Printing
Printing This section covers how to print documents from your printer and how to cancel a job. This section includes: • "Printing from the Computer" on page 141 • "Canceling a Print Job" on page 142 • "Duplex Printing" on page 143 •... -
Page 142: Canceling A Print Job
Canceling a Print Job There are several methods for canceling a print job. This section includes: • "Canceling a Job From the Operator Panel" on page 142 • "Canceling a Job From the Computer (Windows)" on page 142 Canceling a Job From the Operator Panel Press the (Cancel Job) button. -
Page 143: Duplex Printing
Duplex Printing Duplex (2-sided) printing allows you to print on either side of a sheet of paper. The paper sizes available for duplex printing are A4, B5, A5, Letter, Executive, Folio, and Legal. This section includes: • "Automatic Duplex Printing" on page 143 •... - Page 144 Manual Duplex Printing (PCL Print Driver Only) When you have a problem with automatic duplex printing, you may want to try manual duplex printing. Starting manual duplex printing displays a window containing the instructions that you can follow. Note that the window cannot be reopened once it is closed. Do not close the window until duplex printing is complete.
- Page 145 • Loading Print Media in the Paper Tray First print the even pages (rear sides). For a six page document, rear sides are printed in the order of page 6, page 4, then page 2. When printing of the even pages is complete, the (Ready) LED lights and the LCD panel shows the following: Insert Output...
- Page 146 Replace the paper tray cover, insert the paper tray into the printer, and then press the button. Pages are printed in the order of page 1 (rear of page 2), page 3 (rear of page 4), and then page 5 (rear of page 6). Printing Basics...
- Page 147 • Loading Print Media in the Priority Sheet Inserter (PSI) First print the even pages (rear sides). For a six page document, rear sides are printed in the order of page 6, page 4, then page 2. When printing of the even pages is complete, the (Ready) LED lights and the LCD panel shows the following: Insert Output...
-
Page 148: Selecting Printing Options
Selecting Printing Options This section includes: • "Selecting Printing Preferences (Windows)" on page 148 • "Selecting Options for an Individual Job (Windows)" on page 148 • "Selecting Options for an Individual Job (Mac OS X)" on page 151 Selecting Printing Preferences (Windows) Printing preferences control all of your print jobs, unless you override them specifically for a job. -
Page 149: Printing Options For Windows
Printing Options for Windows Operating System Driver Tab Printing Options Windows XP, Paper/Output tab • Favorites • Duplex Windows XP x 64bit, • Copies Windows Server 2003, • Collated Windows Server 2003 x • Paper Summary 64bit, • Paper Size Windows Vista, •... - Page 150 Operating System Driver Tab Printing Options Windows XP, Watermarks/Forms tab • Watermarks – New Text Windows XP x 64bit, – New Bitmap Windows Server 2003, – Edit Windows Server 2003 x – Delete 64bit, – First Page Only Windows Vista, •...
-
Page 151: Selecting Options For An Individual Job (Mac Os X)
Selecting Options for an Individual Job (Mac OS X) To select print settings for a particular job, change the driver settings before sending the job to the printer. With the document open in your application, click File, and then click Print. Select your printer from Printer. - Page 152 Item Printing Options Printer Features • 1. Detailed Settings – Resolution – Screen – Toner Saving Mode – Image Enhancement • 2. Paper Handling – Duplex – Paper Type – Show Paper Size/Type Error Summary Printing Basics...
-
Page 153: Printing Custom Size Paper
Printing Custom Size Paper This section explains how to print on custom size paper using the print driver. The way to load custom size paper is the same as the one to load standard size paper. • "Loading Print Media in the Paper Tray" on page 126 •... -
Page 154: Printing On Custom Size Paper
Printing on Custom Size Paper Use the following procedures to print using either the Windows or Mac OS X print driver. • Using the Windows Print Driver This section explains the procedure using Windows 7 WordPad as an example. NOTE: •... -
Page 155: Checking Status Of A Print Job
You can check the printer status and print job status. For details on the SimpleMonitor, see Help. The following procedure uses Windows 7 as an example: Click Start All Programs Fuji Xerox Fuji Xerox Printer Software for Asia-Pacific your printer SimpleMonitor-Btype for Asia-Pacific. -
Page 156: Printing A Report Page
To launch the Printer Setting Utility used in the following procedure, click @@@002@. • The reports and lists are all printed in English. Click Start All Programs Fuji Xerox Fuji Xerox Printer Software for Asia-Pacific your printer Printer Setting Utility. NOTE: •... -
Page 157: Printer Settings
Printer Settings You can change the printer settings using either the operator panel or the Printer Setting Utility. Changing the Printer Settings • Using the Operator Panel NOTE: • Factory defaults may vary for different regions. • Once one value is selected, it will be active until a new value is applied or the default value is restored. •... - Page 158 Driver settings may have precedence over the changes previously made and you may have to change the printer settings. Click Start All Programs Fuji Xerox Fuji Xerox Printer Software for Asia-Pacific your printer Printer Setting Utility.
-
Page 159: Printing With The Web Services On Devices
Printing with the Web Services on Devices This section provides information for network printing with the Web Services on Devices available on Windows Vista, Windows Server 2008, Windows Server 2008 R2, and Windows 7 protocol of Microsoft. This section includes: •... -
Page 160: Printer Setup
Printer Setup You can install your new printer on the network using the Software Pack CD-ROM that shipped with your printer, or using Add Printer Wizard. Installing a Print Driver Using the Add Printer Wizard Click Start Control Panel Hardware and Sound Printers (Start Devices and Printers for Windows Server 2008 R2 and Windows 7). -
Page 161: Using The Operator Panel Menus
Using the Operator Panel Menus This chapter includes: • "Understanding the Operator Panel Menus" on page 162 • "Panel Lock Feature" on page 185 • "Changing the Power Saver Mode Settings" on page 187 • "Resetting to Factory Defaults" on page 188 Using the Operator Panel Menus... -
Page 162: Understanding The Operator Panel Menus
Understanding the Operator Panel Menus When your printer is connected to a network and available to a number of users, access to the Admin Menu may be restricted. This prevents unauthorized users from using the operator panel to inadvertently change the default menu settings that have been set by the administrator. However, you can change settings for individual print jobs using the print driver. -
Page 163: Report/List
Report/List Use Report/List to print various types of reports and lists. NOTE: • A password is required to use the Report/List menu when Panel Lock Set is set to Enable. In this case, enter the password you specified, and press the button. -
Page 164: Meter Readings
Meter Readings Use Meter Readings to check the total number of printed pages. Admin Menu Use the Admin Menu to configure a variety of printer features. NOTE: • A password is required to use the Admin Menu when Panel Lock Set is set to Enable. In this case, enter the password you specified, and press the button. - Page 165 • Wi-Fi Setup (DocuPrint P255 dw only) Purpose: To configure wireless network settings. Values: Enter a name of up to 32 alphanumeric characters to identify the Manual Enter Network wireless network. As the factory default menu setting, Setup (SSID) wireless_device is specified in advance. Configures a wireless network with access points.
- Page 166 • WPS Setup (DocuPrint P255 dw only) Disables the PBC method for the WPS encryption. Push PBC Start Cancel* Button Enables the PBC method for the WPS encryption. Start Control Starts configuring wireless network settings using the PIN code PIN Code Start assigned automatically by the printer.
-
Page 167: Ip Filter
• Protocol Purpose: To enable or disable each protocol. To make any changes effective, turn off the printer and then turn it back on. Values: Disables the Line Printer Daemon (LPD) port. Disable Enables the LPD port. Enable* Disables the Port 9100 port. Port 9100 Disable Enables the Port 9100 port. -
Page 168: Initialize Nvm
• Initialize NVM Purpose: To initialize wired network data stored in Non-Volatile Memory (NVM). Enabling this feature and rebooting the printer will reset all the wired network settings to their factory default values. Values: Initializes the wired network data stored in NVM. Does not initialize the wired network data stored in NVM. -
Page 169: Auto Reset
• Auto Reset Purpose: To specify a time period before the printer restores the default setting for the current menu item and resumes the ready-to-print state when an attempt to change the setting is left unfinished. Values: 45sec* 1min 2min 3min 4min Factory default menu setting... -
Page 170: Adjust Btr
• Low Toner Alert Msg Purpose: To specify whether to show the alert message when the toner is low. Values: Does not show the alert message when the toner is low. Shows the alert message when the toner is low. Factory default menu setting Maintenance Use the Maintenance menu to adjust print settings for each paper type, initialize the Non-Volatile... -
Page 171: Adjust Fusing Unit
• Adjust Fusing Unit Purpose: To specify a temperature of the fusing unit for optimum printing of each paper type. To lower the temperature, specify a negative value. To increase, specify a positive value. The default settings may not yield the best output on all paper types. When the printed paper has curled, try lowering the temperature. -
Page 172: Toner Refresh
Using a non-genuine toner cartridge may make some printer features unusable, reduce print quality and decrease the reliability of your printer. We recommend you use only new Fuji Xerox brand toner cartridges for your printer. We do not provide warranty coverage for problems caused by using non-genuine consumables. -
Page 173: Adjust Altitude
• Adjust Altitude Purpose: To specify the altitude of the location where the printer is installed. The discharge phenomenon for charging the photo conductor varies with barometric pressure. You can specify the altitude of the printer location for adjustment. NOTE: •... -
Page 174: Secure Settings
Secure Settings Use the Secure Settings menu to set a password to limit access to the operator panel menus. This prevents the printer settings from being changed accidentally. • Panel Lock Purpose: To restrict access to Admin Menu and Report/List with a password. See also: •... -
Page 175: Pcl Settings
• PS Data Format Purpose: To set the PS data communications protocol. To make any changes effective, turn off the printer and then turn it back on. Values: Sets the PS data communications protocol automatically. Auto* Sets the PS data communications protocol to Standard. Standard Sets the PS data communications protocol to BCP. -
Page 176: Image Orientation
Env Younaga3 Env Nagagata3 Env Nagagata4 Env Kakugata3 Specifies the length of the custom size paper. Portrait(Y) 297mm*/11.7inc Which factory default menu setting displays Custom depends on the value selected for mm / inch Size 127mm - under the System Settings menu. See "mm 355mm/5.0inch / inch"... - Page 177 • Font Purpose: To select the default font from the fonts installed on the printer. Values: Courier* AlbertusMd ITCBookmanDb CGTimes AlbertusXb ITCBookmanLtIt CGTimesBd Arial ITCBookmanDbIt CGTimesIt ArialBd NwCentSchlbkRmn CGTimesBdIt ArialIt NwCentSchlbkBd CGOmega ArialBdIt NwCentSchlbkIt CGOmegaBd TimesNew NwCentSchlbkBdIt CGOmegaIt TimesNewBd Times CGOmegaBdIt TimesNewIt TimesBd...
-
Page 178: Symbol Set
• Symbol Set Purpose: To specify a symbol set for the specified font. Values: PC-8* PS MATH WINGDINGS PC-8 DN PI FONT DNGBTSMS PC-850 LEGAL ISO-L6 PC-852 ISO-4 PC-1004 PC-8 TK ISO-6 PC-775 WIN L1 ISO-11 WINBALT WIN L2 ISO-15 UCS-2 WIN L5 ISO-17... -
Page 179: Image Enhancement
• Form Line Purpose: To set the number of lines in a page. Values: Select the value in increments of 1. 5-128 Factory default menu setting NOTE: • The printer sets the amount of space between each line (vertical line spacing) based on the Form Line and Image Orientation settings. -
Page 180: Line Termination
• Line Termination Purpose: To add the line termination commands. Values: The line termination command is not added. Off* CR=CR, LF=LF, FF=FF The CR command is added. Carriage Return CR=CR, LF=CR-LF, FF=CR-FF The LF command is added. Line Feed CR=CR-LF, LF=LF, FF=FF The CR and LF commands are added. -
Page 181: Pdf Settings
PDF Settings Use the PDF Settings menu to change printer settings that only affect the PDF jobs. • Quantity Purpose: To specify the number of copies to print. Values: Select a value in increments of 1. 1 - 999 Factory default menu setting •... -
Page 182: Tray Settings
• Output Size Purpose: To specify the output paper size for PDF files. Values: A4 - 210x297* Auto Letter - 8.5x11 Factory default menu setting • Layout Purpose: To specify the output layout. Values: Auto %* 4 Pages Up 2 Pages Up 100% (No Zoom) Factory default menu setting ... - Page 183 Values: Paper Size A4 - 210x297 A5 - 148x210 B5 - 182x257 Letter - 8.5x11 Folio - 8.5x13 Legal - 8.5x14 Executive Statement #10Env - 4.125x9.5 Monarch Env. Monarch Env.L DL Env - 110x220 DL Env L C5 Env - 162x229 148 x 100mm 148 x 200mm Env Yougata2...
-
Page 184: Paper Type
Paper Type Plain* Light Card Labels Envelope Recycled Postcard Factory default menu setting NOTE: • For details on the supported paper sizes, see "Usable Print Media" on page 119. Using the Operator Panel Menus... -
Page 185: Panel Lock Feature
Panel Lock Feature This feature prevents unauthorized users from changing the settings on the operator panel made by the administrator. However, you can modify the settings for individual print jobs using the print driver. This section includes: • "Enabling the Panel Lock Feature" on page 185 •... -
Page 186: Disabling The Panel Lock Feature
Disabling the Panel Lock Feature Press the (Menu) button. Select Admin Menu, and then press the button. Enter the password, and then press the button. Select Secure Settings, and then press the button. Select Panel Lock, and then press the button. -
Page 187: Changing The Power Saver Mode Settings
Changing the Power Saver Mode Settings The printer enters a power saver mode after the specified time period of inactivity. You can set Power Saving Timer to place the printer in either of the power saver modes. Press the (Menu) button. Select Admin Menu, and then press the button. -
Page 188: Resetting To Factory Defaults
Resetting to Factory Defaults Enabling the Initialize NVM feature and rebooting the printer will reset all the printer settings to their factory default menu settings. Press the (Menu) button. Select Admin Menu, and then press the button. Select Maintenance, and then press the button. -
Page 189: Troubleshooting
Troubleshooting This chapter includes: • "Clearing Jams" on page 190 • "Basic Printer Problems" on page 203 • "Display Problems" on page 204 • "Printing Problems" on page 205 • "Print Quality Problems" on page 207 • "Other Problems" on page 217 •... -
Page 190: Clearing Jams
• If you cannot remove the paper jam by doing the procedures in the manual, do not try to forcibly remove the jam. Doing so may cause injuries. Contact your local Fuji Xerox representative. See also: • "About Print Media" on page 116 •... -
Page 191: Avoiding Jams
Avoiding Jams • Use only recommended print media. • "Loading Print Media in the Paper Tray" on page 126 "Loading Print Media in the Priority Sheet Inserter (PSI)" on page 134 to load print media properly. • Do not load print media before turning on the printer. •... -
Page 192: Identifying The Location Of Paper Jams
Do not attempt to remove a paper deeply jammed inside the product, particularly a paper wrapped around the fusing unit or the heat roller. Otherwise, it may cause injuries or burns. Switch off the product immediately and contact your local Fuji Xerox representative. IMPORTANT: •... -
Page 193: Clearing Paper Jams From The Front Of The Printer
Clearing Paper Jams From the Front of the Printer This section includes: • "Clearing Paper Jams From the Paper Tray" on page 193 • "Clearing Paper Jams From the Priority Sheet Inserter (PSI)" on page 196 Clearing Paper Jams From the Paper Tray IMPORTANT: •... - Page 194 Pull the paper tray out of the printer carefully. Hold the tray with both hands, lift the front slightly, and remove it from the printer. Remove all the jammed and/or creased paper from the tray. Pull the jammed paper out carefully to avoid tearing it. Lower the levers to the original position.
- Page 195 Close the rear cover. Insert the paper tray into the printer, and push until it clicks into place. Troubleshooting...
- Page 196 Clearing Paper Jams From the Priority Sheet Inserter (PSI) IMPORTANT: • Do not put excessive force on the front cover when removing the jammed paper. Doing so could damage the cover. • To prevent electric shock, always turn off the printer and disconnect the power cord from the grounded outlet before performing maintenance.
- Page 197 Lower the levers to the original position. Close the rear cover. Troubleshooting...
-
Page 198: Clearing Paper Jams From The Rear Of The Printer
Clearing Paper Jams From the Rear of the Printer IMPORTANT: • To prevent electric shock, always turn off the printer and disconnect the power cord from the grounded outlet before performing maintenance. • To avoid burns, do not clear paper jams immediately after printing. The fusing unit becomes extremely hot during use. - Page 199 Lower the levers to the original position. Close the rear cover. If the error is not resolved, there may be a piece of paper remaining inside the printer. Use the following procedure to clear the jam. Load a print media on the Paper Tray or PSI if there is no print media. Press and hold (Cancel Job) button for more than three seconds.
-
Page 200: Clearing Paper Jams From The Center Output Tray
Clearing Paper Jams From the Center Output Tray IMPORTANT: • To prevent electric shock, always turn off the printer and disconnect the power cord from the grounded outlet before performing maintenance. • To avoid burns, do not clear paper jams immediately after printing. The fusing unit becomes extremely hot during use. - Page 201 Lower the levers to the original position. Close the rear cover. If the error is not resolved, there may be a piece of paper remaining inside the printer. Use the following procedure to clear the jam. Load a print media on the Paper Tray or PSI if there is no print media. Press and hold (Cancel Job) button for more than three seconds.
-
Page 202: Jam Problems
Jam Problems This section includes: • "Misfeed Jam" on page 202 • "Multi-feed Jam" on page 202 Misfeed Jam Problem Action Print media misfeeds occur. Remove the paper from the Priority Sheet Inserter (PSI), and then ensure that the paper is properly inserted in the paper tray. Depending on the print media you use, take any of the following actions: •... -
Page 203: Basic Printer Problems
Basic Printer Problems Some printer problems can be easy to resolve. If a problem occurs with your printer, check each of the following: • The power cord is connected to the printer, and to a properly grounded electrical outlet. • The printer is turned on. -
Page 204: Display Problems
Display Problems Problem Action After the printer is turned on, the Turn off the printer, wait for 10 seconds, and turn on the printer. (Ready) LED is not lit. Menu settings changed from the Settings in the software program, the print driver, or the printer utilities operator panel have no effect. -
Page 205: Printing Problems
Printing Problems Problem Action Job did not print or incorrect Ensure that the (Ready) LED is lit. characters printed. Ensure that print media is loaded in the printer. Verify that you are using the correct print driver. Ensure that you are using the correct Ethernet or USB cable and that it is securely connected to the printer. - Page 206 Problem Action Print media does not stack neatly Turn the print media stack over in the Priority Sheet Inserter (PSI) and in the center output tray. the paper tray. Printer does not duplex pages. Select Flip on Short Edge or Flip on Long Edge from the Duplex menu on the Paper/Output tab of the print driver.
-
Page 207: Print Quality Problems
Print Quality Problems This section includes: • "The Output Is Too Light" on page 208 • "Toner Smears or Print Comes Off/Stain on Back Side" on page 209 • "Random Spots/Blurred Images" on page 210 • "The Entire Output Is Blank" on page 210 •... -
Page 208: The Output Is Too Light
The Output Is Too Light Problem Action The output is too light. The toner cartridge may be low or need to be replaced. Confirm the amount of toner in the toner cartridge. Check the toner level on the Consumables tab of the Printer Status window of the SimpleMonitor. -
Page 209: Toner Smears Or Print Comes Off/Stain On Back Side
Toner Smears or Print Comes Off/Stain on Back Side Problem Action Toner smears or print comes off. The print media surface may be uneven. Try changing the Paper Type setting in the print driver. For example, change Plain to The output has stain on the back Lightweight Cardstock. -
Page 210: Random Spots/Blurred Images
Random Spots/Blurred Images Problem Action The printed result has random Ensure that the toner cartridge is installed correctly. spots or is blurred. See also: • "Installing a Toner Cartridge" on page 232 If you use a non-genuine brand toner cartridge, install a genuine brand toner cartridge. -
Page 211: Streaks Appear On The Output
Streaks Appear on the Output If this trouble happens, contact our local representative office or authorized dealer. Mottle Problem Action The printed result has mottled Adjust the transfer bias. appearance. Click @@@103@ to display the Adjust BTR page. Launch the Printer Setting Utility, click Adjust BTR on the Printer Maintenance tab. -
Page 212: Ghosting
Ghosting Problem Action The printed result has ghosting. The print media surface may be uneven. Try changing the Paper Type setting in the print driver. For example, change Plain to Lightweight Cardstock. On the Paper/Output tab for Printing Preferences of the print driver, change the Paper Type setting. -
Page 213: Fog
Fog Problem Action The printed result is foggy. When the whole is printed light, contact our local representative office or authorized dealer. When the printed page is partly light, start Clean Developer. Click @@@202@ to display the Clean Developer page. Launch the Printer Setting Utility, and click Clean Developer on the Diagnosis tab. -
Page 214: Auger Mark
Auger Mark Problem Action The printed result has auger The toner cartridge may be low or need to be replaced. Confirm the mark. amount of toner in the toner cartridge. Check the toner level on the Consumables tab of the Printer Status window of the SimpleMonitor. -
Page 215: Wrinkled/Stained Paper
Wrinkled/Stained Paper Problem Action The output is wrinkled. Verify that the correct print media is being used. The output is stained. If not, use the print media recommended for the printer. If excessive wrinkles occur, use paper or other media from a new package. -
Page 216: The Top Margin Is Incorrect
The Top Margin Is Incorrect Problem Action The top margin is incorrect. Ensure that the margins are set correctly on the application being used. NOTE: • If the problem continues even though you have taken suggested actions described above, contact our local representative office or authorized dealer. -
Page 217: Other Problems
Other Problems Problem Action Condensation has occurred This usually occurs within several hours after you heat the room in inside the printer. winter. This also occurs when the printer is operating in a location where relative humidity reaches 85% or more. Adjust the humidity or relocate the printer to an appropriate environment. -
Page 218: Understanding Printer Messages
Understanding Printer Messages The printer’s LCD panel displays a message describing the current state of the printer or indicates a possible printer problem you must resolve. This section describes error codes included in the messages, their meanings, and how to clear the messages. IMPORTANT: •... - Page 219 Error Code What You Can Do 091-441 The printer has exceeded its service life or the settings have been changed to continue using it. The quality of printouts will degrade if the printer continues to be used. See also: • "Machine Life" on page 173 092-651 Turn off the printer, and then on.
- Page 220 Error Message What You Can Do Load the specified paper and press the button to clear the Load Paper message. then Press OK See also: AAAA • "Loading Print Media in the Paper Tray" on page 126 BBBB • "Loading Print Media in the Priority Sheet Inserter (PSI)" on AAAAA: Paper size page 134...
-
Page 221: Contacting Service
Contacting Service When you call for printer service, be prepared to describe the problem you are experiencing or the error message on the LCD panel. You need to know the model of your printer and serial number. See the label on the rear cover of your printer. -
Page 222: Getting Help
Getting Help This section includes: • "LCD Panel Messages" on page 222 • "SimpleMonitor Alerts" on page 222 • "Obtaining the Product Information" on page 223 We provide several automatic diagnostic tools to help you produce and maintain print quality. ... -
Page 223: Obtaining The Product Information
The communication fee shall be borne by users. On your print driver's Properties dialog box, click the Configuration tab and then click About. Click Fuji Xerox Web Site. Your web browser starts and our web site is displayed. Follow the instructions on the web site and download an appropriate print driver. -
Page 224: Enabling Non-Genuine Mode
Enabling Non-Genuine Mode When toner within the toner cartridge is empty, the Replace Toner Cartridge message appears. When you want to use the printer in Non-Genuine Mode, enable Non-Genuine Mode and replace the toner cartridge. IMPORTANT: • If you use the printer in Non-Genuine Mode, the performance of the printer may not be at its optimum. And any problems that may arise from the use of Non-Genuine Mode are not covered by our quality guarantee. -
Page 225: Using The Printer Setting Utility (Windows Only)
The following procedure uses Windows 7 as an example. NOTE: • To launch the Printer Setting Utility used in the following procedure, click @@@109@. Click Start All Programs Fuji Xerox Fuji Xerox Printer Software for Asia-Pacific your printer Printer Setting Utility. NOTE: •... - Page 226 Troubleshooting...
-
Page 227: Maintenance
Maintenance This chapter includes: • "Replacing the Toner Cartridge" on page 228 • "Ordering Supplies" on page 234 • "Storing Consumables" on page 236 • "Managing the Printer" on page 237 • "Conserving Supplies" on page 240 • "Checking Page Counts" on page 241 •... -
Page 228: Replacing The Toner Cartridge
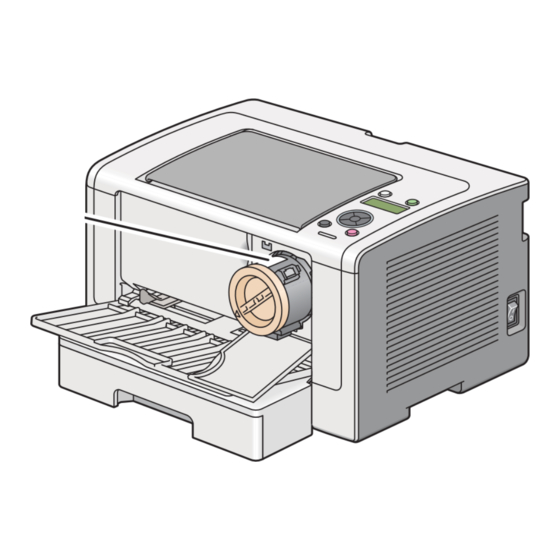
Replacing the Toner Cartridge Genuine toner cartridges are available only through Fuji Xerox. It is recommended that you use a genuine toner cartridge for your printer. Fuji Xerox does not provide warranty coverage for problems caused by using non-genuine consumables. -
Page 229: When To Replace The Toner Cartridge
When to Replace the Toner Cartridge The printer has one toner cartridge: black (K). When a toner cartridge reaches its usable life-span, the following messages appear on the LCD panel. Message Remaining Page Yield Printer Status and Action Approx. 500 pages The toner cartridge has become low. -
Page 230: Removing The Toner Cartridge
Removing the Toner Cartridge Turn off the printer. Open the front cover. Open the toner access cover. Spread a few sheets of paper on the floor or table where you want to place the removed toner cartridge. Turn the toner cartridge counterclockwise to unlock. Maintenance... - Page 231 Pull the toner cartridge out. IMPORTANT: • Do not touch the shutter of the used toner cartridge. • Always pull the toner cartridge out slowly so you do not spill any toner. Place the toner cartridge slowly on the sheets of paper you spread in step Maintenance...
-
Page 232: Installing A Toner Cartridge
Installing a Toner Cartridge Unpack a new toner cartridge and shake it five times to distribute the toner evenly. NOTE: • Handle the toner cartridge carefully to avoid spilling of the toner. Insert the toner cartridge into the cartridge holder, and then turn it clockwise to align to the lock mark. - Page 233 Close the toner access cover. Make sure that the cover clicks into place. Close the front cover. Pack the removed toner cartridge in the box in which the installed toner cartridge was packed up. Taking care not to touch any spilled toner, dispose of the sheets of paper you used for toner cartridge replacement.
-
Page 234: Ordering Supplies
• The printable number of pages for the starter toner cartridge shipped with the printer is approximately 1,000 pages on DocuPrint P255 dw and 2,500 pages on DocuPrint P255 d. • Each toner cartridge includes installation instructions on the box. -
Page 235: Recycling Supplies
Recycling Supplies • For environmental protection and efficient use of resources, Fuji Xerox reuses returned toner cartridges and drums (photoreceptors) to make recycle parts, recycle materials or energy recovery. • Proper disposal is required for toner cartridges no longer needed. Do not open toner cartridges. -
Page 236: Storing Consumables
Storing Consumables Store consumables in their original packaging until you need to use them. Do not store consumables • Temperatures greater than 40 °C (140 °F). • An environment with extreme changes in humidity or temperature. • Direct sunlight. • Dusty places. -
Page 237: Managing The Printer
Managing the Printer This section includes: • "Checking or Managing the Printer with the CentreWare Internet Services" on page 237 • "Checking Printer Status with the SimpleMonitor (Windows Only)" on page 238 • "Checking Printer Status Through E-mail" on page 239 ... -
Page 238: Checking Printer Status With The Simplemonitor (Windows Only)
If the SimpleMonitor icon is not displayed on the taskbar, open the SimpleMonitor from the Start menu. The following procedure uses Microsoft Windows 7 as an example. Click Start All Programs Fuji Xerox Fuji Xerox Printer Software for Asia-Pacific your printer SimpleMonitor-Btype for Asia-Pacific. The Printer Selection window appears. -
Page 239: Checking Printer Status Through E-Mail
Checking Printer Status Through E-mail When connected in a network environment where e-mail exchange is available, the printer can send an e-mail report to specified e-mail addresses containing the following information: • The network settings and the printer status •... -
Page 240: Conserving Supplies
Conserving Supplies You can change several settings of your print driver to conserve toner and paper. Supply Setting Function Toner cartridge Toner Saving Mode in This check box allows the users to select a print mode the Graphics tab of the that uses less toner. -
Page 241: Checking
Checking Page Counts You can print the System Settings page to check the total number of printed pages. The total number of printed pages is shown in the Print Volume section, classified by paper sizes. Single side print (including Multiple Up print) is counted as one job, and 2-sided print (including Multiple Up print) is counted as two. -
Page 242: Moving The Printer
Moving the Printer IMPORTANT: • Printer must be moved or stored top-side up after usage or it may break down. Maintenance... - Page 243 Turn off the printer. Disconnect the power cord, interface cable, and any other cables. Remove all paper from the center output tray and close the output tray extension, if open. Maintenance...
- Page 244 Remove the paper tray from the printer. Lift the printer and move it gently. NOTE: • If you move the printer over a long distance, be sure to remove the toner cartridge and pack the printer inside a box to avoid spilling of the toner. Place the printer at a new location and replace the paper tray.
-
Page 245: Contacting Fuji Xerox
Contacting Fuji Xerox This chapter includes: • "Technical Support" on page 246 • "Online Services" on page 247 Contacting Fuji Xerox... -
Page 246: Technical Support
Technical Support Fuji Xerox recommends the Customer first utilize support materials shipped with the product, product diagnostics, information contained on the Web, and e-mail support. If unsuccessful, to obtain services under product warranty, the Customer must notify Fuji Xerox Telephone Support or its authorized service representative of the defect before the expiration of the warranty period. -
Page 247: Online Services
You can find detail Product and Consumable warranty information and activate your warranty by registering your details on our web site at http://www.fujixerox.com/support/docuprint/. Fuji Xerox Online Support Assistant provides instructions and troubleshooting guides to resolve your printer problems. It is an easy-to-use, searchable online Help. To find out more, please visit our online support at http://www.fujixerox.com/support/docuprint/. - Page 248 Contacting Fuji Xerox...
- Page 249 Index Numerics Density Adjustment Dimensions 2 Sided Options Display problems Draft Mode Duplex printing Adjust Altitude Adjust BTR Adjust Fusing Unit Electrical safety Admin Menu Energy Saver button/LED Auto Reset Envelope Automatic duplex printing Error and warning messages Avoiding jams Error History Error LED Ethernet...
- Page 250 Labels Page description language Launcher Panel Lock Layout Panel Settings Panel Settings Page LCD panel Paper capacity LCD panel messages Paper chute Levers Paper jam location License Center output tray Light Card Front cover Line Termination Levers Liquid Crystal Display OPC drum Loading envelopes Paper tray...
- Page 251 Print media Dimensions Safety Print Mode Electrical Print quality problems Operational Printer Secure Settings Managing SimpleMonitor alerts Messages SNMP Moving Software Download Status Software installation Printer messages Specifications Printer Setting Utility Standard Paper and Tested Paper Printer software StatusMessenger Printer status Configuring Printing Storing consumables...
- Page 252 XML Paper Specification print driver Index...
Need help?
Do you have a question about the DocuPrint P255 d and is the answer not in the manual?
Questions and answers