Table of Contents
Advertisement
Quick Links
Advertisement
Table of Contents

Related Manuals for Fuji Xerox DocuPrint P505 d


Summary of Contents for Fuji Xerox DocuPrint P505 d
- Page 1 User Guide...
- Page 2 The data saved in the hard disk of the machine may be lost if there is any problem in the hard disk. Fuji Xerox is not responsible for any direct and indirect damages arising from or caused by such data loss. Fuji Xerox is not responsible for any breakdown of machines due to infection of computer virus or computer hacking.
-
Page 3: Table Of Contents
Table of Contents Table of Contents Before Using the Machine ........................9 Preface ................................... 10 Types of Manuals .............................. 11 Important Security Instructions ........................12 Using This Guide..............................13 Organization of This Guide ........................13 Conventions..............................14 Setting Up the Printer (Printer Setup).................... 15 Connecting and Setting Up Your Printer .................... - Page 4 Printing on Special Paper..........................49 Printing ...............................59 Printing ...................................60 Sending a Job to Print..........................60 Canceling a Print Job..........................60 Duplex Printing .............................61 Using Stored Print............................63 Print From USB..............................65 Printing With Wi-Fi Direct.........................66 Mobile Printing..............................68 AirPrint................................68 Google Cloud Print™ ...........................69 Mopria™ Print Service..........................73 Device................................75 Device ..................................76 Language ................................76...
- Page 5 Table of Contents Supplies ................................94 Billing/Usage..............................94 Quick Links..............................95 Apps ..................................97 Preferences ..............................97 Installed Apps............................... 97 Jobs ..................................98 List of Active Jobs............................98 List of Completed Jobs..........................98 Deleting a Job............................... 98 Policies ................................98 Connectivity.................................
- Page 6 EAP-TTLS CHAP)............................150 Authentication and Accounting Features...................151 User Authentication and Accounting ..................... 152 Types of User.............................. 152 Roles ................................152 Types of Authentication ........................153 Types of Account Administration....................... 153 Authentication and Accounting Relationship ................154 User Authentication Operations......................154 Creating and Editing User Accounts ....................
- Page 7 Table of Contents IPv4 and IPv6 Connection Problems....................196 Error Code................................198 "005-001" - "011-999" ..........................198 "012-001" - "012-999" ..........................199 "013-001" - "015-999" ..........................200 "016-001" - "016-999" ..........................200 "017-001" - "017-999" ..........................215 "018-001" - "020-999" ..........................218 "021-001" - "022-999" ..........................224 "023-001" - "025-999" ..........................227 "026-001"...
- Page 8 Automated Meter Reading........................277 Check or Maintenance Request of the Machine................277 Automated Alert Notification......................277 Timely Delivery of Consumables ......................277 Remote Modification of the Settings ....................277 Software Upgrade ............................ 277...
-
Page 9: Before Using The Machine
Before Using the Machine... -
Page 10: Preface
Before Using the Machine Preface Thank you for selecting the DocuPrint P505 d (hereafter referred to as "the printer" or "the machine"). This guide describes how to operate the machine and the precautions you should follow during operation. To get the most out of the machine and to use it effectively, be sure to read this guide before use. -
Page 11: Types Of Manuals
Types of Manuals Types of Manuals The following guides are provided with the machine. Accompanying Manuals Software/Product Manual (CD) The guides in this media describe how to operate and maintain the machine. Safety Guide The guide describes precautions you should follow for safe use of the machine. Be sure to read this guide first. -
Page 12: Important Security Instructions
Before Using the Machine Important Security Instructions The Security Warning screen is displayed before the Home screen when any one of the following conditions is fulfilled and you enter the System Administration mode. The system administrator's passcode is the default value. The SNMP protocol's community name and authentication password are default values. -
Page 13: Using This Guide
Using This Guide Using This Guide Organization of This Guide This guide consists of the following chapters: 1 Before Using the Machine Describes how to use this guide. 2 Setting Up the Printer (Printer Setup) Describes how to connect the printer to your computer and network, and how to install the software into your computer. -
Page 14: Conventions
Before Using the Machine Conventions The screen shots and illustrations used in this guide vary depending on the machine configuration and optional components installed. Some of the items in the screen shots may not be displayed or available depending on your machine configuration. ... -
Page 15: Setting Up The Printer (Printer Setup)
Setting Up the Printer (Printer Setup) -
Page 16: Connecting And Setting Up Your Printer
Setting Up the Printer (Printer Setup) Connecting and Setting Up Your Printer To connect your printer to a computer or device, the following specification must be met for each of the connection type: Connection type Connection specifications Ethernet 10BASE-T/100BASE-TX/1000BASE-T USB3.0 Wireless (optional) IEEE 802.11n/802.11g/802.11b/802.11a Connecting to a Computer or a Network... -
Page 17: Turning On/Off The Printer
Connecting and Setting Up Your Printer Connecting to a Network Using the Ethernet Cable Connect the Ethernet cable. Ethernet To connect the printer to a network, connect one end of the Ethernet cable into the Ethernet port on the rear of the printer, and the other end to a LAN drop or hub. Connecting to a Wireless Network See "Configuring the Wireless Settings"... -
Page 18: Configuring Initial Settings On The Control Panel
Setting Up the Printer (Printer Setup) Configuring Initial Settings on the Control Panel When you turn on the printer for the first time, the install wizard screen to perform the initial setup appears on the control panel. Follow the wizard to configure the initial settings, including the following: ... -
Page 19: Configuring The Wireless Settings
Connecting and Setting Up Your Printer Click [Quick Setup] on the main menu screen of the setup program. Accept the terms of the license agreement and click [Next]. The program begins to search for your printer. Wait for the Quick Setup wizard to find your printer. For a network (wired) printer, select your printer after the printer is found, and then click [Next]. - Page 20 Setting Up the Printer (Printer Setup) Determining the Wireless Network Settings You need to know the settings for the wireless network to set up the wireless printer. For details of the settings, contact your network administrator. [Wireless SSID A name with up to 32 alphanumeric characters, which identifies the Settings] wireless network Network...
- Page 21 Connecting and Setting Up Your Printer Note The optional Wireless LAN Kit must be installed on the printer. WPS-PBC You can start Push Button Configuration only from the control panel. Press the Home button. Tap [Device] > [Connectivity] > [Wi-Fi]. Tap [Manual Setup].
- Page 22 Setting Up the Printer (Printer Setup) Enter the login information. When the encryption type of the selected access point is WEP, WPA2 Personal or Mixed Mode PSK (AES/TKIP) in step 3: 1) Enter the password in the [Enter Password] text box. 2) Tap [OK].
- Page 23 Connecting and Setting Up Your Printer 2) Tap [Mode] to select the authentication method from [PEAPv0 MS-CHAPv2], [EAP-TLS], [EAP-TTLS/CHAP], [EAP-TTLS/PAP] or [EAP-TTLS/MSCHAPV2]. If you select any authentication method for Mixed Mode Enterprise (AES/TKIP) or [PEAPv0 MS-CHAPv2] for WPA2 Enterprise, proceed to substep c. If you select [EAP-TLS], [EAP-TTLS/CHAP], [EAP-TTLS/PAP] or [EAP-TTLS/MSCHAPV2] for WPA2 Enterprise, proper security certificates need to be installed using CentreWare Internet Services.
- Page 24 Setting Up the Printer (Printer Setup) Select the encryption type from [No Encryption], [WEP], [WPA2 Personal], [WPA2 Enterprise], [Mixed Mode Personal (AES/TKIP)] or [Mixed Mode Enterprise (AES/TKIP)] in the [Encryption] drop-down list box, and then set each item for the encryption type selected.
-
Page 25: Setting The Ip Address
Setting the IP Address Setting the IP Address Assigning an IP Address You can select the IP mode from Dual Stack, IPv4, and IPv6. If your network supports both IPv4 and IPv6, select Dual Stack. Select the IP mode of your environment, and then set IP address, subnet mask (for IPv4 only), and gateway address. -
Page 26: Verifying The Ip Settings
Setting Up the Printer (Printer Setup) Verifying the IP Settings You can confirm the settings by using the control panel or printing the configuration report. Verifying the IPv4 Settings Using Control Panel Press the Home button. Tap [Device] > [About]. Verify the IP address displayed in [IPv4:] under [Network]. -
Page 27: Installing Printer Drivers On Computers
Installing Printer Drivers on Computers Installing Printer Drivers on Computers Configuration on the Computer To print from the machine, you need to install a print driver on your computer. Reference For information on the driver installation procedures, refer to the Media Information contained in the Media (Software/Product Manual). - Page 28 Setting Up the Printer (Printer Setup)
-
Page 29: Product Overview
Product Overview... -
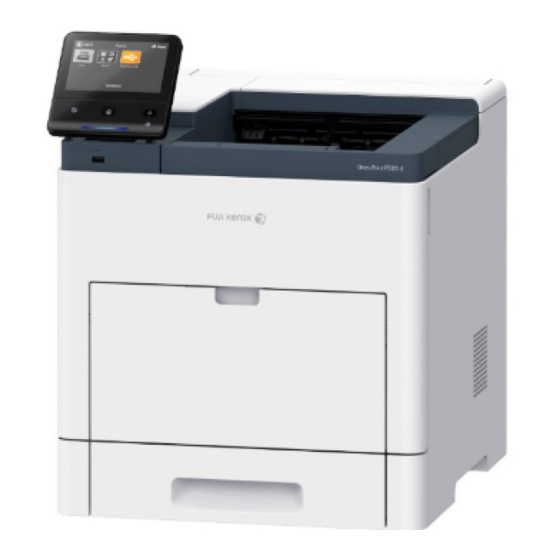
Page 30: Machine Components
Product Overview Machine Components The following describes machine components and their functions. Front and Rear Views Front View 1 Tray 1 2 Tray 2 (optional) 3 Tray 3 (optional) 4 Tray 4 (optional) 5 Tray 5 (optional) 6 Output Tray Extension 7 Output Tray 8 Control Panel 9 USB Memory Port... - Page 31 Machine Components Rear View 1 Transfer Roller 2 Fusing Unit 3 Rear Door 4 Wireless LAN Kit Port Cover 5 USB Port, Type B 6 Ethernet Port 7 Left-Side Panel 8 Power Connector...
-
Page 32: Control Panel
Product Overview Control Panel 1 Touch Screen Display 2 Power Button 3 Home Button 4 NFC (Near Field Communication) 5 Status LED Internal Parts 1 Toner Cartridge 2 Drum Cartridge... -
Page 33: Finisher And 4-Bin Mailbox (Optional)
Machine Components Finisher and 4-Bin Mailbox (Optional) Finisher 4-Bin Mailbox High-Capacity Feeder, Cabinet, and Caster (Optional) 1 High-Capacity Feeder 2 Cabinet 3 Caster... -
Page 34: Control Panel
Product Overview Control Panel About the Home Screen 1 Log In 2 Reset 3 Tiles 4 Customize Log In Select this button to log in. Reset Resets the printer. Tiles Displays the tiles of the functions you can select from. Customize Select this button to change the tile layout. -
Page 35: Moving, Adding Or Removing The Tiles
Control Panel Moving, Adding or Removing the Tiles Tap [Customize] to change the tile layout. To Move the Tiles Tap and hold the tile you want to move, and drag it to the desired place. Tap [Done] to save the changes. To Add the Tiles Tap [Add] and select the item you want to add. -
Page 36: Setting The Power Saver Timers
Product Overview Select [OK] on the [Language] screen to save the settings. Setting the Power Saver Timers You can set the power saver timers for the printer. The printer enters the power saver mode when the printer is not used for a certain period of time. On the Home screen, select [Device]. -
Page 37: Paper And Other Media
Paper and Other Media... -
Page 38: Paper Types
To achieve optimum performance of the machine, we recommend that you use only paper recommended by Fuji Xerox. If you want to use paper not recommended by Fuji Xerox, contact our Customer Support Center. WARNING Do not use conductive paper such as origami paper, carbonic paper or conductivelycoated paper. -
Page 39: Supported Paper Type
Standard Paper When printing on commonly used paper (plain paper), use paper meeting the standards described below. To print as clear as possible, we recommend the following standard paper. Fuji Xerox P Xerox Vitality Multipurpose Paper Supported Paper Frequently used in offices other than the standard paper. - Page 40 Paper and Other Media Unusable Paper Using paper not recommended by Fuji Xerox may cause a paper jam or machine malfunction. Use paper recommended by Fuji Xerox. The following paper cannot be used with the machine. Transparencies Symphony (Pastel Pink etc) Damp or wet paper ...
-
Page 41: Loading Paper
Loading Paper Loading Paper This section describes how to load paper. Loading Paper in Trays 1 to 5 The following describes the procedure for loading paper in Trays 1 to 5. Note You can adjust the length of the trays to accommodate A4, A5, B5, Letter (8.5 x 11"), and Legal (8.5 x 14") paper sizes. - Page 42 Paper and Other Media For paper sizes other than Legal, adjust the paper guides as illustrated. 7.25” 8.5” 10.5” 11” For Legal-size paper, to extend the front of the tray, press the release latch, then pull the tray out. When the tray is extended for Legal-size paper, place the tray cover over the protruding part of the tray to protect the paper.
- Page 43 Loading Paper Fan the paper well, and align the edges of the paper stack on a level surface to avoid paper jams and misfeeds. Load paper into the tray with the print side face up. Load hole-punched paper with the holes to the left. ...
-
Page 44: Loading Paper In Bypass Tray
Paper and Other Media Loading Paper in Bypass Tray Open the Bypass Tray. If the Bypass Tray is loaded with paper already, remove any different size or type of paper. For larger paper sizes, pull out, then open the Bypass Tray extension. Move the paper guides toward the outside edges of the tray. - Page 45 Loading Paper Fan the paper well, and align the edges of the paper stack on a level surface to avoid paper jams and misfeeds. Note Do not unpack paper until you are ready to use the paper. Load the paper in the tray. Note ...
- Page 46 Paper and Other Media For 1-sided printing, load letterhead or pre-printed paper face up with the top edge going into the printer. For 2-sided printing, load letterhead and pre-printed paper face down with the top edge going into the printer. Adjust the paper guides to align the edges of the paper loaded.
-
Page 47: Loading Paper In The High-Capacity Feeder
Loading Paper To select a different paper color, touch the current paper color, and then select the appropriate color from the list. 3) Select [OK] to save the settings. Loading Paper in the High-Capacity Feeder The High-Capacity Feeder tray accommodates 8.5 x 11" / A4 paper only and is loaded in the short-edge feed (SEF) direction. - Page 48 Paper and Other Media Load the paper into the tray. Note Do not load paper above the maximum fill line. It may cause paper jams or machine malfunction. Push in the tray until it stops. If [Tray Mode] is set to [Fully Adjustable], the printer prompts you to set the paper type, size and color.
-
Page 49: Setting The Tray Mode
Loading Paper To select a different paper color, touch the current paper color, and then select the appropriate color from the list. 3) Select [OK] to save the settings. Setting the Tray Mode Tray Mode defines the printer behavior when a paper conflict or mismatch occurs. Configuring the Tray Mode for Trays 1 to 5 and High-Capacity Feeder Press the Home button. - Page 50 Paper and Other Media Do not use padded envelopes. Use envelopes that lie flat on a surface. Do not use envelopes with heat-activated glue. Do not use envelopes with press-and-seal flaps. Loading Envelopes in the Bypass Tray Open the Bypass Tray.
- Page 51 Loading Paper To load the envelopes, select an option: Note To prevent jams, ensure that the leading edge of the envelopes are flat or have only a slight upward curl, less than 5 mm, before loading into the tray. If the edge is curled or swollen, fold it over to decurl. The length of the curl must be within 8-10 mm.
- Page 52 Paper and Other Media - Load envelopes with the print-side up, flaps open and down, and the bottom of the envelope going into the printer. - Load envelopes with the print-side up, flaps closed and down, and flaps going into the printer.
- Page 53 Loading Paper - Load envelopes with the print-side up, flaps closed and down, and short edge going into the printer. Note To print correctly, load envelopes with the flaps open. In the print driver, select [Portrait], [Landscape], or [Rotated Landscape], as needed. To flip the images, select [Rotate Image 180 Degrees]. Adjust the paper guides to align the edges of the envelopes.
- Page 54 Paper and Other Media Adjust the paper guides as illustrated. 7.25” 8.5” 10.5” 11” Load envelopes in the trays with the flaps closed, flap-side down, and the short edge leading into the printer. Note Do not load more than 50 envelopes into the tray, up to 45 mm in height. Adjust the paper guides to align the edges of the envelopes.
- Page 55 Loading Paper From the [Print] dialog on your computer, select the paper setting values and click [OK]. To feed and print the envelopes, click [Print]. Labels You can print labels from the Bypass Tray or Tray 1. Guidelines for Printing Labels Use labels designed for laser printing.
- Page 56 Paper and Other Media For larger paper sizes, pull out, then open the Bypass Tray extension. Move the paper guides toward the outside edges of the tray. Load label sheets in the Bypass Tray, face up, with the top edge of the page feeding into the printer first.
- Page 57 Loading Paper To select a size, touch the current size setting, and then select the appropriate size from the list. To select the color, touch the current paper color, and then select the appropriate color from the list. 3) Select [OK] to save the settings.
- Page 58 Paper and Other Media Insert Tray 1 into the printer, then push it all the way in. If [Tray Mode] is set to [Fully Adjustable], the printer prompts you to set the label sheet size, type and color. 1) If the paper size, type, and color are correct, select [OK]. 2) If the paper size, type, or color are incorrect, change the settings.
-
Page 59: Printing
Printing... -
Page 60: Printing
Printing Printing This section covers tips for printing, how to print certain information from your printer, and how to cancel a job. Sending a Job to Print Install the printer driver to use all the features of the printer. When you choose [Print] from an application, a window representing the printer driver opens. -
Page 61: Duplex Printing
Printing Select [Delete]. Canceling a Job From a Computer ® Canceling a Job From the Taskbar (Windows Only) When you send a job to print, a small printer icon appears in the bottom right corner of the taskbar. Double-click the printer icon. A list of print jobs appears in the printer window. - Page 62 Printing For OS X: The following procedure uses TextEdit on OS X 10.10 as an example. Open the file you want to print. From the [File] menu, select [Print]. Make sure that the [Two-Sided] check box is selected in the dialog box. In the print options pop-up menu, select [Layout].
-
Page 63: Using Stored Print
Printing Flip on Short Edge Assumes binding along the short edge of the page (top edge for portrait orientation and left edge for landscape orientation). The following illustration shows short-edge binding for portrait and landscape pages: Portrait Landscape Using Stored Print When you send a job to the printer, you can specify in the printer driver to store the job in the memory. - Page 64 Printing Procedures for Printing Stored Jobs Note The stored print feature is available when using the PCL or PS driver. Press the Home button. Select [Jobs]. Select a job to print. Printing Secure Print Jobs From Control Panel This section describes how to print the Secure Print jobs.
-
Page 65: Print From Usb
Printing Select [Jobs]. Select a job to delete. Select [Delete]. Note Secure Print jobs will be deleted after printing. Existing jobs will be deleted at a time designated in the CentreWare Internet Services. For details, see "Stored Print Job Settings" (P.98). Print From USB The [Print from USB] feature allows you to print files stored in a USB flash drive without using a computer. -
Page 66: Printing With Wi-Fi Direct
Printing Printing With Wi-Fi Direct This section provides information for Wi-Fi Direct printing. Wi-Fi Direct allows your Wi-Fi mobile devices such as computers, smart phone, and tablets, to connect to the printer directly via a Wi-Fi network. With Wi-Fi Direct, you can print documents, photos, or e-mails on your Wi-Fi mobile devices directly without any wireless access point. - Page 67 Printing Connecting the Mobile Device Connect the mobile device to the Wi-Fi Direct network. ® ® The following procedure uses Windows 7, Windows 10, OS X 10.11, iOS, and Android as examples. ® For Windows 1) Click the network icon on the taskbar. 2) Click the printer's SSID, and then click [Connect].
-
Page 68: Mobile Printing
Printing Install the print driver on the mobile device. ® ® For Windows 7, Windows 10, OS X 10.11: You need to install the printer driver on the mobile device. See "Installing Printer Drivers on Computers" (P.27). For iOS: You need to install the printing program from App Store, and then the printer is ready for use. -
Page 69: Google Cloud Print
Printing Printing via AirPrint The following procedure uses the iPhone running iOS 8.1 as an example. Open the email, photo, web page, or document you want to print. Tap the action icon Tap [Print]. Select your printer and set printer options. Tap [Print]. - Page 70 Printing Selecting the Version of the Google Cloud Print Select the version of the Google Cloud Print from either version 1.1 or version 2.0. Google Cloud Print version 1.1 sends the print data to the printer via Internet. For this version, the printer needs to be connected to the Internet.
- Page 71 Printing For Google Cloud Print Version 2.0 Launch the Google Chrome browser. When you are using the Google Chromebook, start and log in to the Chromebook. Click in the top right corner, and select [Settings]. Click [Show advanced settings]. Click [Manage] under the [Google Cloud Print] menu.
- Page 72 Printing In the window to specify the printer sharing, enter the Google accounts of the users you want to invite to share the printer, and click [Share]. Note When the invited users log in to the Google Cloud Print web page, a message appears to show that the printer owner made the sharing settings.
-
Page 73: Mopria Print Service
Printing Choose your printer from the Google Cloud Print™ area. Note When your printer is registered to Google Cloud Print™ version 2.0, you can print the document by way of the local print with the printer in your local network. In this case, select your printer in [Local Destinations]. Click [Print]. - Page 74 Printing Printing via Mopria Print Service Open the e-mail, photo, web page, or document that you want to print. Tap the menu, and then select [Print]. Tap [All printers] in the menu. Select the printer, and then set printer options. Tap [Print].
-
Page 75: Device
Device... -
Page 76: Device
Device Device The [Device] app allows you to view the printer status and set the general settings of the printer. Note The displayed features may vary depending on your settings. You can scroll the feature list up and down. Language Language Select the language you want to use on the touch panel. -
Page 77: Supplies
Device Supplies See "Supplies" (P.94). Billing/Usage Selecting [Billing/Usage] allows you to check the billing information. The [Billing/Usage] screen shows [Serial Number], [Counter] and [Usage Counters]. In the [Usage Counters] screen, you can check the detailed usage counters. You can filter the counters by setting the filter (set to [All] by default) over the counter. - Page 78 Device Daylight Savings Time Select this to enable daylight saving time. Date Format Select a date format. [mm/dd/yyyy] [dd/mm/yyyy] [yyyy/mm/dd] Use 24 Hour Clock Select this to use 24-hour clock. To use 12-hour clock, deselect this. System Timeout Specify the time lapsed without any operation on the control panel until the machine resets the settings automatically.
-
Page 79: Connectivity
Device Low Power Timeout Specify a time period to enter the Low Power mode after the last operation. Sleep Timeout Specify a time period to enter the Sleep mode after entering the Low Power mode. Auto Power Off Select this to automatically turn the printer off after a specified time has elapsed from the Sleep mode. - Page 80 Device [BOOTP] The address, subnet mask, and gateway address will automatically be set via BOOTP. Note This is displayed only when this option is configured on CentreWare Internet Services. [DHCP] The address, subnet mask, and gateway address will automatically be set via DHCP. ...
- Page 81 Device Mode Select a mode from [DHCP] and [STATIC]. Primary Server, Alternate Server 1, Alternate Server 2 Set DNS server addresses. IPv6 Servers Tap this to set addresses. Mode Select a mode from [DHCP] and [STATIC]. ...
- Page 82 Device [Mixed Mode Enterprise (AES/TKIP)] Note When [Network Type] is set to [Ad hoc], [WPA2 Personal] and [WPA2 Enterprise] are not available. Wi-Fi Protected Setup (WPS) Select [PBC] to configure the network with WPS-PBC. Select [PIN] to configure the network using PIN code assigned automatically by the printer. ...
- Page 83 Device Setup Tap this for Wi-Fi Direct settings. Group Role Select [Auto] to automatically resolve the group role for Wi-Fi Direct according to the group formation. Select [Group Owner] to make it possible for your Wi-Fi mobile devices to discover this printer.
- Page 84 Device Add Exceptions Enter an address that is not to use the proxy. To remove an address, tap the trash box icon and select [Remove Exception]. To edit an address, tap the trash box icon and select [Edit Exception]. ...
-
Page 85: Support
[SMTP Communication Report] Altitude Adjustment Specify the altitude of the location where the printer is installed. Non-Fuji Xerox Toner Cartridges Enable or disable the non-genuine toner mode. Developer & Transfer Roller Cleaning See "Performing a Developer and Transfer Roller Cleaning Procedure" (P.173). -
Page 86: Resets
Device Transfer Voltage Adjustment Adjust the transfer voltage. To lower the voltage, set negative values. To increase, set positive values. The default settings may not give the best output on all paper types. If you see mottles on the print output, try to increase the voltage. If you see white spots on the print output, try to decrease the voltage. -
Page 87: Centreware Internet Services
CentreWare Internet Services... -
Page 88: Overview
CentreWare Internet Services Overview Use CentreWare Internet Services to monitor the status of your network printer without leaving your desk. You can view and/or change the printer settings, monitor toner level, and acknowledge the timing of ordering replacement consumables. If you are a network administrator, you can copy the printer settings to one or all printers on the network using your web browser. -
Page 89: Setting Up The Centreware Internet Services
Setting Up the CentreWare Internet Services Setting Up the CentreWare Internet Services Ensure that you activate JavaScript in your browser before using the CentreWare Internet Services. Follow the procedures below to configure the environment settings of your web browser before using the CentreWare Internet Services. Note ... -
Page 90: Starting The Centreware Internet Services
CentreWare Internet Services Starting the CentreWare Internet Services To launch the CentreWare Internet Services, enter the IP address of your printer in your web browser. Note See "Verifying the IP Settings" (P.26). -
Page 91: Overview Of The Menu Items
Overview of the Menu Items Overview of the Menu Items The CentreWare Internet Services consists of the following menus: Home The Home screen consists of the following menus: [Notifications], [Trays], [Supplies], [Billing/Usage], and [Quick Links]. Use those menus to get immediate feedback on the printer status or to jump to useful services. -
Page 92: Page Display Format
You can go to the corresponding page by selecting their characters. When you click the Fuji Xerox logo at the bottom of the left frame, our website appears in a new window. -
Page 93: Home
Device Details Allows you to view and edit the following items. Device Name Set the name of the printer. Fuji Xerox Asset Tag Reserved for Xerox use to identify the printer. Customer Asset Tag Set the asset tag for the printer. -
Page 94: Supplies
CentreWare Internet Services Size, Type, Color Specify the size, type, and color of paper that can be loaded on the tray as necessary. Auto Select Specify whether to set the tray as a target of automatic tray selection. Priority Specify the priority order of the tray for automatic tray selection. Supplies Displays the status of supplies. -
Page 95: Quick Links
Home Usage Counters You can check the detailed usage counters. Note "Impressions" in Usage Counters means the counts of images. For example, 2-sided printing increases the impressions by two. [Total Impressions] Displays the total number of [Black Impressions]. [Black Impressions] Displays the total number of pages printed in black and white. - Page 96 CentreWare Internet Services [App Customization] [Connections] [Mobile Printing] [Protocols] [Authentication, Authorization, Accounting, Personalization] [Logs] [Date & Time] [Security] [Timeouts] [Power Saver] [PDL Settings] [Defaults and Policies] [Job Management] [Software Update] [Supplies Management] [Notifications] [Internationalization] [Support Information] Support Displays the support information. ...
-
Page 97: Apps
Apps Apps Allows you to configure the settings related to the apps used on the control panel. Preferences Walkup Screen Set the screen displayed after powering on the machine or canceling the Power Saver mode. Installed Apps The list of installed apps is displayed. Select each app to confirm or change the app information and settings. -
Page 98: Jobs
CentreWare Internet Services Jobs The [Jobs] menu contains information on the list of active jobs and completed jobs. These pages show the details of the status regarding each job. Note The jobs stored as Secure Print jobs can only be displayed in the job list on the control panel. List of Active Jobs Displays the jobs that are being processed. -
Page 99: Connectivity
Connectivity Connectivity Note The displayed features may vary depending on your settings. When wired and wireless connections are used at the same time, it is recommended to use different subnets for the primary and secondary network interfaces. Either the wired or wireless connection can be designated as the primary network interface. Only the primary network interface can use the following protocols: IPsec, SMTP, SNTP, WSD Scan , SMB Scan, LDAP, Email Notifications, FTP Server and WebDAV. - Page 100 CentreWare Internet Services IPv4 Click [Edit] for the settings. Mode: Allows you to select a method for obtaining the IP address, subnet mask, and gateway address. DHCP with Auto IP The address, subnet mask, and gateway address will automatically be set via DHCP/AutoIP. If the machine fails to communicate with the DHCP server, the AutoIP function is automatically enabled and an IP address (169.254.xxx.xxx) is assigned to the machine.
- Page 101 Connectivity DHCPv6 Purpose Select a purpose of using DHCPv6. [Directed by Router] [Address Assignment and Configuration Data] [Configuration Data] DHCPv6 Address: Displays the DHCPv6 address. Manual Address: Allows you to select whether or not to configure the IPv6-address settings manually. Manual Address ...
- Page 102 CentreWare Internet Services DNS Search Domains Generate Domain Search List Automatically Select this to automatically generate a search list. Primary Domain, Alternate Domain 1, Alternate Domain 2 Enter domains when you disable [Generate Domain Search List Automatically]. ...
- Page 103 Connectivity TCP/IP Settings Allows you to see the following TCP/IP settings or to select and specify each of them. Common Displays the host name. IPv4 Displays the IPv4 address. IPv6 Displays the IPv6 address. Displays the domain name. ...
- Page 104 CentreWare Internet Services EAP-Identity Specifies the EAP identity for the first authentication. Login Name Specifies the login name to be used for the second authentication for EAP-Enterprise. Up to 32ASCII characters are available. The entry can be the same string as [EAP-Identity]. ...
- Page 105 Connectivity Wi-Fi Direct Enable Select this to enable the Wi-Fi Direct network. Note In multi-interface environment, Wi-Fi Direct becomes disabled if the address range is duplicated with Wi-Fi. Paired Device Displays the status of the Wi-Fi Direct connections between the printer and connected devices.
-
Page 106: Mobile Printing
CentreWare Internet Services Enable Select whether to enable Near Field Communication (NFC). Note To use the NFC feature, you need to enable this item, enable [Plug-In Feature] in [System] >[Plug-in Settings] of the CentreWare Internet Services, and restart the machine. Mobile Printing You can configure settings related to the Mobile Printing feature. -
Page 107: Protocols
Connectivity Protocols Bonjour Port Select this to use Bonjour. Wide-Area Bonjour Select this to enable the Wide-Area Bonjour protocol. Note In multi-interface environment, this setting is for primary interface only. Host Name Enter the host name. ... - Page 108 CentreWare Internet Services Proxy Setup Select a type of proxy connections. This is displayed when you are using multiple interfaces. [Common Proxy] [Different Proxies] Setup Select a type of proxy server settings. To set up automatically, select [Automatic]. To enter the URL of a configurations script, select [Configuration Script].
- Page 109 Connectivity on Devices (WSD)). For IPPS, you can use 443 (HTTPS), and cannot use 80 (HTTPS) or a well-known port (HTTPS). TBCP Filter Select this to enable TBCP filter for PostScript data. When the transmission data includes binary data or EPS data, disable this. ...
- Page 110 CentreWare Internet Services Specify Destination IPv4 Address Set the IPv4 address of the destination. When entering an IP address, enter the address in the format "xxx.xxx.xxx.xxx", where "xxx" is a numeric value from 0 to 255. Specify Destination IPv6 Address Set the IPv6 address of the destination.
- Page 111 Connectivity Advanced Settings Search Directory Root Enter a search root character string with up to 255 characters. Note Enter the distinguished name of the root node. (Example: CN=users, DC=mydomain, DC=mycorp, DC=com) Login Name Enter the login name for searching in LDAP server up to 255 characters.
- Page 112 CentreWare Internet Services Custom Filters [User ID Query Filter] Specify the text string to be used when searching a user ID upon network authentication. Up to 512 ASCII characters can be entered. Port Select this to use LPD. ...
- Page 113 Connectivity Port 9100 Port Select this to use Port 9100. ® Select this option when the communication protocol is in RAW format for Windows Standard TCP/IP port monitor. Port Number Enter a port number for Port 9100 from 1 to 65535. The default value is 9100.
- Page 114 CentreWare Internet Services Device Email Enter the E-mail address of the machine with up to 128 ASCII characters. SMTP Server [Server Address] Opens the screen to set the SMTP server address. Enter the address manually or click [Select Server from List] to search the SMTP server to set the server address.
- Page 115 Connectivity Community Names Community Name Read Only Specify the community name to use for Read Only. Community Name Read/Write Specify the community name to use for Read/Write. Default Trap Community Name Specify the community name to use for trap notification. ...
- Page 116 CentreWare Internet Services SNMP Version For [SNMPv1/v2], specify the SNMP version. Type Select an address type. IP Address : Port Enter an address and a port number. Trap Community Name Enter the trap community name for [SNMPv1/v2]. User Name ...
- Page 117 Connectivity Port Number Enter a port number from 1 to 65535. The default value is 80. Important Do not use a number that is the same as a port number of another port. However, you can use the same port number for a port that uses HTTP (IPP, Internet Services (HTTP), SOAP, WebDAV, and Web Services on Devices (WSD)).
-
Page 118: Permissions
CentreWare Internet Services Permissions Guest Access A Guest is anyone who is not currently logged in to the printer. You can set the Guest permissions on operations from the control panel and CentreWare Internet Services. You can also set permissions on printing features. To set the Guest permissions on operations, click [Edit] and select [Device User Role]. - Page 119 Permissions Add Alternate Server Clicking [Add Alternate Server] adds the [Alternate Server] section to the screen. Set [Realm] and [Server Address] for the alternate server. SMB (Windows ADS) Specify Server By Select the server specification method from [Domain Name] and [Domain Name and Host Name/IP Address].
-
Page 120: Accounting
CentreWare Internet Services Accounting Click [Accounting Method] to select the accounting method and make the accounting settings. Note In the Permissions screen, [Accounting] is displayed instead of [Accounting Method] when [Accounting Method] is set to [Xerox Standard Accounting]. To select the accounting method, click [Accounting] and then select [Accounting Methods]. -
Page 121: Roles
Permissions Roles The device user roles define the permissions on operations from the control panel and CentreWare Internet Services, and the printer user roles define the permissions on printing features. You can create roles and assign each role to the users. Also you can set the permissions server and the LDAP permissions group. - Page 122 CentreWare Internet Services The following shows the [Custom Permissions] settings. Note Some settings may differ from the list depending on the software version. Device Permissions Access Device View Information Pages (under About) and Support Page Configure Paper Tray Settings View Supplies Configure Supplies Settings View Billing/Usage...
- Page 123 Permissions Add New Role from Existing You can use an existing role as a base to create a new role. Select a base role from the existing roles, and select whether or not to transfer any members to the new role. When transferring any members registered on the machine to the new role, select the members in the [Add Members] screen and click [OK].
- Page 124 CentreWare Internet Services [Custom Permissions] [Print Time Permissions] You can set the permissions on black- and-white printing for specific days and times. [Allowed Job Types] You can set permissions on the printing job types. [1-Sided Output] You can set whether or not to allow 1-sided printing.
-
Page 125: Password Rules
Permissions Editing LDAP groups Selecting an existing LDAP group displays the following. Change Device User Role You can change a device user role set to the LDAP group. Change Printing User Role You can change a printing user role set to the LDAP group. -
Page 126: System
CentreWare Internet Services System Date & Time Set the date and time for the system clock of the machine. The date and time set here will be printed on all lists and reports. Date Date Format Select a date format. ... -
Page 127: Timeouts
System Low Power Timeout Specify a time period to enter the Low Power mode after the last operation. Sleep Timeout Specify a time period to enter the Sleep mode after entering the Low Power mode. Auto Power Off ... - Page 128 CentreWare Internet Services Software Option This feature is for service representative use. For more information, contact our Customer Support Center. Note This item appears when HTTP communications are encrypted. For details, see "Configuration of HTTP Communications Encryption" (P.146). ...
- Page 129 System 2-Letter Country Code (C) Enter the Country Code in 2 ASCII characters. State/Province Name (ST) Enter the state or province name with up to 128 characters. This item can be omitted. Locality Name (L) Enter the city, ward, town, or village name with up to 128 characters.
- Page 130 CentreWare Internet Services Automatic Self-Signed Certificate Creation This feature automatically creates a self-signed certificate when no device certificate is available, and also automatically updates the certificate before expiration. Note Manually created self-signed certificates are not automatically updated. Certificate Path Validation Select whether or not to enable the certificate path validation.
- Page 131 System [OCSP] [Send Query to Responder Select how to access an With] OCSP responder from [URL as Specified in Certificate] or [URL as Specified by Administrator]. [Responder URL] Enter the URL of an OCSP responder when [URL as Specified by Administrator] has been selected for [Send Query to Responder With].
- Page 132 CentreWare Internet Services Print Report Select either [Errors Only] or [Always] to specify when to print the job results. Schedule Overwrite Select this to enable scheduled overwrites. Frequency Select the interval at which the schedule recurs. (Only available for [Weekly]) Set the day of the week on which the schedule occurs.
- Page 133 System [Device Certificate - Client] Select a certificate for HTTP SSL/TLS communications. [Verify Remote Server Certificate] When the machine is operated as an SSL client, select whether or not to verify the certificate of the remote server. Port Settings Displays a list of available ports. To register a port, click [Add]. ...
-
Page 134: Defaults And Policies
CentreWare Internet Services Allowed IP Address/Subnet Mask Select [Add], and then enter an IP address and an IP mask (Subnet Mask). To set an IP mask, enter a number from 0 through 128. The number range corresponds to the 128-bit hexadecimal number comprising IP addresses. For example: ... - Page 135 System Paper Supply Adjust Paper Type Select a type of image processing used for each paper type. Custom Paper Names You can name Custom Paper Types 1 to 5. Each name can have up to 24 characters. Printer Settings You can configure related to the paper used in the printer.
-
Page 136: Pdl Settings
CentreWare Internet Services Print Banner Pages Set whether or not to print banner pages. You can output a banner sheet to separate different jobs by users not to be mixed the outputs. The machine outputs the banner sheet before or after the job. A date, time, user name, and file name are printed on the banner sheet. - Page 137 System control panel. [Paper Tray] Specify the default paper tray. [Paper Size] Specify the default paper size. [Paper Size (Bypass Tray)] Specify the default paper size of bypass tray. [Custom Paper Size Width] Specify the width of custom size paper. [Custom Paper Size Length] Specifies the length of custom size paper.
- Page 138 CentreWare Internet Services [CR=CR, LF=CR+LF, FF=CR+FF] Set line termination processing. [Off] The line termination command is not added. [On] The LF/FF command is added. CR+LF/CR+FF [CR=CR+LF, LF=LF, FF=FF] Set line termination processing. [Off] The line termination command is not added. [On] ...
- Page 139 System Paper Supply Specifies the way to select the tray for PostScript mode. [Auto Select] The tray is selected as the same setting as in the PCL mode. [PostScript Tray Setting] The tray is selected in a method compatible with regular PostScript printers.
-
Page 140: Logs
CentreWare Internet Services [2 Pages per Sheet] Prints two pages on one side of a sheet of paper. [4 Pages per Sheet] Prints four pages on one side of a sheet of paper. [100%] Prints in the same size as the document. [Password] Specifies the password to print a PDF file secured with a password to open the PDF file. -
Page 141: Measurements
System Measurements Units Allows you to select a unit of measurement displayed on the screen from [Millimeters] or [Inches]. Paper Size Preference Allows you to select the unit of default paper size to be used for printer settings. To use the A4 size paper for the following printer settings by default and to set the [Units] setting to [Millimeters], select [Metric]. - Page 142 CentreWare Internet Services...
-
Page 143: Encryption And Digital Signature Settings
Encryption and Digital Signature Settings... -
Page 144: Encryption And Digital Signature Overview
Encryption and Digital Signature Settings Encryption and Digital Signature Overview Types of Certificate To use the Encryption feature and the Signature feature on the machine, a certificate is required. The following two types of device certificate can be used on the machine: ... - Page 145 Encryption and Digital Signature Overview Encrypting HTTP Communications from a Client to the Machine (SSL/TLS Server) The SOAP, Internet Services (HTTP), IPP, and WebDAV ports use the HTTP server of the machine. The SSL/TLS protocol is used to encrypt the HTTP communications between a client and the machine.
-
Page 146: Configuration Of Http Communications Encryption
Encryption and Digital Signature Settings Configuration of HTTP Communications Encryption This section describes the settings to encrypt HTTP communications. Step1 Configuration on the Machine Configure a certificate on the machine. When [Automatic Self-Signed Certificate Creation] is set to [On], a self-signed certificate is automatically created as the SSL server certificate. If necessary, import a certificate issued by another CA. -
Page 147: Step2 Configuration On The Computer
Configuration of HTTP Communications Encryption Step2 Configuration on the Computer To encrypt communications between a web browser and the machine, enter an address beginning with "https" instead of "http" in the address box of the web browser. Example of IP address entry: https://192.0.2.1/ (IPv4) https://[2001:DB8::1234]/ (IPv6) ... -
Page 148: Configuration Of Encryption Using Ipsec
Encryption and Digital Signature Settings Configuration of Encryption using IPsec This section describes how to encrypt communications using IPsec. Step1 Import and Configuration of a Certificate The following describes configuration procedures to set up a certificate with CentreWare Internet Services. When [IKE Authentication Method] is set to [Digital Signature], configure a certificate on the machine. -
Page 149: Configuration Of Wireless Lan Wpa-Enterprise (Eap-Tls)
Configuration of Encryption using IPsec Configuration of Wireless LAN WPA-Enterprise (EAP-TLS) Note To manage digital certificates, you must set up HTTPS communication. WPA-Enterprise is available only when [Infrastructure] is selected as [Network Type]. ® Be sure to import the certificate with Internet Explorer ... -
Page 150: Configuration Of Wireless Lan Wpa-Enterprise
Encryption and Digital Signature Settings Configuration of Wireless LAN WPA-Enterprise (PEAPV0-MS-CHAPV2, EAP-TTLS PAP, EAP-TTLS CHAP) Note To manage digital certificates, you must set up HTTPS communication. WPA-Enterprise is available only when [Infrastructure] is selected as the [Network Type]. ®... -
Page 151: Authentication And Accounting Features
Authentication and Accounting Features... -
Page 152: User Authentication And Accounting
Authentication and Accounting Features User Authentication and Accounting Types of User The Authentication feature restricts operations according to the user type. System Administrator The system administrator can register and change system settings to adapt to the environment to be used. A system administrator uses a specific user ID called a system administrator’s user ID. -
Page 153: Types Of Authentication
User Authentication and Accounting Types of Authentication The following describes the types of authentication available on the machine. User ID Authentication The machine requires users to enter their user information with the touch screen of the machine. Authentication is performed using user information registered on the machine or user information registered on a remote server. -
Page 154: Authentication And Accounting Relationship
Authentication and Accounting Features Network Accounting Network Accounting performs account administration using user information managed by a remote service. In Network Accounting, the remote server collects job data stored on the machine and counts up the numbers of pages processed for each user. Note ... -
Page 155: Creating And Editing User Accounts
User Authentication and Accounting Log Out of User Authentication Select the user name on the Home screen. 1) If the confirmation screen appears, select [Log Out]. 2) If the dropdown menu appears, select [Log Out of Accounting]. Note For details on the log-out confirmation method, see "Logout Confirmation"... -
Page 156: User Authentication For Accounting
Authentication and Accounting Features Editing User Accounts from the CentreWare Internet Services You can edit the user accounts in the user details screen which is displayed when you select [Permissions] and select the desired user name under [User Accounts]. [Roles] You can set a device user role and printing user role to the user. -
Page 157: Maintenance
Maintenance... -
Page 158: Replacing Consumables
It may catch fire by electric sparks inside a vacuum cleaner and cause explosion. Use a broom or a wet cloth to wipe off the spills. If you spill a large volume of toner, contact your local Fuji Xerox representative. -
Page 159: Checking The Supplies Status At The Control Panel
The following messages are displayed on the touch screen depending on the amount of toner remaining. Replace the toner cartridge according to the message. Important The use of toner cartridges not recommended by Fuji Xerox may degrade image quality and performance. Use toner cartridges recommended by Fuji Xerox. Message Solution Remaining Page Yield Replace the Toner Cartridge. - Page 160 Maintenance Make sure that the machine is not operating, and open the front door. Hold both its handles, then pull the toner cartridge straight out of the printer. Place the removed toner cartridge on a level surface. Important Until the front door is opened fully, the toner cartridge is locked in place. To prevent damaging the printer, ensure that the front door is opened fully before attempting to remove the toner cartridge.
-
Page 161: Replacing Drum Cartridge
The machine displays a message when a drum cartridge needs to be replaced. When the message is displayed, replace the drum cartridge. Important The use of drum cartridges not recommended by Fuji Xerox may degrade image quality and performance. Use drum cartridges recommended by Fuji Xerox. Open the front door of the printer. - Page 162 Maintenance To remove the toner cartridge, grip both its handles, then pull the toner cartridge straight out of the printer. Place the removed toner cartridge on a level surface. Important Until the front door is opened fully, the toner cartridge is locked in place. To prevent damaging the printer, ensure that the front door is opened fully before attempting to remove the toner cartridge.
- Page 163 Replacing Consumables To remove any debris or toner dust, set the cleaning tool on the LED Lens Block. Slide the cleaning tool until it stops at one end of the LED Lens Block. Then slide the cleaning tool in the other direction until it stops at the opposite end. Repeat this motion two more times. Replace the cleaning tool into its storage location inside the front door.
-
Page 164: Replacing Staple Cartridge
When this message appears, load a new staple case into the staple cartridge. Important The use of staple cartridges not recommended by Fuji Xerox may degrade quality and performance. Use staple cartridges recommended by Fuji Xerox. Note ... - Page 165 Replacing Consumables Take the staple cartridge out of the finisher. Note The staple cartridge is firmly inserted. A slight force is required to pull the cartridge out of the finisher. Push the staple cartridge into the finisher until it clicks into place. Close the finisher cover.
-
Page 166: Cleaning The Machine
Maintenance Cleaning the Machine WARNING When cleaning this product, use the designated cleaning materials exclusive to it. Other cleaning materials may result in poor performance of the product. Never use aerosol cleaners to avoid catching fire and explosion. CAUTION When cleaning this product, always switch off and unplug it. Access to a live machine interior may cause electric shock. -
Page 167: Cleaning The Led Lens
Cleaning the Machine Cleaning the LED Lens Open the front door. To remove the toner cartridge, grip both its handles, then pull the toner cartridge straight out of the printer. Place the removed toner cartridge on a level surface. Important ... - Page 168 Maintenance Remove the cleaning tool from inside the front door. Note If the cleaning pad is dirty, replace it. A replacement cleaning pad is included with the Drum Cartridge Replacement Kit. To remove any debris or toner dust, set the cleaning tool on the LED Lens Block. Slide the cleaning tool until it stops at one end of the LED Lens Block.
- Page 169 Cleaning the Machine Slide the drum cartridge into the printer until it stops. Slide the toner cartridge into the printer until it stops. Close the front door.
-
Page 170: Adjustments And Maintenance Procedures
Maintenance Adjustments and Maintenance Procedures Adjusting Paper Registration Use Adjust Paper Registration to adjust the placement of the printed image on the page. The adjustment allows you to place the top, bottom, left, and right margins exactly where you want. You can specify the image position on both the front and back sides of the paper, for each installed paper tray. - Page 171 Adjustments and Maintenance Procedures On the sample pages, use a ruler to measure the distance of the printed image from the top, bottom, left, and right edges. Note For identification, a single dot is printed on Side 1, and two dots are printed on Side 2. If the image is centered, no adjustment is required.
-
Page 172: Transfer Voltage Adjustment
Maintenance For Side Registration, a positive value shifts the image to the left. To save your settings, touch [OK]. As needed, to enter additional values, repeat the previous steps. Print another sample page, then repeat the process until you complete the registration corrections. -
Page 173: Adjusting The Altitude
Adjustments and Maintenance Procedures the paper you are using. If the toner is blistered or mottled, decrease the temperature for the paper you are using. Note Depending on the machine settings, you may need to log in as the system administrator. Press the Home button. -
Page 174: Adjusting The Density
Maintenance To exit the menu, touch [X]. Press the Home button. Adjusting the Density The Adjust Density feature controls how much toner is used to print. Adjust the density for lighter toner use for saving toner, or adjust for heavier density to make prints bolder. A positive adjustment makes the prints darker, while a negative adjustment makes the prints lighter. -
Page 175: Removing Optional Components
Removing Optional Components Removing Optional Components Important To lift the printer, always use at least two people to grasp the hand holds on each side of the printer. To prevent you from dropping the printer or injury, lift the printer firmly by gripping the recessed areas on both sides of the printer. - Page 176 Maintenance Release the tray’s lock switch. Remove the paper stored in the tray, and then lift the printer.
-
Page 177: Removing The Caster
Removing Optional Components Pull out the legs. Removing the Caster This section describes how to remove the Caster (optional). Important Close the bypass tray, if opened. Turn off the printer, and then unplug the power cable. Remove the network cable, the USB cable, and the power cable from the printer. Remove the power cable from the cable hook. - Page 178 Maintenance Release the tray’s lock switch. Remove the paper stored in the tray, and then lift the printer.
-
Page 179: Removing The Finisher
Removing Optional Components Pull out the legs. Removing the Finisher This section describes how to remove the finisher (optional). Turn off the printer, and unplug the power cable. Take off the finisher’s power cable. Open the rear door. - Page 180 Maintenance Undo the connector cover, and take off the connector. Bundle the cable. Slide and lift the finisher.
-
Page 181: Removing The 4-Bin Mailbox
Removing Optional Components Removing the 4-Bin Mailbox This section describes how to remove the 4-Bin Mailbox (optional). Turn off the printer, and unplug the power cable. Take off the power cable of the 4-Bin Mailbox. Open the rear door. Undo the connector cover, and take off the connector. - Page 182 Maintenance Bundle the cable. Slide and lift the 4-Bin Mailbox.
- Page 183 Problem Solving...
-
Page 184: Problem Solving
Problem Solving Troubleshooting This section describes troubles that may occur with the machine and their solutions. Follow the troubleshooting procedure below to solve the problems. The machine does not work properly. Action Refer to "Machine Trouble" (P.185). A message is displayed. Cause Has a paper jam occurred? Action... -
Page 185: Machine Trouble
Machine Trouble Machine Trouble Before you conclude that the machine is defective, check the machine status again. Symptom Cause Remedy The machine is Is the power switch turned Switch the power on. not powered on. Is the power cord plugged Switch the power off, and then firmly plug into the power outlet? the power cord into the connector of the... - Page 186 Problem Solving Symptom Cause Remedy Paper is often Is the paper damp? Replace the paper with a new one. jammed or Reference wrinkled. Refer to "Loading Paper" (P.41). Is the paper curled? Turn over the paper in the tray, or replace the paper with a new one.
-
Page 187: Image Quality Trouble
Image Quality Trouble Image Quality Trouble If the image quality of printed documents is poor, identify the symptom in the following table to perform the remedy. If image quality does not improve even after performing the remedy, contact our Customer Support Center. - Page 188 Problem Solving Symptom Cause Remedy Dirt appears at The paper path is dirty. Print a few pages to remove the dirt. equal intervals. The drum cartridge has Replace the drum cartridge with a new one. deteriorated or is damaged. Paper Feed Direction White dots The paper is unsuitable.
- Page 189 Image Quality Trouble Symptom Cause Remedy Nothing is Two or more sheets of paper Fan the paper well and load it again. printed. are being fed simultaneously Reference (double-feed). Refer to "Loading Paper" (P.41). Power supply or high-voltage Contact our Customer Support Center. power supply may have malfunctioned.
- Page 190 Problem Solving Symptom Cause Remedy White patches The drum cartridge has Replace the drum cartridge with a new one. appear vertically. deteriorated or is damaged. No toner remains in the toner Replace the toner cartridge with a new one. cartridge. Reference ...
-
Page 191: Trouble During Printing
Trouble during Printing Trouble during Printing This section describes how to resolve print problems. Unable to Print If you cannot print a document, identify the symptom in the following table to perform the remedy. Symptom Cause Remedy Data remains in The machine is not Switch the power on. -
Page 192: The Print Result Is Not What Was Expected
Problem Solving The Print Result is Not What was Expected If the print result is not what was expected, identify the symptom in the following table to perform the remedy. Symptom Cause Remedy Outputs are not The Finisher is not The Finisher is required to staple. -
Page 193: Network-Related Problems
Network-related Problems Network-related Problems This section describes how to resolve network related problems. When using TCP/IP The possible causes, check points, and remedies when using TCP/IP (LPD) are as follows: Windows OS When you cannot print Cause Check point Remedy The IP address is Request your network... -
Page 194: Centreware Internet Services Problems
Problem Solving When print result is not what was expected Cause Check point Remedy Selected printer language Confirm the selected printer Select the printer language on the machine does not language on the machine on the machine to match match the printer language and the printer language of the print data. -
Page 195: Internet/Intranet Connection Problems
Network-related Problems Symptom Remedy Cannot delete jobs. Wait for a while, and refresh the browser. Internet/Intranet Connection Problems The possible causes and remedies for problems when connecting to the Internet or intranet are as follows: When connection to the Internet/Intranet fails Cause Remedy The Authentication feature... -
Page 196: Ipv4 And Ipv6 Connection Problems
Problem Solving Cause Remedy Cannot communicate because Wait for a while and try accessing again. of overloading of the server application. An error occurs that is not Even though an error occurs during background displayed on the control panel. processing, no message appears on the control panel. Display the [Not found] screen or print the Job History Report to confirm the result. - Page 197 Network-related Problems Symptom Remedy A device outside the router When searching for a device outside the router via SMB, cannot be searched. directly specify the address. Multicasting is supported only within a local link (FF02::1). When SSL is enabled on When SSL is enabled, directly specify "https://[IPv6 CentreWare Internet Services, address]".
-
Page 198: Error Code
Problem Solving Error Code This section describes error codes. An error message and error code (***-***) are displayed on the touch screen if printing terminated abnormally because of an error, or a malfunction occurred in the machine. Refer to the error codes in the following table to resolve problems. Important ... - Page 199 Error Code Error Cause/Remedy Code 010-398 [Cause] An error occurred in the machine. [Remedy] Switch off the machine power, make sure that the touch screen is blank, and then switch on the machine power. If the same message is displayed again, contact our Customer Support Center. Mailbox malfunction 011-210 [Cause]...
- Page 200 Problem Solving Error Cause/Remedy Code 012-290 [Cause] The finisher front cover is open. [Remedy] Close the finisher front cover. Switch off the machine power, make sure that the touch screen is blank, and then switch on the machine power. If the error still is not resolved, contact our Customer Support Center.
- Page 201 Error Code Error Cause/Remedy Code 016-234 [Cause] An error occurred in the Authentication feature of the machine. 016-235 [Remedy] Switch off the machine power, make sure that the touch screen is blank, and then switch on the machine power. If the error still is not resolved, contact our Customer Support Center.
- Page 202 Problem Solving Error Cause/Remedy Code An error occurred. 016-347 [Cause] 016-348 [Remedy] Switch off the machine power, make sure that the touch screen is 016-349 blank, and then switch on the machine power. If the same 016-350 message is displayed again, contact our Customer Support Center. 016-351 An error occurred.
- Page 203 Error Code Error Cause/Remedy Code 016-404 [Cause] An internal error occurred. [Remedy] Execute the operation again. If the same message is displayed again, contact our Customer Support Center. An error occurred in the certificate stored in the machine. 016-405 [Cause] [Remedy] Initialize the certificate.
- Page 204 Problem Solving Error Cause/Remedy Code 016-427 [Cause] The user name or password for 802.1x authentication did not match in the setting of Ethernet 2. [Remedy] Confirm and correctly enter the user name or password in the setting of Ethernet 2. If the error still is not resolved, check whether the network environment is set correctly.
- Page 205 If your application usage and print instruction are correct, check with the application manufacturer that sent the print job for operations of the application, not with Fuji Xerox. If the error still is not resolved, contact our Customer Support Center.
- Page 206 Problem Solving Error Cause/Remedy Code 016-518 [Cause] With the PostScript driver, booklet and Watermark were specified at the same time. [Remedy] With the PostScript driver, specifying a combination of booklet and Watermark/UUID is not possible. Cancel one of them. The number of pages reached the maximum number of pages 016-519 [Cause] specified, and the print job is terminated.
- Page 207 Error Code Error Cause/Remedy Code 016-533 [Cause] Kerberos server authentication protocol error [Remedy] The time difference between the machine and the Kerberos server exceeded the clock skew limit value set on the Kerberos server. Check whether the clocks on the machine and Kerberos server are correctly set.
- Page 208 Problem Solving Error Cause/Remedy Code 016-548 [Cause] The machine is not registered in your authentication management software. [Remedy] Register the machine in your authentication management software. For more information on the process, refer to the manual for your authentication management software. Your authentication management software does not support the 016-553 [Cause]...
- Page 209 Error Code Error Cause/Remedy Code 016-562 [Cause] Multiple entries containing the same smart card information were found in the guest database of Active Directory or your authentication management software. [Remedy] Correct the guest database entries of Active Directory or your authentication management software so that they do not contain the same smart card information.
- Page 210 Problem Solving Error Cause/Remedy Code 016-700 [Cause] The job was suspended because the number of the digits for the Secure Print or Charge Print passcode set on the print driver was less than the minimum passcode length for stored jobs specified on the machine.
- Page 211 Error Code Error Cause/Remedy Code 016-716 [Cause] Unable to spool TIFF file because of insufficient storage space. [Remedy] Delete unnecessary files and users from the machine. On the models of which hard disk drive is an option, install the hard disk. For information on installing the hard disk, contact our Customer Support Center.
- Page 212 Problem Solving Error Cause/Remedy Code 016-733 [Cause] Probable causes are as follows: 1. Unable to obtain the IP address (the string after "@" in the destination e-mail address) when e-mail is sent. 2. DNS server was unable to resolve the Internet address (the string after "@") by the DNS server when e-mail is sent.
- Page 213 Error Code Error Cause/Remedy Code 016-750 [Cause] The machine received a printing job ticket with a PDF or XPS from an application that allows direct transmissions of files, but the printing job ticket data had a grammar or print instruction unsupported by the machine.
- Page 214 Problem Solving Error Cause/Remedy Code 016-759 [Cause] The number of pages reached the maximum number of pages for this service. [Remedy] Consult your system administrator. An error occurred during PostScript processing. 016-760 [Cause] *: An optional component is required for some models. For more information, contact our Customer Support Center.
- Page 215 Error Code Error Cause/Remedy Code 016-798 [Cause] Unable to print a document because the hard disk is not installed. [Remedy] Install the hard disk, and try printing again. Contact our Customer Support Center. An invalid print parameter is included in the print data of the 016-799 [Cause] application, or the print data and the Print Setup settings may not...
- Page 216 Problem Solving Error Cause/Remedy Code 017-716 [Cause] SMTP server SSL server authentication error. It is before the valid period of the server certificate. [Remedy] Use the valid SSL server certificate of the SMTP server. You can avoid this error by setting [SMTP-SSL/TLS Communication] in [SSL/TLS Settings] to [Disabled], however the validity of the server cannot be warranted.
- Page 217 Error Code Error Cause/Remedy Code 017-730 [Cause] When the machine is used as a print job storage device, the computer failed to send a job to the machine because a network error occurred. [Remedy] Confirm the followings: The network cable is connected properly. ...
- Page 218 Problem Solving Error Cause/Remedy Code You are not permitted to print. 017-792 [Cause] 017-793 [Remedy] Consult your system administrator to change your authorization. 017-794 017-795 017-796 017-797 017-798 017-799 "018-001" - "020-999" Error Cause/Remedy Code IPsec setting error. 018-400 [Cause] [Remedy] Remove the inconsistency of the IPSec settings, and enable IPSec again.
- Page 219 Error Code Error Cause/Remedy Code 018-412 [Cause] The IPv6 address already exists in the network of Ethernet2. 018-413 [Remedy] Change the IPv6 address of the network in which the address already exists. IP address for IPv6 set manually in Ethernet2 is incorrect. 018-414 [Cause] [Remedy] Set the IP address correctly.
- Page 220 Problem Solving Error Cause/Remedy Code 018-433 [Cause] IPv6 address (self-assigned address 3) duplication on the network used for Wi-Fi. [Remedy] Change the IPv6 address of the device on the network. The IPv6 address (manual) is invalid on the network used for Wi- 018-434 [Cause] [Remedy] Change the IPv6 address manually configured for the machine.
- Page 221 Error Code Error Cause/Remedy Code 018-563 [Cause] A server-side error occurred. (Received HTTP Status 5xx). [Remedy] Check the following: The destination HTTP server for the scanned document is accessible by PC. The server settings 018-564 [Cause] DNS resolution for the specified hostname failed. [Remedy] Check the following: ...
- Page 222 Problem Solving Error Cause/Remedy Code 018-709 [Cause] Network communication error [Remedy] Take one of the following measures depending on the setting: For IPv4 environment Check the IPv4 address of the machine. Confirm whether the network cable is connected correctly. ...
- Page 223 Error Code Error Cause/Remedy Code 018-730 [Cause] The machine cannot connect to Google Cloud Print, because of a network error. [Remedy] Check that the network cable is connected properly. Also check that the environmental settings are adequate. If the problem still remains even when there is nothing wrong, contact our Customer Support Center.
- Page 224 Problem Solving "021-001" - "022-999" Error Cause/Remedy Code The accounting/billing device connected does not match the 021-215 [Cause] device set on the machine. [Remedy] Change the setting on the machine or connect the correct accounting/billing device, and switch off the machine power, make sure that the touch screen is blank, and then switch on the machine power.
- Page 225 Error Code Error Cause/Remedy Code 021-506 [Cause] The SSL Certificate for the EP server is incorrect. [Remedy] Switch off the machine power, make sure that the touch screen is blank, and then switch on the machine power. Execute the operation again. If the error still is not resolved, contact our Customer Support Center.
- Page 226 Problem Solving Error Cause/Remedy Code 021-517 [Cause] An error occurred while connecting to the EP system via the Internet. 021-518 021-519 [Remedy] Wait for a while, and then execute the operation again. If the error still is not resolved, contact our Customer Support Center. An error occurred while connecting to the EP system via the 021-520 [Cause]...
- Page 227 Error Code "023-001" - "025-999" Error Cause/Remedy Code [Cause] An error occurred in the machine. 024-322 024-323 [Remedy] Switch off the machine power, make sure that the touch screen is 024-324 blank, and then switch on the machine power. If the same 024-340 message is displayed again, contact our Customer Support Center.
- Page 228 Problem Solving Error Cause/Remedy Code 024-703 [Cause] Unable to print because the number of booklet pages exceeds the maximum number allowed. [Remedy] Use paper of less weight. Or, cancel the booklet creation. The paper type is not supported for duplex or inversion. 024-707 [Cause] [Remedy] Change the paper type, or change to 1-sided printing.
- Page 229 Error Code Error Cause/Remedy Code 026-705 [Cause] Unable to process for DocuWorks documents because of insufficient memory space. [Remedy] Change the [Image Quality] setting from [High Resolution] to [High Quality], or from [High Quality] to [Standard]. Or, add memory. If the error still is not resolved, increase memory. If the problem persists even after adding memory to the maximum capacity, print using the print driver (PCL, etc.) from DocuWorks Viewer.
- Page 230 Problem Solving Error Cause/Remedy Code 026-727 [Cause] Probable causes are as follows: 1. Unusable characters are included in the path name of the file location. 2. The length of the path name of the file location (including extension) exceeds the number of characters available. [Remedy] Take one of the following measures: 1.
- Page 231 Error Code Error Cause/Remedy Code 027-447 [Cause] The IP address of IPv6 network already exists. [Remedy] Change the [Link-local Address] for IPv6 on the machine, or the IP address of IPv6 on the network device, to remove the duplication of addresses. IPv4 address duplication on the network.
- Page 232 Problem Solving Error Cause/Remedy Code 027-715 [Cause] The received S/MIME certificate has not been registered on the machine, or has not been set for use on the machine. [Remedy] Import the sender's S/MIME certificate to the machine, or change settings to use the S/MIME certificate on the machine if the S/ MIME certificate has already been registered.
- Page 233 Error Code Error Cause/Remedy Code 027-736 [Cause] The server certificate verification feature of the machine is disabled when the server certificate verification is required. [Remedy] Enable the server certificate validation. Or, disable the server certificate validation for data transfer. An error occurred during job flow processing. 027-751 [Cause] [Remedy] Confirm the settings of the job flow.
- Page 234 Problem Solving Error Cause/Remedy Code 027-757 [Cause] Probable causes are as follows: 1. An error occurred while connecting the server. 2. The reliable certificate has not been registered on the machine. 3. The server addresses of the SSL server and the destination server are not same.
- Page 235 Error Code Error Cause/Remedy Code 027-762 [Cause] An on-demand print job is sent to the machine using the Web Applications feature, however, the specified job ticket is invalid because of one of the following causes: Abnormal change to the job ticket because of the machine software failure ...
- Page 236 Problem Solving Error Cause/Remedy Code 027-769 [Cause] WebDAV server connection error [Remedy] Check the network cable connection. Check if the destination WebDAV server is accessible from a computer. Check the network interface. 027-770 [Cause] The print job has a problem. [Remedy] Submit the print job again.
- Page 237 Error Code Error Cause/Remedy Code 027-782 [Cause] Maximum redirects have been reached. [Remedy] Check the re-direct setting in the WebDAV server to see if a re- direct loop occurs. Authorization failed. 027-783 [Cause] Check if the destination WebDAV server is accessible from a [Remedy] computer.
- Page 238 Problem Solving Error Cause/Remedy Code 027-795 [Cause] Unknown method [Remedy] Check if the destination is a WebDAV server. Share the destination file and folder to permit reading and writing. The received e-mail was discarded because no documents were 027-796 [Cause] attached to it.
- Page 239 Error Code Error Cause/Remedy Code 029-706 [Cause] Wi-Fi error. A connection error occurred when he printer obtains a proxy auto-config (PAC) file. [Remedy] Check and correct the following: LAN cable connection Default gateway configuration Subnet mask configuration ...
- Page 240 Problem Solving Error Cause/Remedy Code 029-711 [Cause] Ethernet 1 error. The proxy auto-config (PAC) file is invalid. [Remedy] Ask your network administrator to see if the format is appropriate for JavaScript, and if the file size is 64 KB or less. If the error still is not resolved, contact our Customer Support Center.
- Page 241 Error Code Error Cause/Remedy Code 029-716 [Cause] Ethernet 1 error. A timeout error occurred when the printer obtains the URL of a proxy auto-config (PAC) file. [Remedy] Check and correct the following: LAN cable connection Default gateway configuration ...
- Page 242 Problem Solving Error Cause/Remedy Code 042-335 [Cause] An error occurred in the machine. 042-336 [Remedy] Switch off the machine power, make sure that the touch screen is blank, and then switch on the machine power. If the error still is not resolved, contact our Customer Support Center.
- Page 243 Error Code "047-001" - "047-999" Error Cause/Remedy Code An error occurred while detecting the finisher. 047-216 [Cause] [Remedy] Switch off the machine power, make sure that the touch screen is blank, and then switch on the machine power. If the same message is displayed again, contact our Customer Support Center.
- Page 244 Problem Solving "060-001" - "060-999" Error Cause/Remedy Code An error occurred in the machine. 060-310 [Cause] [Remedy] Switch off the machine power, make sure that the touch screen is blank, and then switch on the machine power. If the error still is not resolved, contact our Customer Support Center.
- Page 245 Error Code "071-001" - "076-999" Error Cause/Remedy Code Tray 2 malfunction 072-210 [Cause] [Remedy] Confirm the paper loading condition for the Tray 2, and then switch off the machine power, make sure that the touch screen is blank, and then switch on the machine power. If the error still is not resolved, contact our Customer Support Center.
- Page 246 Problem Solving "077-001" - "077-999" Error Cause/Remedy Code An error occurred. 077-314 [Cause] [Remedy] Switch off the machine power, make sure that the touch screen is blank, and then switch on the machine power. If the same message is displayed again, contact our Customer Support Center. An error occurred in the machine.
- Page 247 Error Code Error Cause/Remedy Code 092-321 [Cause] Density of Black color is low. [Remedy] Switch off the machine power, make sure that the touch screen is blank, and then switch on the machine power. If the same message is displayed again, pull out the drum and toner cartridges of that color, and then insert them again.
- Page 248 Problem Solving Error Cause/Remedy Code 103-314 [Cause] An error occurred. [Remedy] Switch off the machine power, make sure that the touch screen is blank, and then switch on the machine power. If the same message is displayed again, contact our Customer Support Center. "116-001"...
- Page 249 Error Code Error Cause/Remedy Code An error occurred. 116-359 [Cause] 116-360 [Remedy] Switch off the machine power, make sure that the touch screen is 116-361 blank, and then switch on the machine power. If the same 116-362 message is displayed again, contact our Customer Support Center. 116-363 116-364 116-365...
- Page 250 Problem Solving Error Cause/Remedy Code 116-701 [Cause] Unable to use the 2 Sided Printing feature because of insufficient memory. [Remedy] Increase memory, or install the hard disk on the models of which hard disk drive is an option. For information on installing the hard disk, contact our Customer Support Center.
- Page 251 Error Code Error Cause/Remedy Code 116-725 [Cause] Failed to write the image log because the image log storage area on the machine is insufficient. [Remedy] Execute the operation again. If this error still is not resolved, delete unnecessary image logs. The machine has processed the preset operation printing in black 116-726 [Cause]...
- Page 252 Problem Solving Error Cause/Remedy Code 116-748 [Cause] There is no plot data in the HP-GL/2 print data. *: An optional component is required for some models. For more information, contact our Customer Support Center. [Remedy] Check the print data. The job was cancelled because the specified font does not exist. 116-749 [Cause] [Remedy] Install the font, or set the print driver to replace the font.
- Page 253 Error Code "117-001" - "117-999" Error Cause/Remedy Code An error occurred. 117-311 [Cause] [Remedy] Contact our Customer Support Center. An error occurred in the machine. 117-312 [Cause] [Remedy] Contact our Customer Support Center. An error occurred in the machine. 117-316 [Cause] [Remedy] Switch off the machine power, make sure that the touch screen is blank, and then switch on the machine power.
- Page 254 Problem Solving Error Cause/Remedy Code 117-360 [Cause] The year in the Date & Time setting is out of the available range. [Remedy] Turn off the printer, and turn it on again. Change the year to a correct value. If the error still is not resolved, contact our Customer Support Center.
- Page 255 Error Code "123-001" - "126-999" Error Cause/Remedy Code [Cause] An error occurred in the machine. 123-310 123-311 [Remedy] Switch off the machine power, make sure that the touch screen is 123-312 blank, and then switch on the machine power. If the same 123-325 message is displayed again, contact our Customer Support Center.
- Page 256 Problem Solving Error Cause/Remedy Code 124-326 [Cause] An error occurred in the machine. [Remedy] Follow the on-screen instruction to enter information. 124-327 [Cause] An error occurred in the machine. [Remedy] Switch off the machine power, make sure that the touch screen is blank, and then switch on the machine power.
- Page 257 Error Code Error Cause/Remedy Code An error occurred in the machine. 124-360 [Cause] 124-361 [Remedy] Switch off the machine power, make sure that the touch screen is 124-362 blank, and then switch on the machine power. If the same 124-363 message is displayed again, contact our Customer Support Center.
-
Page 258: Other Errors
Problem Solving Error Cause/Remedy Code An error occurred in the machine. 127-353 [Cause] 127-354 [Remedy] Switch off the machine power, make sure that the touch screen is 127-396 blank, and then switch on the machine power. If the same 127-398 message is displayed again, contact our Customer Support Center. -
Page 259: Paper Jams
WARNING Fusing Unit Safety Do not dismantle the Fusing Unit. When removing paper jam from the Fusing Unit, contact your local Fuji Xerox representative. Otherwise, it may cause injuries. CAUTION Do not attempt to remove a paper deeply jammed inside the product, particularly a paper wrapped around the fusing unit or the heat roller. -
Page 260: Paper Jams In The Bypass Tray
Problem Solving Paper Jams in the Bypass Tray The following describes how to clear paper jams occurring in the Bypass Tray. Remove any paper from the Bypass Tray. Hold both sides of the Bypass Tray, then pull it straight out of the printer. Remove Tray 1 from the printer. - Page 261 Paper Jams Remove the jammed paper. Insert Tray 1 into the printer, then push it all the way in. Note If the tray is extended for Legal-size paper, the tray protrudes when it is inserted into the printer. If removed in a previous step, replace the tray cover.
-
Page 262: Paper Jams In Tray 1
Problem Solving Press the Home button. Paper Jams in Tray 1 The following describes how to clear paper jams occurring in Tray 1. Remove any paper from the Bypass Tray. Hold both sides of the Bypass Tray, then pull it straight out of the printer. Remove Tray 1 from the printer. - Page 263 Paper Jams Remove any crumpled paper from the tray and any remaining paper jammed in the printer. Insert Tray 1 into the printer, then push it all the way in. Note If the tray is extended for Legal-size paper, the tray protrudes when it is inserted into the printer. If removed in a previous step, replace the tray cover.
-
Page 264: Paper Jams In Trays 2 To 5
Problem Solving Press the <Home> button to return to the [Home] screen. Paper Jams in Trays 2 to 5 The following describes how to clear paper jams occurring in Trays 2 to 5. For the tray reported on the Touch Screen Display, pull out the tray until it stops. Lift the front of the tray slightly, and remove the tray from the printer. - Page 265 Paper Jams For the same tray, at the back of the printer, locate the jam-access door. Open the door to remove any jammed paper. Insert the tray into the printer, then push the tray in until it stops. Note If the tray is extended for Legal-size paper, the tray protrudes when it is inserted into the printer.
-
Page 266: Paper Jams In The Fusing Unit
Problem Solving Paper Jams in the Fusing Unit The following describes how to clear paper jams occurring in the Fusing Unit. Lift the rear door release and pull open the door. Lift the tab to open the paper guide on the top of the fusing unit. Remove any jammed paper. -
Page 267: Clearing Paper Jams From The Finisher
Paper Jams Close the paper guide on the fusing unit. Close the rear door. Clearing Paper Jams from the Finisher To resolve the error displayed on the control panel, clear all paper from the paper path. At the back of the printer, locate the finisher jam-access door. Open the door, then remove any jammed paper. -
Page 268: Clearing Paper Jams From The 4-Bin Mailbox
Problem Solving Clearing Paper Jams from the 4-Bin Mailbox To resolve the error displayed on the control panel, clear all paper from the paper path. At the back of the printer, locate the 4-Bin Mailbox jam-access door. Open the door, then remove any jammed paper. -
Page 269: Appendix
Appendix... -
Page 270: Specifications
Appendix Specifications This section lists the main specifications of the machine. Note that the specifications and the appearance of the product may change without prior notice. Basic Specifications Type Desktop/Console Printing Method Laser Xerography Note LED + LED electrophotographic system ... - Page 271 Print quality may deteriorate if printing on preprinted paper or the back of printed paper, or if the environment of use is dry, cold, or hot and humid climates. For details, contact the Fuji Xerox local representative office or an authorized dealer.
- Page 272 Appendix 2 Sided Feature Standard Memory 2 GB PDL TIFF, FX PDF, PCL6, PCL5c, PS, XPS Note XPS stands for XML Paper Specification. Operating System Standard : PCL Driver ® Windows 10 (32bit) ® Windows 10 (64bit) ®...
- Page 273 OS X 10.10 Yosemite OS X 10.9 Mavericks OS X 10.8 Mountain Lion Important For information about the latest supported OS, refer to the Fuji Xerox Web site. Interface USB 2.0, USB 3.0, Ethernet 10BASE-T/100BASE-TX/1000BASE-T Protocol TCP/IP, lpd, IPP, Port9100 ...
-
Page 274: High-Capacity Feeder (Optional)
Appendix Humidity: 5 - 85% (except malfunctions due to dew condensation) Important Until the conditions (temperature and humidity) inside the printer become acclimated to the installation environment, print quality may deteriorate depending on the paper quality. High-Capacity Feeder (Optional) ... - Page 275 Specifications Stacker Capacity 500 sheets (not stapled) 60 sets (stapled, 90 gsm or less) Staple Capability : 50 sheets Paper Size : Same as the Basic Specifications Paper Weight : 64 - 220 gsm Position : 1 place ...
-
Page 276: Optional Components
Appendix Optional Components The following table shows the optional components available. To purchase these options, contact our Customer Support Center. Product Name Description 550-Sheet Feeder Optional paper tray. High-Capacity Feeder Optional paper tray. Cabinet Provides four legs for machine installation. Caster Provides four legs for machine installation. -
Page 277: Ep System
EP System Electronic Partnership (EP) is a system to automatically control or maintain the machine by connecting the machine and the EP center of Fuji Xerox. You can use the EP system via the Internet. The following describes how to use the EP system on the machine. - Page 278 Appendix...
- Page 279 DocuPrint P505 d User Guide ME8277E2-2 (Edition 1) February 2018 Fuji Xerox Co., Ltd. Copyright © 2018 by Fuji Xerox Co., Ltd.
Need help?
Do you have a question about the DocuPrint P505 d and is the answer not in the manual?
Questions and answers