Table of Contents
Advertisement
Quick Links
Advertisement
Table of Contents

Subscribe to Our Youtube Channel
Related Manuals for Silver Star WASH 250 Series


Summary of Contents for Silver Star WASH 250 Series
- Page 1 WASH 250 USER MANUAL www.yagang.com...
- Page 2 Please read over this manual before operation the light...
-
Page 3: Open The Box And Checking
1. Open the box and checking Congratulations on choosing our products! Please carefully read this instruction manual in its entirety and keep it well for using reference. This manual contained about the installation and the relative using information of this products. Please according to this manual's relative speaking when using this equipment. -
Page 4: Operating Determinations
by the plug. Never pull out the plug by tugging the power-cord. This device falls under protection class I. Therefore it is essential to connect the yellow/green conductor to earth. The electric connection, repairs and servicing must be carried out by a qualified employee. -
Page 5: Description Of The Device
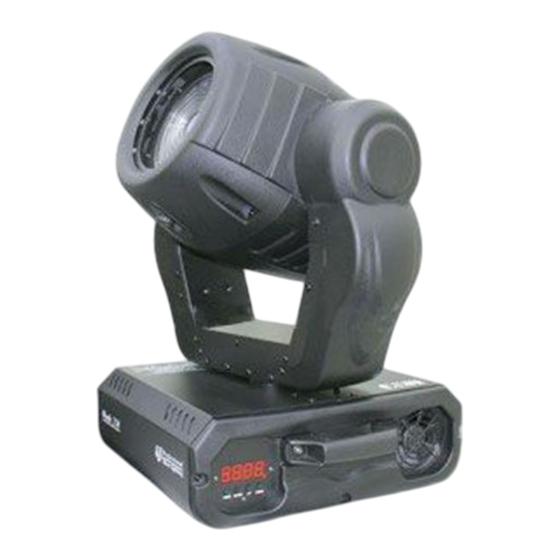
4.Description of the device 1 - Moving head 2 - Y oke 3 - Carry handles 4 - Base Rear panel: LAM P:M SD 25 0/ 2 MS D 250 5 - Power switch SERIAL DATA LINK 6 - DMX output 1=GND 7 - DMX input 2=SIG.-... -
Page 6: Lamp Adjust
.Lamp assembly: Lamp assembly 3 phillips screws "X,Y ,Z" 5.2 Lamp adjust The WASH 250 lampholder is aligned at the factory. Due to differences between lamps , fine adjustment may improve light performance.Strike the lamp,open the shutter and the iris,set the dimmer intensity onto 100% and focus the light on a flatsurface (wall).Center a hot-spot(the brightest par t of... -
Page 7: Rigging The Fixture
5.3 Adjusting beam angle The Fresnel lens system can be configured in the range between Adjusting screw ¡ and 22 ã .To set the desired ¡ ã beam angle, and loose 2 adjusting screws on the Fresnel lens unit Fresnel lens and adjust the required beam angle. -
Page 8: Dmx-512 Connection/Connection Between Fixtures
Before rigging make sure that the installation area can hold a minimum point load of 10 times the projector s weight. The projector can be placed directly on the stage floor or rigged in any orientation on a truss without altering its operation characteristics. For overhead use, always install a safety-rope that can hold at least 10 times the weight of the fixture. -
Page 9: Control Board Operation
Only use a stereo shielded cable and 3-pin XLR-plugs and connectors in order to connect the controller with the fixture or one fixture with another. Occupation of the XLR-connection: DMX-input DMX-OUTPUT XLR mounting-socket: XLR mounting-plug: - Ground - Ground - Signal (-) - Signal (-) - Signal (+) - Signal (+) -
Page 10: Dmx512 Channel Function
Control board operation way: 1.Select working mode by pressing MODE. 2.Press ENTER to confirm the selection. 3.Press UP and DOWN to select working condition. 4.Press ENTER to confirm the selection. DMX512 Channel Function FUNCTION CHANNEL TILT PAN FINE (proportional) TILT FINE (proportional) Speed of PAN/TILT movement Lamp on/off &... - Page 11 CHANNEL 1: PAN Value Effect CHANNEL 2: TILT Value Effect...
- Page 12 CHANNEL3£ º PAN FINE (proportional) Effect Value Fine control of pan movement (16 Bit) CHANNEL 4£ º TILT FINE (proportional) Value Effect Fine control of pan movement (16 Bit) -10-...
- Page 13 CHANNEL 5£ º Speed of PAN/TILT movement Value Effect Slow Slow Fast Fast CHANNEL 6£ º Lamp on/off & reset Value Effect No function 240-255 94-100 90-93 Lamp off after 230-239 3 seconds No function 140-229 55-89 50-54 Lamp on after 128-139 3 seconds, Reset 0-49...
- Page 14 CHANNEL 7: Rainbow Colors Wheel Value Effect 193-255 75-100 Backwards rainbow effect from slow to fast No rotation 191-192 Forwards rainbow 128-190 50-73 effect from slow to fast 114-127 44-49 UV-filter 100-113 39-43 Pink 86-99 33-38 Blue 72-85 28-32 Orange Green 58-71 22-27...
- Page 15 CHANNEL 9: Shutter/strobe Value Effect 224-255 87-100 Shutter Open 192-223 75-86 Random strobe- effect from slow to fast 160-191 62-74 Shutter Open 128-159 50-61 Pulse-effect in sequences from slow to fast 96-127 37-49 Shutter Open 64-95 25-36 Strobe-effect from slow to fast (max 10 Flashes/s) 32-63 12-24...
-
Page 16: Technical Specifications
Technical specifications US-model: Voltage......AC100/110/120V , 50/60Hz Fuse........ T 6.3 A@120V EU-model: Voltage......AC220/230/240V ,50/60Hz Fuse ........T10 A @230V Rated Power 500W £ º DMX512 Channel 10CHS £ º Luminous 18000 LUX £ º Lamp: Philips MSD 250/2 or MSD 250 GY 9,5 Optical system: -High luminous-efficiency parabolic reflector 8 ~22 manual zoom system... - Page 17 Beampath: Min. beam angle 8¡ ã 52 Foot-ca ndles 8960 2240 1000 560 LUX 20 Distance (m) 2,8 Diameter(m ) Max. beam angle 22¡ ã 23 Foot-ca ndles 4050 1015 255 LUX 20 Distance (m) 1,94 3,89 5,83 7,77 Diameter(m ) D i s t a n c e = 5 m 10000 (LUX)
-
Page 18: Maintenance And Cleaning
9. Maintenance and cleaning It is absolutely essential that the fixture is kept clean and that dust, dir t and smoke-fluid residues must not buildup on or within the fixture. Otherwise, the fixtures light-output will be significantly reduced. Regular cleaning willnot only ensure the maximum light-output, but will also allow the fixture to function reliably throughout its life.A soft lint-free cloth moistened with any good glass cleaning fluid is recommended, under no circumstances should alcohol or solvents be used!
Need help?
Do you have a question about the WASH 250 Series and is the answer not in the manual?
Questions and answers