
Related Manuals for Kramer VP-437xl


Summary of Contents for Kramer VP-437xl
-
Page 1: User Manual
Kramer Electronics, Ltd. USER MANUAL Model: VP-437xl Presentation Switcher / Scaler... -
Page 2: Table Of Contents
Figure 4: Straight Cable RS-232 Connection with a Null Modem Adapter Figure 5: Infrared Remote Control Transmitter Tables Table 1: VP-437xl Presentation Switcher / Scaler Front Panel Features Table 2: VP-437xl Presentation Switcher / Scaler Rear Panel Features Table 3: The MAIN MENU Features... -
Page 3: Introduction
Scan Converters and Scalers; GROUP 8: Cables and Connectors; GROUP 9: Room Connectivity; GROUP 10: Accessories and Rack Adapters; GROUP 11: Sierra Products 2 Download up-to-date Kramer user manuals from the Internet at this URL: http://www.kramerelectronics.com 3 The complete list of Kramer cables is on our Web site at http://www.kramerelectronics.com... - Page 4 Getting Started KRAMER: SIMPLE CREATIVE TECHNOLOGY...
-
Page 5: Overview
RGBHV video output together with a digital audio output and an analog stereo audio output. The VP-437xl is HDTV compatible and the resolution can be up- or down- scaled as follows: Native, VGA, SVGA, XGA, SXGA, UXGA, 480i, 480p, 576i, 576p, 720p... -
Page 6: About Hdmi
Overview The VP-437xl is housed in a 19” 1U rack mountable enclosure, with rack “ears” included, and is fed from a 100-240 VAC universal switching power supply. 3.1 About HDMI High-Definition Multimedia Interface (HDMI) is an uncompressed all-digital audio/video interface, widely supported in the entertainment and home cinema industry. -
Page 7: Recommendations For Best Performance
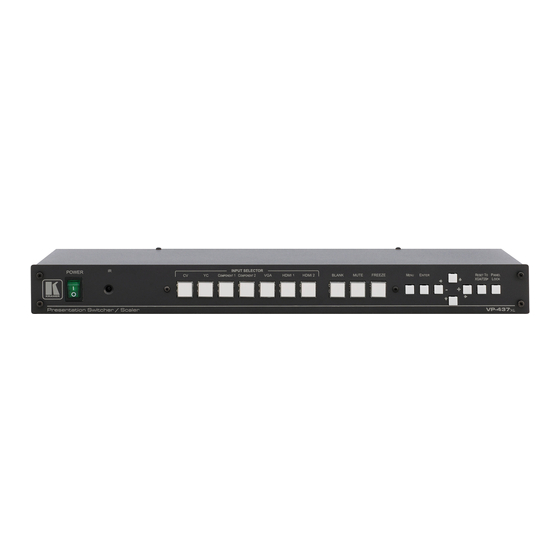
(often associated with low quality cables) • Avoid interference from neighboring electrical appliances and position your Kramer VP-437xl away from moisture, excessive sunlight and dust Your VP-437xl Presentation Switcher / Scaler define the VP-437xl Presentation Switcher / Figure... -
Page 8: Figure 1: Vp-437Xl Presentation Switcher / Scaler
Your VP-437xl Presentation Switcher / Scaler Figure 1: VP-437xl Presentation Switcher / Scaler KRAMER: SIMPLE CREATIVE TECHNOLOGY... -
Page 9: Table 1: Vp-437Xl Presentation Switcher / Scaler Front Panel Features
Your VP-437xl Presentation Switcher / Scaler Table 1: VP-437xl Presentation Switcher / Scaler Front Panel Features Feature Function POWER Switch Illuminated switch for turning the unit ON or OFF IR Receiver Receives signals from the remote control transmitter Press to select the composite video input... -
Page 10: Table 2: Vp-437Xl Presentation Switcher / Scaler Rear Panel Features
Your VP-437xl Presentation Switcher / Scaler Table 2: VP-437xl Presentation Switcher / Scaler Rear Panel Features Feature Function HDMI Connector Connect to the HDMI source (from 1 to 2) VGA 15-pin HD Connector Connect to the computer graphics source CV RCA Connector... -
Page 11: Installing The Vp-437Xl In A Rack
Installing the VP-437xl in a Rack Installing the VP-437xl in a Rack This section provides instructions for rack mounting the unit. -
Page 12: Connecting The Vp-437Xl Presentation Switcher / Scaler
1 You do not have to connect all the inputs and outputs, connect only those that are required 2 Alternatively, you can connect the DVI connector on the DVD player to the HDMI connector on the VP-437xl via a DVI-HDMI adapter. When using this adapter, you can connect the audio signal via the terminal block connector... -
Page 13: Figure 2: Connecting The Vp-437Xl Presentation Switcher / Scaler
Connecting the VP-437xl Presentation Switcher / Scaler Figure 2: Connecting the VP-437xl Presentation Switcher / Scaler... -
Page 14: Using The Vp-437Xl
You can also implement this feature every time the input is switched to VGA or when the input resolution changes, via the FINE TUNE menu ( Table 7.2 Using the OSD Menu The control buttons let you control the VP-437xl via the OSD menu. Press the: • MENU button to enter the menu •... -
Page 15: The Main Menu
Using the VP-437xl 7.2.1 The MAIN MENU Table 3 defines the MAIN MENU features and functions. Table 3: The MAIN MENU Features Mode Function CONTRAST Set the contrast BRIGHTNESS Set the brightness FINETUNE (see section 7.2.2) COLOR Set the red, green and blue shades (0 to 100, default 48, 48 and 52 respectively) -
Page 16: The Finetune Menu
Using the VP-437xl 7.2.2 The FINETUNE Menu Table 4 defines the FINETUNE menu: Table 4: The FINETUNE Menu Features Input Signal Parameter Function CV, YC, Set the hue COMPONENT SATURATION Set the saturation SHARPNESS Set the sharpness NOISE REDUCTION Select the noise reduction: OFF, HI, LOW and MID (middle) -
Page 17: The Osd Menu
DISPLAY Select between INFO, ON, OFF 7.3 Connecting to the VP-437xl via RS-232 You can connect to the unit via a crossed RS-232 connection, using for example, a PC. A crossed cable or null-modem is required as shown in method A and B respectively. If a shielded cable is used, connect the shield to pin 5. -
Page 18: Connecting The Vp-437Xl Via The Ethernet Port
Figure 4: Straight Cable RS-232 Connection with a Null Modem Adapter 7.4 Connecting the VP-437xl via the ETHERNET Port To connect and configure the Ethernet port of the VP-437xl, refer to the ETHERNET Configuration (Lantronix) GUIDE on our Web site: http://www.kramerelectronics.com... -
Page 19: Controlling Via The Infrared Remote Control Transmitter
Using the VP-437xl 7.5 Controlling via the Infrared Remote Control Transmitter You can control the VP-437xl from the infrared remote control transmitter, as Figure 5 Table 7 define: Table 7: Infrared Remote Control Transmitter Functions SIZE POWER Keys Function SIZE... -
Page 20: Technical Specifications
Technical Specifications Technical Specifications Table 8: Technical Specifications of the VP-437xl Presentation Switcher /Scaler INPUTS: 2 HDMI connectors 1 VGA on a 15-pin HD connector 1 composite video on an RCA connector 1 YC on a 4-pin connector 2 component video each on 3 RCA connectors... -
Page 21: Rs-232 Communication Protocol
RS-232 Communication Protocol RS-232 Communication Protocol The following is the COM port setting: Baud Rate: 9600bps Parity: None Data Bits: 8bits Stop Bits: 1bit Set CTS Mode: Off Set XON/XOFF: Off Table 10 defines the symbol characters: Table 10: Character Symbols Definitions Symbol Meaning Space... -
Page 22: Table 11: Rs-232 Protocol
0~100 Color: Red 2: Get 1: Set 0~100 Color: Green 2: Get 1: Set 0~100 Color: Blue 2: Get 1: Set 0~100 Brightness 2: Get 1: Set 0~100 Contrast 2: Get 1: Set 2: Get 0~100 KRAMER: SIMPLE CREATIVE TECHNOLOGY... - Page 23 RS-232 Communication Protocol Control Type Function Param (for Set) Function Description Comment 1: Set 0~100 Sharpness 2: Get 1: Set 0~100 Saturation 2: Get 1: Set 0~100 Output volume setting 2: Get 1: Set 0~100 Input volume setting 2: Get 0: Set Volume down 0: Set...
- Page 24 0: Off 6: Set Freeze 7: Get 1: On 6: Set 0: Off Blank 7: Get 1: On 0: Off 6: Set Mute 7: Get 1: On 0: Off 6: Set Key lock 7: Get 1: On KRAMER: SIMPLE CREATIVE TECHNOLOGY...
- Page 25 EXCLUSION OF DAMAGES The liability of Kramer for any effective products is limited to the repair or replacement of the product at our option. Kramer shall not be liable for: 1. Damage to other property caused by defects in this product, damages based upon inconvenience, loss of use of the product, loss of time, commercial loss;...
- Page 26 For the latest information on our products and a list of Kramer distributors, visit our Web site: www.kramerelectronics.com, where updates to this user manual may be found. We welcome your questions, comments and feedback. Safety Warning: Disconnect the unit from the power supply before opening/servicing.
Need help?
Do you have a question about the VP-437xl and is the answer not in the manual?
Questions and answers