Table of Contents
Advertisement
Advertisement
Table of Contents

Related Manuals for REMEHA iSense


Summary of Contents for REMEHA iSense
- Page 1 Digital timer thermosatat iSense Installation and Service Manual 120666-AG...
-
Page 2: Table Of Contents
Contents Preface ......................4 General ..............4 Location of the installation ................5 Position of the regulator ........5 Installation and connection .........6 Location of the outside sensor ......7 Room sensor ............7 Start-up ......................8 Fitted control unit ..........8 3.1.1 Meaning of the symbols on the display ....8 3.1.2 Functions of the keys ..........9 Setting language, time and date ......9... - Page 3 Contents 4.3.10 Comfort correction ..........18 4.3.11 Legionella function ..........18 4.3.12 Controlling the tap water temperature ....18 4.3.13 Central heating settings ........20 4.3.14 Frost protection - System ........21 4.3.15 Frost protection - Room ........21 Selecting the control strategy ..............22 Six control strategies .........22 Setting the control strategy .......23 Specific settings for weather-compensated control ..............24...
- Page 4 030211 - 120666-AG...
-
Page 5: Preface
1. Preface Preface General The Remeha iSense is a timer thermostat with many enhanced functions. The controller is supplied in a OpenTherm and RF variant: 4 iSense OpenTherm. 4 iSense OpenTherm RF(Wireless). With the iBase RF transmitter. This installation and service manual describes all the functions of the iSense. -
Page 6: Location Of The Installation
2. Location of the installation iSense Location of the installation Position of the regulator Controller OpenTherm and controller RF The controller is set to room control by default. The controller can be installed on an inside wall or in a boiler, if the boiler is suitable for this. -
Page 7: Installation And Connection
2. Location of the installation Installation and connection Before you can connect the controller, you must first: 4 Adjust the boiler so that it can be connected to a OpenTherm controller. See the installation and service manual for the boiler. -
Page 8: Location Of The Outside Sensor
2. Location of the installation iSense 4. (Only controller OpenTherm) Place 3 AA batteries in the controller if necessary. These are not supplied. The batteries ensure that the clock keeps running when the boiler is switched off. The batteries also power the backlights of controllers for boilers that do not have OpenTherm Smart Power. -
Page 9: Start-Up
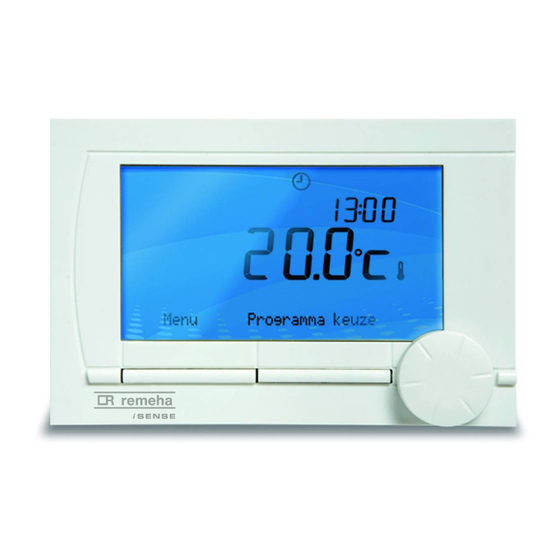
3. Start-up Start-up Fitted control unit 3.1.1. Meaning of the symbols on the display Pictograms Textbox Pictograms Temperature Time menus Clock program active Clock program A active Clock program B active Continuous day temperature Continuous night temperature Frost protection... -
Page 10: Functions Of The Keys
3. Start-up iSense 3.1.2. Functions of the keys The controller is menu-controlled, which means it is very simple to operate. It only has three buttons. The function of button A and button B depends on the task you are carrying out. - Page 11 3. Start-up You can of course adapt the clock programs to your own requirements. ¼ "Defining or modifying a timer program", page 030211 - 120666-AG...
-
Page 12: Setting
4. Setting iSense Setting Changing the settings 4.1.1. Defining or modifying a timer program Time MO 20℃ 20℃ 20℃ 20℃ 20℃ 7:00 15℃ 15℃ 15℃ 15℃ 20℃ 20℃ 9:00 11:00 13:00 15℃ 15:00 17:00 19:00 21℃ 21℃ 21℃ 21℃ 21℃... -
Page 13: Setting Continuous Temperatures
4. Setting 4. Go to the time you want to set. Press button C to confirm You can use the Remove button to remove the selected switch time. 5. Use button C to set the time and the corresponding desired temperature. -
Page 14: Setting The Holiday Mode
4. Setting iSense The Night temp setting is also used in combination with the functions Day temperature limit, Night temperature limit ¼ "Specific settings for weather-compensated control", page 24 DHW standby function ¼ "Controlling the tap water temperature", page 18. -
Page 15: Operating The Controller
4. Setting Operating the controller 4.2.1. Selecting a program You can select one of the following programs via Program in the main display: 4 Clock prog.: The central heating temperature is controlled by the program you have set. 4 Continuous day program: The temperature remains constant at the day temperature you have set. -
Page 16: Fireplace Mode
4. Setting iSense 4.2.3. Fireplace mode Once the temperature has reached the desired level in the room where the controller is located, the central heating switches off. This may be inconvenient if you have an open fire. Or if a lot of people are present. -
Page 17: Changing Usage Settings
4. Setting Changing usage settings 4.3.1. Setting the display Set the following via: Menu > Settings > Users > Display Large information line Small information line 4 Info line small: Select what information should be displayed on the small information line. -
Page 18: Resetting Factory Settings
4. Setting iSense Some settings can only be changed in the mode Extended mode. The settings you create remain enabled in the modes Basic mode and Normal mode. 4.3.5. Resetting factory settings You can reset all settings, including the clock program, to the works setting via: Menu >... -
Page 19: Comfort Correction
4. Setting Other: You can set the start and end of summer time yourself by indicating the month and the week. The time will change on the Sunday. Manual: The controller does not switch between summer and winter time. The time must be changed manually. - Page 20 4. Setting iSense Both functions are active simultaneously. The T icon is shown in the display when DHW standby is switched off. Time Desired room temperature 07:00 20℃ 09:00 15℃ T 11:00 13:00 15:00 17:00 19:00 21℃ 21:00 23:00 15℃ T...
-
Page 21: Central Heating Settings
4. Setting The maximum temperature that can be set depends on the boiler settings. When setting a clock program, start this an hour before you require the first hot water. This gives the boiler sufficient time to heat up. -
Page 22: Frost Protection - System
4. Setting iSense 4.3.14. Frost protection - System You can use the frost protection system option to protect radiators in frost-sensitive rooms against freezing. For example: The temperature in the home at night does not drop below 19℃, which means the pump does not come on. -
Page 23: Selecting The Control Strategy
5. Selecting the control strategy Selecting the control strategy Six control strategies The controller can be used as a weather compensator or as a room thermostat (Room control). Six control strategies are available for this. 1 RTC: (Modulating control) Room control The control measures the room temperature in the reference room (the room where the thermostat is located). -
Page 24: Setting The Control Strategy
5. Selecting the control strategy iSense Adjustments are not needed in the room where the controller is located. Any radiator valves present in the reference room must be fully opened. 4 OTC + C-RT: Weather-compensated with comfort function The basis of this control strategy is the same as weather- compensated control. -
Page 25: Specific Settings For Weather-Compensated Control
5. Selecting the control strategy Specific settings for weather-compensated control If you have opted for a weather-compensated control strategy, a Increased room temperature during the day number of extra settings are available via: Menu > Settings > Desired room temperature of 20ºC during the day System >... -
Page 26: Heating Curve - For Example
5. Selecting the control strategy iSense Heating curve - For example The settings for the heating curve are highly dependent on the design of the central heating system and the home. This means that no clear advice can be given on this matter. Use the tables below as a basic setting if you do not know the design information. -
Page 27: Installer Settings
6. Installer settings Installer settings Telephone number for service messages and failure signals You can enter a telephone number to be shown if the boiler displays a service message or failure signal. Select: Menu > Settings > Installer > Phone number > Service... -
Page 28: Examples
6. Installer settings iSense 2. Use Function to select the command that the controller has to perform when ordered to by the external module. - Not used: The digital input is switched off. - Day temp.: The continuous day program is switched on. - Page 29 6. Installer settings Door contact FUNCTION The temperature switches to continuous night temperature after 3 minutes if the door opens. The controller immediately switches back to its normal program when the door closes. SETTING Connect a door contact to the digital input and set the digital input as follows: 4 Mode: Night temp.
-
Page 30: Boiler Setting
6. Installer settings iSense Boiler Setting You can choose a number of specific boiler settings via: Menu > Settings > Installer > Boiler settings: After setting code 0012, depending on the boiler, parameters can be changed. 4 Parameters: Use the boiler manual, when changing the boiler parameters. -
Page 31: Messages
7. Messages Messages Error messages This is what a fault message or service message looks like: N o c o n n e c t i o n Fault indication t o o u t s i d e... -
Page 32: Maintenance Message
7. Messages iSense Error codes Fault indication Display text Solution Current water The water pressure in your Top up the water in the central heating system. See The water pressure pressure central heating system is the installation and service manual for the boiler. - Page 33 7. Messages Problem Solution It takes a long time for the tap Boiler: It may be that the DHW standby function is switched off. water to get up to temperature. In that case, the symbol T is shown in the display.
-
Page 34: Menu / Technical Data
8. Menu / Technical data iSense Menu / Technical data Menu structure For user levels Basic and Normal, some menu items are not visible. The Set boiler menu depends on the options offered by the boiler. Menu options Factory setting Program Clock prog. - Page 35 8. Menu / Technical data Menu options Factory setting Remote input Allow ☑ Disallow ⃞ Phone number Service Repair Service report ☑ ⃞ Service code ☑ ⃞ Settings Installer Boiler settings Parameters Restore param. Reset service Start detection Settings...
-
Page 36: Technical Characteristics
8. Menu / Technical data iSense Menu options Factory setting Settings Anti-Legionella Activate on... ⃞ ☑ Standby Continuous off ⃞ Continuous on ⃞ Night temp off ☑ DHW temperature Temperature ☑ 60℃ Clock prog. ⃞ Settings Time/date Set time Set date... - Page 37 8. Menu / Technical data Specifications Date: Day - Month - Year. Automatic switching to summer time Programs 2 clock programs with 6 switch points per day Boiler clock program with 6 switch points per day 16 Holiday programs...
- Page 40 © Copyright All technical and technological information contained in these technical instructions, as well as any drawings and technical descriptions supplied, remain our property and shall not be multiplied without our prior consent in writing. 030211 120666...
Need help?
Do you have a question about the iSense and is the answer not in the manual?
Questions and answers
Fehler 203, Heizung startet ****.
What does error code A02.06 mean? What do I have to do?