Paradox DGP2-648 User Manual
Digiplex 848 48-zone led keypad
Hide thumbs
Also See for DGP2-648:
- User manual (48 pages) ,
- Installer's manual (28 pages) ,
- Manual (12 pages)
Table of Contents
Advertisement
Quick Links
Advertisement
Table of Contents

Subscribe to Our Youtube Channel
Related Manuals for Paradox DGP2-648


Summary of Contents for Paradox DGP2-648
- Page 1 48-Zone LED Keypad User Manual DGP2-648...
-
Page 3: Table Of Contents
TABLE OF CONTENTS INTRODUCTION ............3 BASIC OPERATION ..........4 Auditory Feedback (Beep Tones) ......5 Keypad Indicator Lights .......... 5 PARTITIONED SYSTEM ........... 7 Area Display............7 ZONES ............... 8 Zone Display ............8 ARMING ..............9 Exit Delay Timer............9 Regular Arming ............ - Page 4 ACCESS CODES ............ 19 System Master Code..........19 User Access Codes..........20 Area Assignment ..........24 Erasing Access Codes ......... 25 Keypad Lock-Out ..........25 TROUBLE DISPLAY ..........26 ADDITIONAL FEATURES ........29 Programmable Outputs (PGMs)......29 Panic Alarms ............29 Programming Chime Zones .........
-
Page 5: Introduction
1.0 INTRODUCTION Your security system uses advanced technology which will provide you with reliable security protection and powerful features that are easy to use. Since you will communicate your instructions to the system through your keypad, please read this manual carefully and have your installer explain basic system operation. -
Page 6: Basic Operation
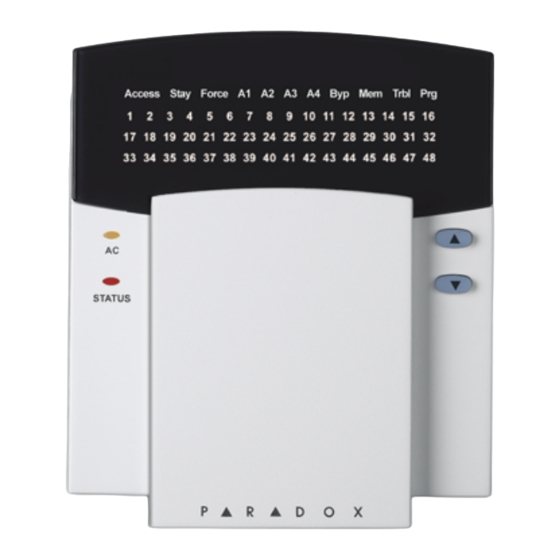
2.0 BASIC OPERATION The system communicates by illuminating the “AC” light, the “Status” light and the various lights on the screen as shown in figure 1. Figure 1: Keypad Overview Area Lights: (A1, A2, A3 and A4) ON = Area armed OFF = Area disarmed FLASH = Area in alarm Action Lights: (Access, Stay,... -
Page 7: Auditory Feedback (Beep Tones)
2.1 A UDITORY EEDBACK ONES When you enter information on your keypad, it will guide you with beep tones to communicate acceptance or rejection of your entries. Confirmation Beep: When an operation (i.e. arming/disarming) is successfully entered or when the system switches to a new status/ menu, your keypad... - Page 8 2.2.2 C ONFIDENTIAL The installer can program your keypad not to display the status of your system by changing the keypad from Normal Mode to Confidential Mode. This occurs when your keypad has been inactive for a period of time defined by your installer. In Confidential Mode all the indicator lights will turn off.
-
Page 9: Partitioned System
3.0 PARTITIONED SYSTEM Your installer can set your keypad to recognize separate protected areas. A separated system is called a partitioned system, which can be useful in situations where shared security systems are more practical. For example, a company that has both an office and a warehouse area, can arm and disarm each area separately while controlling access to each area. -
Page 10: Zones
In Area Status Display, the following will illuminate for the area selected: • The area lights (A1, A2, A3, and A4) if the associated area is armed. For example, if you have selected area 3 and it is currently armed, A3 will illuminate. •... -
Page 11: Arming
5.0 ARMING When the system is armed, it will respond to any breach in the zones according to the way each zone is programmed. For example, if someone opens a window that is armed, the system can trigger an alarm and alert your security company. 5.1 E ELAY IMER... -
Page 12: Stay Arming
5.3 S RMING Stay Arming will partially arm your system to permit you to remain in the protected area. For example, you can arm your doors and windows at home without arming the motion detectors so you will be protected while you sleep. Only User Access Codes with the Stay and Instant Arm option enabled can Stay Arm the system. -
Page 13: Force Arming
How do I Instant Arm? 1) Enter your [Access Code]. Your keypad will emit a Confirmation Beep. The A action light will flash. CCESS 2) Press the [5] key. If you have access to more than one area, press the number key representing the area you want to Instant Arm or the [0] key for all assigned areas. -
Page 14: One-Touch Keys
You may use the One-Touch keys (see section 5.6) or a keyswitch (see section 5.7) to arm the area. Ask your installer for details. 5.6 O OUCH Your installer can program your system to respond to certain features with the touch of a key. You will then access these features without using your User Access Code by pressing and holding the desired key. -
Page 15: Auto-Arming
5.7.2 M OMENTARY KEYSWITCH To arm the system, place it in the “ON” position briefly then place it back in the “OFF” position. Repeating this process will disarm the system. 5.8 A RMING You can program one or more areas to arm automatically. Ask your installer for details. -
Page 16: Bypass Programming
If you have access to more than one area, the symbol(s) corresponding to the area(s) for which you have access will illuminate in sequence. Press the number key representing the area you want to arm. To view the time set, instead of entering the time in Step 4, the first number of the time you set will illuminate. - Page 17 Fire Zones cannot be bypassed. How do I bypass a zone? 1) Enter your [Access Code]. Your keypad will emit a Confirmation Beep and the A action light will flash. CCESS 2) Press the [Byp] key. The P action light will illuminate and the action light will flash.
- Page 18 2) Press the [Byp] key. Your keypad will emit a Confirmation Beep and the P action light will illuminate. The B action light will also flash. 3) Press the [Mem] key. All zones (numerical lights) bypassed during the last time the system was armed will illuminate and will be bypassed.
-
Page 19: Disarming
6.0 DISARMING When the system is disarmed, the system deactivates the zones so the alarm will not be triggered if zones are breached. Any user can disarm the system unless their code has been assigned the Arm Only option. 24hr. zones/Fire Zones are always active (enabled), therefore will always generate an alarm if triggered. -
Page 20: Alarm Memory Display
How do I disarm a system in alarm? 1) Enter your [Access Code]. 2) Call your security company quickly to advise them of the alarm. In case of a burglar alarm, leave the premises and call your security company from a safe place. 6.3 A LARM EMORY... -
Page 21: Access Codes
7.0 ACCESS CODES Access Codes are codes that will allow you and others to access the system. These codes can be programmed to permit access to all or some features and areas. The installer will program User Access Codes to be four digits, six digits, or variable from one to six digits in length. -
Page 22: User Access Codes
4) Enter either numbers [0] and [1] (for a Digiplex 848 system) or [0], [0], [1] (for a DigiplexNE system). Your keypad will emit a Confirmation Beep. The P action light and the numerical light of the first number in the code will illuminate (10 = zero). The area light(s) and A action light will turn off. - Page 23 How do I program a user access code? 1) Enter your [System Master Code] or [Access Code] with Master feature. 2) Press the [0] key to enter the User Programming Menu. The area lights of areas assigned to your User Access Code and the P action light will flash.
- Page 24 If your keypad emits a Rejection Beep, you may have chosen an existing User Code or the Master Code used to modify or create the code does not have access to the User Options or Area Assignment programmed. To view the programmed code, instead of entering the User Code in Step 5, the first number of the code programmed will illuminate.
- Page 25 Press option ON/OFF Option Description Duress Feature OFF (default) Duress feature disabled. Duress feature enabled. Sends a silent alarm to the security company when you enter your code. For use when someone forces you to disarm areas. Bypass Feature Bypass feature disabled. ON (default) Bypass feature enabled.
-
Page 26: Area Assignment
User Access Code. When option [8] is OFF, the keypad will only permit access to the areas it controls. This option is active but not functional on the DGP2-648 keypad. 7.3 A SSIGNMENT In a partitioned system the system can be divided into distinct protected areas. -
Page 27: Erasing Access Codes
Table 2: Area Assignment Press Key ON/OFF Area Assignment [1] ON (default) Access to Area 1 [2] ON Access to Area 2 [3] ON Access to Area 3 [4] ON Access to Area 4 All keys OFF Controls PGMs only (if PGMs programmed installer). -
Page 28: Trouble Display
8.0 TROUBLE DISPLAY When your system experiences problems or is tampered with, the action light will illuminate. Most of the trouble conditions will be programmed by your installer to be reported directly to your security company (if connected). Your keypad will only display troubles, which occur in the area(s) to which the keypad has been assigned. - Page 29 8.0.1 G [1]: S ROUP YSTEM Trouble [1]: AC Failure This means that your system is running on the backup battery. The AC light on your keypad will be turned off during a power failure. If this trouble occurs when your establishment is not experiencing a power failure, call your security company for repairs.
- Page 30 cleaned or a wireless device is no longer communicating with its receiver. 8.0.5 G [8]: C ROUP LOCK The time and date have been reset to the default. This is the only trouble that we recommend that you correct. How do I set the time within the trouble menu? 1) Press the [8] key.
-
Page 31: Additional Features
9.0 ADDITIONAL FEATURES 9.1 P (PGM ROGRAMMABLE UTPUTS Your system includes two or more programmable outputs (PGMs), which can be programmed by your installer. A PGM triggers when a predetermined event or series of events occurs in your system. The PGMs can be programmed to reset smoke alarms, turn on light switches, open or close garage doors and much more. -
Page 32: Programming Chime Zones
for two seconds, the system will generate an alarm. The alarm can be programmed to be either silent or audible according to your preference. 9.3 P ROGRAMMING HIME ONES You can program your keypad to emit a rapid, intermittent beep whenever designated zones are opened or only when opened between certain hours. - Page 33 9.3.2 S ETTING A HIME ERIOD How do I program all the keypad’s Chimed Zones to beep only when they open between specific hours? 1) Enter your [Access Code]. Your keypad will emit a Confirmation Beep. The A action light will flash. CCESS 2) Press the [9] key to enter the Chiming Menu.
-
Page 34: Programming The Time
9.4 P ROGRAMMING THE How do I program the time? 1) Enter your [Access Code]. 2) Press the [TRBL] key. 3) Press the [8] key. 4) Enter the hour and minutes according to the 24-hour clock (i.e. 9AM is 09:00 and 9PM is 21:00). 5) Enter the correct date according to yyyy/mm/dd. -
Page 35: Quick Function Keys
10.0 QUICK FUNCTION KEYS You will only need to use the Quick Function keys upon your installer or security company's request. Only the System Master Code or User Access Codes with the Master feature enabled will be able to access these functions. How do I Access the Quick Function keys? 1) Enter your [System Master Code] or [Access Code] with Master feature. -
Page 36: Fire And Burglar Alarms
11.0 FIRE AND BURGLAR ALARMS 11.1 S TANDARD During a fire alarm, the bell/siren will emit an intermittent sound ) until silenced or reset. If the zone is a standard Fire BEEP BEEP BEEP Zone, the system can immediately send an alert to your security company. - Page 37 Figure 2: Delayed Fire Zone Digiplex 848/DigiplexNE LED Keypads...
-
Page 38: Fire Safety Tips
What do I do if the fire alarm is set off accidentally? 1) Press the [Clear] key within 30 seconds of the alarm. 2) Clear the problem from the area. 3) If problem remains, the alarm will sound again. Press the [Clear] key again. -
Page 39: Minimizing Home Fire Hazards
11.4 M INIMIZING AZARDS How can you avoid the four most common causes of fires at home? 1) Never leave cooking food unattended. Cooking fires often result from unattended cooking and human error, rather than mechanical failure. 2) Stay alert when smoking. Careless smoking is the leading cause of fire deaths. -
Page 40: Testing And Maintenance
12.0 TESTING AND MAINTENANCE 12.1 B URGLAR LARM ESTING This test requires two people. One person will watch the keypad while the other person walks around and opens the zones (i.e. open the doors and windows that are protected). The numerical lights for the opened zones will illuminate when opened (or breached). - Page 41 How do I conduct the system test? 1) Call the security company to advise them that you are testing the system. 2) Enter your [Access Code]. 3) Press the [8] key. The system will test all its connections and can send a report to your security company.
- Page 42 Specifications may change without prior notice. For the latest information on product approvals, such as UL and CE, please visit our Web site at www.paradox.ca Digiplex 848 and DigiplexNE are trademarks of Paradox Security Systems © 2002 Paradox Security Systems 40 User’s Manual...
- Page 44 780 Industriel Blvd., Saint-Eustache (Quebec) J7R 5V3 CANADA Tel.: (450) 491-7444 Fax: (450) 491-2313 www.paradox.ca PRINTED IN CANADA 11/2003 DGP2648-EU06...
Need help?
Do you have a question about the DGP2-648 and is the answer not in the manual?
Questions and answers