Table of Contents
Advertisement
Advertisement
Table of Contents

Subscribe to Our Youtube Channel
Related Manuals for TECHVIEW QV-3039


Summary of Contents for TECHVIEW QV-3039
- Page 1 16 Channel H.264 DVR Model No QV -3039 USER’S MANUAL...
-
Page 2: Table Of Contents
User Manual Contents CONTENTS ..................................1 SAFETY INSTRUCTION ..............................4 CHAPTER 1 FEATURES AND FUNCTIONS ........................1 CHAPTER 2: OVERVIEW ..............................2 2.1 16- CH DVR Front Panel ............................. 2 2.2 16- CH DVR Rear Panel ............................. 3 2.3 16-CH R .............................. - Page 3 User Manual 5.2.4.6 DDNS Set ....................................20 5.2.5 Alarm ..................................20 5.2.5.1 Motion ..................................... 20 5.2.5.2 Alarm Set ....................................21 5.2.6 Device ..................................22 5.2.6.1 HDD Set ....................................22 5.2.6.2 PTZ Set ..................................... 23 5.2.6.3 Serial Set ....................................23 5.2.7 System ..................................23 5.2.7.1 General ....................................
- Page 4 User Manual CHAPTER 7: APPENDIX ..............................40 7.1 O ..............................40 PERATION UNCTION ABLE 7.2 R ................................41 ECORD LARM SETTING 7.3 M ................................42 AIL BOX SERVER 7.4 T ................................. 42 ROUBLESHOOTING 7.5 U ................................43 SAGE AINTENANCE 7.6 S ..............................
-
Page 5: Safety Instruction
User Manual Safety Instruction 1. Read Instruction All the safety and operating instruction should be read before the equipment is operated. 2. Power sources This equipment should be operated only from the type of power source indicated on the marking label. If you are not sure of the type of power, please consult your equipment dealer. -
Page 6: Chapter 1 Features And Functions
User Manual Chapter 1 Features and Functions Function Brief and Description Double video output; with monitor, VGA virtual output port or HDMI Output; Real time Support net-viewer and MP live surveillance and also support zoom in/out, monitoring auto sequence and PIP display. H.264 video compression format;... -
Page 7: Chapter 2: Overview
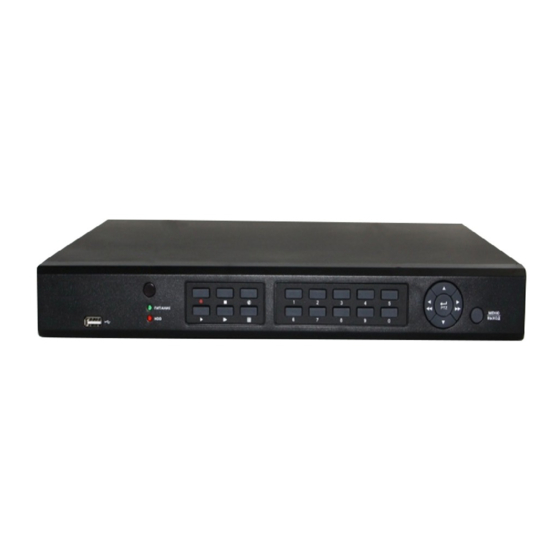
User Manual Chapter 2: Overview 2.1 16- CH DVR Front Panel Reminder: DVR is the abbreviation of Digital Video Recorder Equipment. Key title Item Type Marks Function /Indicator When the “Red” indicator flashes it means the hard HDD indicator drive is being read or written to. Indicator If the “Green”... -
Page 8: 16- Ch Dvr Rear Panel
User Manual 2.2 16- CH DVR Rear Panel Item Physical port Connection method Connect CH1-16(Virtual) video input(BNC interface) Video input Connect monitor output(BNC interface) Video output 4CH audio input (RCA interface) Audio Input Audio output (RCA interface); Audio output Connect USB device (Flash Drive, Hard Drive and Recorder USB Port etc) HDMI Output... -
Page 9: 16-Ch Remote Controller
User Manual 2.3 16-CH Remote Controller Key Title Key Function Press the button to enter into manual record. Press the button to enter into record search menu SEARCH Enter into Quad display 2×2 Enter into 9-split display 3×3 Enter into 16-split display 4×4 Enter into dwell time display AUTO... - Page 10 User Manual Mouse Operation Except using buttons of front panel or remote controller, you also can use mouse to perform system operation. TYPE Function In menu lock mode, Enter into pop-up menu and clicking any sub menu to pop up Log-in window; on menu unlock mode, enter into pop-up menu, and then clicking left key to enter into any sub menu directly.
-
Page 11: Chapter 3 Dvr Connection
User Manual Chapter 3 DVR CONNECTION 3.1 HDD Installation Caution: : : : Please do not Install or take out hard drive when DVR is running! HDD Installation:: (1) Cut power firstly, and then remove screws and open DVR upper cover carefully; (2) Insert Power Cord and data cable into Pin of hard drive securely;... -
Page 12: Live Interface
User Manual 4.2 Live Interface After finishing initialization the system will enter into After finishing initialization the system will enter into <Live> screen. Picture 4-2 is the 16-split display defaulted by system, which is showing no video input status. Once there system, which is showing no video input status. -
Page 13: Main Menu Guide
User Manual Live set 5.1 Main Menu Guide Display Output Set Privacy Zone Record Parameters Record Schedule Main Stream Record Search Clip Set Record Playback Search Backup Event Search Log search Network Set Sub stream Main Menu Email Set Network Mobile Set DDNS Set Motion Detection... -
Page 14: Main Menu
User Manual 5.2 Main Menu On <Live> mode, click [Menu] button on the front panel or Remote controller to enter into Main menu interface shown as Picture 5-2. And also you can click [ ] icon to enter the main menu screen. - Page 15 User Manual Go to [Main menu Display Output] Output] Click [Live] to pop up the interface Click [Live] to pop up the interface to enter into the output set interface enter into the output set interface shown as Picture 5-6. Now you could 6.
-
Page 16: Privacy Zone
User Manual 5.2.1.3 Privacy Zone The function Allow you setup privacy zone parameters according to Picture 5-12. Each channel could set up to four privacy zones, and please follow below steps to set: 1. Select the area no (Area 1 ~ Area 4); 2. -
Page 17: Main Stream
User Manual After you complete the schedule you activate it by clicking the [Apply] button. After you complete the schedule you activate it by clicking the [Apply] button. You can also click on the Default button You can also click on the Default button to use the system defaults. Explanation: Under the <record>... -
Page 18: Contents
User Manual Time Search: In the <Search screen> In the <Search screen>, user can search for a specific date and time for a recording and , user can search for a specific date and time for a recording and view it in Playback mode. This is useful for hunting a specific recording of an incident if you know the date view it in Playback mode. -
Page 19: Event Search
User Manual and/or end time (that is to say that is to say, click any points of the processing bar as start time and/or end time essing bar as start time and/or end time), Now, the whole time axis equals the time quantum you j Now, the whole time axis equals the time quantum you just selected (shown as Picture ust selected (shown as Picture 5-19B-1. -
Page 20: File Backup
User Manual (Last page): go to the last page. Clicking the [last] button will make you enter into last page quickly. ALL (Select all): Allows you to select all the events on the current page. Inverse (Select Invert): Allows you to select other events on the current page except those you have currently selected. - Page 21 User Manual Picture 5-25 Picture 5 Picture 5-26 Play button: click the icon to playback the backup record; Play button: click the icon to playback the backup record; : Pause button: click the icon to pause the backup record; Pause button: click the icon to pause the backup record; :...
-
Page 22: Log Search
User Manual 5.2.3.6 Log Search Herein allow you preview the log information you Go to [Main menu Search Log] option to have searched. And click [Backup] to export all enter into the Log search interface shown as the log information which is listed. For other Picture 5-28. -
Page 23: Mobile Set
User Manual Friendly Reminder: All the parameters you set are available only when you click [Apply] and after system are All the parameters you set are available only when you click [Apply] and after system are All the parameters you set are available only when you click [Apply] and after system are restarted. -
Page 24: Router's Port Forwarding
User Manual 4、 System auto restart; 5、 User name and password of mobile is consistent User name and password of mobile is consistent with DVR 5.2.4.3 Router’s Port Forwarding Router’s Port Forwarding Port forwarding is required when you want to access the DVR connected to the router from outside of the required when you want to access the DVR connected to the router from outside of the required when you want to access the DVR connected to the router from outside of the router’s network. -
Page 25: Ddns Set
User Manual Sender address: indicates sender’s email address. The email address should be consistent with the server you use. That is to say, when you use email address – aaa@gmail.com, the according server should be smtp.gmail.com. Receiver address: indicates receiver’s email address. The email address is used to receive image transmitted from DVR alarm. -
Page 26: Alarm Set
User Manual Latch time: you can set how long the buzzer will sound when object move is detected (10s, 30s, 40s, 60s); Show Message: You can set show message on the screen when motion alarm is detected. Buzzer time: you can set how long the buzzer will sound when motion is detected (off, 10s, 30s, 40s, 60s);... -
Page 27: Device
User Manual Post Recording: you can set how long alarm record will last when alarm ends (30s, 1minute,2minutes, 5minutes); Copy: allow you copy all the setting of one channel to other ones. Alarm Type Function Sends alarm when DVR can’t receive video signal (such as camera damage, cable broken or Video Loss damaged or power supply malfunction). -
Page 28: Ptz Set
User Manual 5.2.6.2 PTZ Set Click [Main Menu Device PTZ] to enter into the below window shown as Picture 5-47. You could select the channel you desire to control and set PTZ protocol (Pelco-D or Pelco-P), Baud Rate (1200, 2400, 4800, 9600), Data bit (8, 7, 6, 5), Stop bit (1, 2), Parity Check (None, Odd, Even, Mark, Space), Address Code and Cruise status respectively. -
Page 29: Users
User Manual Picture 5-51 Picture 5-50 Note: The above [NTP function] change will be available only when system connected to internet. And When NTP function is set to “Enable”, system will calibrate the time at every 00:07:50 and every start-up. 5.2.7.2 Users Click [Main Menu System users] option and then enter into the interface shown as Picture 5-51 Picture 5-53... -
Page 30: Information
User Manual 5.2.7.3 Information Click [Main Menu System Info] and then enter into the interface shown as Picture 5 Info] and then enter into the interface shown as Picture 5 Info] and then enter into the interface shown as Picture 5-55. Now user can check the current Device check the current Device name, Device ID, Device type, Device S/N, MAC... -
Page 31: Menu Lock
User Manual 5.3 Menu Lock Considering a system safety feature you can click [ a system safety feature you can click [ ] icon to lock system interface system interface when leaving the DVR. If you want to login to the DVR again login to the DVR again, you would input device code and password password to unlock the interface shown as Picture 5-59... -
Page 32: Pip Mode
User Manual 5.6 PIP Mode You can display a Picture-in-Picture in live mode. PIP has two display modes, including 1X1 display mode and 1X2 display mode. 1x1 display mode 1x2 display mode 5.7Record search You could enter into [Record Search] menu from Pop-up menu conveniently and quickly and search/playback the record histories. -
Page 33: Chapter 6: Web Application Manager
User Manual Chapter 6: Web Application Manager 6.1 ActiveX control download and installation Open your web browser and input the IP address and web port of DVR, such as : http://172.18.6.202:8080/ . If your computer is connected to internet, it will download and install “ActiveX” Plug-in automatically. -
Page 34: Web Application Manager Log - In
User Manual 6.2 Web Application Manager Log Web Application Manager Log-in After ActiveX controls installation ActiveX controls installation, please input user name, password and client port; and client port; and select <Main stream> or <sub stream>, and then allow you tick stream>... -
Page 35: Ptz Control
User Manual Or click the right key of mouse on each <Live> window to pop up the interface shown as Picture 6 key of mouse on each <Live> window to pop up the interface shown as Picture 6 key of mouse on each <Live> window to pop up the interface shown as Picture 6-4. Show bit rate: Right-click the Preview window and tick click the Preview window and tick-select the option to show current bit rate;... -
Page 36: Playback
User Manual 6.3.2 Playback Click [ ] icon to enter into <playback> interface shown Picture 6 ] icon to enter into <playback> interface shown Picture 6-7. Picture 6-7 6.3.2.1 Record search Firstly, select one day you want to check and tick Firstly, select one day you want to check and tick-select <synchronous Playback>... -
Page 37: Playback Control
User Manual If you tick-select < > option, that means the selected channel will playback synchronously; > option, that means the selected channel will playback synchronously; otherwise, you could separately control the channels playback. otherwise, you could separately control the channels playback. Thirdly, Click [ ] icon to start record playback. -
Page 38: Configuration
User Manual Record file download Click [ ] icon to enter into the below interface shown as Picture 6 below interface shown as Picture 6-12. Picture 6-12 Tick-select the record file you want to download and click [Start download] select the record file you want to download and click [Start download] System will download the record file in turn and save to local PC. -
Page 39: Record
User Manual 6.3.3.2 Record Click <Record> option to unfold its sub Click <Record> option to unfold its sub-options: Record parameter, Schedule and Main stream. options: Record parameter, Schedule and Main stream. Picture 6-15 Picture 6 Picture 6-16 1、 Record Parameters: Record Parameters: Under [Record parameters] option, allow you set channel, record enable, pack time you set channel, record enable, pack time... -
Page 40: Alarm Set
User Manual 2、Sub stream (shown as Picture 6 (shown as Picture 6-21): Relative parameters should be consistent with DVR local setting. 21): Relative parameters should be consistent with DVR local setting. Picture 6-21 3、 Email setting: Click [Email setting] option to allow you set alarm email configuration parameters shown Click [Email setting] option to allow you set alarm email configuration parameters shown Click [Email setting] option to allow you set alarm email configuration parameters shown as Picture 6-22. -
Page 41: Device
User Manual Picture 6-24 1、 Motion Detection: allow you configure its <Sensitivity>, <Alarm out>, <Alarm record> and <Alarm allow you configure its <Sensitivity>, <Alarm out>, <Alarm record> and <Alarm allow you configure its <Sensitivity>, <Alarm out>, <Alarm record> and <Alarm Capture>... -
Page 42: System
User Manual 2、PTZ: Configuration (shown as Picture on (shown as Picture 6-28): Details setting should be consistent with DVR local setting. setting should be consistent with DVR local setting. Picture 6-28 6.3.3.6 System Click <System> option to unfold its sub Click <System>... -
Page 43: Advanced
User Manual 6.3.3.7 Advanced Click <Advance> to unfold its sub-options: System update, Load default, Events and system maintain etc. options: System update, Load default, Events and system maintain etc. 1、 、 、 、 Click <Advance> to unfold its System update: allow you upgrade DVR system remotely shown as Pictur System update: allow you upgrade DVR system remotely shown as Picture 6- -32. -
Page 44: Local Setting
User Manual 3、 、 、 、 Events: Allow you configure abnormal type, buzzer output time, and alarm email and sh Allow you configure abnormal type, buzzer output time, and alarm email and sh Allow you configure abnormal type, buzzer output time, and alarm email and show message shown as Picture 6-36. -
Page 45: Chapter 7: Appendix
User Manual Chapter 7: Appendix 7.1 Operation Function Table Type Title Description Page Time setting Set system date/time, display format and day-light saving time Set system language Language select Set CH title and position; adjust image color parameter Channel value; set CH display to ON / Off and time display/recording setting time overlaying to On/Off. -
Page 46: Record Alarm Setting
User Manual playback PTZ control Remotely control PTZ camera, position, focus, zoom and iris etc. parameter Set local CH display, record, alarm, PTZ control set of DVR parameter value via network remotely Backup record file via network Network download Check device ID, software version and MAC System info address Auxiliary... -
Page 47: Mail Box Server List
User Manual 7.3 Mail box server List Web site Sender server( ( ( ( 25) ) ) ) Receiver server( ( ( ( 110) ) ) ) Mail box @163.com smtp.163.com pop3.163.com @vip.163.com smtp.vip.163.com pop.vip.163.com @188.com smtp.188.com pop.188.com www.163.com @126.com smtp.126.com pop3.126.com @netease.com... -
Page 48: Usage Maintenance
User Manual A: Check if the current screen is in Play mode, pressing [Stop] button to exit the Play mode and then you can enter into the [Record] function. Q: Why the Remote Controller can’t work normally? A: Check if the battery is power off; or check if the Remote Controller is broken. Q: Can we records whilst playing-back? A: Yeah, you can do it. -
Page 49: System Connection Diagram
User Manual 7.6 System Connection Diagram 7.7 Accessories 16 CH Accessories Power cord Power Adaptor User Manual Remote Controller Software CD USB Mouse... - Page 50 The material in this document is the intellectual property of our department . No part of this manual reproduced, copied, translated, transmitted, or published in any form or by any means without our department prior written permission. Our products are under continual improvement and we reserve the right to make changes without notice.
Need help?
Do you have a question about the QV-3039 and is the answer not in the manual?
Questions and answers
Hi, i have a techview model QV-3036, it still works perfectly, i just chanced a internet provider, now I don't know how to make my camera work. Please help me. Thanks