Table of Contents
Advertisement
Advertisement
Table of Contents

Related Manuals for Thecus N4100+


Summary of Contents for Thecus N4100+
- Page 1 Thecus N4100+ User’s Manual...
-
Page 2: Copyright And Trademark Notice
About This Manual All information in this manual has been carefully verified to ensure its correctness. In case of an error, please provide us with your feedback. Thecus Technology Corporation reserves the right to modify the contents of this manual without notice. -
Page 3: Safety Warnings
Safety Warnings For your safety, please read and follow the following safety warnings: Read this manual thoroughly before attempting to set up your N4100+. Your N4100+ is a complicated electronic device. DO NOT attempt to repair it under any circumstances. In the case of malfunction, turn off the power immediately and have it repaired at a qualified service center. -
Page 4: Table Of Contents
Table of Contents Copyright and Trademark Notice ........... 2 About This Manual ................. 2 Limited Warranty................2 Safety Warnings ................3 Table of Contents ................4 Chapter 1: Introduction ..............8 Overview ....................8 Product Highlights................. 8 File Server...................8 Media Server ..................8 FTP Server...................8 iTunes®... - Page 5 RAID Configuration ................24 RAID Level ....................24 Disk Settings .................... 25 Creating a RAID ..................25 Deleting a RAID ..................25 Folder Management ................26 Adding Folders ..................26 Editing Folders ..................27 Deleting Folders ..................27 Folder Access Control List (ACL) ..............27 Service Folders...................
- Page 6 Setting Up an Nsync Target on an Nsync Device..........57 Setting Up an Nsync Target on Another Device ..........58 Designating N4100+ as an Nsync Target............58 Thecus Backup Utility ................58 Windows XP Data Backup ..............60 Apple OS X Backup Utilities ..............60 Chapter 6: Tips and Tricks ............
- Page 7 Overview ..................... 74 Benefits ....................74 Improved Performance ................ 74 Data Security..................74 RAID Levels..................74 RAID 0....................74 RAID 1....................75 RAID 5....................75 JBOD ....................75 Stripe Size ................... 75 Disk Usage ..................75 Appendix D: Active Directory Basics ..........76 Overview .....................
-
Page 8: Chapter 1: Introduction
Chapter 1: Introduction Overview Thank you for choosing the Thecus N4100+ IP Storage Server. The Thecus N4100+ is an easy-to-use storage server that allows a dedicated approach to storing and distributing data on a network. Data reliability is ensured with RAID features that provide data security and recovery—over three Terabyte of storage... -
Page 9: Backup Server
To set up the Printer Server, refer to Chapter 4: Additional Feature Setup > Printer Server. Package Contents Your N4100+ package should contain the following items: • Thecus N4100+ NAS Device • Accessory Pack: Power cord RJ-45 Ethernet cable hard disk screws... -
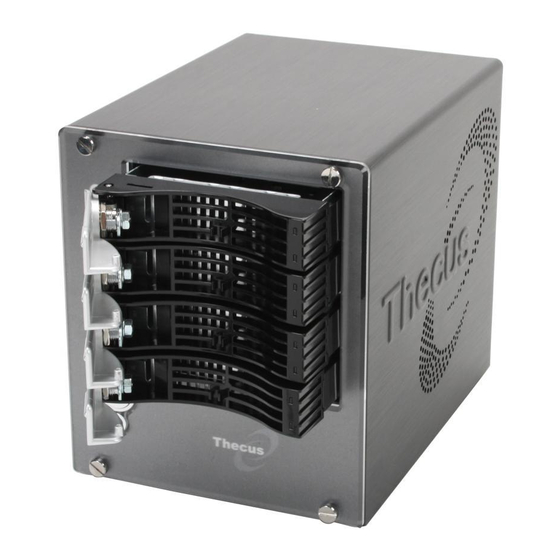
Page 10: Front Panel
Front Panel The N4100+’s front panel displays the unit’s array of status LEDs, and is also where you’ll find the reset and power buttons. See the table below for a detailed explanation of each: Item Description HDD Trays • There are four hard disk drive (HDD) trays. Each tray supports a 3.5-inch SATA HDD. -
Page 11: Rear Panel
Rear Panel The rear panel of the N4100+ houses the USB and Ethernet connections, as well as the power connector. See the table below for descriptions of each: Item Description Power Connector • Connect the included power cord to this connector WAN Port •... -
Page 12: Chapter 2: Getting Started
1. Remove an HDD tray from the Thecus N4100+. 2. Slide the new HDD into the tray and fasten the screws. 3. Insert the HDD and tray back into the Thecus N4100+ until it snaps into place and lock it with a key if desired. -
Page 13: Checking System Status
Chapter 7: Troubleshooting Guide. Installation Wizard The handy Thecus Setup Wizard makes configuring N4100+ a snap. To configure the N4100+ using the Setup Wizard, perform the following steps: 1. Insert the installation CD into your CD-ROM drive (the host PC must be connected to the network). - Page 14 4. Select the N4100+ that you like to configure. 5. Login with the administrator account and password. The default account and password are both “admin”. 6. Name your N4100+ and configure the network IP address. If your switch or router is configured as a DHCP Server, configuring the N4100+ to automatically obtain an IP address is recommended.
- Page 15 The Thecus Setup Wizard is designed for installation on systems running Windows NOTE XP/2000 or Mac OSX or later. Users with other operating systems will need to install the Thecus Setup Wizard on a host machine with one of these operating systems before using the unit.
-
Page 16: First Time Setup
First Time Setup Once the hardware is installed, physically connected to your network, and powered on, you can now configure the Thecus N4100+ so that it is accessible to your network users. Follow the steps below for initial software setup. -
Page 17: Step 4: Select Raid Level
2. Set host name and specify the domain name. 3. Enable DHCP for setting the IP automatically or Disable DHCP to enter your own IP settings. 4. Repeat steps 2 and 3 for the LAN item under the Network menu to configure the LAN port. -
Page 18: Step 6: Create Folders And Set Up Acls
For more information on configuring Active Directory, see Chapter 4: System Management > User and Group Management > ADS/NT Configuration. For information about the benefits of Active Directory, see Appendix D: Active Directory Basics. Step 6: Create Folders and Set Up ACLs Once users are introduced into your network, you can begin to create various folders on the N4100+ and control user access to each using Folder Access Control Lists. -
Page 19: Chapter 3: System Management
Chapter 3: System Management Overview The N4100+ provides an easily accessible web management interface. With it, you can configure and monitor the N4100+ anywhere on the network. Web Administration Interface Make sure your network is connected to the Internet. To access the N4100+ Login Page: 1. -
Page 20: Menu Bar
Menu Bar The Menu Bar is where you will find all of the information screens and system settings of the N4100+. The various settings are placed in the following groups on the menu bar: Menu Bar Item Description Status Current system status of the N4100+. Storage Information and settings for storage devices installed into the N4100+. -
Page 21: Status Menu
Status Menu The Status Menu on the menu bar allows you to see various aspects of the N4100+. From here, you can discover the status of the N4100+, and even find out other details like firmware version and up time. Product Information Once you login, you will first see the basic Product Information screen providing... -
Page 22: System Information
System Information From Status menu, choose the Info item, and the System Information screen appears. You can change the system information that appears on uPnP devices screens (i.e. Network Neighborhood) on Windows-based systems by entering the new information here and pressing Apply to confirm. -
Page 23: Storage Management
Storage Management The Storage Menu displays the status of storage devices installed or connected to the N4100+, including disk and RAID information. Disk Information From the Storage menu, choose the Disks item and the Disks Information screen appears. From here, you can see various items about installed SATA hard disks. -
Page 24: Raid Configuration
RAID Information Item Description RAID Level Shows the current RAID configuration. Total Capacity Shows total capacity of the RAID configuration. Status Indicates status of the RAID. Can read either Healthy or Failed. Used Percentage Displays percentage of used RAID capacity. Stripe Size Shows the current disk stripe size. -
Page 25: Disk Settings
Disk Settings Using Disk Settings, you can select stripe size, choose which disks are RAID disks or the Spare Disk, as well as enter a name for each disk. Disk Settings Item Description RAID Check the boxes of the hard drives you wish to add to the storage volume. -
Page 26: Folder Management
Folder Management From the Storage menu, choose Folder, and the Folder screen appears. This screen allows you to create and configure folders on the N4100+ volume. Folder Item Description Folder name Displays the name of the folder. Description Provides a description of the folder. Press ACL (Access Control List) to configure which users have access to this folder. -
Page 27: Editing Folders
Editing Folders On the Folder screen, press the Edit button and the Edit Folder screen appears. This screen allows you to change folder information. After entering the information, press Apply to apply the changes. Press Back to return to the Folder screen. Edit Folder Item Description... -
Page 28: Service Folders
Service Folders The N4100+ automatically creates folders for its built-in applications. Service Folders Folder Name Description Photos Default directory for your photos. Music Music for the iTunes Server is located here. The iTunes server will share the music located in this directory. Video Default directory for your video files. -
Page 29: Network Management
Network Management Use the Network menu to make network configuration settings as well as service support settings. WAN Configuration From the Network menu, choose WAN, and the WAN Configuration screen appears. This screen displays the network parameters of the WAN connection. You may change any of these items and press Apply to confirm your settings. -
Page 30: Lan Configuration
LAN Configuration The N4100+ supports a second Ethernet port for higher service availability. To configure these ports, choose LAN from the Network menu, and the LAN Configuration screen appears. Press Apply to save your changes. LAN Configuration Item Description MAC Address Displays the MAC address of the LAN interface. -
Page 31: Wlan Configuration
WLAN Configuration When a compatible wireless USB dongle is installed on the N4100+, the N4100+ will become an access point, and the Network dropdown menu will contain a WLAN menu item. From the Network menu, choose WLAN, and the WLAN Configuration screen appears. -
Page 32: Web Services Configuration
Users should obey the international RF regulatory rules as they set up the wireless RF channel on the N4100+. The RF operating channels for different regions have been specified as following. Thecus has no responsibility for users attempting to violate the international RF regulation. -
Page 33: Apple Network Setup
Apple Network Setup From the Network menu, choose the Apple Network item, and the Apple Network Configuration screen appears. This screen displays the configuration items for the Apple Filing Protocol. You can change any of these items and press Apply to confirm your settings. -
Page 34: User And Group Management
User and Group Management The N4100+ has built-in user database that allows administrators to manage user access using different group policies. From the Accounts menu, you can create, modify, and delete users, and assign them to groups that you designate. Local User Configuration From the Accounts menu, choose the Users item, and the Local User... -
Page 35: Modifying Users
Modifying Users 1. Select an existing user from the Local User Configuration screen. 2. Click on the Modify button, and Local User Setting screen appears. 3. From here, you can enter a new password and re-enter to confirm, or use the << or >> buttons to have this user join or leave a group. -
Page 36: Adding Groups
Adding Groups 1. On the Local Group Configuration screen, click on the Add button. 2. The Local Group Setting screen appears. 3. Enter a Group Name, and select users to be in this group from the Users List by adding them to the Members List using the <<... -
Page 37: Ads/Nt Configuration
Enter the ADS/NT Administrator password. Password To join an AD domain, you can use the example below to configure the N4100+: AD Domain Example Item Information Work Group / Domain Thecus Name ADS Support Enable ADS Server Name ADServer ADS/NT Realm thecus.com... -
Page 38: System Management
System Management The System menu gives you a wealth of settings that you can use to configure your N4100+’s system administration functions. You can set up system notifications, view system logs, and even upgrade firmware from this menu. System Notifications From the System menu, choose the Notification item, and the Notification Configuration screen appears. -
Page 39: System Logs
System Logs From the System menu, choose the Logs item and the System Logs screen appears. This screen shows a history of system usage and important events such as disk status, network information, and system booting. See the following table for a detailed description of each item: System Logs Item... -
Page 40: System Configuration Backup And Restore
If an NTP server is selected, please make sure your N4100+’s network has been WARNING setup to access the NTP server. System Configuration Backup and Restore From the System menu, choose the Config Mgmt item and the System Configuration Download/Upload screen appears. From here, you can download or upload stored system configurations. -
Page 41: Reset To Factory Default Settings
3. The beeper beeps and the Busy LED blinks until the upgrade is complete. • The beeper only beeps if it is enabled in the System Notification menu. NOTE • Check Thecus website for the latest firmware release and release notes. -
Page 42: Change Administrator Password
Change Administrator Password From the System menu, choose the Administrator Password item and the Change Administrator Password screen appears. Enter a new password in the New Password box and confirm your new password in the Confirm Password box. Press Apply to confirm password changes. See the following table for a detailed description of each item. -
Page 43: Logout
remain on until a scheduled off time is reached, or if the unit is shutdown manually. Example - Monday: On: 8:00 System will turn on at 8:00 AM on Monday, and will not shut down unless powered down manually. You may also choose two on times or two off times on a particular day, and the system will act accordingly. -
Page 44: Chapter 4: Additional Feature Setup
Chapter 4: Additional Feature Setup Overview With a bevy of additional features and services, the N4100+ is so much more than a mere external hard disk. The sections below show you how you can utilize your N4100+ to serve files, music, movies, pictures, and more. FTP Server N4100+ can act as a FTP server, enabling users to download and upload files with... -
Page 45: Itunes® Server
iTunes® Server With the built-in iTunes server capability, the N4100+ enables digital music to be shared and played anywhere on the network! From the Network menu, choose the iTunes item, and the iTunes Configuration screen appears. You may enable or disable the iTunes Service from here. -
Page 46: Adding Media Share Folders
2. Login to the N4100+ with the administration user name and password. The defaults are: Username: admin Password: admin 3. Once logged in, navigate to System > Module Mgmt. 4. From the Module Management screen, click Browse…. Browse the Installation CD and locate the Module > Media Server directory. 5. -
Page 47: Download Manager
3. Turn on the TV and change the video signal input to DMA. 4. Setup the DMA (These steps will be different if you use a different DMA) a. From the Server List screen, select “N4100+:Mediabolic Server” as the server. b. -
Page 48: Adding An Http Task
Click to delete the specified task. A prompt will appear asking you if you would like to delete the task itself, or the task and all related downloaded files. Task Name of the task. Click to see more information about this task. Transfer rate of the task in kilobytes per second (KB/s). -
Page 49: Adding A Bt Task
Adding a BT Task To add a new BT task to the Download Manager, follow these steps: 1. Using the Task Type dropdown, select BT. 2. Click Add Task. 3. Click Browse and locate the torrent file. 4. Select the destination folder from the Destination Folder dropdown. The default folder is Music. -
Page 50: Printer Server
2. To schedule a daily download period, select Daily and select a start time and end time. To schedule a weekly download period, select Weekly and select a start day/time and end time/day. 3. Click Apply to save your changes. If the Download Scheduler is enabled, ALL download tasks will adhere to the NOTE designated schedule. -
Page 51: Windows Vista
“Default Printer”. Select Yes and all your print jobs will be submitted to this printer by default. Click Next. 9. Click Finish. • Not all USB printers are supported. Please check Thecus website for a list of NOTE supported printers. - Page 52 4. Select The printer that I want isn’t listed. You can press The printer that I want isn’t listed to go into next page without waiting for Searching for available printers to finish. 5. Click Select a shared printer by name. Type http://<Thecus_NAS>:631/printers/usb-printer in the box, where <Thecus_NAS_IP>...
- Page 53 7. Windows will attempt to connect to the printer. 8. You can choose to set this printer as the default printer by checking the Set as the default printer box. Click Next to continue. 9. Done! Click Finish.
-
Page 54: Chapter 5: Using The N4100
Chapter 5: Using the N4100+ Overview Once the N4100+ is setup and operating, users on the network may manage all varieties of digital music, photos, or files by simply using their web browsers. To manage your personal files or access public files on the N4100+, just enter its IP address into your browser, and you will be taken to the N4100+ Login page. -
Page 55: Using Itunes® Server
Click to go up one directory level New Folder Click to create a new folder New File (upload) Click to upload a new file to this folder Delete Selected Items Click to delete all checked items 3. When user clicks on a file name, the file will be downloaded. The Delete Selected Items, New Folder, and New File (upload) options are only NOTE visible if the user has write access to the specific folder. -
Page 56: File Backup
File Backup There are a number of ways to back up your data to your N4100+. Nsync You can backup a share folder to another N4100+ (Nsync Target) or any FTP server for safe keeping as long as you have appropriate access right on that target. -
Page 57: Adding An Nsync Task
Add Nsync Task Item Description Task Name The name of your Nsync task. Manufacturer Select whether the target is a Thecus Product (e.g. N4100+) or FTP server. Target Server IP The IP address of your target server. Address Source Folder The share folder you want to backup. -
Page 58: Setting Up An Nsync Target On Another Device
Backup Utility. If it is not installed, you can copy the file (Thecus Backup Utility.exe) to a convenient location on your hard disk and double click to execute it. On Mac OS X, just click Thecus Backup Utility.1.0.0.dmg to start the Thecus Backup Utility. - Page 59 If you can not find Thecus Backup Utility on your CD, please download it from the NOTE Thecus website (http://www.thecus.com). When you execute this utility for the first time, it will ask you whether to create a DB file. Click Yes.
-
Page 60: Windows Xp Data Backup
Windows XP Data Backup If you use Windows XP Professional, you can also use the Windows Backup Utility (Ntbackup.exe) to backup your files. If you use Windows XP Home Edition, follow these steps to install the utility: 1. Insert the Windows XP CD into a drive and double-click the CD icon in My Computer. -
Page 61: Chapter 6: Tips And Tricks
Chapter 6: Tips and Tricks Mapping a Client PC to the N4100+ You can map share folders on the N4100+ so that you can access them as if they were drives on your computer. You can connect to the shared network folders on the N4100+ as follows: Windows 1. -
Page 62: Apple Os X
7. Click OK. The share folder appears as the drive you assigned. You can now access this folder as though it were a drive on your computer. Apple OS X On an Apple computer, you can connect to shared computers and servers using a network address. -
Page 63: Usb Storage Expansion
3. When MAC OS X is trying to connect N4100+, it will ask for a User Name and Password which has access to the folder. 4. When MAC OS X has connected to the N4100+ successfully, an icon representing the folder will appear on the MAC OS X desktop. You can access the folder by double clicking on the icon. -
Page 64: Replacing Damaged Hard Drives
Replacing Damaged Hard Drives If you are using RAID 1 or RAID 5, you can easily replace a damaged hard drive in the Thecus N4100+ while keeping your data secure with the system’s automatic data recovery. Hard Drive Damage When a hard drive is damaged, its bottom LED glows a steady red. If there is data in the RAID volume, the system LED also glows red and the system beeps. -
Page 65: Part I - Setup A Dyndns Account
Router setup will differ slightly depending on router used. For this example, we will NOTE use the Asus WL500g because it has support for Dynamic DNS. Contact your router hardware vendor for setup help. Part I - Setup a DynDNS Account 1. -
Page 66: File System Check
File System Check The N4100+ has a built-in utility that allows you to check the N4100+’s file system for errors. To use the File System Check utility, follow the steps below: WARNING The File System Check utility works only with LAN 1 and not LAN 2. 1. - Page 67 If the file system is corrupted beyond repair, you may have to remove RAID and NOTE recreate the file system.
-
Page 68: Chapter 7: Troubleshooting Guide
If you forget your network IP address and have no physical access to the system, you can use the setup wizard to retrieve the IP of your N4100+. 1. Start the Setup Wizard, and it will automatically detect all Thecus IP storage products on your network. -
Page 69: Can't Access N4100+ From The Lan
Can't Access N4100+ from the LAN If you cannot access the N4100+ from the LAN, make sure that its network cable is correctly plugged in. Also, check to see if the N4100+’s WAN and LAN settings are configured correctly. Can't Map a Network Drive in Windows XP You may have problems mapping a network drive under the following conditions: 1. -
Page 70: Simple Problem Diagnosis Procedure
3. Under NTP Server, select No. 4. Set the Date, Time, and Time Zone. 5. Click Apply. In addition, if the N4100+ is able to access the Internet and you Want to keep the NTP Server clock.isc.org by default, please make sure the DNS Server is correctly, thereby allowing the NTP Server name to correctly resolve. -
Page 71: Appendix A: Product Specifications
Appendix A: Product Specifications Hardware Specifications Core Processors / Memory Processor IOP80219 (600MHz) SATA Controller Silicon Image 3114 NOR Flash 16MB Memory 128MB Network Interfaces 1 x 10/100/1000 Mbps Ethernet Port 1 x 10/100/1000 Mbps Ethernet Port Wireless (optional) IEEE 802.11b/g AP mode (using approved USB Dongles) Storage HDD Bays 4 x 3.5”... - Page 72 MS Windows, MAC OS X device discovery and setup utility program Email Notification Send system message via Email to specified Email accounts HDD Spin Down Thecus N4100+’s HDDs can spin down after certain amount of inactivity Schedule On/Off The system will be powered on/off at designated time...
-
Page 73: Appendix B: Customer Support
Customers in the US should send all technical support enquiries to this email address: support-us@thecus.com If you would rather receive support over the phone, you can contact Thecus FAE Support at: +886-2-26981788 Please note that our headquarters are in Taipei, Taiwan, and our office hours are Monday to Friday, 9:00 to 17:00. -
Page 74: Appendix C: Raid Basics
RAID volume can regenerate data from the data and parity stored on its other hard disk drives. RAID Levels The Thecus N4100+ supports standard RAID levels 0, 1, 5, and JBOD. You choose a RAID level when you create a system volume. The factors for selecting a RAID level are: •... -
Page 75: Raid 1
RAID 1 RAID 1 mirrors all data from one hard disk drive to a second one hard disk drive, thus providing complete data redundancy. However, the cost of data storage capacity is doubled. This is excellent for complete data security. RAID 5 RAID 5 offers data security and good performance. -
Page 76: Appendix D: Active Directory Basics
Appendix D: Active Directory Basics Overview With Windows 2000, Microsoft introduced Active Directory (ADS), which is a large database/information store. Prior to Active Directory the Windows OS could not store additional information in its domain database. Active Directory also solved the problem of locating resources;... -
Page 77: Appendix E: Licensing Information
Source Code Availability Thecus Technology Corp. has exposed the full source code of the GPL licensed software. For more information on how you can obtain our source code, please visit our web site, http://www.thecus.com. -
Page 78: Cgic License Terms
CGIC License Terms Basic License CGIC, copyright 1996, 1997, 1998, 1999, 2000, 2001, 2002, 2003, 2004 by Thomas Boutell and Boutell.Com, Inc. Permission is granted to use CGIC in any application, commercial or noncommercial, at no cost. HOWEVER, this copyright paragraph must appear on a "credits"... - Page 79 Also, for each author's protection and ours, we Want to make certain that everyone understands that there is no warranty for this free software. If the software is modified by someone else and passed on, we Want its recipients to know that what they have is not the original, so that any problems introduced by others will not reflect on the original authors' reputations.
- Page 80 c) If the modified program normally reads commands interactively when run, you must cause it, when started running for such interactive use in the most ordinary way, to print or display an announcement including an appropriate copyright notice and a notice that there is no warranty (or else, saying that you provide a warranty) and that users may redistribute the program under these conditions, and telling the user how to view a copy of this License.
- Page 81 operating system on which the executable runs, unless that component itself accompanies the executable. If distribution of executable or object code is made by offering access to copy from a designated place, then offering equivalent access to copy the source code from the same place counts as distribution of the source code, even though third parties are not compelled to copy the source along with the object code.
- Page 82 This section is intended to make thoroughly clear what is believed to be a consequence of the rest of this License. 8. If the distribution and/or use of the Program is restricted in certain countries either by patents or by copyrighted interfaces, the original copyright holder who places the Program under this License may add an explicit geographical distribution limitation excluding those countries, so that distribution is permitted only in or among countries not thus excluded.
Need help?
Do you have a question about the N4100+ and is the answer not in the manual?
Questions and answers