
Related Manuals for Hoveround MPV4


Summary of Contents for Hoveround MPV4
- Page 1 Hoveround.arc 11/2/06 10:07 AM Page 1 OWNER’S MANUAL & WARRANTY D82008204 REV B 1/14/04...
- Page 2 HOVEROUND CORPORATION. Neither HOVEROUND CORPORATION nor its affiliates shall be liable to the purchas- er of this product or third parties for damages, losses, cost or expenses incurred by purchaser or third parties as a result of: accident, misuse, or abuse of this product or unauthorized modifications, repairs, or alterations to this product.
- Page 3 10:07 AM Page 3 Dear MPV 4 Owner, Congratulations on your choice of the Hoveround MPV 4 to fulfill your personal mobility needs. The MPV 4 has the same innovation of design that is the hallmark of our company. It is compact yet very stable;...
- Page 4 Hoveround.arc 11/2/06 10:07 AM Page 4 D82008204 REV B 1/14/04...
-
Page 5: Table Of Contents
Hoveround.arc 11/2/06 10:07 AM Page 5 Table Of Contents Introduction ..........7-11 Service . - Page 6 Hoveround.arc 11/2/06 10:07 AM Page 6 Chapter 6 Routine Maintenance ......29-30 Chapter 7 Disassembling and Reassembling Your MPV 4 .
-
Page 7: Introduction
Whenever your mobility needs require special attention and equipment delivered with an extra measure of care and concern, you can count on Hoveround. Service Service is our commitment to our clients and their continued mobility is our priority. -
Page 8: Safety Instructions / Before You Use Your Mpv 4
6. Always ensure that the unit power is off before: a) Getting in to or out of the seat. b) Making any adjustments to your Hoveround. Bending, leaning, adjusting clothing while seated. Safety Instructions... - Page 9 3. Do not exceed the 300 lbs. maximum weight capacity of this vehicle. 4. Do not operate optional power seat lift unless you are on a flat, hard, level surface. 5. Do not occupy your Hoveround ® MPV 4 while it is being transported within a motor vehicle.
- Page 10 20. Do not connect any devices, medical or otherwise, to the batteries or electrical system of your MPV 4 except those supplied by Hoveround. 21. Do not operate without your feet securely on the footrest or legrests. 22. Do not operate a vehicle that is not functioning correctly.
-
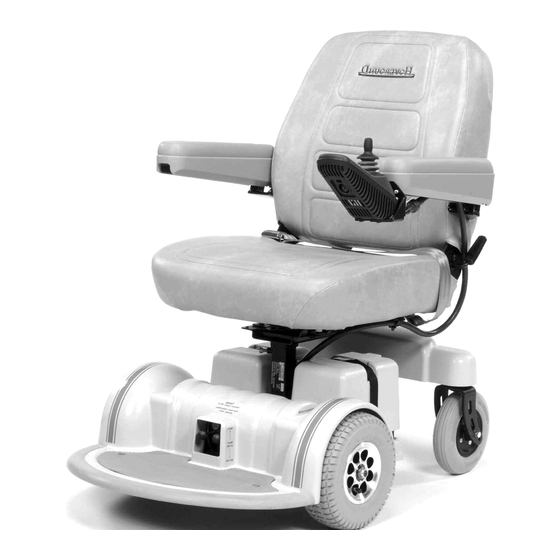
Page 11: Hoveround ® Mpv 4
• • Seat Belt Seat-Back Recline • Lever • Swivel Seat • Catch For Controller Cable Brake Release Levers Battery Cable Connection • • • Dual Motor Front Foot Rest Wheel Drive D82008204 REV B 1/14/04 Hoveround MPV 4 Diagram... -
Page 12: Operating Instructions
Hoveround.arc 11/2/06 10:07 AM Page 12 Chapter 1 Operating Instructions Driving your MPV 4 Note: See section on joystick controllers to identify the type of control on your MPV 4. 1. Always fasten your seat belt before driving. 2. Allow plenty of space to test drive your MPV 4. - Page 13 Practice driving in a wide open area using movable items such as empty boxes as an obstacle course to learn how to maneuver your Hoveround ® 11. As your skill increases, you may want to increase the Speed/Response Control.
-
Page 14: Joystick Controllers
Hoveround.arc 11/2/06 10:07 AM Page 14 Joystick Controllers All the controls and indicators necessary to drive your MPV 4 are located on the joystick controller. Your MPV 4 may be equipped with one of the following joystick controllers. Figure 1A - VSI... -
Page 15: Chapter 1 Operating Instructions
Hoveround.arc 11/2/06 10:07 AM Page 15 1. On/Off - Press to turn the system on and off. 2. System Status Indicator – Steady illumination means all systems are functioning properly. A flashing display indicates an error is present or the controller is locked. -
Page 16: Batteries And Charging
The battery pair is connected into a series configuration to provide 24 volts of power. The batteries supplied by Hoveround ® are of the sealed-type that require no main- tenance. These batteries are classified as “wet - non-spill” and may be transported by air, land or sea. -
Page 17: Battery Replacement
Support. The replacement batteries must be of the sealed, deep-cycle Wet or Gel electrolyte or Sealed Lead Acid types of the appropriate size. We recommend that your Hoveround service technician installs the new batteries for you. Dispose of the old batteries in accordance with EPA regulations. -
Page 18: Charging Your Batteries
Hoveround.arc 11/2/06 10:07 AM Page 18 Charging Your Batteries Your chair is equipped with one of several different chargers. Please follow the operating instructions for the appropriate charger. The recharging time for the batteries will vary based on the amount of use the chair has had. - Page 19 Hoveround.arc 11/2/06 10:07 AM Page 19 If you have a: Flying Power FY-4101 Charger 1. Switch the power on. A light will illuminate on the output side of the charger, indicating power is available. If the light does not go on, please check to make sure the household power is working.
- Page 20 Hoveround.arc 11/2/06 10:07 AM Page 20 CSB/prism 2404 Charger 1. Turn the red power switch to the power on position. A red light will illuminate indicating power is available. If the red light does not go on, please check to make sure the household power is working.
-
Page 21: Manual Brake Release Levers
Hoveround.arc 11/2/06 10:07 AM Page 21 Chapter 3 Manual Brake Release Levers On occasion it may be necessary to push your MPV 4. To enable the chair to be pushed, each motor has a manual release lever. These manual brake release levers protrude forward through the cover (See Figure 3A, below). -
Page 22: Seating
Hoveround.arc 11/2/06 10:07 AM Page 22 Chapter 4 Seating A good driving posture is necessary for both comfort and safety. You must have a clear line of sight ahead of the vehicle, a good view of the joystick/controller and comfortable hand access to the joystick and speed/response control. -
Page 23: Controller Position Adjustment
This feature is provided to make side transferring easier. The swivel release lever is mounted on the left side in the standard position, and can be changed to the right side by a Hoveround Service Technician. Warning! The seat must be locked into the forward position before attempting to drive the vehicle. -
Page 24: Seatback Adjustment
Hoveround.arc 11/2/06 10:07 AM Page 24 To unlock the seat and swivel 90 degrees in either direction: 1. Locate the swivel release lever positioned at the rear-left underside of the seat, or front-right side under the seat if so equipped. - Page 25 Hoveround.arc 11/2/06 10:07 AM Page 25 Warning! Make sure the lever is in the locked position before applying weight to the seat back or arms. Move the lever clockwise if unsure. Warning! The power chair should be driven only with seat-back in an upright position.
-
Page 26: Options
Hoveround.arc 11/2/06 10:07 AM Page 26 Chapter 5 Options A. Optional Tie-Down Brackets When transporting the MPV 4 in a motor vehicle, the wheelchair must be adequately secured within the motor vehicle. Optional tie-down brackets can be located in the sockets provided at the front and rear corners under the seat (See Fig. - Page 27 Hoveround.arc 11/2/06 10:07 AM Page 27 B. Optional Powered Seat Lift (PSL) – 6” Lift Press either seat symbol button to activate the PSL mode. When the indicator light is lit, move the joystick forward to raise the seat, back to lower. The MPV 4 will not drive while seat is raised and light is on.
-
Page 28: Chapter 5 Options
Hoveround.arc 11/2/06 10:07 AM Page 28 D. Optional Legrests or Footrests 1. Install each leg / footrest onto the appropriate hanger bracket and swing into the forward facing position. If elevating legrests are installed, set the angle to the lowest possible position. -
Page 29: Routine Maintenance
Hoveround.arc 11/2/06 10:07 AM Page 29 Chapter 6 Routine Maintenance Wherever possible, Hoveround has incorporated maintenance-free components ® into the design of the MPV 4. Bearings and batteries are sealed. The requirement for periodic service is minimal. Owner Maintenance Daily •... - Page 30 Warning! Never spray the vehicle with water - use a damp cloth only. Service Service requirements for your MPV 4 are minimal. Yearly service and maintenance is highly recommended to ensure proper operation. Please contact Hoveround Technical Support at 1-800-96-HOVER (1-800-964-6837). Chapter 6 D82008204 REV B 1/14/04...
-
Page 31: Chapter 7 Disassembling And Reassembling Your Mpv 4
Hoveround.arc 11/2/06 10:07 AM Page 31 Chapter 7 Disassembling and Reassembling Your MPV 4 A. Controller Removal/Replacement Removal 1. Check that vehicle power is OFF. 2. Lift the arm and loosen the socket head cap screw closest to the controller. Use the 1/4 inch hex wrench supplied with your chair (See Fig. -
Page 32: Removing And Replacing The Seat
Hoveround.arc 11/2/06 10:07 AM Page 32 B. Seat Removal/Replacement Removal 1. Remove controller. 2. Remove the controller cable from the seat clip by pinching the small tabs on the clip with one hand while removing the strap with your other hand. -
Page 33: Removing And Replacing Batteries
Hoveround.arc 11/2/06 10:07 AM Page 33 Warning! The cable that joins the joystick to the junction box is a critical part of the vehicle. Ample cable is provided to allow for adjustments. There is a danger if this cable is not correctly routed. -
Page 34: Removing And Replacing The Outrigger
Hoveround.arc 11/2/06 10:07 AM Page 34 D. Outrigger Removal 1. Remove seat as detailed on pages 32-33. 2. Find the retaining hitchpin that protrudes through the outrigger horizontal tube from the top. 3. Remove that retaining pin. 4. Loosen the socket head cap screw that is located on the outrigger horizontal corner using the 1/4”... -
Page 35: Hoveround.arc 11/2/06 10:07 Am
Hoveround.arc 11/2/06 10:07 AM Page 35 Chapter 8 Electromagnetic Interference (EMI) Our environment is saturated with radio (electromagnetic) waves that originate from transmitters of television, radio and communication signals. The waves are invisible and their strength at any location is unknown but in general, the strength of a given e.m. - Page 36 Hoveround.arc 11/2/06 10:07 AM Page 36 The sources of radiated EMI can be broadly classified into three types. 1. Hand-held portable transceivers (transmitters-receivers) with the antennas mounted directly to the transmitting unit. Examples include: Citizen band (CB) radios, “walkie-talkie”, security, fire, and police transceivers, cellular telephones and other personal communication devices.
-
Page 37: Important Information
Hoveround.arc 11/2/06 10:07 AM Page 37 1. Do not turn on hand-held personal communication devices, such as citizens band (CB) radios and cellular phones, while the powered wheelchair is turned 2. Be aware of nearby transmitters, such as radio or TV stations and try to avoid coming close to them. -
Page 38: Appendixes
Hoveround.arc 11/2/06 10:07 AM Page 38 Chapter 9 Appendixes Appendix A: Programmable Parameters The controller used on your power chair is programmable for basic functions. It requires a programmer to make changes. Any changes must be made by a qualified technician only. -
Page 39: Appendix B Fault Codes
C. Switch on the control system again and try to drive the chair. If the fault occurs again, switch off and do not try to use the chair. Contact Hoveround Support 1-800-96-HOVER (1-800-964-6837) MPV 4s using these style control systems use lighted bars to display fault codes. - Page 40 Hoveround.arc 11/2/06 10:07 AM Page 40 If a fault occurs, you can find out what has happened by counting the number of bars on the battery gauge that are flashing. 1 bar: Low battery or a bad connection. 2 bars: Bad connection to left motor.
- Page 41 Hoveround.arc 11/2/06 10:07 AM Page 41 When flashing, it indicates a “fault” condition somewhere in the control system (see Figure 9A, Pg. 40). The nature of the fault is indicated by the number of flashes in each burst, referred to as the “Flash Code”.
-
Page 42: Appendix C Locking Feature
Hoveround.arc 11/2/06 10:07 AM Page 42 Appendix C: Locking Feature Your MPV 4 is equipped with a locking feature. Please refer to the appropriate instructions for the controller on your MPV 4. Lock Sequence System On / Off Button Joystick Figure 9B - VSI 1. - Page 43 Hoveround.arc 11/2/06 10:07 AM Page 43 Key Lock Systems Figure 9C - Pilot Key Figure 9D - Pilot 1. Turn the controller on. 2. To lock the unit, insert and the key at the charger port. REMOVE (See Figure 9C and 9D above). Note: The key must be removed for controller to lock.
- Page 44 Hoveround.arc 11/2/06 10:07 AM Page 44 Magnetic Lock Systems Figure 9E - Commando 1. Turn on the controller. 2. To lock the chair, swipe the magnetic key over the key symbol (see Fig. 9E, above). The joystick controller will beep and turn off and lock.
-
Page 45: Appendix D Specifications
Hoveround.arc 11/2/06 10:07 AM Page 45 Appendix D: MPV 4 Specifications Performance Maximum Speed 5 mph Range (per battery charge) 15 miles Capacity 300 lbs Turning Radius 22.3” Ground Clearance 2.5” Maximum step climb 1.5” Maximum grade climb 5° per ADA ramp recommendations Dimensions and weight (with 17”... -
Page 46: Appendix E Record Of Service
Hoveround.arc 11/2/06 10:07 AM Page 46 Appendix E: Record of Service Date Technician Service Performed Chapter 9 D82008204 REV B 1/14/04... -
Page 47: Limited Warranty
For warranty service please contact your authorized Hoveround service center. In the event that you do not receive satisfactory warranty service, please write or call directly to Hoveround, provide the service center’s name and address, and indicate the nature of the problem. - Page 48 Hoveround.arc 11/2/06 10:07 AM Page 48 Phone: 1-800-96-HOVER (1-800-964-6837) Fax: 1-800-747-9252 CORPORATE HOURS: Monday-Friday (EST) 8:00 am - 8:00 pm | Saturday (EST) 9:00 am - 1:00 pm 2151 Whitfield Industrial Way | Sarasota, Florida 34243 www.hoveround.com...
Need help?
Do you have a question about the MPV4 and is the answer not in the manual?
Questions and answers
Does the pneumatic drive tire on the hoveround mpv4 accept the standard air fill valve used on auto tires?
The context does not specify the type of air valve used on the pneumatic drive tire of the Hoveround MPV4. Therefore, it cannot be determined if it accepts a standard air fill valve used on auto tires.
This answer is automatically generated
my controller will not turn on, what can I do?