Table of Contents
Advertisement
Quick Links
Advertisement
Table of Contents

Subscribe to Our Youtube Channel
Related Manuals for D-Link DVS-210-1


Summary of Contents for D-Link DVS-210-1
-
Page 2: Table Of Contents
Logs ............... 47 Network Setup ............22 Help ............... 48 Dynamic DNS ............24 Using & Configuring the DVS-210-1 ...... 49 Image Setup ............25 Router Set-Up and Installation ......52 Audio and Video ............ 26 Motion Detection ............ 27 Troubleshooting ............ - Page 3 Table of Contents Example DI/DO Schematic ........56 Networking Basics ............ 57 Check your IP address .......... 57 Statically Assign an IP address ......58 Technical Specifications........... 59 D-Link DVS-210-1 User Manual...
-
Page 4: Product Overview
If any of the above items are missing, please contact your reseller. System Requirements • Pentium 4 - 2.4GHz or higher with 512MB RAM • Windows Vista / Windows XP with SP2 or higher / Windows 2000 with SP4 or higher • Microsoft IE 6.0 or higher D-Link DVS-210-1 User Manual... -
Page 5: Introduction
Congratulations on your purchase of the DVS-210-1 Video Encoder. The DVS-210-1 is a versatile solution that allows you to make the most of your existing analog surveillance infrastructure. The DVS-210-1 is a standalone system with a built-in video encoder that converts an analog camera into a full-featured IP-based system. The DVS-210-1 can be remotely accessed and controlled using a Web browser over an Intranet or the Internet. -
Page 6: Hardware Overview
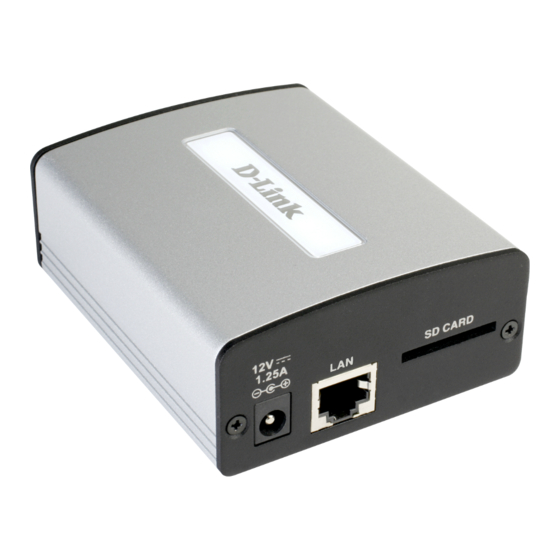
The 10/100 Ethernet LAN port connects the Video Encoder to networking equipment such as a router or switch. SD Card Slot: This slot supports SD cards (standard and SDHC) for removable storage of video and still images. D-Link DVS-210-1 User Manual... -
Page 7: Rear
15 seconds until the power LED stops blinking. The device will reboot automatically after it has been reset. Status LED: When solidly lit, this LED indicates that the the device is initializing. When blinking, this LED indicates that the device has acquired an IP address. D-Link DVS-210-1 User Manual... -
Page 8: Hardware Installation
Attach the external power supply to the DC power socket (labeled 12V 1.25A) and plug the two-pronged adapter into an AC power outlet. When the DVS-210-1 is receiving power, the green power LED will be lit. D-Link DVS-210-1 User Manual... - Page 9 Connect Additional Peripheral Devices (Optional) If desired, you may also connect audio equipment such as a microphone or speaker to the AUDIO IN and AUDIO OUT ports respectively. DI/DO devices and PTZ controls may also be connected. D-Link DVS-210-1 User Manual...
- Page 10 Remove the four rubber feet from the bottom of the device, then affix the mounting brackets as shown below. Secure both of the brackets into place using the supplied screws. The brackets may now be used to mount the device on a wall or another flat surface using bolts or screws. D-Link DVS-210-1 User Manual...
-
Page 11: Initial Configuration
Section 3 - Configuration Initial Configuration This section will show you how to configure your new DVS-210-1 Video Encoder using the D-Link Setup Wizard SE. Setup Wizard After loading the Setup Wizard, your Video Encoder’s IP Address will be displayed along with its corresponding MAC Address here. - Page 12 Click Next Select DHCP if you want to obtain a new IP address every time the Video Encoder boots up, or select Static IP to use the same IP address at each boot up. Click Next D-Link DVS-210-1 User Manual...
-
Page 13: Connect To Your Video Encoder
Video Encoder. Click Link The Setup Wizard will automatically open your web browser to the IP address of the DVS-210-1. In this example it is: http://192.168.1.169. Your DVS-210-1 may have a different IP Address. Enter admin as the default User name and leave the Password blank. Click OK to continue. -
Page 14: Web-Based Configuration Utility
Configuration Web-based Configuration Utility This section explains how to configure your new D-Link Video Encoder using the Web-based Configuration Utility. Click on the D-Link Setup Wizard SE icon that was created in your Windows Start menu. Start > D-Link > Setup Wizard SE Select the Video Encoder and click the button labeled "Link"... - Page 15 This section shows your Video Encoder’s live video. You can select your video profile and view or operate the Video Encoder. For additional information about web configuration, please refer to the user manual included on the CD-ROM or the D-Link website. D-Link DVS-210-1 User Manual...
-
Page 16: Live Video
When a recording is in progress, this indicator Indicator will change color. Video Profile 1 Video Profile 2 Video Profile 3 Full screen mode Taking a Snapshot Recording a Video Clip Set a Storage Folder Listen/Stop Listening Zoom Talk/Stop Talking Start/Stop Digital Output D-Link DVS-210-1 User Manual... -
Page 17: Setup
Internet Connection Setup Wizard This wizard will guide you through a step-by-step process to configure your new D-Link Video Encoder and connect the camera to the internet. Click Next to continue. Note: Select DHCP if you are unsure of which settings to choose. - Page 18 If you have a Dynamic DNS account and would like the Video Encoder to update your IP address automatically, Select Enable DDNS and enter your host information. Click Next to continue. Enter a name for your Video Encoder and click Next to continue. D-Link DVS-210-1 User Manual...
- Page 19 If you have selected DHCP, you will see a summary of your settings, including the Video Encoder's IP address. Please write down all of this information as you will need it in order to access your Video Encoder. Click Apply to save your settings. D-Link DVS-210-1 User Manual...
-
Page 20: Motion Detection Setup Wizard
Please see the Motion Detection section on page 27 for information about how to configure motion detection. Step 2 This step allows you to enable motion detection based on a customized schedule. Specify the day and hours. You may also choose to always record motion. D-Link DVS-210-1 User Manual... - Page 21 Click Next to continue. Step 4 You have completed the Motion Detection Wizard. Please verify your settings and click Apply to save them. Please wait a few moments while the Video Encoder saves your settings and restarts. D-Link DVS-210-1 User Manual...
-
Page 22: Network Setup
Enabling this setting allows your Video Encoder to be configured as a UPnP device on your network. Enable UPnP Enabling this setting allows the Video Encoder to add port forwarding entries into the router automatically on a UPnP Port Forwarding: capable network. D-Link DVS-210-1 User Manual... - Page 23 Entering a value of '0' indicates that the Bandwidth: Video Encoder should not monitor bandwidth. Specifying other values will limit the Video Encoder's transfer speed to the specified number of Kilobytes per second. D-Link DVS-210-1 User Manual...
-
Page 24: Dynamic Dns
Enter your user name or e-mail used to connect to the DDNS. Password: Enter your password used to connect to the DDNS server. Timeout: Enter DNS Timeout values. Status: Indicates the connection status, which is automatically determined by the system. D-Link DVS-210-1 User Manual... -
Page 25: Image Setup
This setting may help to improve the image in some low light conditions. You may choose a value between 0 and 255. Saturation: This setting controls the strength of color. You may choose a value between 0 and 255. D-Link DVS-210-1 User Manual... -
Page 26: Audio And Video
Level: Select 0 dB for no gain or 20 dB to make the audio louder. Audio Out Off: Select this option to disable Audio Out. Audio Out Volume Level: Choose a level between 1 and 10. D-Link DVS-210-1 User Manual... -
Page 27: Motion Detection
Right clicking on the camera image brings up the following menu options: Select All: Draws a motion detection area over the entire screen. Clear All: Clears any motion detection areas that have been drawn. Restore: Restores the previously specified motion detection areas. D-Link DVS-210-1 User Manual... -
Page 28: Time And Date
Enable this feature to obtain time automatically from an NTP Server: NTP server. NTP Server: Network Time Protocol (NTP) synchronizes the DVS-210-1 with an Internet time server. Choose the one that is closest to your location. Set the Date and This option allows you to set the time and date manually. -
Page 29: Event Setup
2. To delete the selected item from the pull-down menu of event, server or media, click Delete. 3. Click on the item name to pop up a window for modifying. Note: You can add up to four events, five servers, and five media fields. D-Link DVS-210-1 User Manual... -
Page 30: Application
Application In a typical application, when motion is detected, the DVS-210-1 Video Encoder sends images to a FTP server or via e-mail as notifications. As shown in the illustration below, an event can be triggered by many sources, such as motion detection or external digital input devices. -
Page 31: Add Server
Enter the configuration for the target e-mail server account. FTP: Enter the configuration for the target FTP server account. Network Storage: Specify a network storage device. Only one network storage device is supported. SD Card: Use the Video Encoder's onboard SD card storage. D-Link DVS-210-1 User Manual... -
Page 32: Add Media
The maximal file size would be generated. File name prefix: The prefix name will be added on the file name of the video clip. System log: Select this option to save events to the system log. D-Link DVS-210-1 User Manual... - Page 33 Specify the maximal recording duration in seconds. You can set up to ten seconds. For example: If the Pre-event recording is set to five seconds and the Maximum duration is set to ten seconds, the Video Encoder continues to record D-Link DVS-210-1 User Manual...
- Page 34 8 sec. 9 sec. 10 sec. The moment the trigger is activated. File name prefix Enter the text that will be added at the beginning of the file name. VIDEOS20080104_100341 File name prefix Date and time suffix The format is: YYYYMMDD_HHMMSS D-Link DVS-210-1 User Manual...
-
Page 35: Add Event
Triggers an event when the system boots up. Network Lost: Triggers an event when the network connect is lost. Video Lost: Triggers an event when the video feed is lost. Time: Select Always or specify the time interval. D-Link DVS-210-1 User Manual... - Page 36 Specify the location where the event information should be saved to. This option will not be available for the Network Lost trigger. Select this option to record to an SD card that has been inserted into the device. D-Link DVS-210-1 User Manual...
-
Page 37: Add Recording
Size of each file File size for each recording file. You may input the value in the range of 200-5000. for recording: File Name Prefix: The prefix name will be added on the file name of the recording file(s). D-Link DVS-210-1 User Manual... -
Page 38: Sd Card
If video files are stored on the SD card, click on the video folder Recorded Video: and choose the video file you would like to view. Refresh: Reloads the file and folder information from the SD card. D-Link DVS-210-1 User Manual... -
Page 39: Advanced
Therefore events are triggered when the device status changes to "Closed." LED: You may specify whether or not to illuminate the LED on the side of the Video Encoder. D/I and D/O Pin Block D-Link DVS-210-1 User Manual... -
Page 40: Rs-485
The stop bit can be set to 1 or 2. The default value is 1. D-Link DVS-210-1 User Manual... -
Page 41: Https
Create a certificate request and install Status: Displays the status of the certificate. Note: The certificate cannot be removed while the HTTPS is still enabled. To remove the certificate you must first uncheck Enable HTTPS secure connection. D-Link DVS-210-1 User Manual... -
Page 42: Access List
Access List Here you can set access permissions for users to view your DVS-210-1. Allow list: The list of IP addresses that have the access right to the Video Encoder. Start IP address: The starting IP Address of the devices (such as a computer) that have permission to access the video of the camera. -
Page 43: Maintenance
Select this option to enable the On-Screen Display feature for your video feed. Label: Enter a label for the Video Encoder. This label will appear on the video feed. Show Time: Select this option to enable the time-stamp display on the video feed. D-Link DVS-210-1 User Manual... -
Page 44: Backup And Restore
Video Encoder Hard Drive: by clicking Load Configuration. Restore to You may reset your Video Encoder and restore the factory Factory Default: settings by clicking Restore Factory Defaults. Reboot Device: This will restart your Video Encoder. D-Link DVS-210-1 User Manual... -
Page 45: Firmware Upgrade
Firmware Upgrade The Video Encoder's current firmware version will be displayed on this screen. You may visit the D-Link Support Website to check for the latest available firmware version. To upgrade the firmware on your DVS-210-1, please download and save the latest firmware version from the D-Link Support Page to your local hard drive. -
Page 46: Status
Status Device Info This page displays detailed information about your device and network connection. D-Link DVS-210-1 User Manual... -
Page 47: Logs
Logs This page displays the log information of your Video Encoder. You may download the information by clicking Download. You may also click Clear to delete the saved log information. D-Link DVS-210-1 User Manual... -
Page 48: Help
Help This page provides helpful information regarding Video Encoder operation. D-Link DVS-210-1 User Manual... -
Page 49: Using & Configuring The Dvs-210-1
This section is designed to walk you through the setup process of installing your Video Encoder behind a router and enabling remote video viewing. For the basic setup of the DVS-210-1, follow the steps outlined in the Quick Installation Guide. - Page 50 Run the Setup Wizard program from the CD included with the DVS-210-1. Follow the steps in the Quick Installation Guide to configure the DVS-210-1. The Video Encoder will be assigned a local IP Address that allows it to be recognized by the router. Write down this IP Address for future reference.
- Page 51 Run your Internet Explorer Web browser. In the address bar, type in the IP Address that was assigned to the Video Encoder by the Installation Wizard program. The DVS-210-1 Home Page appears with a window displaying live video from the Video Encoder. You are able to view this screen from any PC running Internet Explorer on your LAN.
-
Page 52: Router Set-Up And Installation
Access the Router with Your Web Browser The following steps generally apply to any router that you have on your network. A D-Link Router is used as an example to clarify the configuration process. Configure the initial settings of the router by following the steps outlined in your own router’s installation guide. - Page 53 Open Server Ports to Enable Remote Image Viewing The firewall security features built into the router prevent users from accessing the video from the DVS-210-1 over the Internet. The router connects to the Internet over a series of numbered ports. The ports normally used by the DVS- 210-1 are blocked from access over the Internet.
- Page 54 ISP so that you can open the appropriate ports accordingly. If your ISP does not pass traffic on port 80, you will need to change the port from 80 to something else, such as 800. Not all routers are the same, so refer to your user manual for specific instructions on how to open ports. D-Link DVS-210-1 User Manual...
-
Page 55: Troubleshooting
Options menu. You may also need to change the security settings on your browser to allow the ActiveX plug-in to be installed. If you are using a version of Internet Explorer before version 6.0, you will need to upgrade Internet Explorer in order to view the streaming video transmitted by the Video Encoder. D-Link DVS-210-1 User Manual... -
Page 56: Example Di/Do Schematic
Receives signals from a reed switch, vibration sensor, or any other external security device. Connects to an alarm or buzzer. Connects to an RS-485 interface for controlling 485+/485- auxiliary equipment such as an external camera enclosure for pan, tilt, and zoom functionality. D-Link DVS-210-1 User Manual... -
Page 57: Networking Basics
Check your IP address After you install your new D-Link adapter, by default, the TCP/IP settings should be set to obtain an IP address from a DHCP server (i.e. wireless router) automatically. To verify your IP address, please follow the steps below. -
Page 58: Statically Assign An Ip Address
Network Connections. Windows XP - Click on Start > Control Panel > Network Connections. Step 2 Right-click on the Local Area Connection which represents your D-Link network adapter and select Properties. Step 3 Highlight Internet Protocol (TCP/IP) and click Properties. -
Page 59: Technical Specifications
Operating Humidity • Supported Protocols: IPv4, DHCP, ARP, DNS, TCP/IP, DDNS • 20% to 80% non-condensing (D-Link), HTTP, HTTPS, UPnP™ Port Forwarding, Samba, SMTP, PPPoE, NTP (D-Link), FTP, RTP, RTSP, UDP, RTCP, Certifications ICMP, 3GPP • CE (Class A) • C-Tick (Class A) •...
Need help?
Do you have a question about the DVS-210-1 and is the answer not in the manual?
Questions and answers