Table of Contents
Advertisement
Quick Links
1 to 3 Standalone Hard Drive Duplicator
and Eraser
SATDUP13
DE: Bedienungsanleitung - de.startech.com
FR: Guide de l'utilisateur - fr.startech.com
ES: Guía del usuario - es.startech.com
IT: Guida per l'uso - it.startech.com
NL: Gebruiksaanwijzing - nl.startech.com
PT: Guia do usuário - pt.startech.com
For the most up-to-date information, please visit: www.startech.com
Manual Revision: 09/20/2013
*actual product may vary from photos
Advertisement
Table of Contents

Related Manuals for StarTech.com SATDUP13


Summary of Contents for StarTech.com SATDUP13
- Page 1 DE: Bedienungsanleitung - de.startech.com FR: Guide de l'utilisateur - fr.startech.com ES: Guía del usuario - es.startech.com IT: Guida per l'uso - it.startech.com NL: Gebruiksaanwijzing - nl.startech.com PT: Guia do usuário - pt.startech.com For the most up-to-date information, please visit: www.startech.com Manual Revision: 09/20/2013...
-
Page 2: Fcc Compliance Statement
StarTech.com. Where they occur these references are for illustrative purposes only and do not represent an endorsement of a product or service by StarTech.com, or an endorsement of the product(s) to which this manual applies by the third-party company in question. Regardless of any direct acknowledgement elsewhere in the body of this document, StarTech.com hereby... -
Page 3: Table Of Contents
Table of Contents Product Diagram ..................1 Front View ..............................1 Rear View ..............................1 Introduction ....................2 Packaging Contents ..........................2 Hardware Installation ................3 Hardware Operation ................4 Hard Drive Duplication ........................... 4 Compare Duplicated Drives ........................5 Compare & Duplicated Drives ......................5 Hard Drive Eraser ............................ -
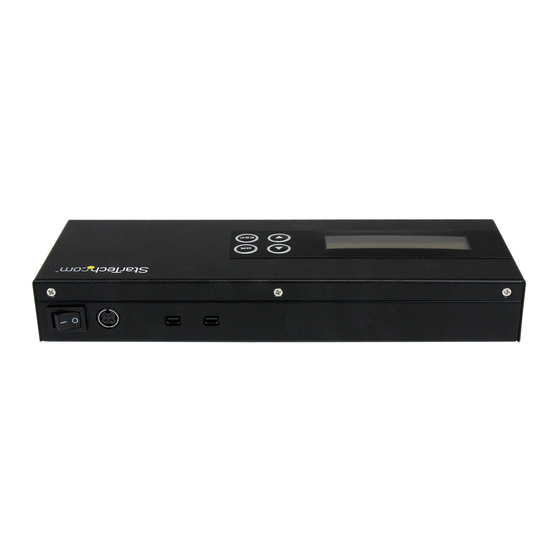
Page 4: Product Diagram
Product Diagram Front View 1. Display Screen 2. Navigation buttons 3. OK button 4. Esc button 5. SATA HDD source port 6. SATA HDD destination ports Rear View 1. Power Switch 2. Power Adapter Port 3. Daisy Chain ports Instruction Manual... -
Page 5: Introduction
Introduction Packaging Contents • 1 x 1 to 3 HDD Duplicator/Eraser • 4 x SATA Cables • 1 x Power Adapter • 3 x Power Cords (NA, UK, EU) • 1 x Instruction Manual WARNING! Hard drives and storage enclosures require careful handling, especially when being transported. -
Page 6: Hardware Installation
Note: If using less than 3 HDDs, drives should be connected from left to right leaving port(s) closest to the right unoccupied. 4. Press the power switch to the “On” position, the SATDUP13 is now ready to use. Instruction Manual... -
Page 7: Hardware Operation
Hardware Operation Hard Drive Duplication 1. Using the Navigation buttons, locate “HDD Duplicator 1. Copy” and press OK. Default copy mode is “System and Files”. To change Copy mode please see “Setup section”. 2. The duplicator will analyze the source drive and ensure all the targets are ready, by verifying size. -
Page 8: Compare Duplicated Drives
Compare Duplicated Drives The Compare function ensures the Hard Drive duplication was accurate. 1. After your Hard Drive duplication has completed, locate “HDD Duplicator 2. Compare” Using the Navigation buttons, and press OK. 2. Once compare has completed. A report will be displayed with the results of the compare test. - Page 9 Note: The number 4 at the beginning of each option below represents the Erase heading on the main menu, the numbers: .1, .2, .3, etc. indicate the option within the Erase sub menu. 4.1 Quick Erase The function will ONLY erase the index of the HDD, which is the quickest way to erase it.
-
Page 10: Utility Options
StarTech.com Technical Support for assistance. a) Format a blank hard drive with a 10GB FAT32 partition. b) Download the firmware file from the StarTech.com Website, and place the file on the main directory of the new partition. c) Connect the hard drive to the source port of the SATDUP13. -
Page 11: Advanced Configuration Using Setup
Advanced Configuration Using Setup 1. Using the Navigation buttons, locate “6. Set up” and press OK. 2. From the Setup option you can access different advanced configurations. See the list below outlining the details of each option. Note: The number 6 at the beginning of each option below represents the Utility heading on the main menu, the numbers: .1, .2, .3, etc. - Page 12 6.3 Erase Master This function is used to set if erasing the source HDD or not. Please make sure this setting before you execute erase function. 6.4 Unknown Format This function allows you to set how the device manages unknown HDD area. 6.5 Transfer Rate This function allows you to select the best transfer rate from UDMA 2 to UDMA 4 for your HDD duplication progress.
-
Page 13: Technical Support
Limitation of Liability In no event shall the liability of StarTech.com Ltd. and StarTech.com USA LLP (or their officers, directors, employees or agents) for any damages (whether direct or indirect, special, punitive, incidental, consequential, or otherwise), loss of profits, loss of business, or any pecuniary loss, arising out of or related to the use of the product exceed the actual price paid for the product. - Page 14 StarTech.com is an ISO 9001 Registered manufacturer of connectivity and technology parts. StarTech.com was founded in 1985 and has operations in the United States, Canada, the United Kingdom and Taiwan servicing a worldwide market.
Need help?
Do you have a question about the SATDUP13 and is the answer not in the manual?
Questions and answers