Avery Dennison Monarch 9485 User Manual
Portable printer
Hide thumbs
Also See for Monarch 9485:
- System administrator manual (49 pages) ,
- Instructions (2 pages)

Related Manuals for Avery Dennison Monarch 9485


Summary of Contents for Avery Dennison Monarch 9485
-
Page 1: User Manual
USER MANUAL TC9485UM Rev. AE 04/14 All specifications are subject to change without notice... -
Page 2: Table Of Contents
Table of Contents RISK OF EXPLOSION IF BATTERY IS REPLACED BY AN INCORRECT TYPE. DISPOSE OF USED BATTERIES ACCORDING TO THE INSTRUCTION 1. Unpacking 2. Product overview 3. Installation & Usage 3-1. Display 3-2. Installing the Battery 3-3. Removing the Battery 3-4. -
Page 3: Unpacking
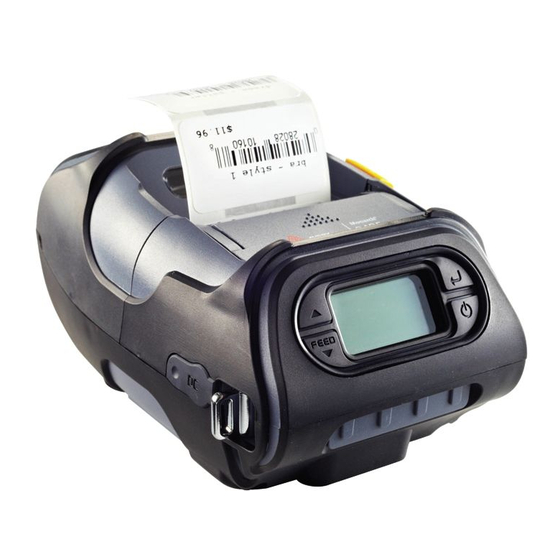
1. Unpacking 2. Product overview Standard Front PEELER WING PEELER BODY Printer Battery Belt Clip COVER OPEN DISPLAY BUTTON SERIAL Recharger USB Cable Serial cable Bottom BATTERY DOOR Quick Reference BELT CLIP CONNECTOR Optional SHOULDER STRAP RING CHARGER Stock Shoulder Strap CONNECTOR... -
Page 4: Display
3. Setting Up the Product 3-2. Installing the Battery 3-1. Display Button Name function Paper Feed/ Advances the supply. Clears error message. Down button Moves down through menu options. Remove the battery door. Insert the battery as shown. Enter button Selects the highlighted menu option. -
Page 5: Removing The Battery
3-3. Removing the Battery 3-4. Charging the Battery ② ① 1. Turn off the printer. 2. Be sure that the AC plug is correct. If AC plug is wrong, change the plug to the correct one. Remove the battery door. Lift out the battery. 3. -
Page 6: Stock Installation
3-5. Belt clip Usage 3-6. Stock Installation Put the stock in so it unrolls from the Open the Paper cover by pressing the Insert screw into belt clip. bottom. Remove the stock core when Open button and set the width of paper it is empty. -
Page 7: Peel Mode
3-7. Peel Mode 3-8. Shoulder Strap Installation Peel Mode Optional With a roll of stock installed, slide the Push the peeler body until you see two peeler body towards the back of the complete triangles. Press the feed button. Insert the strap into the hook of the printer. printer. -
Page 8: Diagnostic Test
3-9. Diagnostic Test The sample of self test printout Turn off the printer. Press and hold the feed button and power button. NOTE 1. For Hex Dump mode, do steps 1-2 then press the feed button. 2. After printing ASCII pattern, Upon initial installation or for troubleshooting, you can run the diagnostic test to get the diagnostic test is complete. -
Page 9: Peripherals Connection
4. Peripherals Connection 4-2. Interface Cable Connection This product can communicate with other devices using Bluetooth, WiFi (802.11b/g), or a USB/Serial cable. 4-1. Wireless Communication Serial 1. Printer can connect to a PDA or PC for wireless communication. 2. Your PC must support Bluetooth or WiFi (802.11b/g) to connect to the printer. 1. -
Page 10: Printer Cleaning
5. Printer cleaning If the interior of the printer is dusty, printing quality can be lowered. 5-2. Platen Roller Cleaning In this case, follow the instructions below to clean the printer. 1.Clean the platen roller with a clean soft cloth moistened with isopropyl 5-1. -
Page 11: Specification
6. Printer Specification 6-1. Specification Printing Method Direct Thermal Battery Charger input AC100~240V, 50/60 Hz Printing Speed 80mm/sec output 8.4V , 800~1200mA Resolution 203 DPI X 203 DPI Battery Battery type Li-ion Character ALPHA NUMERIC Character, Extension Character output 7.4V, 18.9wh Barcode One-Dimensional UPCA +2/+5, UPCE +2/+5, EAN8 +2/+5, EAN13... -
Page 12: Cpcl Command Compatibility
7. CPCL Command Compatibility DATAMATRIX ● NOTE GS1(RSS-14) ○ Compatible with only Partially AZTEC ○ commanders provided by Compatible Compatible Compatible GRAPHICS Compatibility the manufacturer. ○ ○ △ ● LINE ○ INVERSE-LINE ○ Printer Commands Compatibility PATTERN ○ PRINT ○ GRAPHICS FORM ○... -
Page 13: Zpl Command Compatibility
8. ZPL Command Compatibility SETBOLD ○ Command Compatibility SETSP ○ ○ Special ASCII Characters ○ ○ SETFF ○ ○ SET-TOF ○ ○ SETLP-TIMEOUT ○ ○ ADVANCED UTILITIES Compatibility ○ VERSION ○ ○ CHECKSUM ○ ○ ○ ○ ○ ○ DEFINE-FILE ○... - Page 14 Command Compatibility Command Compatibility ○ ○ ○ ○ ○ ○ ^CC ~CC ○ ○ ○ ○ ○ ○ ○ ○ ^CT ~CT ○ ○ ○ ○ ○ ○ ○ ○ ○ ○ ○ ○ ○ ○ ○ ○ ○ ○ ○...
- Page 15 Command Compatibility ○ ○ ○ ○ ○ ○...
Need help?
Do you have a question about the Monarch 9485 and is the answer not in the manual?
Questions and answers